Downloading: Valiant Hearts: The Great War

Valiant-Hearts-Logo

World War I has quickly moved from news to memory to history in the past 100 years, especially in the United States. While there are certainly plenty of grand remembrances being made of the lingering historical and political ripples of the Great War, the best parts of historical memory often continue to ring truest to us through personal stories. This is the reason why a classic book like All Quiet On The Western Front or the more recent graphic novel The Harlem Hellfighters resonate still in telling the story of WWI.

So, in this centenary year it’s a pleasure to have the distant memory of WWI retold in a vivid modern way with Valiant Hearts: The Great War from Ubisoft. Like any good war story, Valiant Hearts isn’t really about guns and glory, but more about love, friendship, connection and dedication humans strive to maintain when faced with the most hugely catastrophic events.

ValiantHeartsCharacters
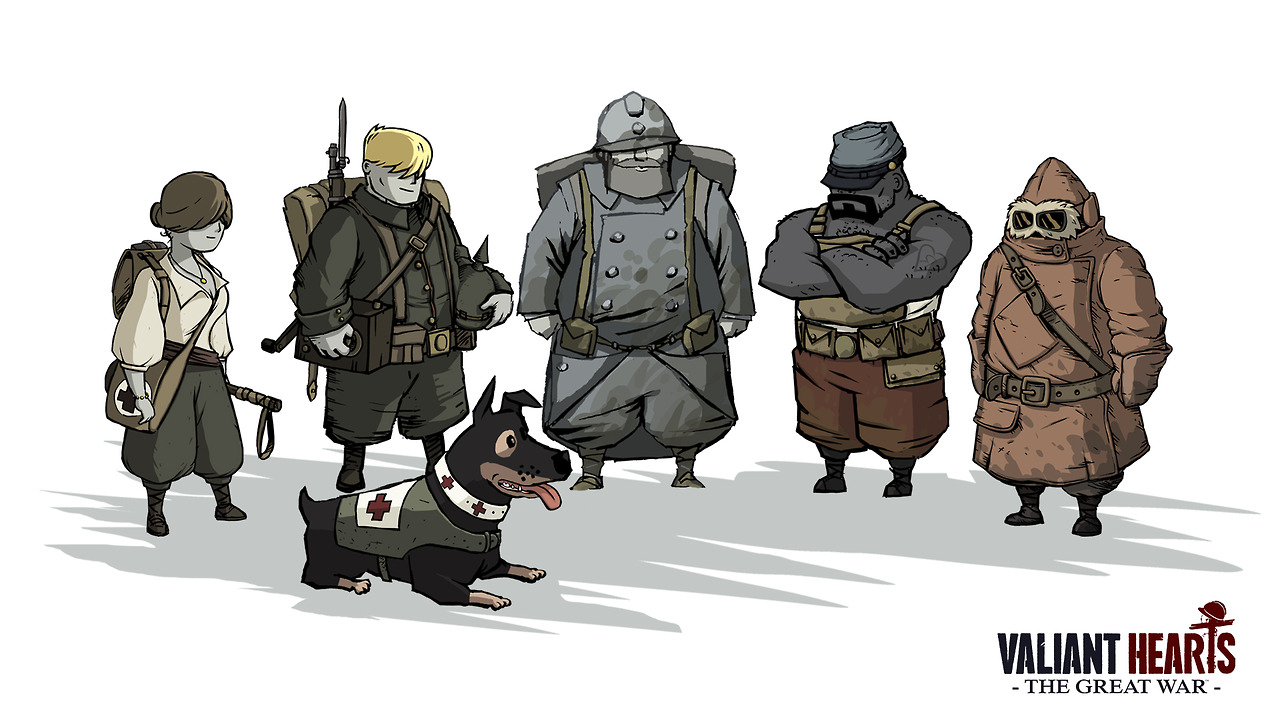
Main cast of characters from Valiant Hearts: Ana, Walt (dog), Karl, Emile, Freddie and George

The cast of characters presented in Valiant Hearts represents a cross-section of nationalities swept up in the European conflict. The main character is Emile, a French farmer who is pressed into service at the outbreak of the war. His daughter is in a relationship with Karl, a German who is exiled from France at the beginning of the war and subsequently compelled into service with the German army. Just after completing basic training, Emile meets Freddie, an American ex-patriot living in Paris and volunteer in the fight against Germany. Once in the trenches, Emile befriends a military service dog named Walt. A fast-driving Belgian nurse named Ana completes the main cast of characters, although a British pilot named George does make a cameo later on in the game.

vhtraining

Emile completing basic training in Valiant Hearts

With a minimal amount of introductory back story of the outbreak of WWI, the game begins with Emile marching off to some quick basic training which introduces a player to the basic climbing, attacking, picking-up and throwing actions. Once at the front, the game quickly moves into the more familiar trench warfare settings which were the hallmark of the war.

For gamers looking for WWI first-person combat wielding a bayonetted rifle or driving a clattering tank through No Man’s Land, there will be disappointment. Although death and destruction surrounds the game, there is surprisingly little direct combat experienced by the player. The entire WWI setting and all its trappings of planes, tanks, artillery and machine guns become tools to propel the characters to action, more like a violent ghostly hand lurking in the background than the main focus of the action.

vhgp6

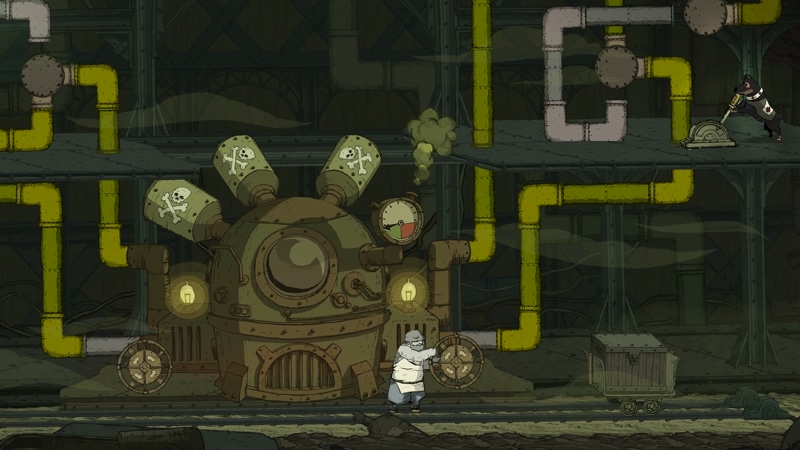
A typical puzzle challenge in Valiant Hearts

As a game, the main focus of Valiant Hearts is at its core a platform, puzzle and adventure game. It is a game set within the war, but the playable characters are not working on racking-up body counts. More typically, a character will work their way through completing a series of tasks to progress to the next level– break down a wall, crouch in a trench, dig a tunnel, climb a ladder, crank a wheel, set a charge and blow up a bridge.

Different characters in the game also work in combination to get puzzles solved and sometimes work with non-player characters. For instance, the burly Freddie is good at smashing down walls, doors and barriers with his bare fists while Emile is handy at digging and Ana provides care to wounded soldiers on and off the field. Characters can also order commands to Walt to move and fetch objects from areas unreachable by the other human characters, such as crawling under clouds of poisonous gas.

vhgp1

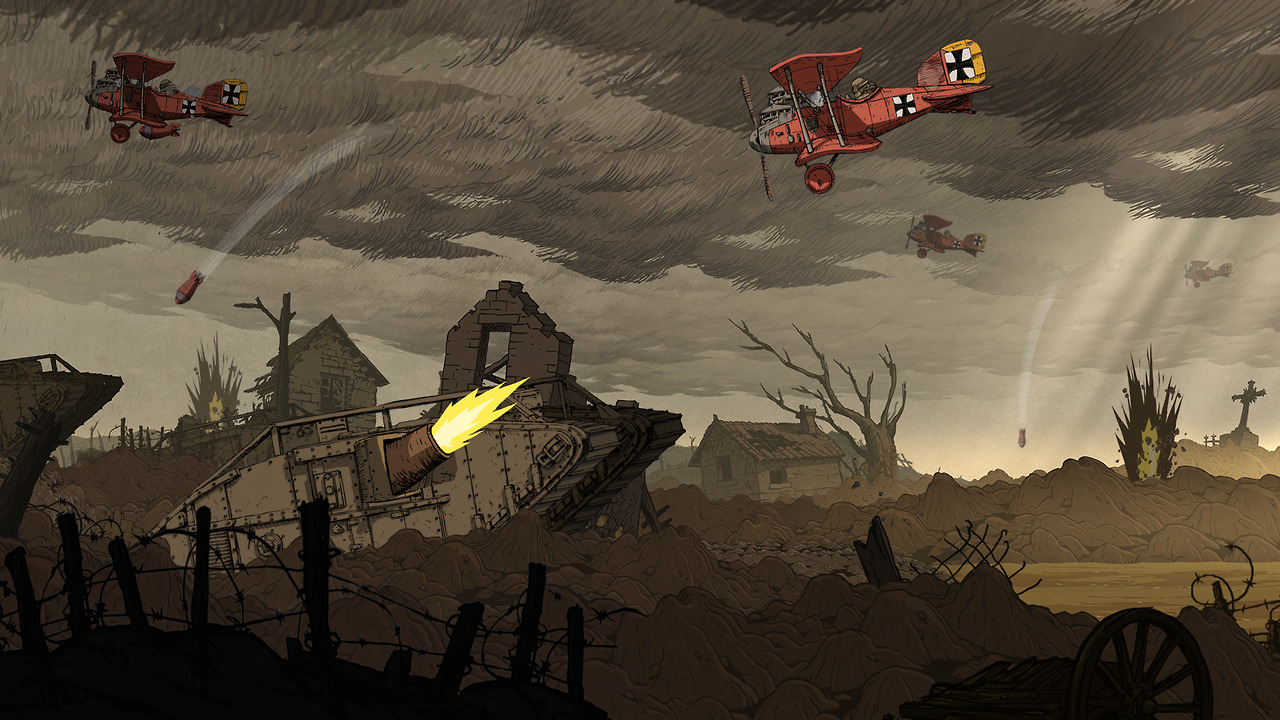
Richly accurate artwork of the Western Front and equipment such as tanks and biplanes set the scene in Valiant Hearts

Beyond the entertainment of the puzzle adventure gameplay, Valiant Hearts is rich in historic detail. A number of short behind-the-scenes developer videos on the game’s website show the depths to which the team at Ubisoft went to paint a vivid picture of WWI using primary documents. Even within the cartoonish game animation, there’s a ton of detail in the flags, uniforms, weapons, vehicles and settings throughout the game. The diversity of nations participating in the war is well-represented, so we not only see the typical British, German, United States and French soldiers but also those from countries like India. To keep the nationalities with their mix of languages consistent, dialogue among characters is limited to emotive symbols and vaguely accented but recognizable foreign mumbles.

Valiant Hearts: The Great War_20140625183402

Historical photos and background fill out the detail in Valiant Hearts

As Valiant Hearts progresses, gamers and would-be historians will find a wealth history laced within the action. Brief cut-scenes do well to set chapters within regional maps and shifting events throughout the war. Pop-up screens provide historical facts and beautifully color-tinted period photographs of life, equipment and stories from WWI. Players who complete puzzles within the game also collect historic artifacts such as identification tags, a whistle, a helmet or actual letters from soldiers of multiple nations. Again, additional pop-up windows takes a player back to the primary sources from which each object is drawn.

Both my 14-year-old son and I have spent time playing through Valiant Hearts this week. As a hardcore gamer, my son found the play pretty rudimentary by modern standards but my greener fingers did find at least some initial challenge to the puzzles. What we both equally delighted in was the art and historical documentation which was wrapped up around the simple human story unfolding throughout the game.

Far away from the politics, grand plans and horrors of combat, every war throughout history has come down to humans and relationships torn asunder or brought together in wartime. This is the journey of the characters in Valiant Hearts: The Great War and one well worth the trip back a century in time.

Valiant Hearts: The Great War is available for PS3, PS4, Xbox 360, Xbox One and Windows PC.

Flames of War: Fielding the FOW M10 Tank Destroyer Platoon

m10

The Blitzkreig of German armored forces is one of the more enduring tactics introduced in World War II. Swarmed masses of German tanks and mechanized forces in the early war period rolled through Poland, France, Belgium and the Netherlands in Western Europe and punched into the Soviet Union with Operation Barbarossa in 1941. With early Panzer and later Panther and Tiger tanks ruling the battlefields of Europe, Allied forces struggled for solutions to crack the German tide of iron.

m10normandy

A US M10 tank destroyer comes ashore in Normandy after D-Day in 1944

By mid-war, the Americans had a solution with the M10 tank destroyer. Introduced first into the battlefields of North Africa in 1943, the M10 GMC (“gun motor carriage”) carried a big 3-inch/76mm gun and on a Sherman hull. After success in Africa against earlier model German tanks, M10s became part of the post-D-Day Allied breakthrough campaign. While effective against Panzer III and IV tanks, more heavily-armored Panther and Tiger tanks still proved problematic. Luckily, the M10 was supplemented by the British-modified Sherman 76mm Firefly and the later US-built M18 Hellcat which was quicker on the field. The combination of these three tank destroyers, along with the stalwart work of Allied infantry and deadly air support, turned the tide in Europe.

fowm10set

One of my earliest 15mm WWII purchases years ago, and somewhat at random, was the now-discontinued M10 Tank Destroyer Platoon set from Flames of War. I think at the time, I just liked the look of the models and I was looking to fill-out my new US forces with more variety. To get to a full platoon of four M10s, a fellow club member at Metropolitan Wargamers in Brooklyn, NY recently gave my two more M10s to which I’ve added an additional M20 scout car.

IMG_3389New M10 tank destroyer and M20 scout car

IMG_3388New M10 tank destroyer

IMG_3387New M20 scout car

IMG_3390US tank destroyer platoon with new models (left) and older models (right)

With my existing and new section sections, I now can field a full tank destroyer platoon using a variety of Allied Late War European lists. Anti-tank tactics in the game provide multiple opportunities for the M10 platoon to be used in combination with infantry and other Allied armor on the game table. With optional deployment as a recon platoon using the M20 scout cars, the M10s can create ambushes to wreak havoc on German tanks. Admittedly, using this full platoon will take some practice but I’m certain they’ll be causing headaches for my German opponents in the very near future.

Flames of War: Modelling Western European Terrain in 15mm

normandystuartterrain

I’ve had a lot of great feedback from the past year of posting after action reports for Flames of War games. Fellow players have been universally complimentary on the layout of my terrain used in my scenarios. With that, I’m increasingly being asked questions about the make of my models, where I buy them and how I achieve some of the other rerrain modelled  in my games.

Modelling terrain, like any aspect of miniatures wargaming, has to take into account the three main factors of skill, budget and time commitment. I find myself somewhere in the middle of all three categories, and I feel my level of personal investment in my terrain modelling is reflective of this. One of the many benefits of belonging to a club like Metropolitan Wargamers in Brooklyn, NY is the opportunity to share in our massed collections of terrain and create some pretty impressive-looking games.

As a longtime miniatures hobbyist with a passion for scale modelling, I wanted to share a quick round up of the current state of my 15mm terrain collection I use for Flames of War. To date, my FOW gaming has focused on the European Western Front, so the vast majority of my terrain focuses on buildings and other features appropriate for France, the Low Countries and Western Germany. All that said, let’s take a European tour in miniature…

markivposter

Any small town or rural tabletop Western European battlefield needs buildings — barns, houses, shops and cafes — not only for visual appeal, but to provide covering positions and even possible objectives during game play. FOW offers a fine line of pre-painted buildings but I find them to be a bit on the expensive side and toy-like. I also like to paint, so breaking up modelling little tanks and soldiers with some miniature real estate projects makes for a nice change to hobbying routine.

Last year I discovered the cast resin terrain produced by Mark IV Miniatures. As a second-generation wargamer, the owner of Mark IV obviously invests a great deal of care to his Western and Eastern front models. All the buildings come with removable multiple stories and roofs, making their use in FOW gaming a breeze. I just acquired my second set of models from Mark IV (ordered from Musket Miniatures), giving me a number of houses, barns and shops which I set close together as a village center or spread out for use in the countryside. For my towns, I also have a set of Mark IV  walls, a cobblestone courtyard and nifty fountain monument model. At about $18-24 per model, Mark IV’s offerings are my hands-down favorite in miniature buildings.

gowlogo

With so many Mark IV models on my shelf, I wanted to add in a few more commercial structures representing stores or cafes common to European towns small and large. The excellent Model Dads UK blog recently reviewed the 15mm town shop models from Games of War. Based on a shop in Caen, the GOW shops come in three different pre-painted varieties for about $24 each shipped from the UK.

The GOW buildings scale nicely with my Mark IV models, and just a little work weathering the existing paint blends them nicely into the streetscape. I also added some signage and posters to the exterior walls, bringing a bit more sense of liveliness to the townscape.

IMG_3111Painting Mark IV and Games of War buildings

jrlogo

The first 15mm buildings I ever bought were from JR Miniatures. An old standby in the hobby, JR offers a wide variety of scales and themes for eveything from Ancients to Historicals to Sci Fi. I have a small, roughly-cast farmhouse and outbuildings from JR which I use as area terrain. Overall, I find JR’s buildings to be a bit less crisp in detail than those from Mark IV and GOW, and many buildings don’t open for placement of figures.

Last year, I picked up a basic JR European stone bridge at a convention for about $14. The simplicity of the model made it easy to paint with a few stone-colored dry-brushed layers of paint. The model stretches over just about every river running through my gaming tables, and I may very well pick up another bridge in a different design from them soon.

MBAlogo

On the higher end of the terrain options, I’ve always had a thing for the Miniature Building Authority. MBA’s extensive 15mm European line comes pre-painted with lift-off sections to place units in the buildings or model them as destroyed structures. They also carry some rather unique structures and large set-pieces like a multiple-model farm complex or full train depot set-piece.

My brother and his gaming friends have been collecting MBA buildings for years, buying a few buildings a year and sharing in their collection. Taking their gradual approach, I recently started small and ordered a couple of their shops and a large, beautiful hotel model for my collection. Over time, I hope to add more from MBA and grow toward larger, more urban scenarios.

fowcobblestone

Laying out a gaming table almost always necessitates having roads. I bought some rubberized roads years ago at a convention which suit rural unpaved areas well. A small town or rural setting requires having paved streets, and cobblestones provide a suitable road surface for Western Europe at the time of WWII.

I experimented with stone-textured papers and looked at rubberized stone streets, but none of them provided the depth or the solidity inherent in a stone road. Finally, I’ve bitten the bullet and invested in a set of the FOW cobblestone roads  at a slight discount from a seller on eBay. With a total of more than 6-feet of pre-painted cast resin roads, the box has given me what I think to be plenty roadway for my tanks to rumble down.

wslogo

Trees are one of the standard needs for any miniatures wargaming table in any era. Several wargaming manufacturers offer boxes of pre-made tree stands and bases for around $35-40 for maybe a dozen trees. I choose to go the economic bulk route and make my own using trees, flocking and modelling details from Woodland Scenics. For about $75 I’ve been able to make more than enough to fill even the largest battlefields.

IMG_3040Tree-making assembly line

Using two different sized trees from the WS Ready Made Trees Value Pack line, I first glued groups of 2-3 trees to cork coasters picked up at a craft store. On top of the spray-painted green coaster bases, I apply white glue and sprinkles of gravel of varying sizes in random places. After dry, another coat of glue to the remainder of the bases is then flocked with a basic green grass flocking. A few twigs and larger rocks glued here and there add some more depth to the little mini-scenes on each base.

IMG_3041Applying white glue to the tree bases before flocking

Bases are finished off with coarse clumped foliage to represent bushes and undergrowth. Mixing colors of the trees and foliage provides a realistic look. Gravel and larger rocks get hit with some brown washes to tone down the glaring brightness of the paths and piles on each base. All my work is done assembly line style in stages over an old baking sheet so excess flock and gravel shaken from the bases can go back in their containers to use again. When finished, I hit the bases with a matte spray to hold everything in place. In just a few hours time, my model forest on some 30 bases is ready to provide cover for any troops seeking concealment from enemy fire.

IMG_3156Completed homemade trees

Putting it all together, a dozen buildings, cobblestone roads, a bridge and a bunch of my homemade trees gives me more than enough terrain to present rural and town landscapes in Western Europe. Adding in some river sections, dirt roads and fields from fellow club members completes the look of just about any inland battle scenario in Normandy. Check out the pictures below of the results, and keep an eye on my after action reports for future glimpses into my tiny tabletop fields of battle.

IMG_3161Farm complex with Mark IV buildings and walls, JR Mini bridge and FOW fields and river

IMG_3159Games of War shops with added weathering and signage

IMG_3162Row of Mark IV buildings

IMG_3160Mark IV buildings and monument

IMG_3158Town set-up with terrain from Mark IV, JR Mini, FOW, Games of War and my homemade trees

IMG_3157Town set-up with terrain from Mark IV, JR Mini, FOW, Games of War and my homemade trees

Flames of War: Aalst 1944 Scenario

aalst

The ultimately unsuccessful week-long Operation Market Garden commenced on September 17, 1944 with an Allied push toward Germany. The ground “Market” portion of the campaign saw the British Guards Armoured Division taking point on the push into the Low Countries.

On the second day of the operation, a column of the Guards Armoured had rolled to the southern outskirts of Aalst, a Belgian town occupied by German forces since 1940. Led by Col. Joe Vandeleur, the division’s tanks encountered the remnants of German troops and guns which were dug in but heavily-damaged by the previous day’s Allied air bombings and artillery barrages. For the Germans, Aalst was a line in the sand protecting the Allied advance northeast to Antwerp and  the Netherlands beyond. For the Allies, keeping the long column of armour moving was key to reinforcing the Allied airborne troops already engaged with German forces along several bridges.

This past weekend at Metropolitan Wargamers in Brooklyn, NY we ran the Aalst scenario for Flames of War with 2000-point forces on either side of the table. We pulled our British and German lists from the Market Garden and Bridge By Bridge books. As a jumping off point for the game’s outline, we referenced an Aaalst scenario originally designed for Battlefront. We planned a 10-turn game with points scored for destroyed platoons and an immediate end to the game when the British rolled a platoon off the German-defended north end of the table.

IMG_3026

German set-up at Aalst

As per the actual situation at Aalst in 1944, the Germans began setting up with half their force heavily dug in just north of the town’s center. Deadly 8.8 cm Flak guns were positioned on roads to their right and left flanks, and 7.5 cm PaK 40 anti-tank guns stood closer to town. Infantry and heavy machine gun platoons hunkered down in the fields just outside of town, and a single Jagdpanther idled nearby. Expecting both ground and possible air forces, the German guns were well-prepared for the arriving British.

IMG_3027

German 88’s dug in at the northeast and northwest ends of town

IMG_3016

British set-up at Aalst

The British laid out their 8-gun 25 pdr battery at the rear of the table and rolled on two platoons from the Guards with Joe Vandeleur attached. Spotters for the artillery were deployed in Shermans to the right and left hoping to provide eyes across the entire table for. Towed 6 pdr anti-tank guns, infantry, machine gunners and additional tanks lay in reserve off-table to follow the initial wave of armour. The plan was to use Vandeleur’s special rules to rush tanks to the center of the table, saturate the Germans with artillery fire and pave the way from additional supporting platoons.

IMG_3029

 Vandeleur leads the Guards into position behind the town

IMG_3028

German infantry and Pagdpanther make for the church at the center of Aalst

In the first two turns, the Guards quickly rolled up to take position behind the town to the south with their Vickers machine gun platoon riding on the tanks. The British artillery spotter hopped from his Sherman tank and ran for back door of a building. The Germans made way to the north of town with infantry looking to occupy the church at Aalst with a lone Jagdpanther in support.

IMG_3031

A Firefly lays waste to the approaching Jagdpanther with its first shot

IMG_3032

The Guards take heavy fire and two Shermans and a Firefly sit in flames

Fire opened up in the next two turns with a well-positioned Firefly scoring a kill on the nearing Jagdpanther. Returning fire, German 88s destroyed the Firefly and PaK 40s bailed and subsequently wrecked two other Shermans. Machine gunners made their saves, jumped off their tanks and made way for cover in a nearby building at the town’s intersection. Meanwhile, British artillery lobbed a volley over the town hoping to slow down the German infantry and machine guns looking to take hold of the town’s buildings. The barrage resulted in a destroyed PaK 40 just to the north of the church, but the German infantry pressed on to take up positions in the church.

IMG_3034

British infantry move to assault the church as reserve armor rolls to the town center

With British infantry reserves moved at the double to the town and then moved in a subsequent turn to assault the church. At the same time, a reinforcing Guards tank platoon raced to the town center. Shots from the Shermans failed to destroy nearby PaK 40s but fire from the Vickers guns in a nearby building pinned the Germans in the church ahead of the assault. Despite all the British fire lighting up the center of town, the assault failed and the British infantry fell back to the other side of the street.

IMG_3033

German armored reserves arrive

With the British stalled at the crossroads in Aalst, German reserves moved onto the table. A Stug platoon, Wirbelwinds and a fresh Jagdpanther began closing in from the northwest of town, drawing fire from the British battery looking to slow their advance. Volleys from the 25-pound guns blew up an 88 and a PaK 40, but the mass of German hardware kept rolling forward.

IMG_3035

British command tanks move to engage the Germans

IMG_3036

A swarm of German armor and troops push forward under British artillery fire

IMG_3037

A Panzerfaust lights up a British command tank

Hoping for a hard push of combined arms on the German right, British command tanks followed by two platoons of infantry pressed forward from a nearby woods. The British tankies proved to be tough, surviving a turn of fire from nearby Stugs and an attempted infantry assault with  Panzerfaust-wielding infantry as British guns continued to range in and rain shells on the Germans to no effect.

IMG_3038

The lone surviving command British tank awaits its fate from the German onslought

Back at the center of town, the last tank platoon took fire from the 88s, PaK 40s and a Panzerfaust in the church steeple and was destroyed. The one lone command tank on the western outskirts of town was surrounded and destroyed by combined tank and artillery fire. With only the remnants two rifle platoons and the Vickers left spread through the town, the game was lost for the British. As the sun set in the west, Aalst remained in Axis hands.

In our discussion after, the British artillery had only been effective only about 50% of the time and only eliminated a few units throughout the game. Too many British tanks burned too quickly against overwhelming crossfire from German guns, and reinforcing British infantry could never make headway beyond Aalst’s crossroads. More British tank platoons with Fireflies might have gone a long way toward at least pushing through the town.

Fortunately for the people of Aalst, the engagement during Market Garden resulted in the liberation of the town by the British. Pictures from the victory show a very different outcome from our game with smiling faces all around. The very nature of wargaming sometimes just makes things go a different way, and this past weekend the dice rolled against the tide of history with a victory for the Germans at Aaalst.

Flames of War: Buchholz Station 1944 Scenario

bulge

On December 16, 1944 what became known as the Battle of the Bulge began. The German surprise winter campaign offensive – Unternehmen Wacht am Rhen (“Operation Watch On The Rhine”) – would run until the end of the following month. In the cold, snowy forests of the Ardennes region of France, Luxembourg and Belgium, the series of ferocious engagements would see the highest casualties for the US during WWII severely set back the German war machine’s fighting ability for the remainder of the conflict.

BBmap

Map of the southern flank of the Battle of the Bulge, featuring Buchholz Station

Early in the morning of the 16th, a US company at Buchholz Station was taking a quick break from the morning’s action. Lining up for a hot breakfast, the weary American riflemen spotted distant shadowy shapes  moving through the fog along the nearby railway tracks. Initially figuring these troops to be fellow Americans, machine gun fire quickly erupted as the realization that these were in fact Germans moving to take the nearby train station. The Americans rushed to meet the Germans, eventually filling the area with exchanged mortar and gun fire. Late-arriving US anti-tank guns and some gutsy attacks eventually repelled the small German force.

IMG_2758Table set up for Buchholz Station at Metropolitan Wargamers

Recently on The Miniatures Page message boards I stumbled on a Buchholz Station scenario for Flames of War. A fellow blogger had sunk a fair amount of research into the scenario and presented a great overview on his blog known simply as Kevin’s Blog. Having never done a Battle of the Bulge scenario before, I was anxious to give Kevin’s game a try.

IMG_2761The US chow truck waiting for hungry GIs to show up at Buchholz Station

This past weekend I finally got around to running the scenario at Metropolitan Wargamers. Using the online scenario as a jumping off point, I modified it down to a 4′ x 4′ table decked out in snowy terrain (using regular baking flour). I also tweaked the US and German forces since my own collection didn’t have exactly what Kevin’s scenario called for as written.

IMG_2760The Buchholz Station depot — the main German objective

The Confident-Veteran Germans consisted of three rifle-machine gun Grenadier platoons, plus a heavy machine gun platoon. The Confident-Trained US company featured three rifle platoons, a light machine gun and mortar weapons platoon and a small anti-tank gun platoon towed by Jeeps. Both the US and Germans had large off-table mortars with German spotters deployed in the game and all US command spotting for their own mortar crews. Each company featured just under 750 points per side.

IMG_2776US deployment at the beginning of the game

As in the scenario outline, the Americans began with two rifle companies on the board. One was deployed within 4″ of the chow truck, and the second within 4″ of the small group of buildings at the table corner. All other US platoons were held in delayed reserve, meaning they would not come on until at least turn three. The towed anti-tank gun platoon would be the last reserves for the Americans.

IMG_2777German deployment after their first turn

The German platoons deployed all at once with their first turn, entering the table within 6″ of either side of the railroad tracks. They chose to move at the double and divided their force, heading toward the woods to hold off an American advance and straight toward their objective of the train station.

IMG_2778Turn one ends with a race to the train station

The Americans finished the first turn with their own movement at the double. The platoon at the chow truck headed for a small clump of trees, hoping the forest would provide just enough cover from the coming German fire. The second platoon stayed to one side of the road, out of range of German bullets and racing to the train station.

IMG_2779One US rifle platoon takes heavy fire while the second slides to cover the objective

In turn two, the Germans and US platoons each exchanged fire from their occupied woods. The US took their first casualties and were pinned from the withering German heavy machine gun fire. With most of the fire concentrated on the one US platoon in range, the second American platoon was able to slide toward the train station to control the objective ahead of the Germans.

IMG_2780US and German platoons fire between the woods

Turn three was somewhat of a repeat of turn two as the one US platoon swallowed a ton of German gunfire and remained pinned down in the woods. The US failed to roll any reserves on the table in their first attempt, but the platoon at the train station began occupying the buildings to hold off the coming German onslaught.

IMG_2781The Germans sprint in the open

With turn four, the Germans came out into the wide open looking to assault the remnants of the platoon in the woods and the train station objective. The Americans in the woods took more casualties but stuck it out with a motivation test roll as the Germans moved nearer to assault. The Americans in and around the train station benefited from cover and stayed in control of the objective with the Germans advancing. As the turn ended, two adjacent German platoons took American rifle and mortar fire, pinning the Germans in their advance to the train station.

IMG_2782Germans surround the train station

The last of the remaining Americans in the woods at the center of the table fled in turn five, just as the Germans prepared to assault them. Another German platoon reached the doors and windows of the train station but had their assault repulsed. At long last, the first American reserves arrived, and a light machine gun and mortar platoon platoon hit the ground running at the double. Additional US off-table mortar fire rained onto the assaulting Germans in the snowy open field.

IMG_2783US light machine gun and mortar reserves arrive

The Germans still in the woods broke from the trees iat the top of  turn six and made way toward the train station. Germans already at the station destroyed the remaining Americans there, effectively taking the objective. A few Americans ran at the double to contest the objective. The US responded with fire from the newly-arrived light machine guns and more from the mortars.

IMG_2785The final US reserves arrive…but too late

Things ended on turn seven with the last of the American reserves arriving too late and too far out of range movement and fire to contest the train station objective now in control by the Germans. Timing on the battlefield is everything, and the lack of US reserves arriving earlier in the game made it a tough slog for the Americans. The scenario is pretty fairly matched, and playing a FOW game without the usual mass of tanks was a refreshing break.

The Battle of the Bulge also seemed fitting, given the snowy winter we’ve had here in Brooklyn this past month. With the 70th anniversary of the Battle of the Bulge coming up at the end of the year, playing this first scenario already has me thinking of more wintery tabletop warfare about 11 months from now.