I Ain’t Been Shot Mum: Saint Lambert-Sur-Dives 1944 Scenario

stlambertsurdives1944
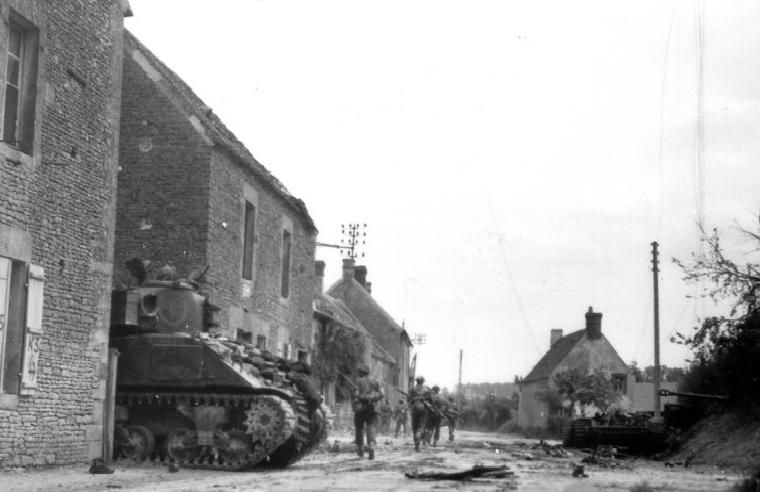
Just over two months after the Allied D-Day landings, the Normandy campaign marched toward a conclusion at the Battle of the Falaise Pocket in mid-August 1944. With orders not to withdraw, a last ditch German defense was cobbled together from surviving Panzer divisions in an area about 20 miles south of Caen. Over a nine day period desperate fighting, the German defenders were eventually encircled by overwhelming British, Canadian and US forces. Aside from tens-of-thousands of surrendering troops, Germany had suffered enormous losses in its dwindling tank forces. Elements of the German 7th Army managed to elude capture and slipped back to the German border, although they too took heavy losses in men and and equipment.

VCCurrieMajor David Currie, winner of the Victoria Cross for his actions at Saint Lambert-Sur-Dives in August 1944

On August 18, 1944, Canadians from the Argyll & Sutherland Highlanders and armored South Alberta Regiment made way for Saint Lambert-Sur-Dives. The objective was to take and hold the town, thus preventing more Germans from slipping out of the Allied encirclement. Over three days of infantry fighting and tank duels in and around the town, heavy losses piled up on both sides. With dozens of vehicles and tanks destroyed, the surviving Germans surrendered to Major David Currie. Currie’s actions at Saint Lambert-Sur-Dives earned him the Victoria Cross, the only one earned by a Canadian during the Normandy campaign.

IMG_4093
View from the north entry point for Canadian troops in the IABSM Saint Lambert-Sur-Dives scenario

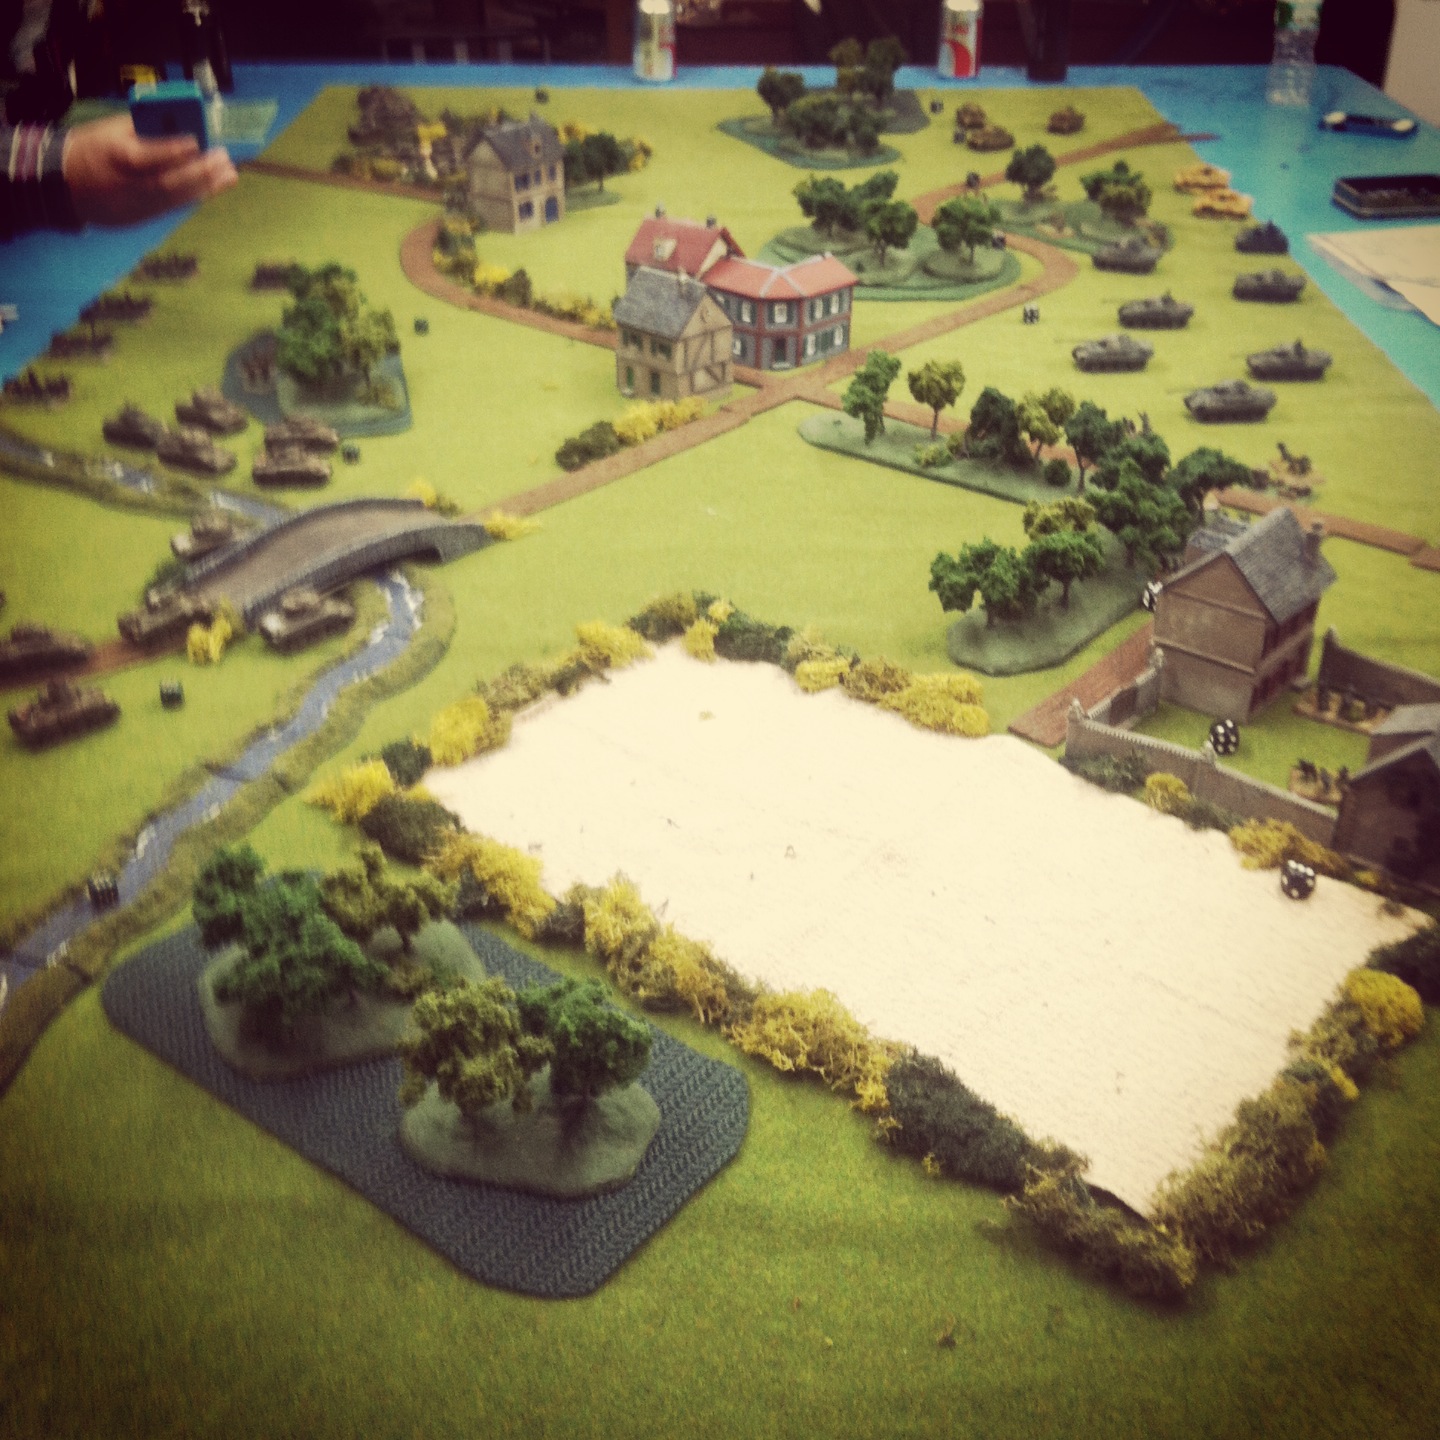
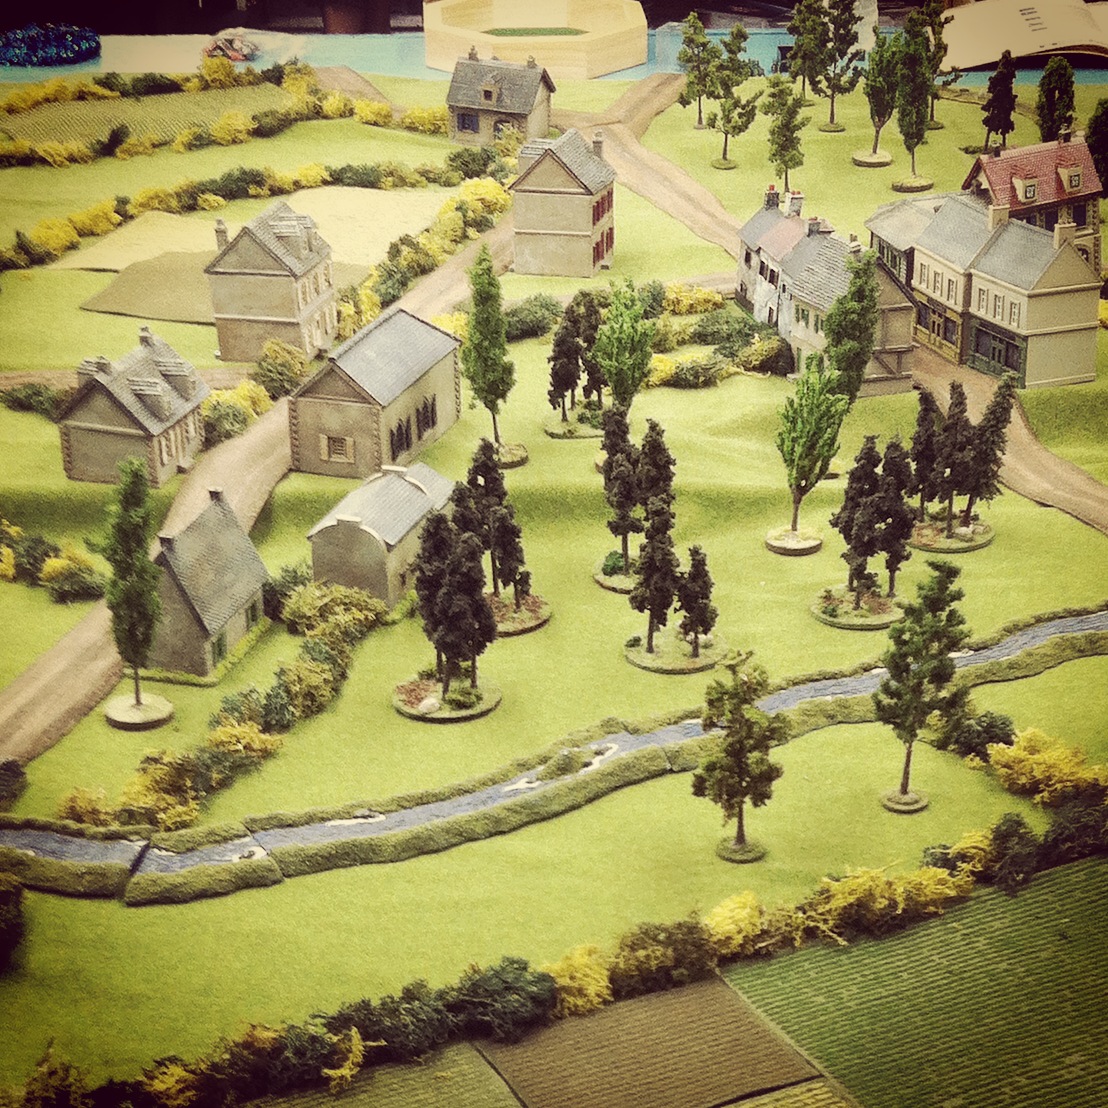
The rulebook for I Ain’t Been Shot Mum from Too Fat Lardies includes a scenario for the battle at Saint Lambert-Sur-Dives which we recently ran at Metropolitan Wargamers in Brooklyn, NY. Using 15mm terrain, we set up the table with a series of roads intersecting at the town sitting at the edge of a hill surrounded by fields, orchards and hedgerows.

IMG_4092View from the south of the IABSM scenario — the Canadian objective is the crossroads at the lower right

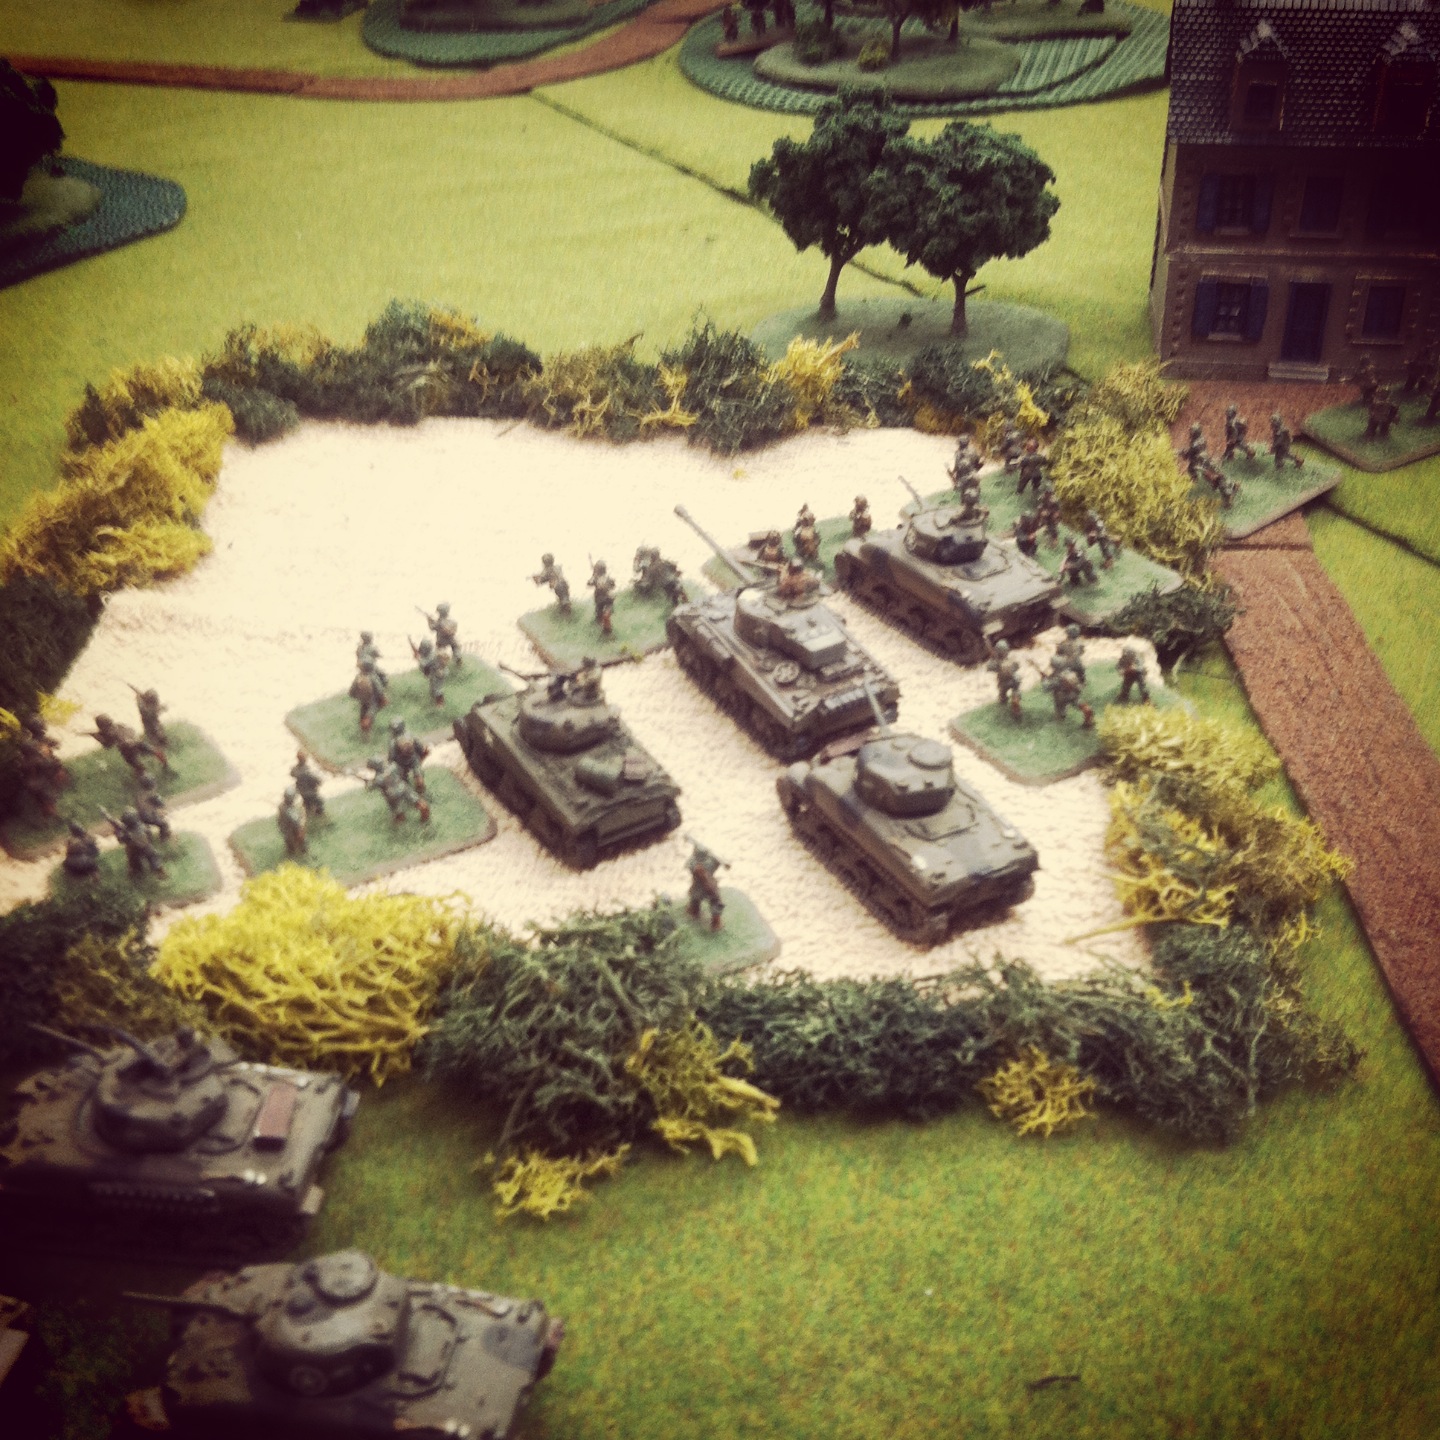
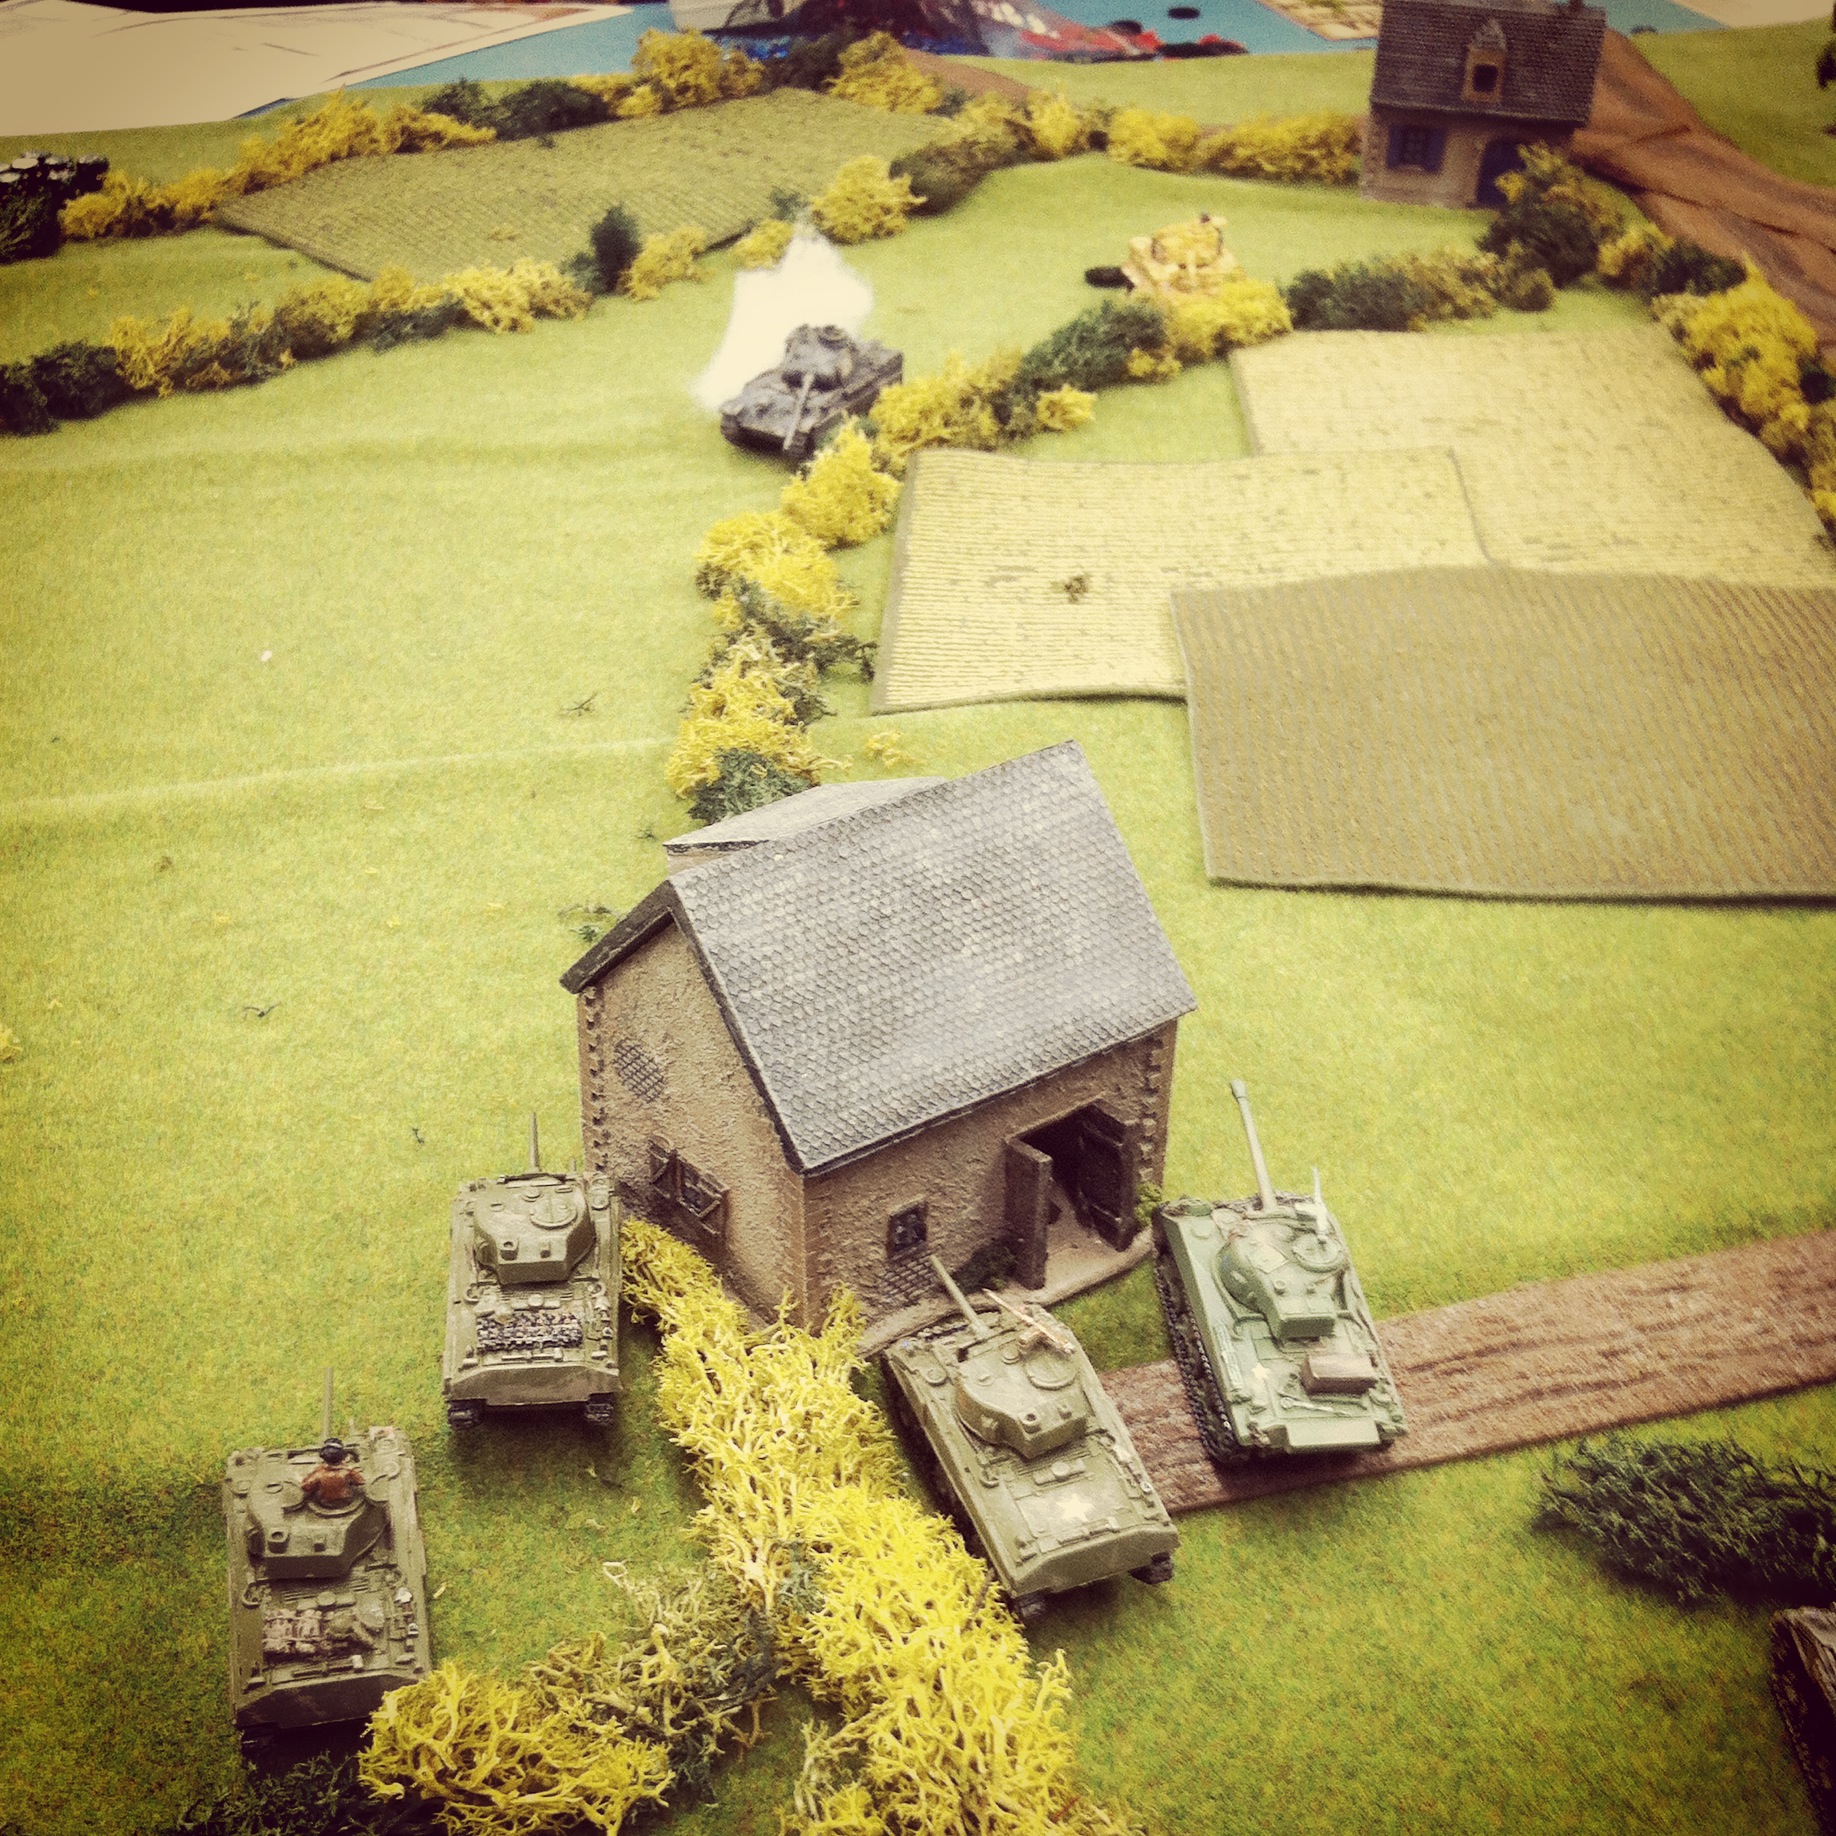
My first Canadian platoons arrived under blinds along the road to the north heading straight for the town where the Germans waited. With several turns of movement under blinds, the plan for each side was quickly exposed in two main areas of the field. My two platoons of M4 Sherman and Firefly tanks made straight down the main road toward the crossroads objective. To stave off the Canadian armor, the Germans quickly set up their Panther A and Tiger tanks behind a hedge southeast of town. The other German armor, two Panzer IVs operating without a commander present, set up in the orchard south of town and covering the other main road to the objective.

IMG_4095
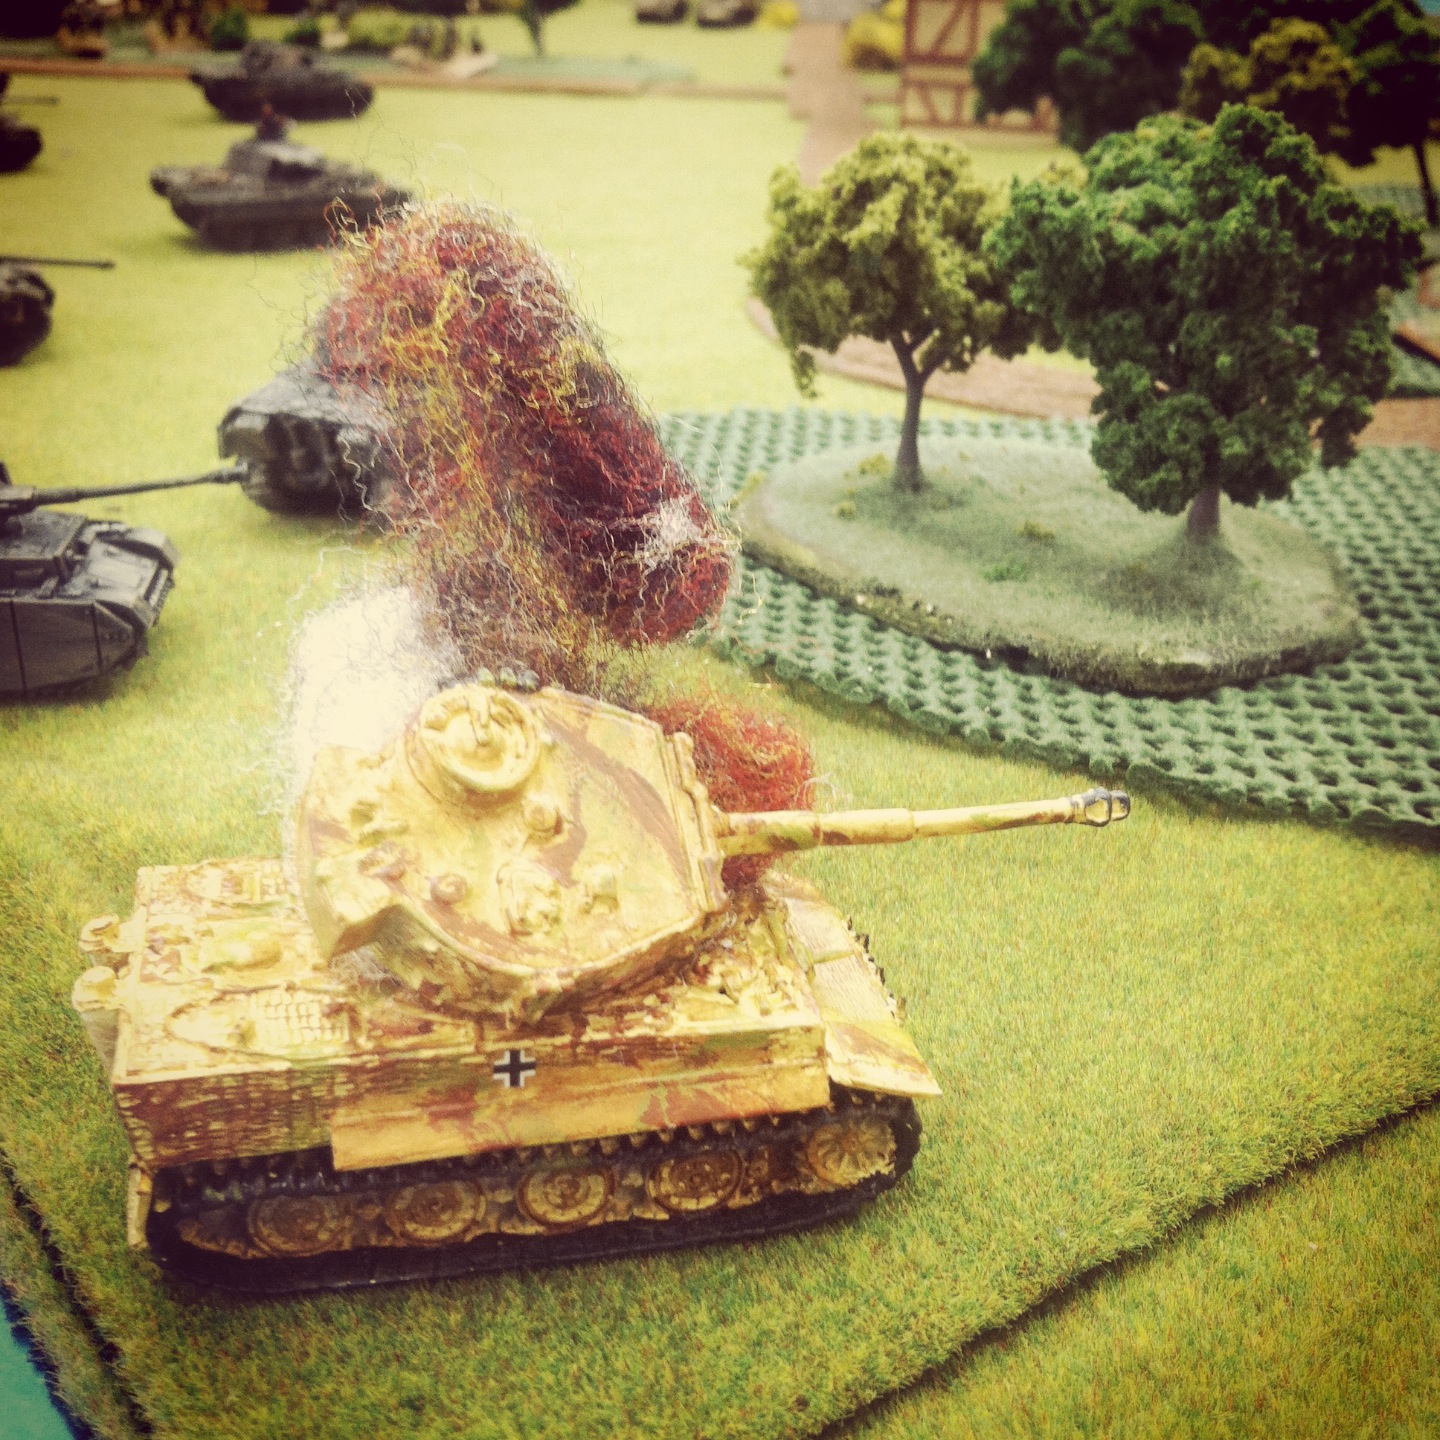
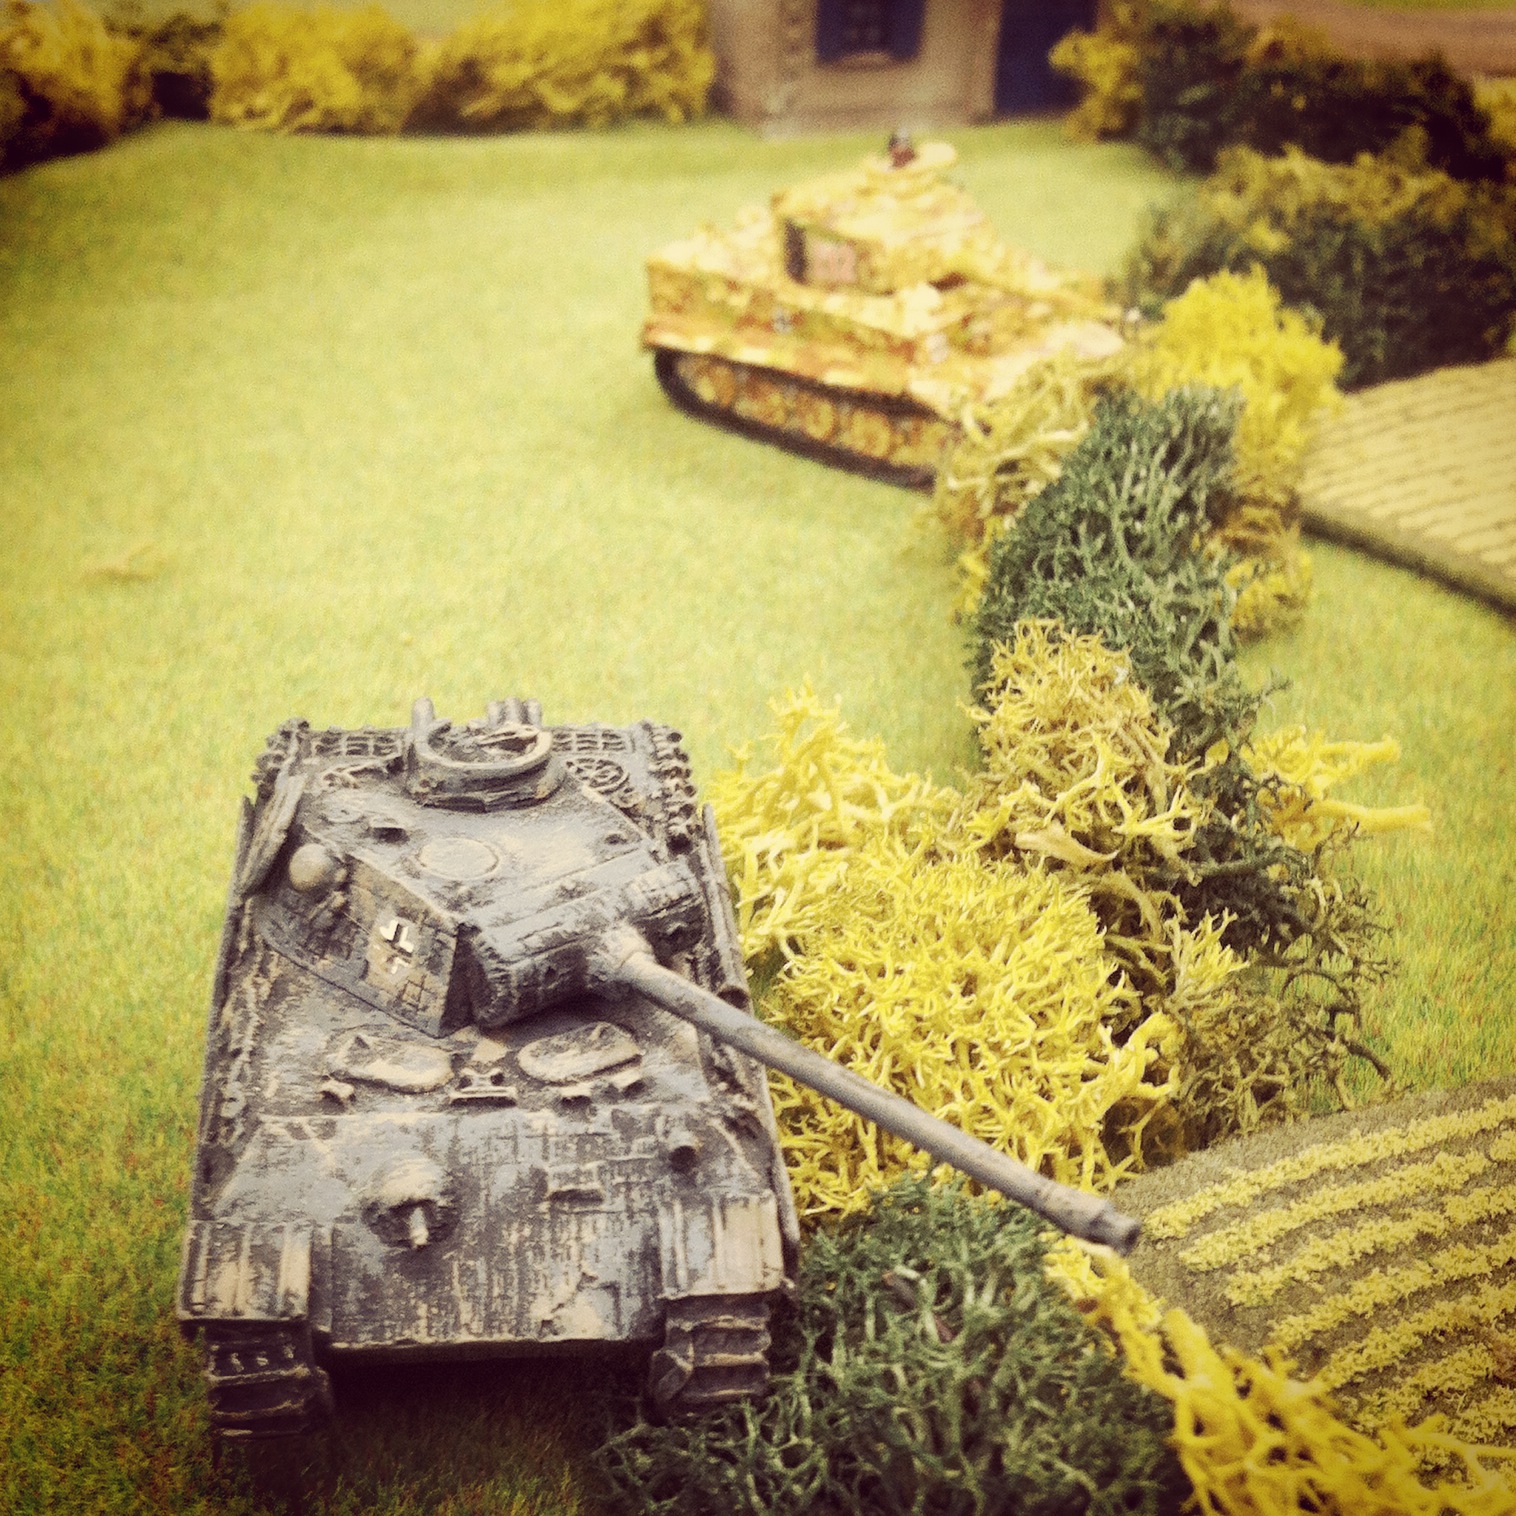
German Panther and Tiger tanks overlook the main road into Saint Lambert-Sur-Dives

IMG_4096Panzer IVs occupy the orchard at the southwest corner of Saint Lambert-Sur-Dives

Two platoons of Canadian rifle infantry crossed the river. One made way to the orchard just north of town at the middle. Meeting them was a single, smaller German rifle platoon. The veteran Canadians quickly destroyed half of one fire team from the tired, German regulars. The surviving Germans pulled back to take up position in the buildings in town as the Canadians pursued.

IMG_4094Canadian and German troops open fire across the stream just north of Saint Lambert-Sur-Dives

IMG_4098
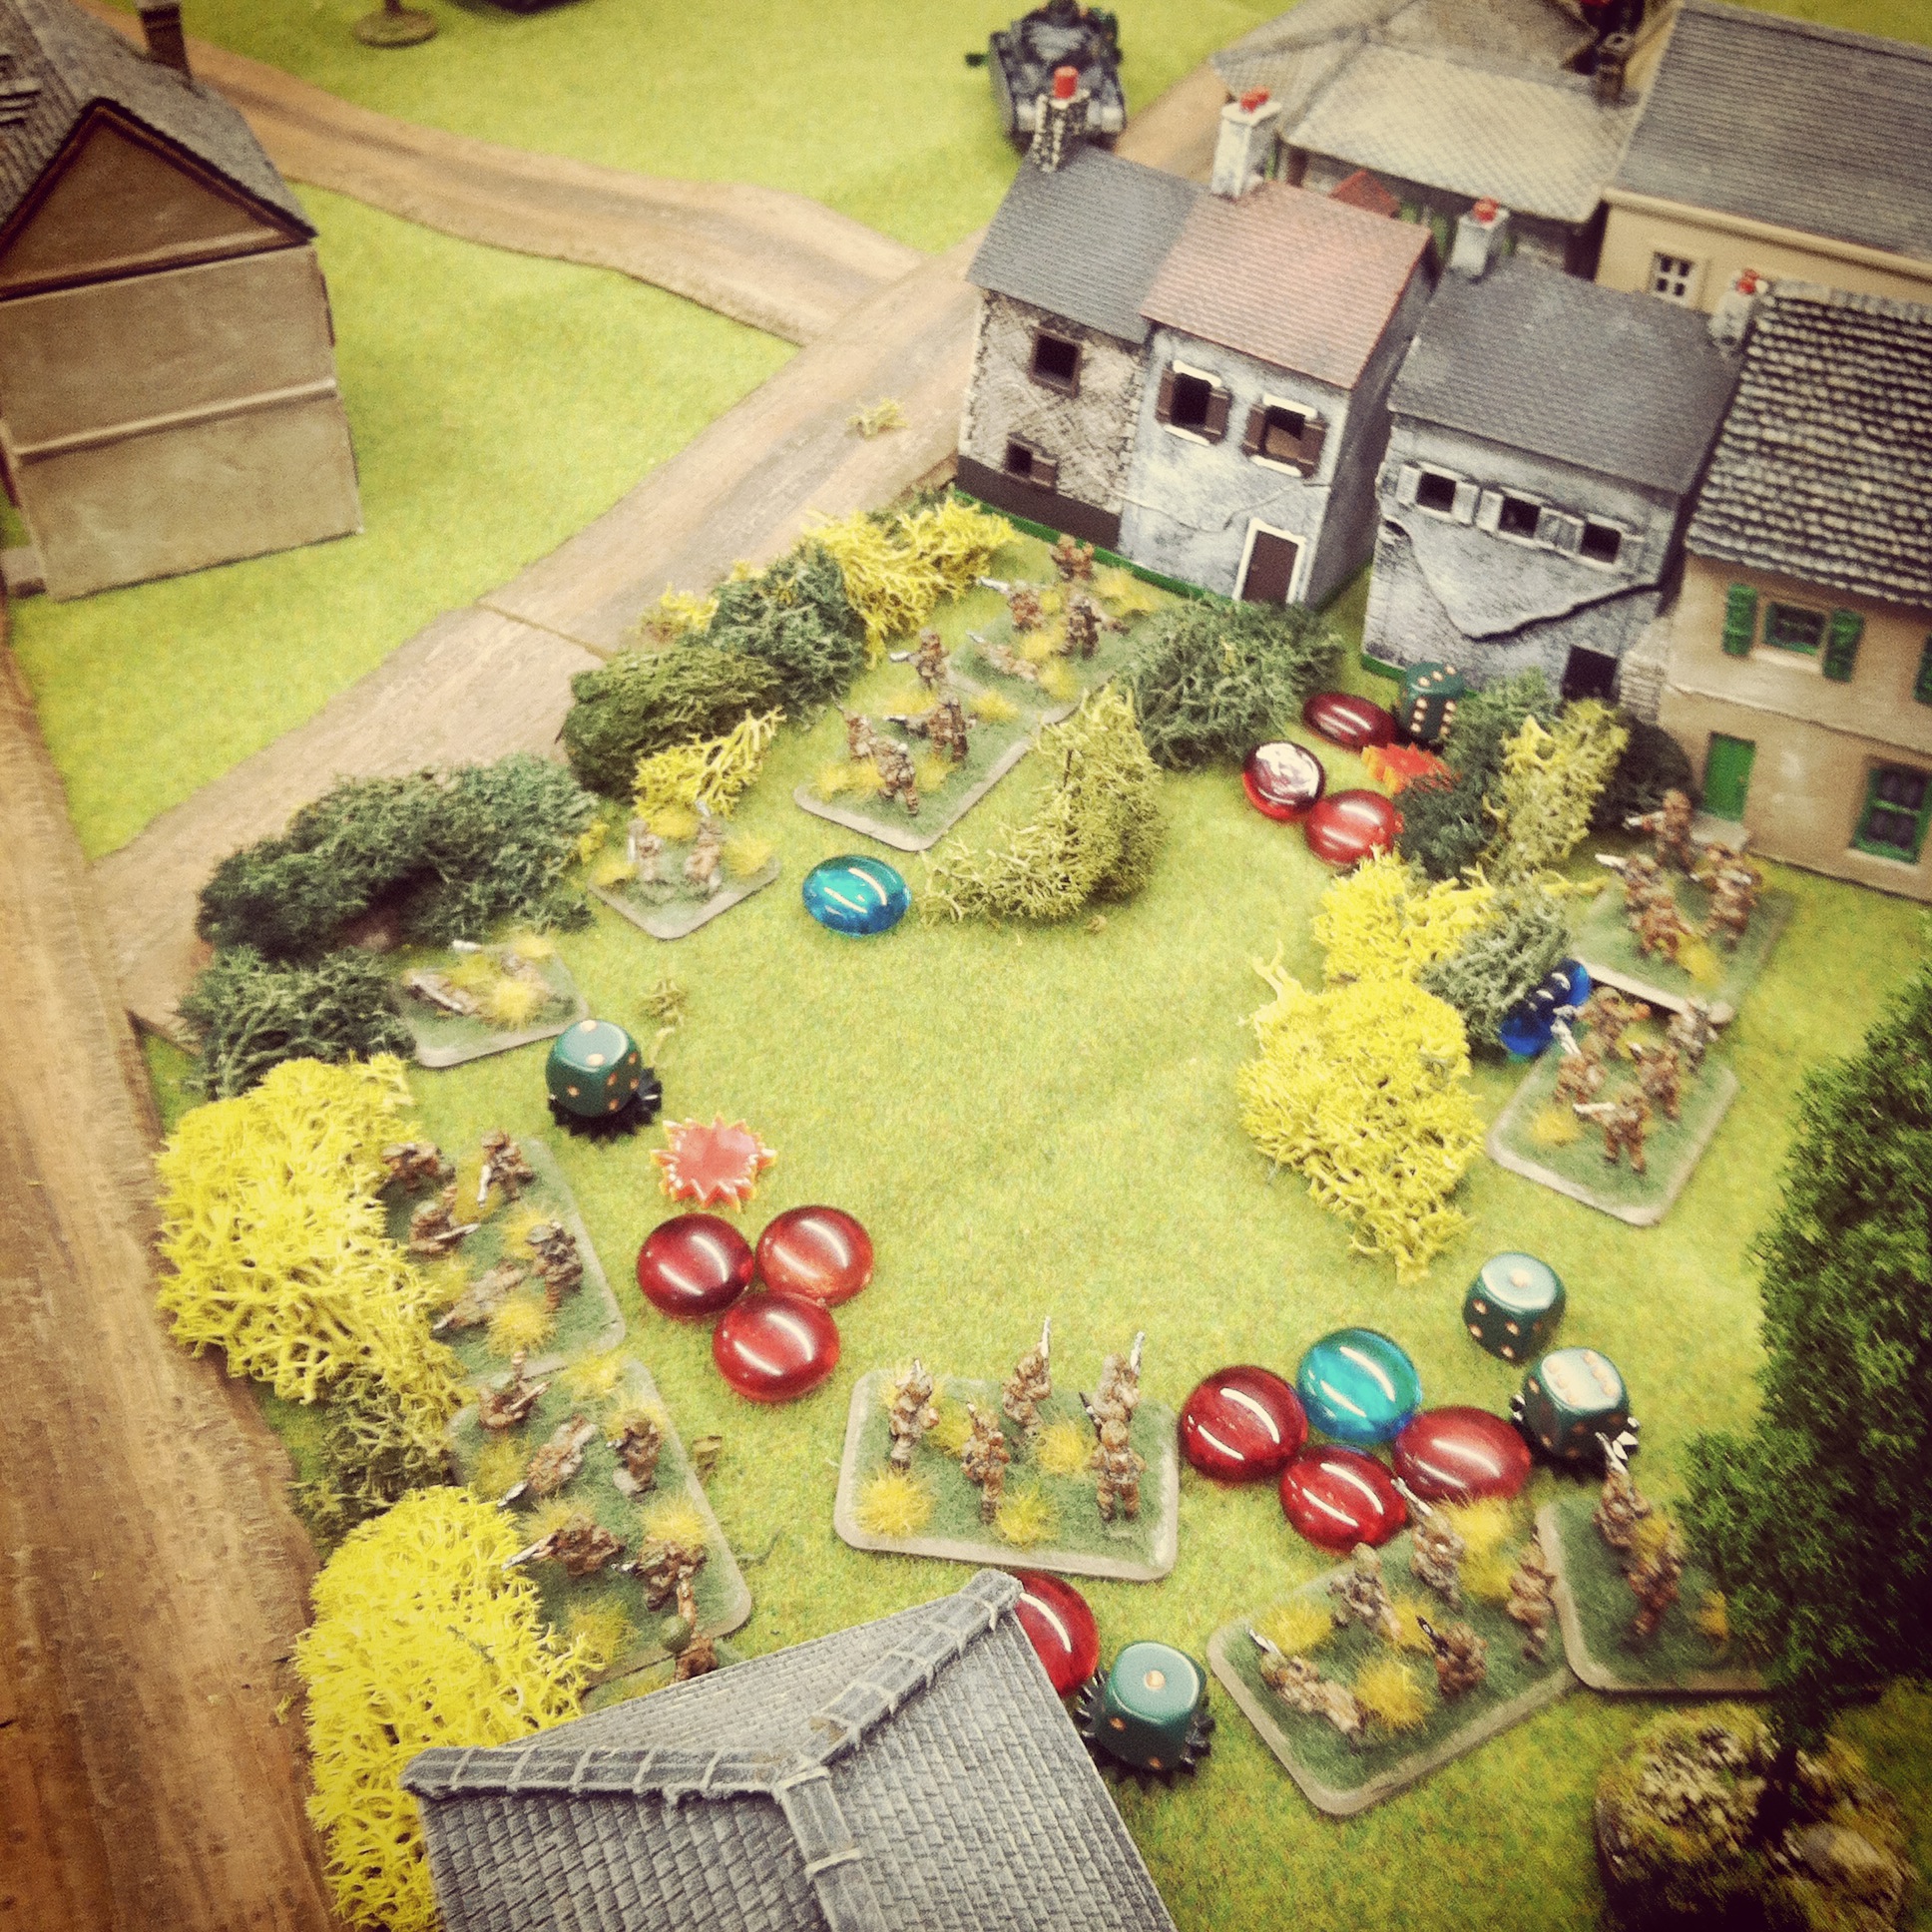
Canadian infantry press forward through vicious fire at the center of town

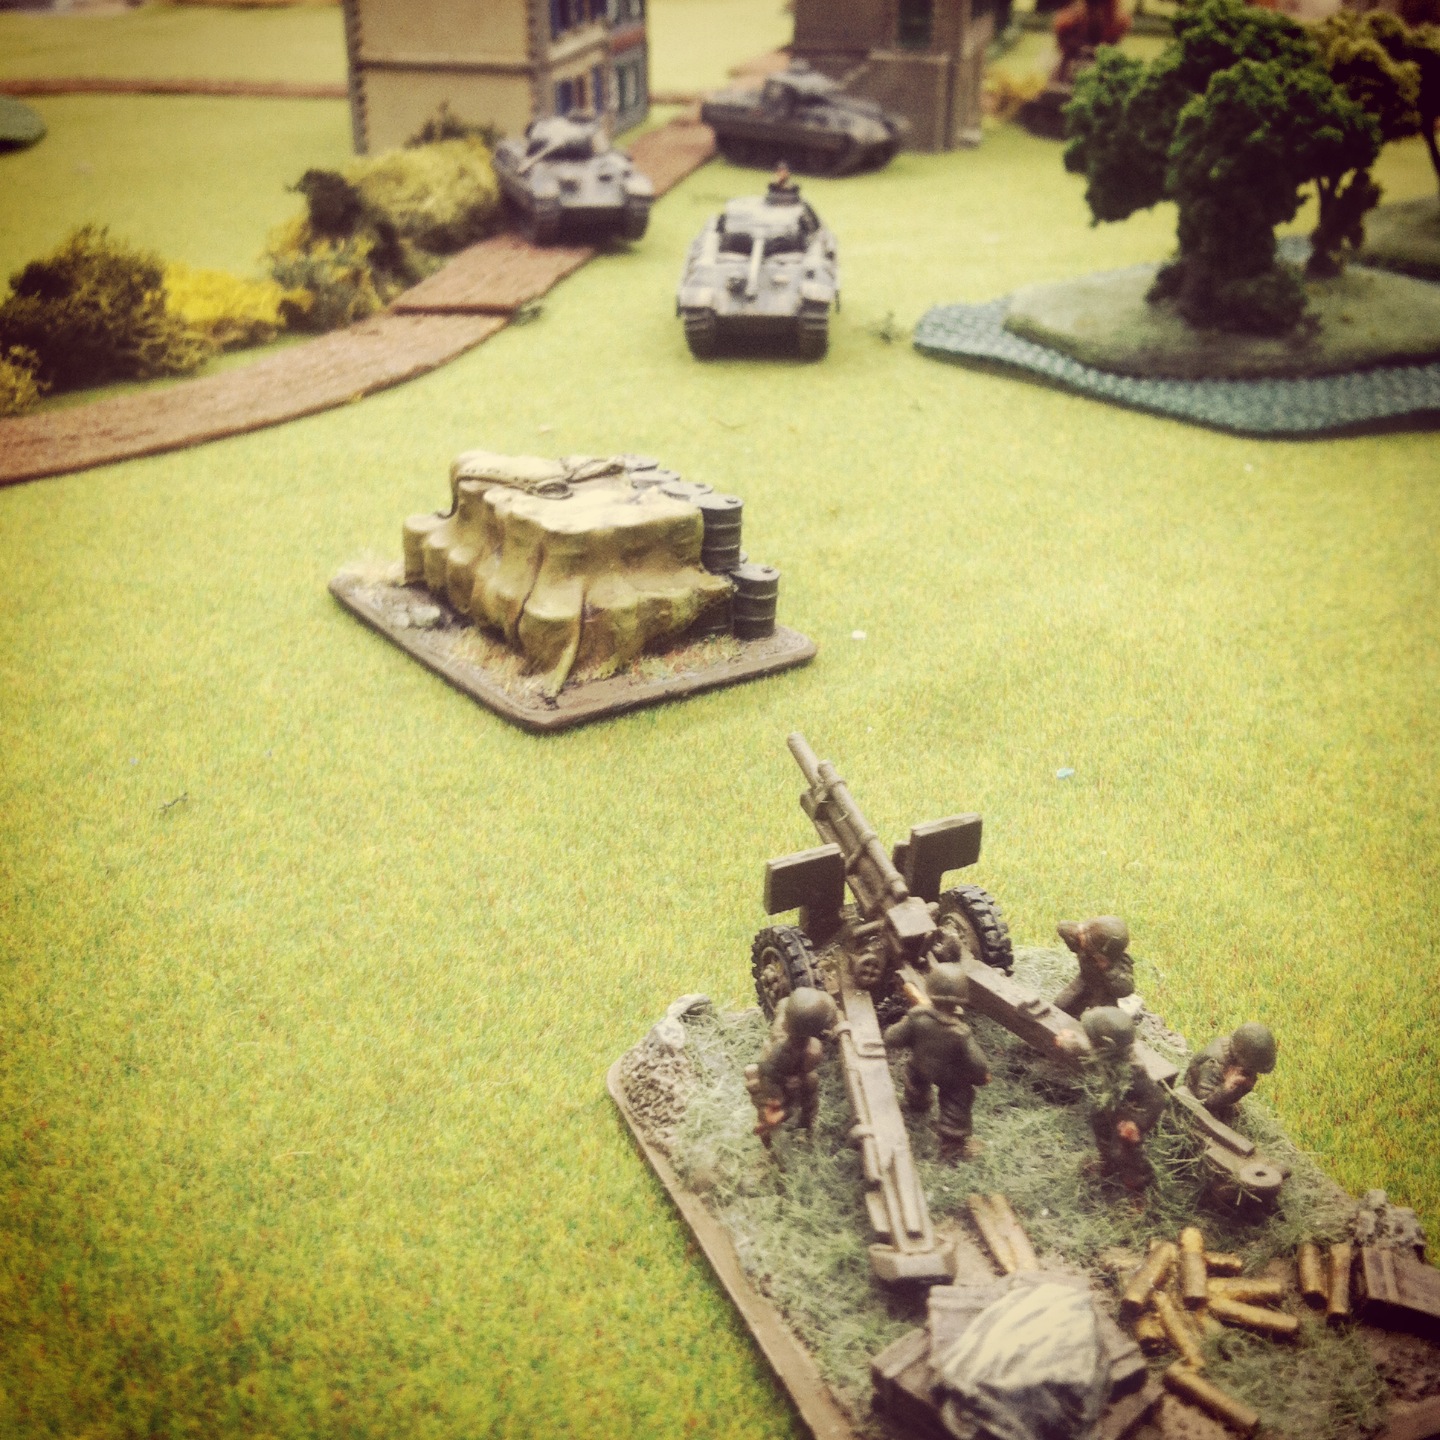
The second Canadian rifle platoon made way through the buildings nearby their fellow Canadian tank platoons. Once close enough, the Canadian rifles exposed a German platoon armed with a frightful MG42 camped out in a farmhouse on the eastern edge of town. Thus all the infantry settled into a series of firing positions at the center of town with the Canadians taking fire from German rifles and machine guns on two sides.

IMG_4097
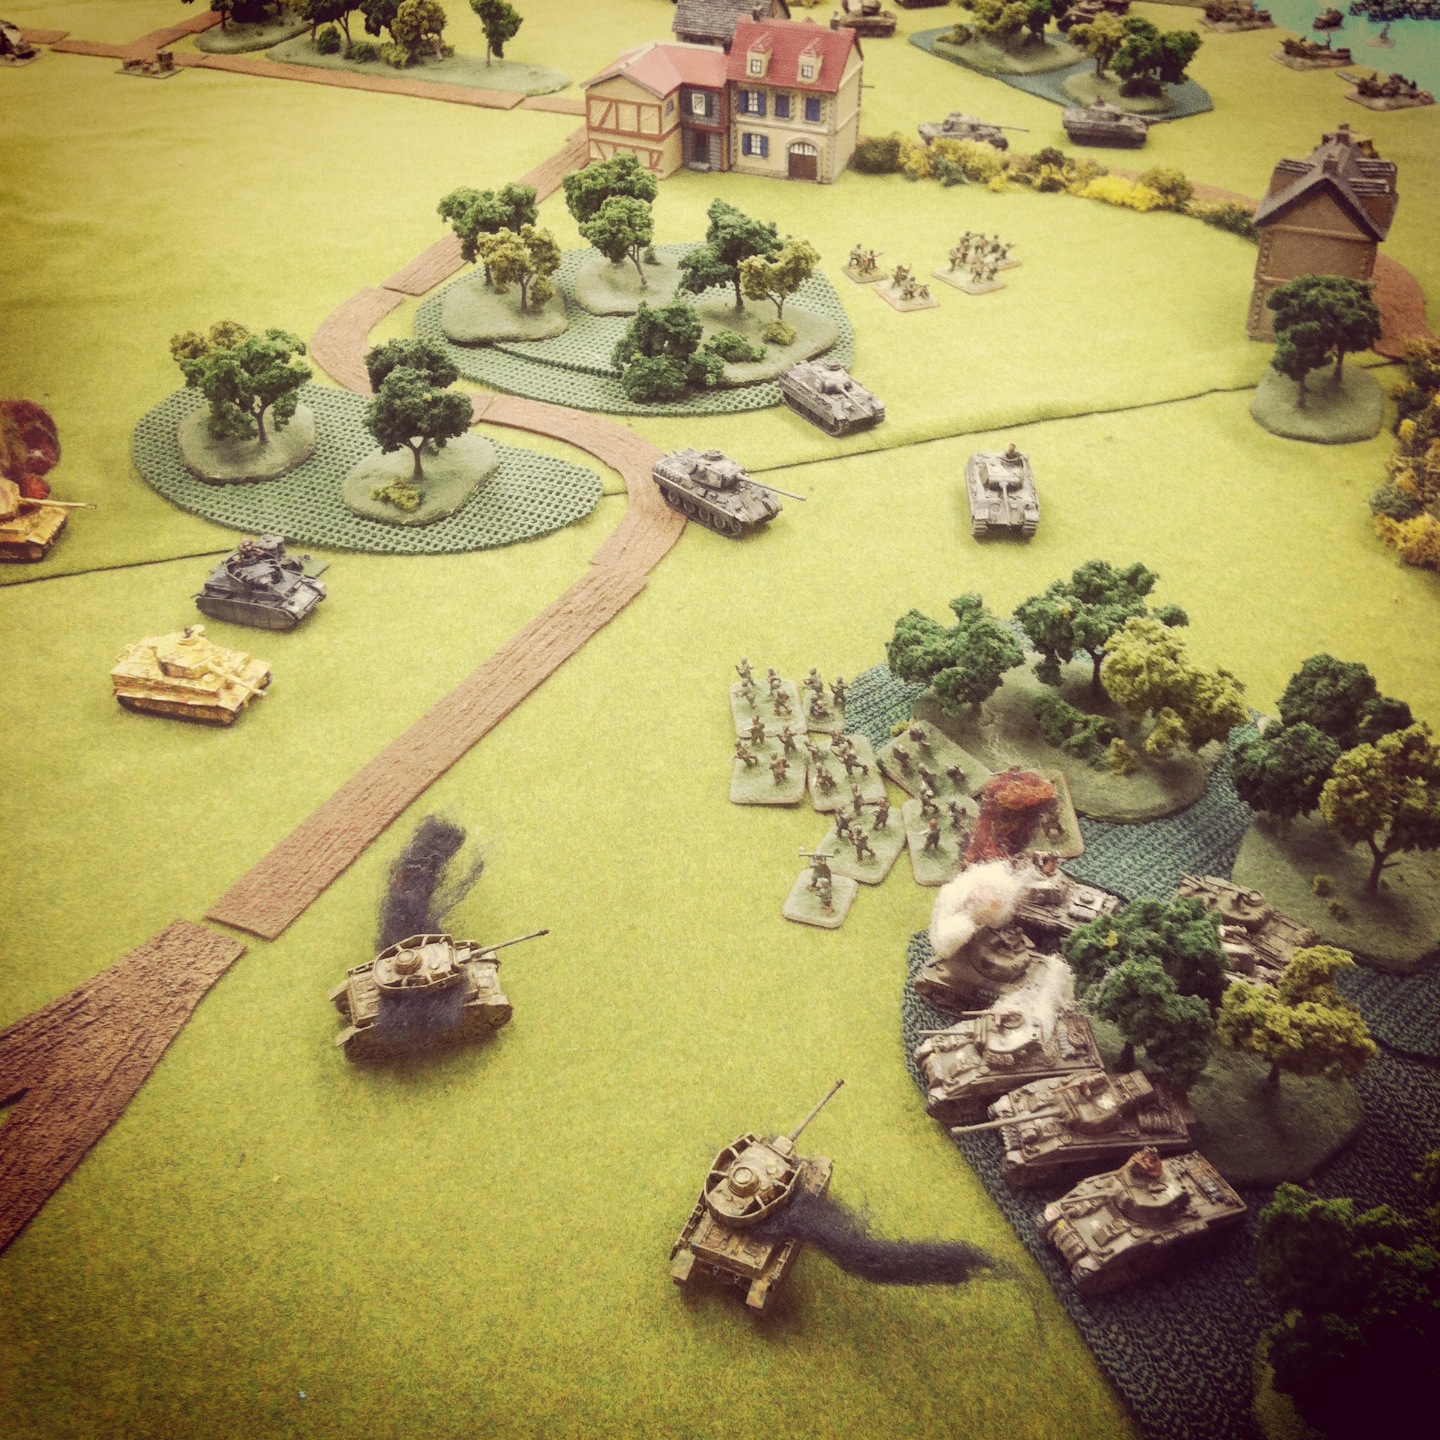
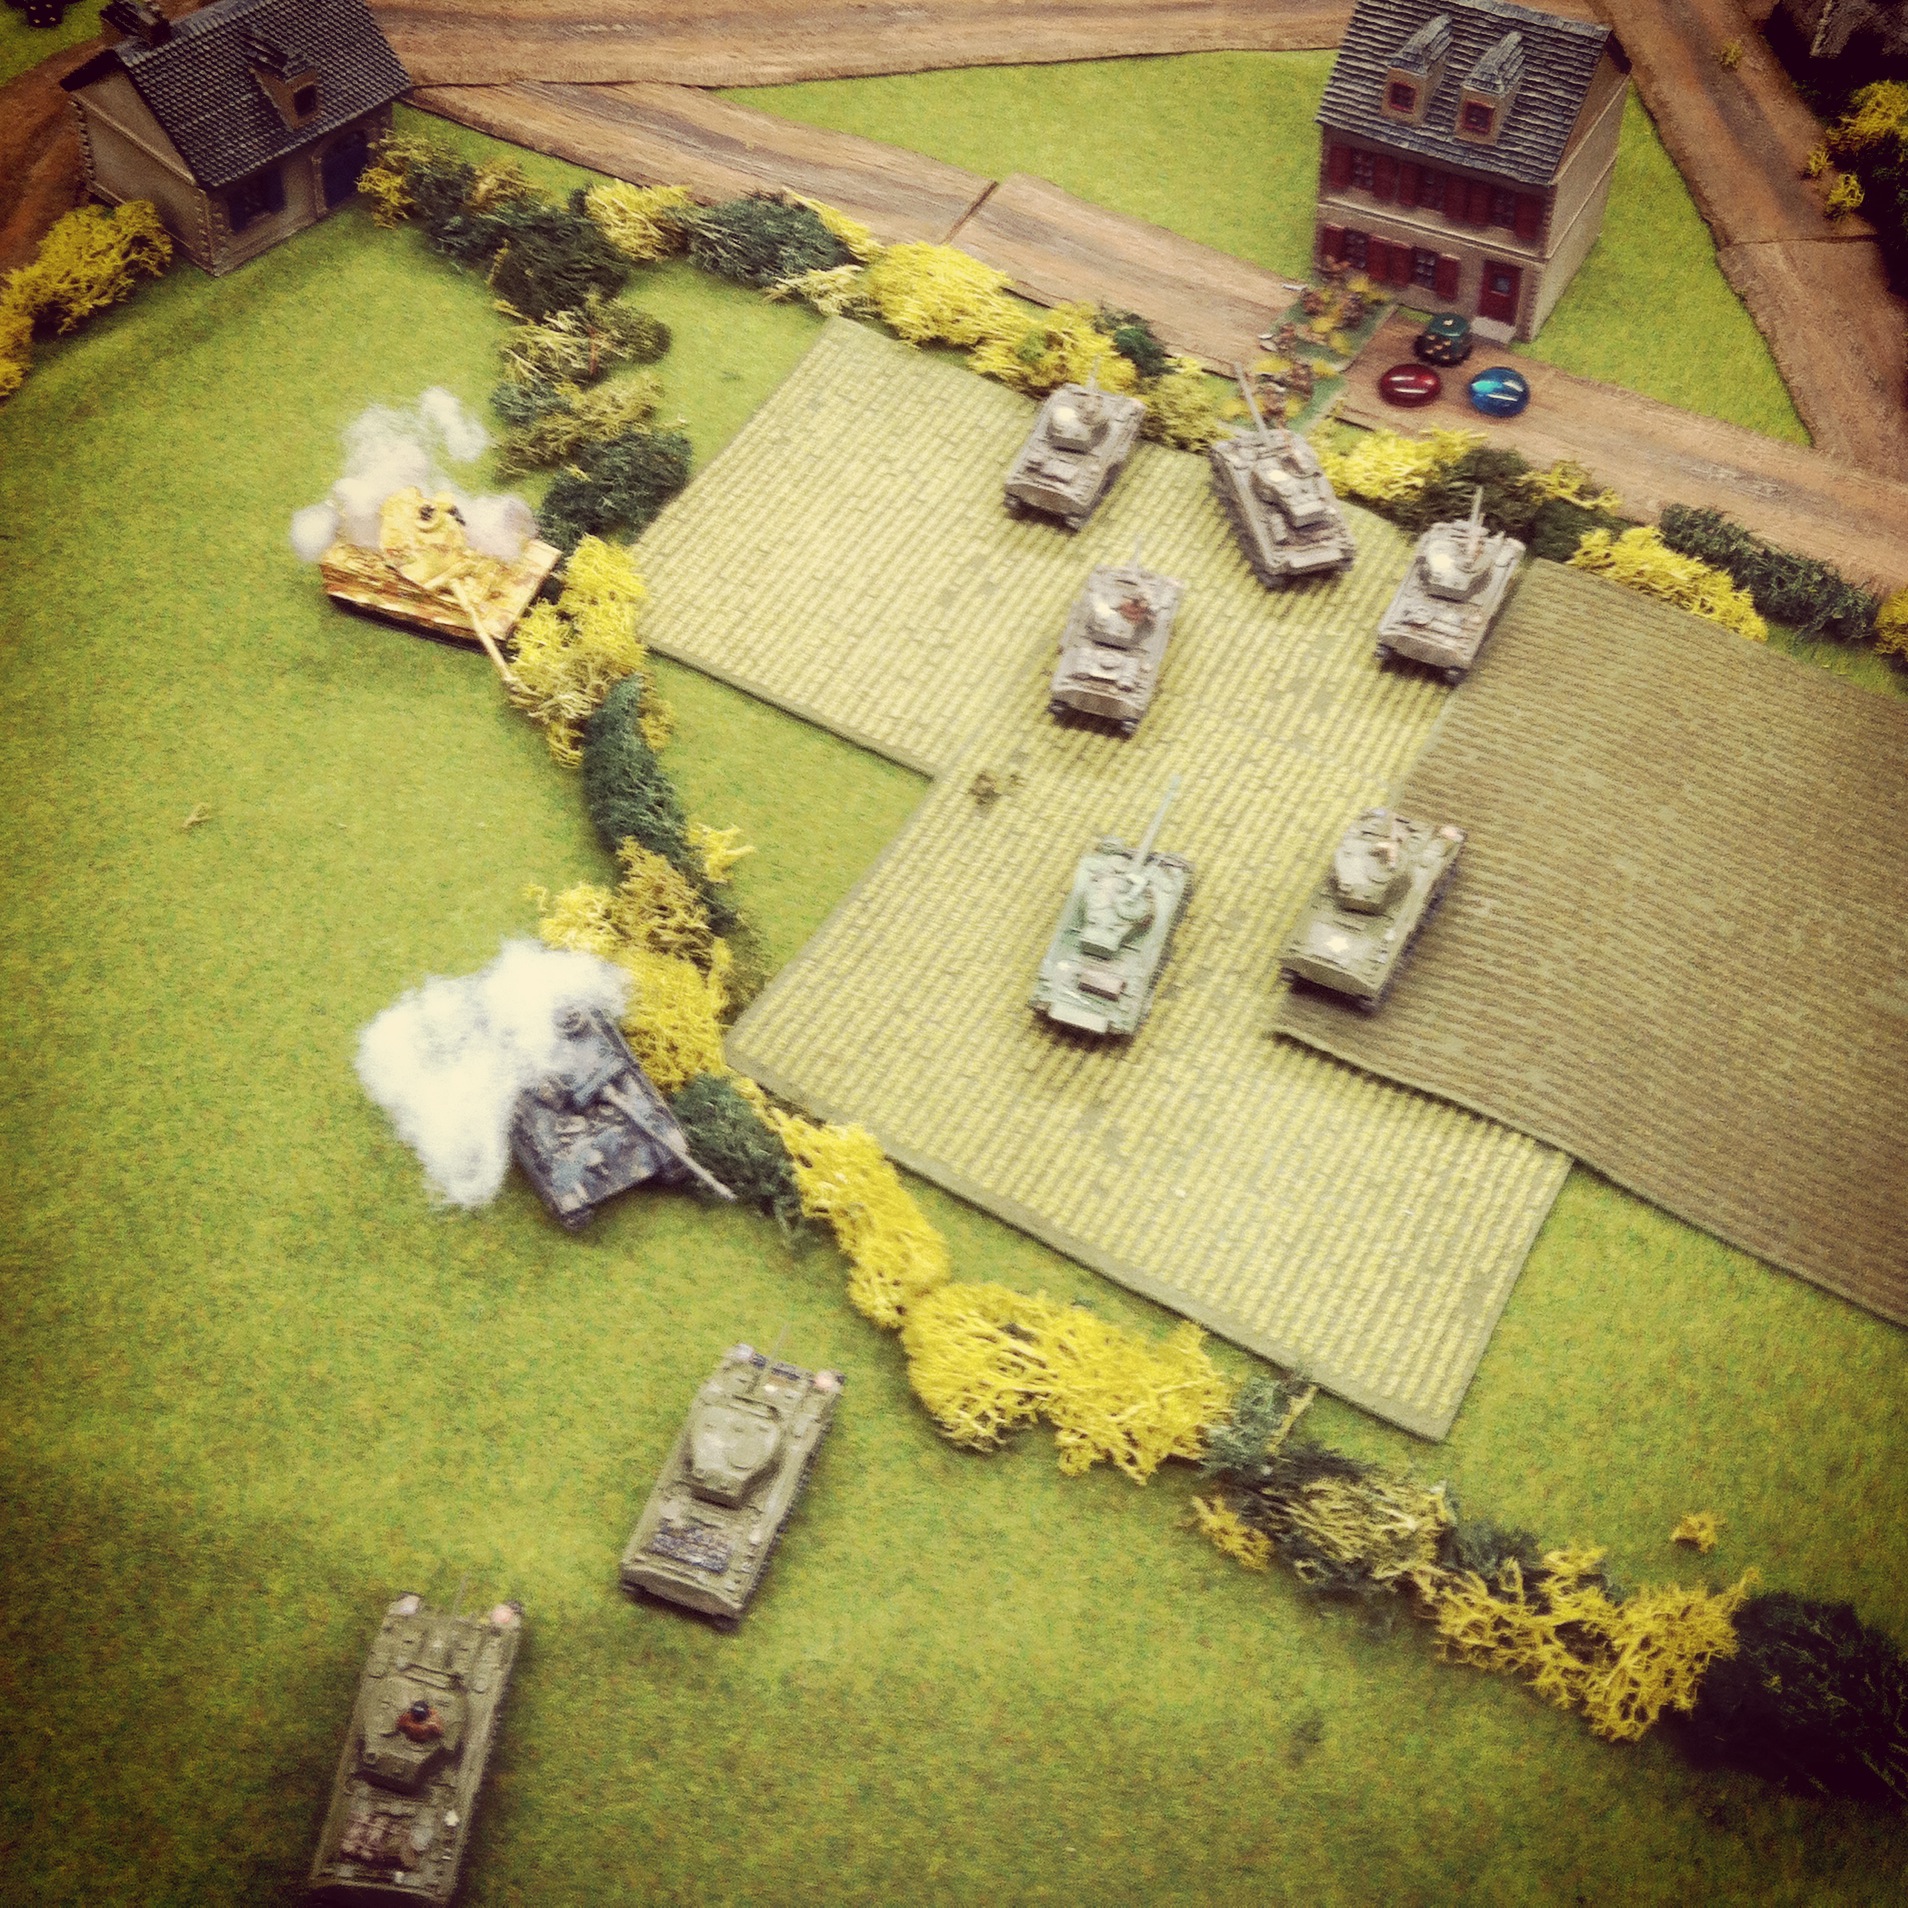
Canadian and German tanks exchange fire to the southeast of Saint Lambert-Sur-Dives

At the farm to the east, a game-long tank duel erupted with the Canadian Shermans and Firefly tanks firing from positions behind the French farm’s buildings. The German Panther and Tiger fired from light cover of a hedgerow over the fields beyond. In two turns of fire, the Panther sat in flames and the Sherman platoons were able to focus on the Tiger which unsuccessfully returned fire over repeated tries. One Panzer IV shot harrassingly at the Sherman platoon closer to town which was forced to turn its guns away from the Tiger to return fire.

IMG_4100With German armor aflame, Canadian tanks roll to seize the objective

Back at the town’s center, the Canadian infantry took heavy casualties from German rifles shooting from building windows and the Panzer IVs firing from the orchard. The breakthrough for the Canadians came as the Tiger was destroyed and the Shermans were able to fire up their engines and make way across the fields. Turning the Sherman and Firefly guns to the orchard, the Panzer IVs were quickly destroyed. One more fresh German rifle platoon finally moved to occupy buildings in the town, but by then the path was wide open for the Canadian armor to roll unmolested to the crossroads objective and victory.

This was our first IABSM game using a lot of armor, and the unbalanced number of Canadian tanks firing and moving without a single loss clinched the game for the Allies. The veteran Canadian rifles had also served their purpose of locking down the town in a pitched battle with their numbers and quality allowing them to hold out against their German foes.

Seventy years ago at Saint Lambert-Sur-Dives the German surrender was captured by a a film crew, and bits of the film survive today (see below). The exploits of the Canadians in the Falaise Pocket led by Major David Currie helped seal victory for the Allies after months of fighting in Normandy, and his miniature tank crews won the battle again on our tabletop historical repeat of this important victory at one more crossroads in the French countryside.

Newsreel footage of Canadian troops in action and the German surrender at Saint Lambert-Sur-Dives in August 1944

Flames of War: Fielding the FOW M10 Tank Destroyer Platoon

m10

The Blitzkreig of German armored forces is one of the more enduring tactics introduced in World War II. Swarmed masses of German tanks and mechanized forces in the early war period rolled through Poland, France, Belgium and the Netherlands in Western Europe and punched into the Soviet Union with Operation Barbarossa in 1941. With early Panzer and later Panther and Tiger tanks ruling the battlefields of Europe, Allied forces struggled for solutions to crack the German tide of iron.

m10normandy

A US M10 tank destroyer comes ashore in Normandy after D-Day in 1944

By mid-war, the Americans had a solution with the M10 tank destroyer. Introduced first into the battlefields of North Africa in 1943, the M10 GMC (“gun motor carriage”) carried a big 3-inch/76mm gun and on a Sherman hull. After success in Africa against earlier model German tanks, M10s became part of the post-D-Day Allied breakthrough campaign. While effective against Panzer III and IV tanks, more heavily-armored Panther and Tiger tanks still proved problematic. Luckily, the M10 was supplemented by the British-modified Sherman 76mm Firefly and the later US-built M18 Hellcat which was quicker on the field. The combination of these three tank destroyers, along with the stalwart work of Allied infantry and deadly air support, turned the tide in Europe.

fowm10set

One of my earliest 15mm WWII purchases years ago, and somewhat at random, was the now-discontinued M10 Tank Destroyer Platoon set from Flames of War. I think at the time, I just liked the look of the models and I was looking to fill-out my new US forces with more variety. To get to a full platoon of four M10s, a fellow club member at Metropolitan Wargamers in Brooklyn, NY recently gave my two more M10s to which I’ve added an additional M20 scout car.

IMG_3389New M10 tank destroyer and M20 scout car

IMG_3388New M10 tank destroyer

IMG_3387New M20 scout car

IMG_3390US tank destroyer platoon with new models (left) and older models (right)

With my existing and new section sections, I now can field a full tank destroyer platoon using a variety of Allied Late War European lists. Anti-tank tactics in the game provide multiple opportunities for the M10 platoon to be used in combination with infantry and other Allied armor on the game table. With optional deployment as a recon platoon using the M20 scout cars, the M10s can create ambushes to wreak havoc on German tanks. Admittedly, using this full platoon will take some practice but I’m certain they’ll be causing headaches for my German opponents in the very near future.

Flames of War: Metropolitan Wargamers Tanksgiving 2013

Tanksgiving PicAbout ten of us at Metropolitan Wargamers in beautiful Park Slope, Brooklyn kicked off the holiday season this past weekend with a day of WWII armored action in conjunction with our first Flames of War Tanksgiving event. The official rules for the event called for 1500-point companies facing off in multiple games throughout the day. Given we had so many new players interested in playing their first games of Flames of War, a few of the more experienced players decided to play host with our own forces brought along for the day over two tables.

FFAMissionThe bigger of the two tables featured Allied forces facing off against Germans in a Late War Western Europe scenario. The Flames of War website offers a group of basic missions of increasingly-complex scenarios, each easily playable in about three hours. Given we were dealing with an entry-level game, we went with a beginner-friendly Free-For-All mission with two 1500-point companies on each side.

IMG_2442Allied defenders (left) and German attackers (right) deployed

Since this was a tank-focused game, we went easy on terrain with just a smattering of wooded areas, buildings and fields spread over the table. The Allied forces defended, beginning on the side of the table defined primarily by a small river crossing bridge on the Allied right and a field and nearby farmhouse on the Allied left.  On the attacking German side of the table, a walled farm complex surrounded by a tree-lined road sat to the German left and a group of wooded areas to their right. A small town was situated squarely at a crossroad at the center of the field.

IMG_2446Guards Armoured and 101st Airborne started in the farm field

The British Guards Armoured Company began near the farm at their left, deploying its Sherman and Firefly tanks along with one platoon from the US 101st Airborne. Near the bridge, the US 4th Armored Company set its 75mm and 76mm tanks and finally deployed its 105mm artillery platoon at the center of the table edge hidden behind a copse of trees. The Germans deployed Panzer IVs, two Tiger tanks and a Grenadier platoon near a forest at their right. A large group of Panthers started near the center behind the small town with a supporting dismounted Panzergrenadier platoon on their left and a two-tank Panther command platoon at their extreme left.

IMG_2444US 75mm and 76mm Shermans tanks at the bridge near the German objective

With the German player starting things off, their main thrust of Panthers moved toward the center of the table while their Panzer IVs and Tigers made a move looking to shutdown to the advance of the Guards Armoured and US airborne troops. The Panzergrenadiers made their way for the walled farm and the treeline at the neighboring road, and the commanding Panthers looped around the farm toward the river and the American right flank.

IMG_2448A Tiger sits burning after being hit by a Firefly

On the Allied first turn, the 101st Airborne made a beeline for the neighboring forest across from the field while tanks rolled into the gap between the forest and the field. A lucky opening shot from a British Firefly took out a German Tiger, providing one of the only bright spots for the Allies during the entire afternoon. The spotter for the US howitzers ran for the cover of the town’s buildings while the mass of American tanks on the right split to hold off the center German advance as well as the German command section’s coming end-run at the river.

IMG_2453The Armoured Guards take ferocious fire from the German tanks

In the second and third turns, the German players began running the table to their victory. A concentration of fire into the town destroyed the US artillery spotter, effectively shutting down any good chance of Allied artillery support. The Tigers began laying waste to the line of advancing Shermans in the field and rolling in the open. A failed assault on the German tanks by the 101st Airborne out of the woods stalled under a hail of machine gun before it began, but the Guards Armoured managed to route the Panzer IVs off the board and whittle-down the Grenadiers making their way between the town and farm house nearby.

IMG_2460Panzer IVs and Shermans aflame as the 101st Airborne sprints across the field

By the fourth turn, German infantry making their way through the open both for the bridge and objective near the American artillery were mowed down under heavy machine gun fire from the US Shermans. Finding a gap amid the tank fight around them, the 101st made a dash to the next forested area while German tanks poured more fire into the British armor at the rear. At the bridge, American 76mm guns managed to destroy one command tank and bail the crew from the other. Unfortunately, the remnants of the American armor were outgunned and entangled in the burning shells of their comrade’s tanks. With nothing left to stop the advance, German tanks rolled to the center and seized their objective.

IMG_2458Nothing left to stop the German advance to victory

While things raged away on the European table, an Early War showdown between 1500-point British and Italian forces in Africa dustily clamored away one table over. You couldn’t get a more different game with less advanced equipment and differently skilled troops battling in a desert environment laced with prepared defensive positions. Since most of my gaming has focused on Late War Europe, the earlier war stuff fascinates me and I’m definitely going to make some time to try my hand at this other period soon.

IMG_2440Early War Italian and British desert action at Tanksgiving in Brooklyn

As it turned out, the Italians took the game on the Africa table, making our first Tanksgiving event a 2-0 victory for the Axis powers. I learned a mass of German armor is really hard nut to crack unless you’ve got some effective artillery and enough infantry to assault and push to an objective. Every game under my belt gives me ideas for the next. Win or lose, I think a few hours of playing may have hooked a couple new players on Flames of War. For that, we’ll all be thankful as we deploy our platoons for another game very soon.