On The Trail of the Sullivan-Clinton Campaign

SullivanClintonMap

As I’ve written here many times before, I grew up amid the fields of great wars which shaped world history for more than two centuries hence. These conflicts of the 18th-century — the French and Indian War and the American War of Independence — partially played out in my childhood backyard of Western New York State. It was there in the 1750s-1780s where the European powers of France and England, many American indigenous civilizations and upstart Colonial settlers clashed over the continent savagely and ultimately formed the North American continent we know to this day.

A few months ago I had occasion to journey back again from my current home in Brooklyn to my original hometown in the Genesee Valley of Western New York. In doing so, I was able to partially retrace the movement of once-great alliances of armies and tribes of 1779.

Idealized images of the American War of Independence

Tracing the route of the Sullivan-Clinton Campaign uncovers some of the complexity to the story of the American Revolution and the country’s creation myths. Like most Americans, my view of the War of Independence was shaped at an early age with idealistic impressions of the era, its events and its legendary personalities — the Boston Tea Party, the Boston Massacre, Colonial Minutemen firing at British Redcoats, Paul Revere’s ride, Washington crossing the Delaware River, Betsy Ross sewing the first American flag and Molly Pitcher at the Battle on Monmouth. The portrayal of history with a heroic flourishes is not uncommon for sure, but stops along the Sullivan-Clinton Campaign route boldly reveal where many of our gaps between legend and reality persist in how we interpret our history.

The Sullivan-Clinton Campaign

IMG_7308

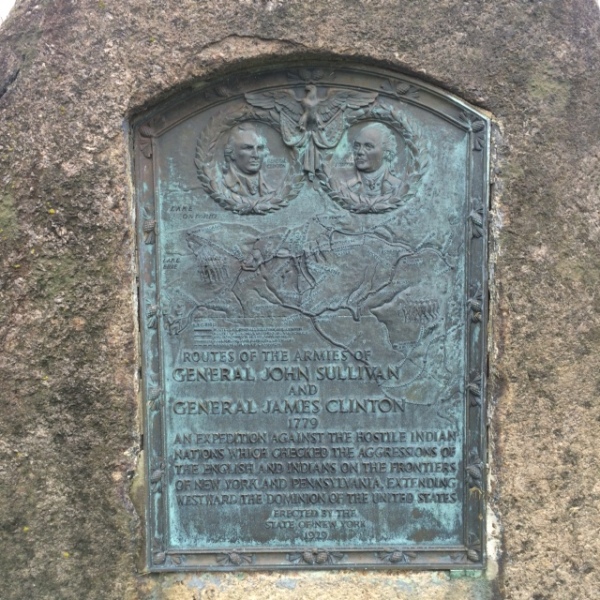
Monument to the Sullivan-Clinton Campaign erected at various sites throughout the region on the 150th anniversary in 1929

By the summer of 1779, the American Revolution was at its midpoint. The surrender of the British at the Battle of Saratoga in October 1777 encouraged France to join the war in 1778. Even with much-needed support flowing to the Colonies, the alliance between the Iroquois Confederacy and the British was holding the New York State frontier in the hands of England. Encouraged by British and Tory sympathizers operating from Fort Niagara across Western New York, the Iroquois harassed and killed settlers in the Mohawk Valley and also provided support to the British army in the form of food supplies.

In retaliation, General George Washington set his eyes on crushing the Iroquois alliance to “war upon them in their own style; penetrate their country, lay waste their villages and settlements.” The task was assigned to Major General John Sullivan with Brigadier General James Clinton acting as second in command. Sullivan set off northwest from Easton, PA and joined Clinton at Tioga near present day Athens, PA at the New York border in August 1779. Against military tradition, Washington assigned a major portion of the Continental Army (four brigades of over 4500 men) away from the front against the British. Committing such a sizable amount of men and supplies to the back country campaign points to the importance Washington placed on the mission.

Newtown Battlefield

NewtownMap

Setting out from their encampment on August 26, 1779, the well-supplied columns of the Clinton-Sullivan force marched along the Chemung River. Three days later, the expedition encountered Royalist forces comprised of a handful of British regulars, a couple hundred Tory militia and perhaps 1000 Iroquois warriors lying in wait in well-hidden earthworks.

IMG_7343

A view from atop the Newton Battlefield park

The militia at the Battle of Newtown were the famed Butler’s Rangers, commanded by Loyalist John Butler. Butler’s relationship with the British stretched back to the French and Indian War with his irregular troops participating in a number of key battles in Upstate New York and the Northeast region. Known for their green jackets and tactics which departed from standard 18th-century European line fighting, Butler’s Rangers were well-adapted to fighting in the thick woods of the American frontier. Leading the Iroquois at Newtown was Joseph Brant, a Mohawk who had likewise begun his military career fighting alongside British forces in the French and Indian War.

IMG_7347

Monuments to John Sullivan and the battle at Newtown Battlefield

Despite their dug in positions, Loyalist forces were greatly outnumbered at Newtown and a plan was quickly devised by Sullivan once the enemy’s presence was revealed. With Colonial cannon fire pouring into Loyalist positions, flanking troops were sent east and west. Despite relatively low casualties on both sides, the Loyalist forces ceded the field. The Battle of Newtown, the largest engagement of the Sullivan-Clinton campaign, left a lasting impression on the Iroquois in particular who retreated from the Colonial’s guns and superior numbers.

Groveland Ambuscade

AmbuscadeMap

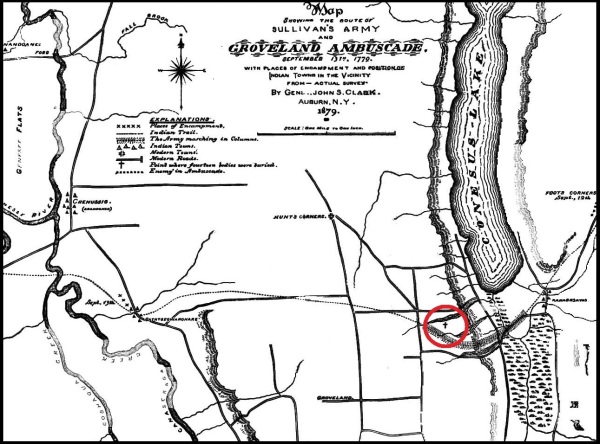
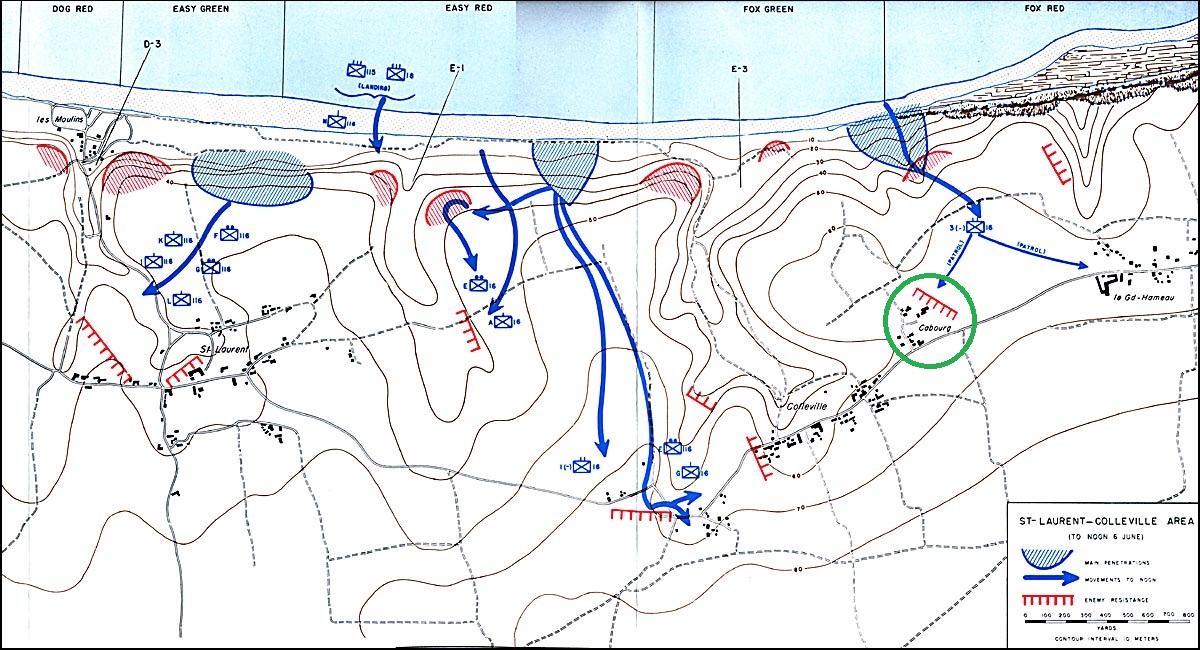
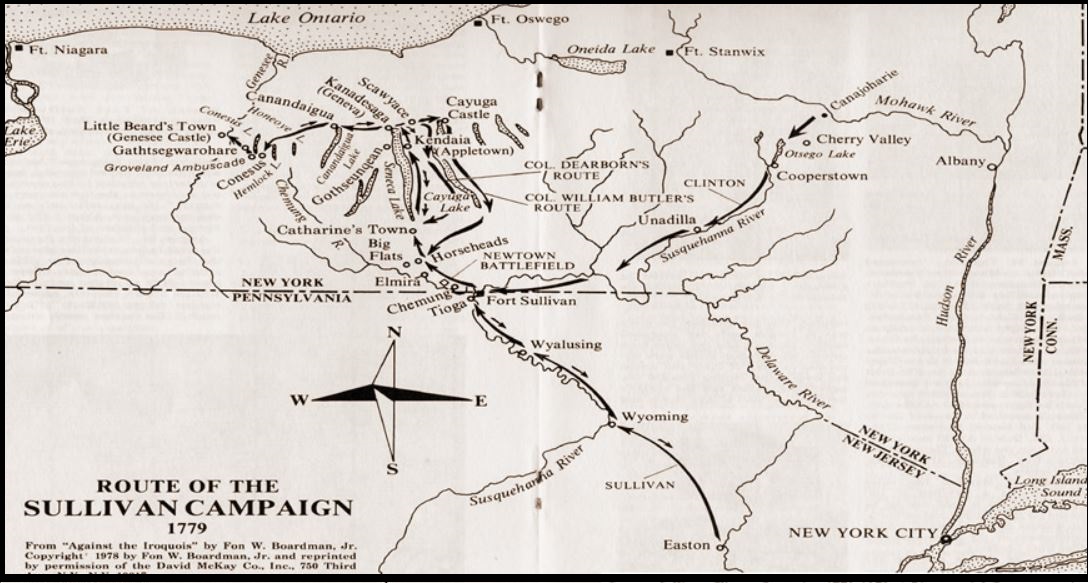
 Map of the Genesee Valley and the site of the ambush of the Boyd-Parker expedition on September 13, 1779

After Newtown, Sullivan and Clinton continued marching northwest. With the Iroquois on the run westward, the Colonials cut a swath of destruction against largely civilian tribes people. Fields of crops were cut down and dozens of villages were burned. What we would deem today as atrocities were meted out on the Iroquois population of the Finger Lakes Region with Washington’s orders of a scorched-earth mission delivered mercilessly.

IMG_7301

Roadside sign to the Groveland Ambuscade

By mid-September 1779, the Sullivan-Clinton expedition had reached up through the Genesee Valley. In the dense terrain differing from the wider fields of Newtown a month prior, the Colonials were slowed and at a disadvantage without opportunities to use their cannon effectively. On September 12, Clinton assigned Lt. Thomas Boyd, Sergeant Michael Parker and just over 20 men to find the Iroquois village of Little Beard’s Town. Lying again in ambush were Butler’s men and hundreds of Senecas.

FullSizeRender

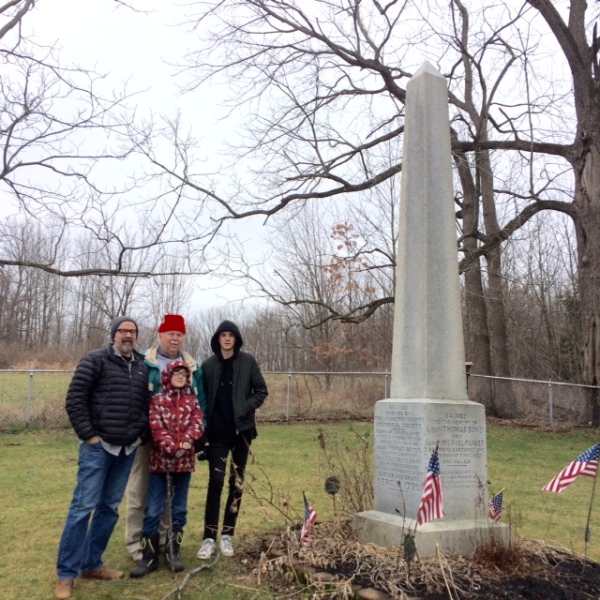
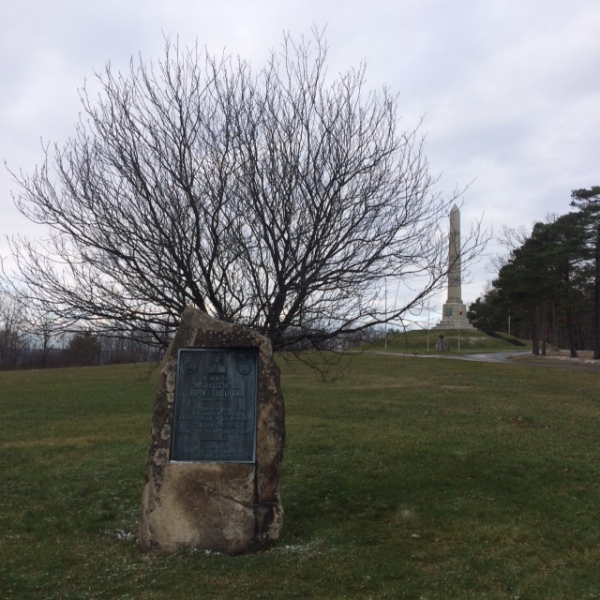
Me, my father and sons at the Groveland Ambuscade monument

The following morning on September 13, 1779, Boyd’s scouting party engaged in a brief gunfight with a half-dozen Senecas near Conesus Lake and present-day Groveland. Against the advisement of his guide, Boyd pursued the Indians into a trap where they were quickly surrounded by Butler and Brant’s large force. In the ensuing ambush, about a dozen of Boyd’s men were killed. As the smoke cleared, another twelve men were captured along with Boyd and Parker themselves. Today, the Groveland Ambuscade park and monument marks the place of this quick and yet bloody skirmish.

Boyd-Parker Park

BoydParkerSign

Historical marker at the Boyd-Parker “torture tree” site in Cuylerville, NY

The captured Colonials were led to nearby Little Beard’s Town some five miles west of the ambush near present day Cuylerville, NY. After enduring a summer of unrelenting viciousness at the hands of the Sullivan-Clinton campaign, Brant was anxious to confront his now-imprisoned enemies face to face. With his questioning over, Brant left the men to the Senecas who tortured and killed Boyd, Parker and all but one of their men.

IMG_7306

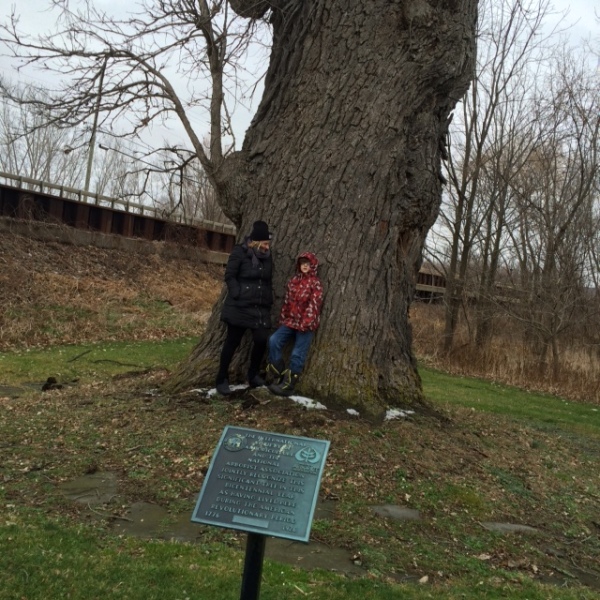
My wife and son at the Boyd-Parker “torture tree”

The centerpiece of the present day Boyd-Parker Park is the infamous “torture tree.” Soaring over 70 feet high and some 24 feet in circumference, the 250-year-old bur oak tree is a direct living link to the past events of the valley centuries ago. While legend has it the tree is the actual spot where Boyd and Parker met their end through horrendous acts of torture, the name is dubious since no actual documentation exists to prove the exact tree’s location.Two days after the deaths of the Boyd and Parker’s group, Sullivan’s main force arrived to destroy Little Beard’s Town and bury their comrades.

BoydParkerShrine

One of many plaques at the Boyd-Parker park

In the weeks following the events in the Genesee Valley toward the end of September 1779, Sullivan and Clinton’s expedition force began to disband to winter quarters. While a decisive blow had not been dealt to the Iroquois, thousands of Indians were dispersed throughout Western New York and into Canada as winter set in with starvation and disease devastating the already weakened population.

Memory of the Sullivan-Clinton Campaign

Touring the landscapes and monuments of the Sullivan-Clinton Campaign in the Genesee Valley is a remarkable experience. Attempting to place yourself back in a time of a region dotted with large Indian towns, large fields of mature agriculture and scattered white settlers takes a great leap of imagination. The modern plaques and signage along roadsides and memorial parks document the events of 1779 with words like “hostile” and “aggression” applied repeatedly to the Iroquois who peacefully lived their lives for centuries before becoming embroiled in the wars of Europeans and American colonists. On the flip side, the upstart Colonials who set on a single-minded destructive campaign against the locals are portrayed heroically as “undaunted” and sacrificially giving their blood for “American freedom.” Following the trail of history today leads to ongoing battles of a different sort — battles to square the nation’s history myths with the realities of the events of over two centuries ago.

New Game Weekend: The Grizzled

grizzledbox

In June 1914, a member of a group of fringe Bosnian Serbs assassinated Archduke Franz Ferdinand of Austria in an effort to split some of  Austria-Hungary’s territory into a freed Yugoslavia. Through a series of cascading and intertwined alliances, the act of terrorism begat World War I and led to the death of millions.

Over a hundred years later in January 2015, two brothers self-identifying as Islamic terrorists associated with a Yemeni branch of Al-Qaeda forced their way into the Paris offices of the French satire newspaper Charlie Hebdo. The men shot more than 20 people, killing 11 and setting off a nationwide manhunt lasting for two days until the men were found and gunned down.

A month after the 2015 Paris shootings, a WWI-themed card game called Les Poulis was released by Sweet November, a French company which largely produces colorful games geared toward children. Carrying the line “L’amitié plus forte que la guerre?” or “Can friendship be stronger than war?,” the game prominently features the artwork of Bernard Verlhac who drew under the name Tignous and was one of those killed in the attack on Charlie Hebdo the month before. A century apart, the war which nearly destroyed early 20th-century Europe and the modern threat of international terrorism intersected in this curious little game.

Les Poilus is French slang for “infantry” roughly meaning “the hairy,” an appropriate title for a game which focuses on the experience of French soldiers in the trenches of WWI. The game’s designers wrote a manifesto of sorts for the game, here presented in the American printing under the translated title The Grizzled:

At the same level as literature and cinema, games are a cultural media which is undeniably participative.
There are no subjects it can’t broach, though some are more delicate than others. That of the life of the Grizzled is one of those.
Guided by the deepest respect that the suffering endured by these men has inspired in us, we’ve designed and tweaked this game with this constant concern.
In this earnest endeavor we’ve chosen to focus on the individual, with his preoccupations and his daily fears.
The only escape for the men we’ve portrayed is to use their solidarity, their brotherhood, and mutual assistance to save one another.
Without ever touching on the warlike aspect, “The Grizzled” offers each player the chance to feel some of the difficulties suffered by the soldiers of the trenches. Thus the emotions around the table will often be intense.
The path to victory may seem difficult, but don’t get discouraged – persist and survive the Great War!
IMG_7357A player’s set-up from The Grizzled with the Mission Leader marker, Speech and Support tokens and Hard Knock cards

Rather than attempt a grand take on the war, The Grizzled brings the war down to the level of six French friends who mobilize to action in the early August 1914 days when the war still seemed something heroic and noble. The cooperative game presents the soldiers fulfilling a series of missions in an attempt to deplete all the Trial cards covering a winning Peace card before the Morale Reserve cards covering a losing Monument card are used up.

IMG_7358The six Threats from The Grizzled – Shell, Night, Whistle, Rain, Mask and Snow

In each round, the mission’s leader chooses to deal 1-3 Trial cards to each soldier. Trial cards feature Threats of six types — Shell, Night, Whistle, Rain, Mask and Snow — or Hard Knock cards featuring various negative battle effects. In turn, players have a choice of actions. Threat cards may be played in the center of the table’s No Man’s land for the current mission, avoiding playing three of the same type and failing the mission. Hard Knock cards are assigned to the active player with immediate effect, and four Hard Knocks on the same player also causes a loss of the mission. Players can also choose to make a Speech, removing one type of Threat card from all player hands or use their Good Luck Charm to clear a card already played in the current mission.  Finally, players may withdraw from the current mission and assign a Support tile to another player.

IMG_7359The Peace and Monument cards from The Grizzled

Once all players have withdrawn from the mission, support tiles are passed to other players. Players with the majority of the support for that round may clear Hard Knock cards or refresh their Good Luck Charm. Cards are then moved from the Morale Reserve to the Trials pile according to the number of cards players still hold in their hands from the previous mission. With that the new mission leader deals cards and the next round begins.

The Grizzled is a powerful game in a tiny package and one of the most challenging games I’ve played in some time. The collaborating players need to tightly manage their own hands and plays while keeping an eye on all other the other players. As Hard Knocks mount up, effects on one player wind up rippling through the entire group, hindering the collective effectiveness in missions. Clearing Hard Knocks with Support becomes key late in the game but getting Support to the players needing it most also becomes a challenge.

Winning a game of The Grizzled feels like a real accomplishment. In the first week I had the game, I played about 15 games and my group of experienced gamers only won twice. Fortunately, a typical game runs about 30 minutes, so multiple games can be run in a sitting. It’s interesting the original French publisher states the game is for ages 10 and up while the American version from Cool Mini Or Not suggest ages 14 and up. The game’s play is intense but that’s the point, no matter the age of the group.

We’re still in the midst of the centennial commemoration of World War I, an enormously complicated war still argued over to this day. While fully understanding the war’s big picture may be a nearly impossible exercise, getting a view from the trenches in The Grizzled shows how the trauma of violence on individuals or small groups of friends or colleagues is an unfortunate timeless human reality.

Battleground: Bocage HQ Near Le Mesnil-Rouxelin 1944 Scenario

leMesnilRouxelinJune1944

On June 6, 1944, General Dietrich Kraiss and the 7000 some soldiers of his 352nd Infantry Division were at Omaha Beach to meet the Allied invasion. Fighting valiantly against the overwhelming tide of American and British forces, Kraiss and 352nd were stretched thin at the beaches and continued the defense inland for weeks as they fought the Allied advance toward their objective of St. Lo.

LeMesnilStLoMapMap of the area around Le Mesnil-Rouxelin and the US 175th Infantry Regiment June 14-18, 1944 advance

St. Lo was an important crossroads objective which had endured German occupation since 1940. On the morning of June 6, 1944, the city was hit with vicious American artillery bombardments. As the Allies advanced inland after the coastal landings toward St. Lo, the German 352nd and 353rd Infantry Divisions and 3rd Parachute Division formed a line to slow them down. By late July, St. Lo was liberated by the Allies and the 352nd was destroyed. By early August, Kraiss was dead, and the German presence in Northern France was near its end.

SCHeroesofOmahaSkirmish Campaigns “Heroes of Omaha and Panzer Lehr” scenario book

The Heroes of Omaha and Panzer Lehr book from Skirmish Campaigns outlines the eleven engagements during this key period from D-Day to the German counterattack through the Allied breakthrough. This past weekend at Metropolitan Wargamers in Brooklyn, NY we ran through the battle near Le Mesnil-Rouxelin just north of St. Lo on June 17, 1944. With elements of the US 175th Infantry Regiment closing in, General Kraiss and his headquarters quickly assembled an ad hoc force to delay the American advance. In the game, three US rifle squads (each armed with a BAR team) and a lone M4 Sherman must advance and seize the German HQ while being held at bay by several small German teams armed with rifles, Panzerfausts, a mortar and a MG-42. the Americans have to hustle, and they have eight turns to capture the German HQ before Kraiss and his staff can make their escape to fight another day.

IMG_6808Game set up near Le Mesnil-Rouxelin with the German HQ in the distance

With my US Airborne 28mm models standing in for the American infantry, they spent the first few turns moving in from the north and navigating the bocage hedgerows. Two squads and the US HQ moved to the east of the main road, the Sherman ran straight through the middle and one squad edged toward a French farmhouse mid-field. The German machine gun set up at the road edge in the bocage, looking to cover the advance by road or in the thick fields. Other German riflemen spread out along the hedges, looking to create a defense using their thin units and cover to the best advantage.

IMG_6804

US soldiers push through the fields and bocage

IMG_6805

German soldiers edge into position along the bocage

IMG_6806The Sherman rolls straight along the road toward the objective

By turn four, the firing began. Germans along the bocage made an attempt to shoot the Sherman at close range with a panzerfaust but the shot miraculously missed. The Sherman answered with a burst of machine gun and high explosive shots, forcing the Germans to fall back from the hedge and into the field. The Sherman rolled forward and a second squad of Germans emerged from the bocage and rushed the tank, placing three grenades along its left side. With the charges set to blow, the tank moved forward and rotated its turret to light up the exposed Germans with another round of machine gun fire, destroying the entire unit. Just as the smoke cleared, the grenades blew up along the side of the tank, immobilizing it for the game with its weapons still functional and crew left unharmed. Back in the field at the center, the German rifles and MG-42 took up new positions and the two US rifle squads and HQ continued to creep forward in prone positions.

IMG_6807Germans await the Sherman’s advance from their bocage positions

IMG_6809Germans disperse under machine gun fire from the Sherman

IMG_6810Germans bravely close assault the Sherman from the hedgerow

IMG_6813The Sherman is immobilized but still keeps fighting

With game time running short, the Americans in the field stood to fire on the Germans. Two German riflemen fell and the MG-42 crew took heavy fire, knocking it out for a round as the remaining crew scrambled back into position. At the left of the field, a US squad opened up at the Germans stretched along the hedgerow. Leaping the bocage and rushing forward, the Germans vanished in a hail of bullets, opening the route forward to the German HQ ahead. At the same time, Germans fell back along the right side of the field and the Americans ran forward. On the far US right, the third fire team ran forward, using their broken tank as cover as they made an end run toward the German command team in their farmhouse HQ.

IMG_6811
Two US squads and the platoon HQ advance at prone through the field

IMG_6814

US riflemen and BAR gunner fire into the German MG-42 as another American squad rushes forward in the distance

IMG_6815With the German HQ in sight, the US soldiers push hard to their objective

By the sixth turn, Kraiss and his command staff were on the move, making a run south from the safety of the farm where they had sat in cover for the whole game. With the final German defense in the field breaking, Americans broke through toward the farmhouse straight ahead and to both sides. Four remaining German rifles behind a wall and in a small copse of trees at the farm exchanged fire with the Americans, holding off dozens of GIs as Kraiss continued his run for safety.

IMG_6816American and German soldiers come face-to-face at the German HQ

With the final turn eighth turn’s arrival, the Americans finally reached the edge of the farm. After quick series of shots, another German fell but no Americans were able to seize the HQ in time as Kraiss and a couple straggling men slipped off to the south further toward St. Lo..

Our battle at the German HQ near Le Mesnil-Rouxelin presented a pretty good feel for the fighting that occurred in mid-June 1944. With a wave of Allied forces closing in toward their objective of St. Lo, General Kraiss and the other German commanders struggled to stall the advance. With the four-year German control of Northern France at stake, German forces cobbled together a fierce retreating defense. Beginning with the tide of men landing on the beaches and from the air on D-Day, the war had turned inevitably for the Allies.

Flames of War: Fielding the US M1 57mm Anti-Tank Platoon

m157mmIt was clear to the Allies from the early years of World War II that German tanks were a big problem. From the early Panzer models to the medium Panthers and finally to the famed Tiger I and Königstiger, German armor combined with German tactics were major threats to Allies forces throughout the war.

To help counter the German armor threat on the battlefield, the Allies quickly evolved their anti-tank weaponry. Building on earlier. lighter guns, the British introduced the “6 pounder” early in the war. Even before entering the war, the United States began production of its version with the M1 57mm anti-tank gun which it exported for use by UK and Soviet forces. Despite the gun’s mixed effectiveness against the strongest German tanks and only occasional use against infantry, the M1 57mm became the standard Allied anti-tank gun of the war with some 15,000 produced.

I’ve previously modeled the British 6 pounder version of these guns for Flames of War, but I wanted to add some of the American M1 57mm models to my miniatures arsenal ahead of the Sint-Oedenrode scenario I’ll be running at the upcoming Fall In! convention in November. As luck would have it, a member of Metropolitan Wargamers in Brooklyn, NY was getting rid of some extra packs of the models and I picked them up on the cheap.

Getting these assembled, painted and ready for the table was a quick process. After gluing everything up and covering the bases in a layer of filler putty, they got hit with a basic olive drab spray base undercoat. Flesh and equipment details got picked out, and skin was topped off in a flesh wash. The guns themselves received a brown wash and a lightened green highlighted brush coat. The bases were flocked, I added little bits of shrubby and then everything got a matte spray finish.

The resulting four guns and two command stands gives me a lot of flexibility to add these to a lot of forces throughout the late war period I generally play. As a ubiquitous gun on the battlefields of World War II, these M1 57mm artillery pieces are certain to be making a lot of appearances in my games to come.

IMG_0786

IMG_0787

IMG_0789

IMG_0790

IMG_0792

IMG_0788

IMG_0785

I Ain’t Been Shot Mum: Pegasus Bridge and Bénouville June 6, 1944 Scenarios

Horsas

There are thousands of little actions in the history of warfare, and a longtime favorite of myself and other wargamers is the capture of Pegasus Bridge on June 6, 1944. Just minutes past midnight, Operation Deadstick delivered some 180 British soldiers from the 6th Airborne Division onto French soil near two key bridges on the far eastern flank of the Allied invasion during the D-Day invasion throughout that historic day.

DDayOverallMapThe D-Day Allied assault routes with the British 6th Airborne Division drop zone (circled in red)

Landing in the dark in six wooden Horsa gliders with only one casualty and minimal other initial incident, the British soldiers and engineers made quick work of the surprisingly meager defense by about 50 men from the German 716th Infantry Division. With the bridge over the Caen Canal secured and another at the nearby River Orne also captured, the initial mission had been accomplished in quick order.

The mission then shifted to a defensive one for the British at the bridges and nearby Bénouville as the German command ordered a counter attack. Another 200 paratroopers from the British 7th Parachute Battalion landed to join in the occupation but were met by German tanks, mortars and guns. Under German sniper fire at the bridge and with few heavy weapons at their disposal, the British held out in the town amid house-to-house fighting in Bénouville until the close of the first day of the invasion.

Too Fat Lardies, makers of the I Ain’t Been Shot Mum company-level WWII rules, provided scenarios for the actions at Pegasus Bridge and Bénouville in the 2006 Summer Special. Playing the scenarios recently at Metropolitan Wargamers in Brooklyn, NY allowed me to use my recently-completed 15mm bridge model from Najewitz Modellbau and refight one of my favorite little moments in the big history of the war.

The Battle for Pegasus Bridge

Like most IABSM games, the fight at the bridge started with hidden German troops and the British entering the board on blinds. Initial blind placements were randomized through a die roll to reflect the off-board glider landings. Owing to the time just past midnight, spotting of any troops was impossible until units closed with just inches of each other.

IMG_6299Initial set up of the scene at Pegasus Bridge

IMG_6300British charge hard into the German positions

IMG_6301A British fire team splits off to attack the German bunker

Dividing my British force, one platoon rushed into an initial German position, took a few hits in a close assault, fell back but charged back to overwhelm the Germans. The remainder of my force (including my engineers) moved slowly, clipped a path through barbed wire and made its way toward the concrete bunker. A brief firefight at the bunker sent the German defenders fleeing toward the canal, the engineers placed their explosives and the rest of the British made way for the bridge.

IMG_6302German troops flee their bunker as the British cut the wire and push onward

IMG_6303British engineers set charges at the bunker as German machine guns open fire across the canal

As the German bunker went up in and explosion of flame, German machine guns revealed themselves on the opposite side of the bridge. Two sniper sentries also appeared and began harassing the advancing British with fire. To clear the way, a British officer took a heroic run at one sniper, capturing the German where he sat.

IMG_6305The bunker burns, the British head over the bridge but take shots from German snipers

IMG_6304A thin line of Germans look to hold off the advancing British

IMG_6306With the Germans in retreat, the British take Pegasus Bridge

With the bunker aflame, the British marching over the Bridge and the thin German defense starting to run, the British had again made quick work of their mission. The bridge was held, but it was on to Bénouville and the inevitable German counterattack.

The Battle for Bénouville

At Bénouville British blinds moved on to the table for six turns, stalling briefly in turns four and five. Taking up occupying positions in the town, the mission was to simply hold against the coming German counterattack. As German blinds began entering the field in the woods and open areas outside the town, the initial British infantry were supported by slow-arriving reinforcements to the rear.

IMG_6307Initial set up of the scene at Bénouville from the British end of the table

IMG_6308British blinds enter and occupy the town

Attacking from a safe position within two buildings, the British over zealously abandoned their defensive mission and attacked to reveal the closing German blinds. In a close assault, the British were thrown back as reinforcing German heavy machine guns and mobile guns moved in. Taking fire from the German guns at close range, the remaining British defenders in the nearest house answered with a side-armored shot from a PIAT which left one German gun burning but the Germans still on the advance.

IMG_6309German troops advance on the town supported by mobile guns

IMG_6310Germans swarm out of the woods toward the British defenders

IMG_6311A British PIAT takes out a German gun

The licky destruction of one German gun was about the last thing to go right for the British. Additional reinforcements were tardy in their arrival as Germans continued to pour into the town. As the Germans set up positions amid the town’s houses, two towed field guns also rumbled into the town. Additional close combat erupted between the buildings with the British continuing to take heavy casualties and losing more ground.

IMG_6312German artillery is towed into the town

As British reserves continued to fail in their arrival, the Germans pressed on. After initially holding four safe positions in the buildings of Bénouville, British positions continued to evaporate and men fell back under continued German combined arms fire and close assaults. By that time of the game, it was clear the British were not going to hold the town and the German counterattack was clearly on its way to victory.

Our final score in the played action at Pegasus Bridge and Bénouville was 1-and-1. The early success at the bridge had not been capitalized upon by the British at Bénouville, upsetting the historic balance from 1944 but still making for a great afternoon of gaming a favorite scenario for the first time.

Battleground: Brecourt Manor 1944 Scenario

brecourt1944

This year’s 71st anniversary of the Allied invasion of Normandy on June 6, 1944 didn’t get the same attention as last year’s full weekend of D-Day gaming at Metropolitan Wargamers in Brooklyn, NY. Even so, a few of us did come together for a quick run through a gamer favorite small-scale battle at Brecourt Manor.

101stABDDaydropsDrop zones of the US 101st Airborne on June 6, 1944 and the area around Brecourt Manor (circled in red)

Made famous in more recent years in the hit HBO series Band Of Brothers, the action at Brecourt Manor by a couple dozen men from the US 101st Airborne has long been a favorite for military historians and a textbook example of a small-scale assault on a heavily defended position. With four 105mm howitzers firing on Utah Beach, the German gunners were defended in a series of shallow trenches by several MG42 heavy machine guns and a number of infantry. Through surprise and quick movement through the trenches, the US Airborne quickly took the position and disabled the German guns.

IMG_6037

Skirmish Campaigns  “Normandy ’44 – First Hours” scenario book

For our replay of Brecourt Manor, we turned to the classic Normandy ’44 – First Hours scenario book from Skirmish Campaigns. The Skirmish Campaigns series of books offers well-researched and detailed campaign scenarios filled with orders of battle, terrain layout maps and deeply descriptive narrative of how actual engagements unfolded during World War II. Adaptable to a number of rules systems, the scenario as outlined in the book scaled nicely to our game. Using most of my recently painted 28mm German and US troops and classic Battleground WWII skirmish rules, we were set to replay Brecourt Manor.

IMG_6025The 101st Airborne plot their assault on Brecourt Manor

Two players split their command as the US Airborne and set their battle plans before my Germans deployed in the trench system. Beginning German positions were defined by four gun emplacements each crewed by a team of five rifle-armed gunners and an officer. I also placed three MG42s at different points in the trench lines and one patrolling battery command squad of four riflemen and two officers deployed at the western end of the position.

IMG_6027Germans sit at the ready in their positions at Brecourt Manor

The Americans moved first, slowly deploying a .30 cal machine gun crew from behind the farmhouse at the northwest corner of the table. Directly to the north, a bazooka team crept into position behind a copse of trees with two fire teams behind the nearby hedgerows in support. To the west and toward the south, the other two US fire teams set up and moved toward the German lines, also under cover of the thick bocage.

IMG_6026105mm gun crews stand at the ready

Spotting the American bazooka team to the north, I quickly redeployed one of my machine guns to hold back the advance on that side of my position. Not waiting to get their machine gun in place, the Americans advanced on two sides and took heavy fire to their fire teams leaving them pinned in place. Hoping to pin down the Germans at the strongly defended north and western edges of the position, the US machine gun attempted to lay down a stream of fire but jammed is the trigger was pulled on its first shot of the day.

IMG_6029A 105mm gun position is destroyed by an American bazooka

Even under fire, the US bazooka team managed to get into place and a shot destroyed the northernmost howitzer, killing one German gunner and suppressing most of the rest of the gun team. On the western side, another of my redeployed machine guns was instantly spotted and raked with American gunfire and all but knocked out of the rest of the game. With only one MG42 left in the western trench line, a US Airborne team moved with over confidence toward making their first assault. The foolhardy bravery of the Americans was met with combined arms fire from my remaining MG42, rifles at the gun position and shots from the command squad. When the smoke cleared, one American fire team was left with just one man standing and the other had been briefly pinned.

IMG_6028   US Airborne units ready for a close assault at Brecourt Manor

By turn three, the American machine gunners cleared their jam and were finally able to lay down strafing fire along the entire western edge of the German trenches. With bullets whizzing overhead, the Germans were forced to the ground and the remaining Airborne came over the hedge and made way for the German howitzer. The Airborne soldiers poured into the German gun position and hand-to-hand combat ensued leaving two Germans and two Americans dead in the melee. With no clear victory in the first close combat of the day, the Americans bounced out of the German position, pulling back toward the hedges from where they had just come.

Back to the north, the American bazooka team had been cut to just one man who had retreated under heavy fire. One other US rifle team at the north had been eliminated, and the last had been whittled to just two injured men. With just a few rattled troops strung along two sides of the field, the US Airborne retreated and left three guns ready to continue raining shells on the beaches in the distance.

What the scenario showed us, as it did on the actual day some 71 years ago, was the importance the US machine gunners in a tight assault like the one at Brecourt Manor. Met with a larger, more well-defended German force, the American machine guns were the equalizer in real life. Had the American soldiers on our tabletop focused their assault after pinning the German defenders, our game this month may very well have gone the way of history with another victory in the hedgerows of Normandy.

28mm: US Airborne Pathfinders And Characters By Artizan Designs

USABcharacters

Among the US 101st Airborne Division, the volunteer pathfinders were a particularly hearty group. Parachuting into France just after midnight on June 6, 1944, the pathfinders were among the first allied troops to set foot on French soil as the D-Day invasion commenced. Tasked with marking the drop zones, the mission of the pathfinders was hampered by poor weather, heavy German defenses, flooded fields and faulty equipment. Despite the challenges hampering the pathfinders on the ground, the Allied air invasion of more than 13,000 men behind the beaches of Normandy proved key to the day’s success.

ADlogo

In continuing to round out my 28mm US Airborne collection, I went back to Artizan Designs for their pathfinder models as well as some additional characters. Two of the pathfinders feature the signature mohawk hairstyles and I added “war paint” markings on their faces as seen in some historic photographs. The other character models will serve as officers since their poses display confidence in command.

AB Paint Scheme

Painting 28mm US Airborne

  1. Clean flash from metal models with a sharp knife and glue to metal washer or plastic bases.
  2. Apply filler putty to bases. When dry, scrape off excess with a sharp knife.
  3. Base coat models and bases with flat black spray primer.
  4. Paint uniforms and bandages on helmets with Tallarn Sand.
  5. Paint helmets and knee and elbow patches with Waaagh! Flesh.
  6. Paint faces and hands with Tallarn Flesh.
  7. Paint webbing and packs with Baneblade Brown.
  8. Paint bases, boots, gun stocks and helmet straps with Dark Brown.
  9. Apply Agrax Earthshade wash to uniforms, helmet netting, webbing and packs.
  10. Mix 50/50 Baneblade Brown and Off White and lightly dry brush packs, webbing and socks.
  11. Lightly dry brush bases, gun stocks, helmet netting, holsters and elbow and shoulder patches with Baneblade Brown.
  12. Paint metal gun parts with black and finish with a light dry brush of metallic silver.
  13. Paint eyes with small dots of Off White and Dark Brown. Clean up around eyes with Tallarn Flesh.
  14. Mix 50/50 Tallarn Flesh and Off White and brush highlights on cheekbones, chins, forehead, nose and hands.
  15. Cover bases in white glue and cover in 50/50 mix of fine light green and dark green grass flock.
  16. Glue small pieces of clump foliage to base.

To finish my models I’ll be adding decals to shoulders and helmets from Company B, followed by a coat of Solvaset decal fixative from Walthers and a spray coat with matte finish. After that, these guys will relive the heroics of D-Day on a tabletop soon.

IMG_0745

IMG_0747

IMG_0748

IMG_0746

IMG_0750

IMG_0749


Flames of War: Najewitz Modellbau 15mm Pegasus Bridge

PegasusBridgeWWII

Most of my 15mm wargaming terrain building I do is generic enough to be used throughout Western Europe during World War II. Even with a large collection of buildings at my disposal, there are a few iconic WWII landmarks that have long stood out in my imagination as projects I should tackle at some point. One of those is Pegasus Bridge at Bénouville, France.

The bridge was made famous by a brief but important battle in the early morning hours of D-Day on June 6, 1944. Glider units from the British 6th Airborne Division landed near two bridges just past midnight and quickly secured the Caen Canal crossings with minimal casualties. The quick nighttime action ensured movement and counterattack by German forces would be significantly limited in the coming days and weeks after the Allied landings in Normandy.

NMlogo

Building Pegasus Bridge would turn out to be a number of firsts for me. The model I picked up from Najewitz Modellbau in Germany is laser-cut, a model material I had not worked with before. The nature of the model and its situation crossing the Caen Canal would also necessitate I create surrounding terrain. In all, the project allowed me to try out a bunch of new things on a signature set piece which wound up being much more of a project than I originally envisioned.

Building the Bridge

The Pegasus Bridge model shipped in plastic bag folded into a flat, short cardboard box which had definitely shown some wear and tear during its journey from Germany to Brooklyn. Some pieces of the model had come loose from the MDF sheets during transit, but everything was there and unbroken. The rest of the model was easily punched or carefully cut out using a fresh blade in a hobby knife. With all the parts cut out, I sorted them on a tray to get a handle on the task of things before me. The model does not ship with assembly instructions, but they are available for download once registered to the Najewitz Modellbau website. The instructions are pretty spare, relying on simple wordless graphics and some imagination to put all the pieces together. I found referring to historic and contemporary images of the bridge online was just as helpful as the actual manufacturer instructions. Since there were no images online of the bridge being constructed, I decided to offer up a visual step-by-step for others looking to add this model to their terrain collection.

IMG_5918

IMG_5919

I started by laying out the parts into subsections, including the little control house which sits adjacent to the bridge and the two large sections which are found at the top of the bridge. I dry fit all the pieces to test them at first and then used carpenters wood glue to put the pieces together. Getting the stairs to the control house together was a little finicky. The curved roof on the small structure at the top of the bridge was achieved by scoring the flat roof and carefully bending it to the shape of the arched roof line.

IMG_5920

IMG_5923

IMG_5921

IMG_5922

IMG_5924

IMG_5925

IMG_5926

Next, I tackled all the trusses and supporting elements of the main bridge structure. This is where the fine lasercut detail really started to pop as I glued pieces together to resemble the plates and seams of the metal work on the bridge. After each section dried, I glued them to the main deck. The fine railings which run all around the bridge again were a challenge to figure out which went where, but some careful test fitting before gluing everything in the correct place.

IMG_5927

IMG_5928

IMG_5929

IMG_5930

IMG_5931

To finish the bridge, I glued the small gatehouse to an extra piece of square basing, attached it to the main bridge and cut some of the railings to fit around the building. The separate piece of the road approach on the other end was glued to the main bridge using a thin piece of cardboard glued to the underside to create a flexible hinge-like connection. The model doesn’t come with crossing guards, so I used extra pieces of the kit’s wood to cut some simple shapes. The cross guards were simply painted white with red stripes. The entire structure got a grey sprayed base coat and was then dry brushed in an off white paint to produce a worn look to the entire bridge.

IMG_5816

IMG_5933

Building the Terrain

As I was constructing the bridge I quickly realized it was going to need to be elevated off the table to accommodate the graded approach and a span over the canal. I went to the trusty standby of foam sheets in order to create sections of terrain on either side of the canal to create roads to the bridge and banks of the canal.

Using a ruler and marker, I outlined the areas to be cut away and sculpted. After making the rough cuts, I smoothed the edges out using wood filler and then sanding everything to a relative smooth shape. The foundation under each side of the bridge would also feature stone sections which I gently carved by using a pencil to create rows of masonry. Everything got an undercoat of brown spray paint followed by a coat of watered-down white glue and mixed flocking. The stone foundations received several coats of gray and off white dry brushed paint to create a realistic. The roads were likewise dry brushed in various shades of browns. Small chunks of foliage were glued here and there around the stone sections to add a little detail.

IMG_5940

IMG_5851

IMG_5941

IMG_5934

IMG_5935

IMG_5936

IMG_5937

IMG_5938

Pegasus Bridge

With all the painting and construction done, everything got a dull coat spray to seal the model and terrain. I decided to keep the bridge and two terrain section separate and unglued from each other to ease transport and storage. Laid out on the table, the bridge spans the canal with approaches on either side. The only thing left to do is get the model on the table, and the heroic early morning raid on Pegasus Bridge will be ready to be replayed on the tabletop soon.

IMG_5969

IMG_5971

IMG_5970

IMG_5972

IMG_5973

I Ain’t Been Shot Mum: Cabourg June 6, 1944 Scenario

LandingatOmahaOn the morning of the Normandy Landings of June 6, 1944, taking the eastern sector of Omaha Beach fell to the United States 1st Infantry Division. Despite some missed targeted landing zones on the beach and heavy losses at the far ends, the exit “draws” were largely secured by mid-morning. As additional troops and supplies began to arrive, the push inland began.

Omaha to CobourgMap of the US push to Cabourg from Omaha Beach, June 6, 1944

(via US Army Center of Military History)

Moving toward the objective of Colleville-sur-Mer, probing forces from the 1st Infantry Division pressed forward through the seaside fields of Normandy and began to encounter German defenders in various states of disarray. Tired from the fighting at the beach, the first group of Americans on patrol moved cautiously into Cabourg from the north and east while the German force scrambled to hold against any additional headway by the invaders. WhereTheHell After a couple of month hiatus, we jumped back into a 15mm World War II game at Metropolitan Wargamers in Brooklyn, NY this past weekend centering on the action at Cabourg. Using the I Ain’t Been Shot Mum rules and a post-D-Day scenario from the Where The Hell Have You Been Boys? book, all from Too Fat Lardies, our table was set to show the American advance and German defense at Cabourg.

IMG_4940Initial advance of US forces on blinds from the east and north toward Cabourg

Playing on the US side, my partner and I divided our force of three rifle platoons under blinds plus three false blinds. I swung two platoons and a false blind directly at the village from the east while my teammate took the other two false blinds and a single platoon around to the north behind a copse of trees. The mass of US blinds hiding a force only half the actual size provided a great simulation of the confusion the Germans felt that morning as they also lay hidden in and around the village in defense.

IMG_4941US forces near Cabourg on blinds from the east

IMG_4942The first US forces are revealed beyond a wood north of Cabourg

After a couple turns of US movement and prodding for Germans outside the town, the Germans spotted the Americans moving cautiously to the north. With two false blinds exposed, the third American blind revealed a rifle platoon armed with a mortar and two officers present. A false blind was also revealed near a farm at the eastern edge of the town as the Germans continued to burn up turn actions trying to find out where the Americans actually were.

IMG_4943American and German forces simultaneously surprise each other near the farm

IMG_4944A close assault erupts in the woods behind the barn

In close proximity to each other to the rear of a barn at the farm, US and German blinds were exposed nearly simultaneously with American gunfire tearing into the outnumbered Germans. A close assault at a hedgerow quickly pushed the first German fire team to the rear and out the action for the game. The remainder of the German platoon stayed to continue on firing from within the first barn and a hede nearby.

IMG_4945The final American blind is exposed just north of the farm

IMG_4946Americans give and take fire at a hedgerow

On the other side of the farm, the final American blind revealed another rifle platoon hunkered behind a hedge lining a road to town. At long-range, shots were exchanged between German defenders in and around the barn and the Americans now shooting from both sides of the barn. The action at the east end of Cabourg settled into a stalemate of fire across the fields and around the barns.

IMG_4947US forces inch toward Cabourg across hedges and fields from the north

IMG_4949US forces stall out to the northeast of Cabourg

Back to the north of town, the lone US platoon on the moved cautiously along a road and over fields, fences and hedgerows. With the Americans creeping toward Cabourg, the Germans opened up with MG 42s positioned in an upper story of a second barn and from the garret of a farmhouse near the entry road to town. With a cross-fire of heavy machine gun pouring into the Americans at the north and east, the US advance stalled somewhat until something could be done about the German fire ripping from building windows.

IMG_4948The remnants of the first German rifle platoon look to reposition to cover

IMG_4950Americans move to assault the German machine guns at the second barn

Back at the two barns, one US platoon swung around to the rear of the barn to assault the German machine gun crew inside. With the MG 42 crew thrown back into a retreat from the barn, the surviving German rifles on the other side of the barn retreated from fire into a nearby house. Firing from their new position, the Germans stalled the Americans pushing around the barns to the village. At the same time, the other MG 42 continued to fire into the other US platoon now pinned with dwindling numbers behind a hedge.

IMG_4951German reserves arrive late in the day to defend against the American push from the north

As the engagement progressed late into the scenario, the game’s referee announced the arrival of reserves on both sides. From the west, a fresh German rifle platoon joined the fight at the road and tree line at the northern edge of town. At full strength, two German platoons focused fire on the lone American platoon which had so cautiously moved toward that end of the village. Taking casualties, the shrinking US force began to fall back over the hedges and fields from where they had just come.

On the far end of the table, three more American platoons arrived from the beach to the east. Looking to advance quickly on the road straight toward town, the US reserves just couldn’t get in the fight fast enough. With the US forces already near Cabourg greatly reduced and in retreat to defensive positions, the game was called with the Germans holding Cabourg from the American assault.

At Normandy in 1944, the result was the same and the German defense halted the US advance which broke off by mid afternoon. The IABSM scenario at Cabourg is a great illustration of the dozens of small inland battles which raged after the morning’s landings along the Normandy coast over 70 years ago, and we’ll be returning to more follow-up actions in the weeks to come.

Flames of War: JR Miniatures 15mm Arnhem Row Houses

arnhemstreet

I picked up two different 15mm JR Miniatures Arnhem row house models on my recent trip to the HMGS Fall In! 2014 convention at a real steal of 40% off the list price. At nearly 12″ long and up to 8″ tall, these cast resin models create a quick urban feel to a tabletop battlefield. Each model has lift off roofs and interior floor and wall sections which pull out to allow for stands of troops to occupy varying rooms and levels. The roofs on the models also contain open parapet areas where artillery spotters, machine gunners or other troops can placed to command the battlefield from high upon the rooftops.

IMG_4674Cleaned and primed Arnhem row houses from JR Miniatures

As with most of my experiences with JR Miniatures models, there’s a fair amount of clean up to flash before getting started. The castings also contain a few air holes here and there, but nothing that detracts too much from the overall models. If anything, missing pieces of a cornice or a small hole in a wall might be chalked up to gunfire.

Here’s a simple outline of my technique for painting resin buildings:

Painting Western European Buildings

  1. Use a sharp hobby knife to carefully remove extra resin flash from casting. Particular care should be taken to make sure interior floor sections lift out of the model easily.
  2. Wash models in warm soapy water to remove molding residues. Allow models to dry overnight.
  3. Spray prime roof and removable interior floor sections in flat black and main building sections in flat grey. Allow primer to dry overnight.
  4. Paint roofs:
    1. Tile roofs begin with a dry brush of 50/50 black and red paint, followed by a dry brush coat of red paint and finished with a dry brush of orange paint to highlight.
    2. Shingled roofs begin with a dry brush of dark grey, followed by dry brushed coats of lighter browns, light greys and dark green.
    3. Stuccoed areas in roof gables and dormer windows receive a dry stipple brushed coat of light brown followed by off-white paint dry brushed with the same stipple brush.
  5. Paint floor sections:
    1. Dry brush floorboards with layers of dark and lighter brown paints.
    2. Paint wall sections in off-white paint.
  6. Paint building facades:
    1. Stucco walls receive a dry stipple brushed coat of light brown followed by off-white paint dry brushed with the same stipple brush. Dab some random areas with more off-white to create areas of more fresh stucco to create variations along the street.
    2. Dry brush a slightly heavier amount of off-white paint over cornices and door a window molding to create more depth of highlights.
    3. Stone areas receive a dry brush of light grey followed by off-white dry brush highlights and a dark brown wash in recesses.
    4. Brick areas are dry brushed with 50/50 black and red paint followed by random dry brushing in off white paint to highlight.
    5. Paint doors and shutters with a variety of blues, whites, greens, reds and browns. Follow basecoat with highlight in same color slightly lightened with off-white. Dab doorknobs with brass paint with a fine brush.
    6. Window panes are all carefully given a light coat of black and then dry brushed with dabs of lightly dry brushed white paint to give the illusion of glass.
    7. Sidewalks are dry brushed with light greys over a medium grey basecoat.
  7. Ground areas at the rear of the buildings receive brown and green dry brush coats followed by grass flocking and small clumps of foliage.
  8. Coat models in several layers of spray clear matte finish, allowing each coat to dry before applying an additional coat.

I was able to achieve a pretty decent tabletop quality finish to my buildings with maybe three hours of work on each model using the painting scheme above. Since colors on buildings are rarely monotone (unless newly constructed), I use a plastic surface on which I dab a variety paint shades and mix colors from this palette as I go with my dry brushing. I then build up areas with heavier amounts of one color or another to pull out highlights, create varying textures and differentiate from one building to the next along the street.

IMG_4695A completed JR Miniatures Arnhem row house

IMG_4694 The other completed row house with corner shop

IMG_4692Close up of the corner shop

IMG_4698A view along both row house blocks

IMG_4697Rear detail of one of the blocks

IMG_4693Close up view of the facades

IMG_4696A German Stug parked in front of the row houses

IMG_4691Overhead view of the interior floors

IMG_4690A floor section being removed for placing troops inside

I’m really excited about these models which nearly double the footprint of my existing Western European buildings in 15mm. Models from JR Miniatures fit in nicely with my buildings from Mark IV Miniatures and terrain from a variety of other manufacturers. Although modeled on actual streetscapes of Arnhem, the buildings are easily usable in creating the look of many densely populated areas of France, the Netherlands or elsewhere in Western Europe during late war operations.