Flames of War: Najewitz Modellbau 15mm Pegasus Bridge

PegasusBridgeWWII

Most of my 15mm wargaming terrain building I do is generic enough to be used throughout Western Europe during World War II. Even with a large collection of buildings at my disposal, there are a few iconic WWII landmarks that have long stood out in my imagination as projects I should tackle at some point. One of those is Pegasus Bridge at Bénouville, France.

The bridge was made famous by a brief but important battle in the early morning hours of D-Day on June 6, 1944. Glider units from the British 6th Airborne Division landed near two bridges just past midnight and quickly secured the Caen Canal crossings with minimal casualties. The quick nighttime action ensured movement and counterattack by German forces would be significantly limited in the coming days and weeks after the Allied landings in Normandy.

NMlogo

Building Pegasus Bridge would turn out to be a number of firsts for me. The model I picked up from Najewitz Modellbau in Germany is laser-cut, a model material I had not worked with before. The nature of the model and its situation crossing the Caen Canal would also necessitate I create surrounding terrain. In all, the project allowed me to try out a bunch of new things on a signature set piece which wound up being much more of a project than I originally envisioned.

Building the Bridge

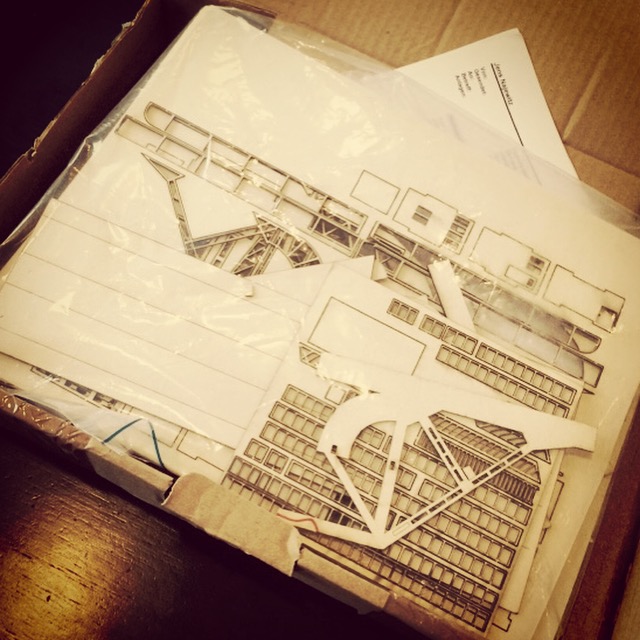
The Pegasus Bridge model shipped in plastic bag folded into a flat, short cardboard box which had definitely shown some wear and tear during its journey from Germany to Brooklyn. Some pieces of the model had come loose from the MDF sheets during transit, but everything was there and unbroken. The rest of the model was easily punched or carefully cut out using a fresh blade in a hobby knife. With all the parts cut out, I sorted them on a tray to get a handle on the task of things before me. The model does not ship with assembly instructions, but they are available for download once registered to the Najewitz Modellbau website. The instructions are pretty spare, relying on simple wordless graphics and some imagination to put all the pieces together. I found referring to historic and contemporary images of the bridge online was just as helpful as the actual manufacturer instructions. Since there were no images online of the bridge being constructed, I decided to offer up a visual step-by-step for others looking to add this model to their terrain collection.

IMG_5918

IMG_5919

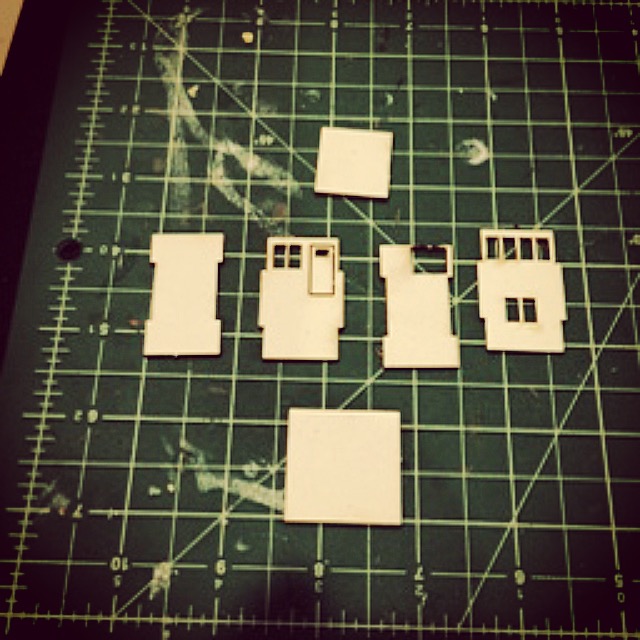
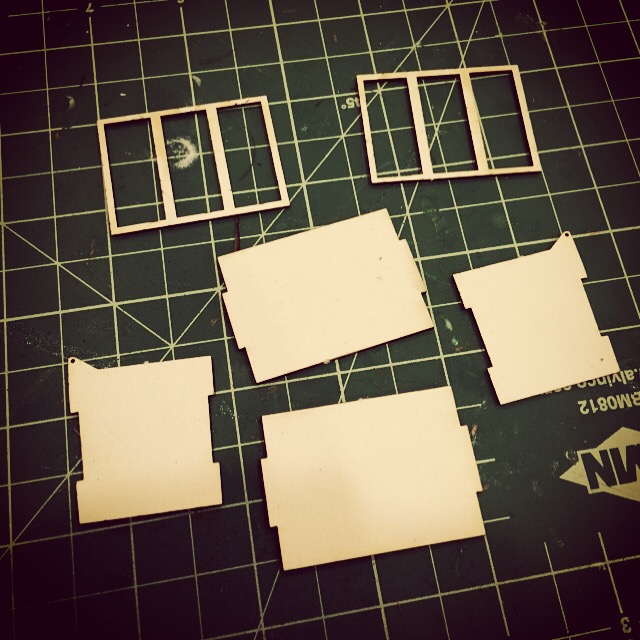
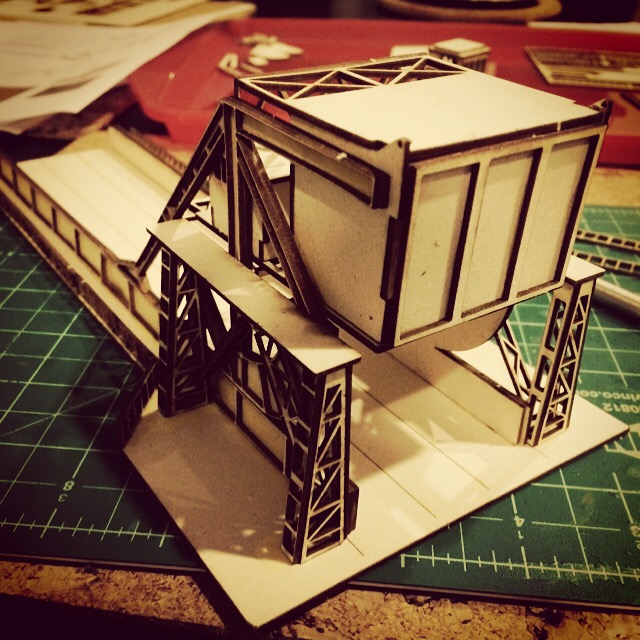
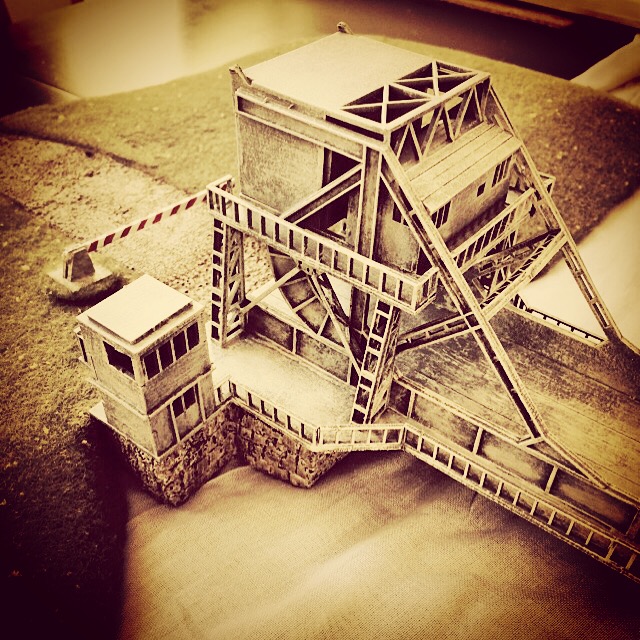
I started by laying out the parts into subsections, including the little control house which sits adjacent to the bridge and the two large sections which are found at the top of the bridge. I dry fit all the pieces to test them at first and then used carpenters wood glue to put the pieces together. Getting the stairs to the control house together was a little finicky. The curved roof on the small structure at the top of the bridge was achieved by scoring the flat roof and carefully bending it to the shape of the arched roof line.

IMG_5920

IMG_5923

IMG_5921

IMG_5922

IMG_5924

IMG_5925

IMG_5926

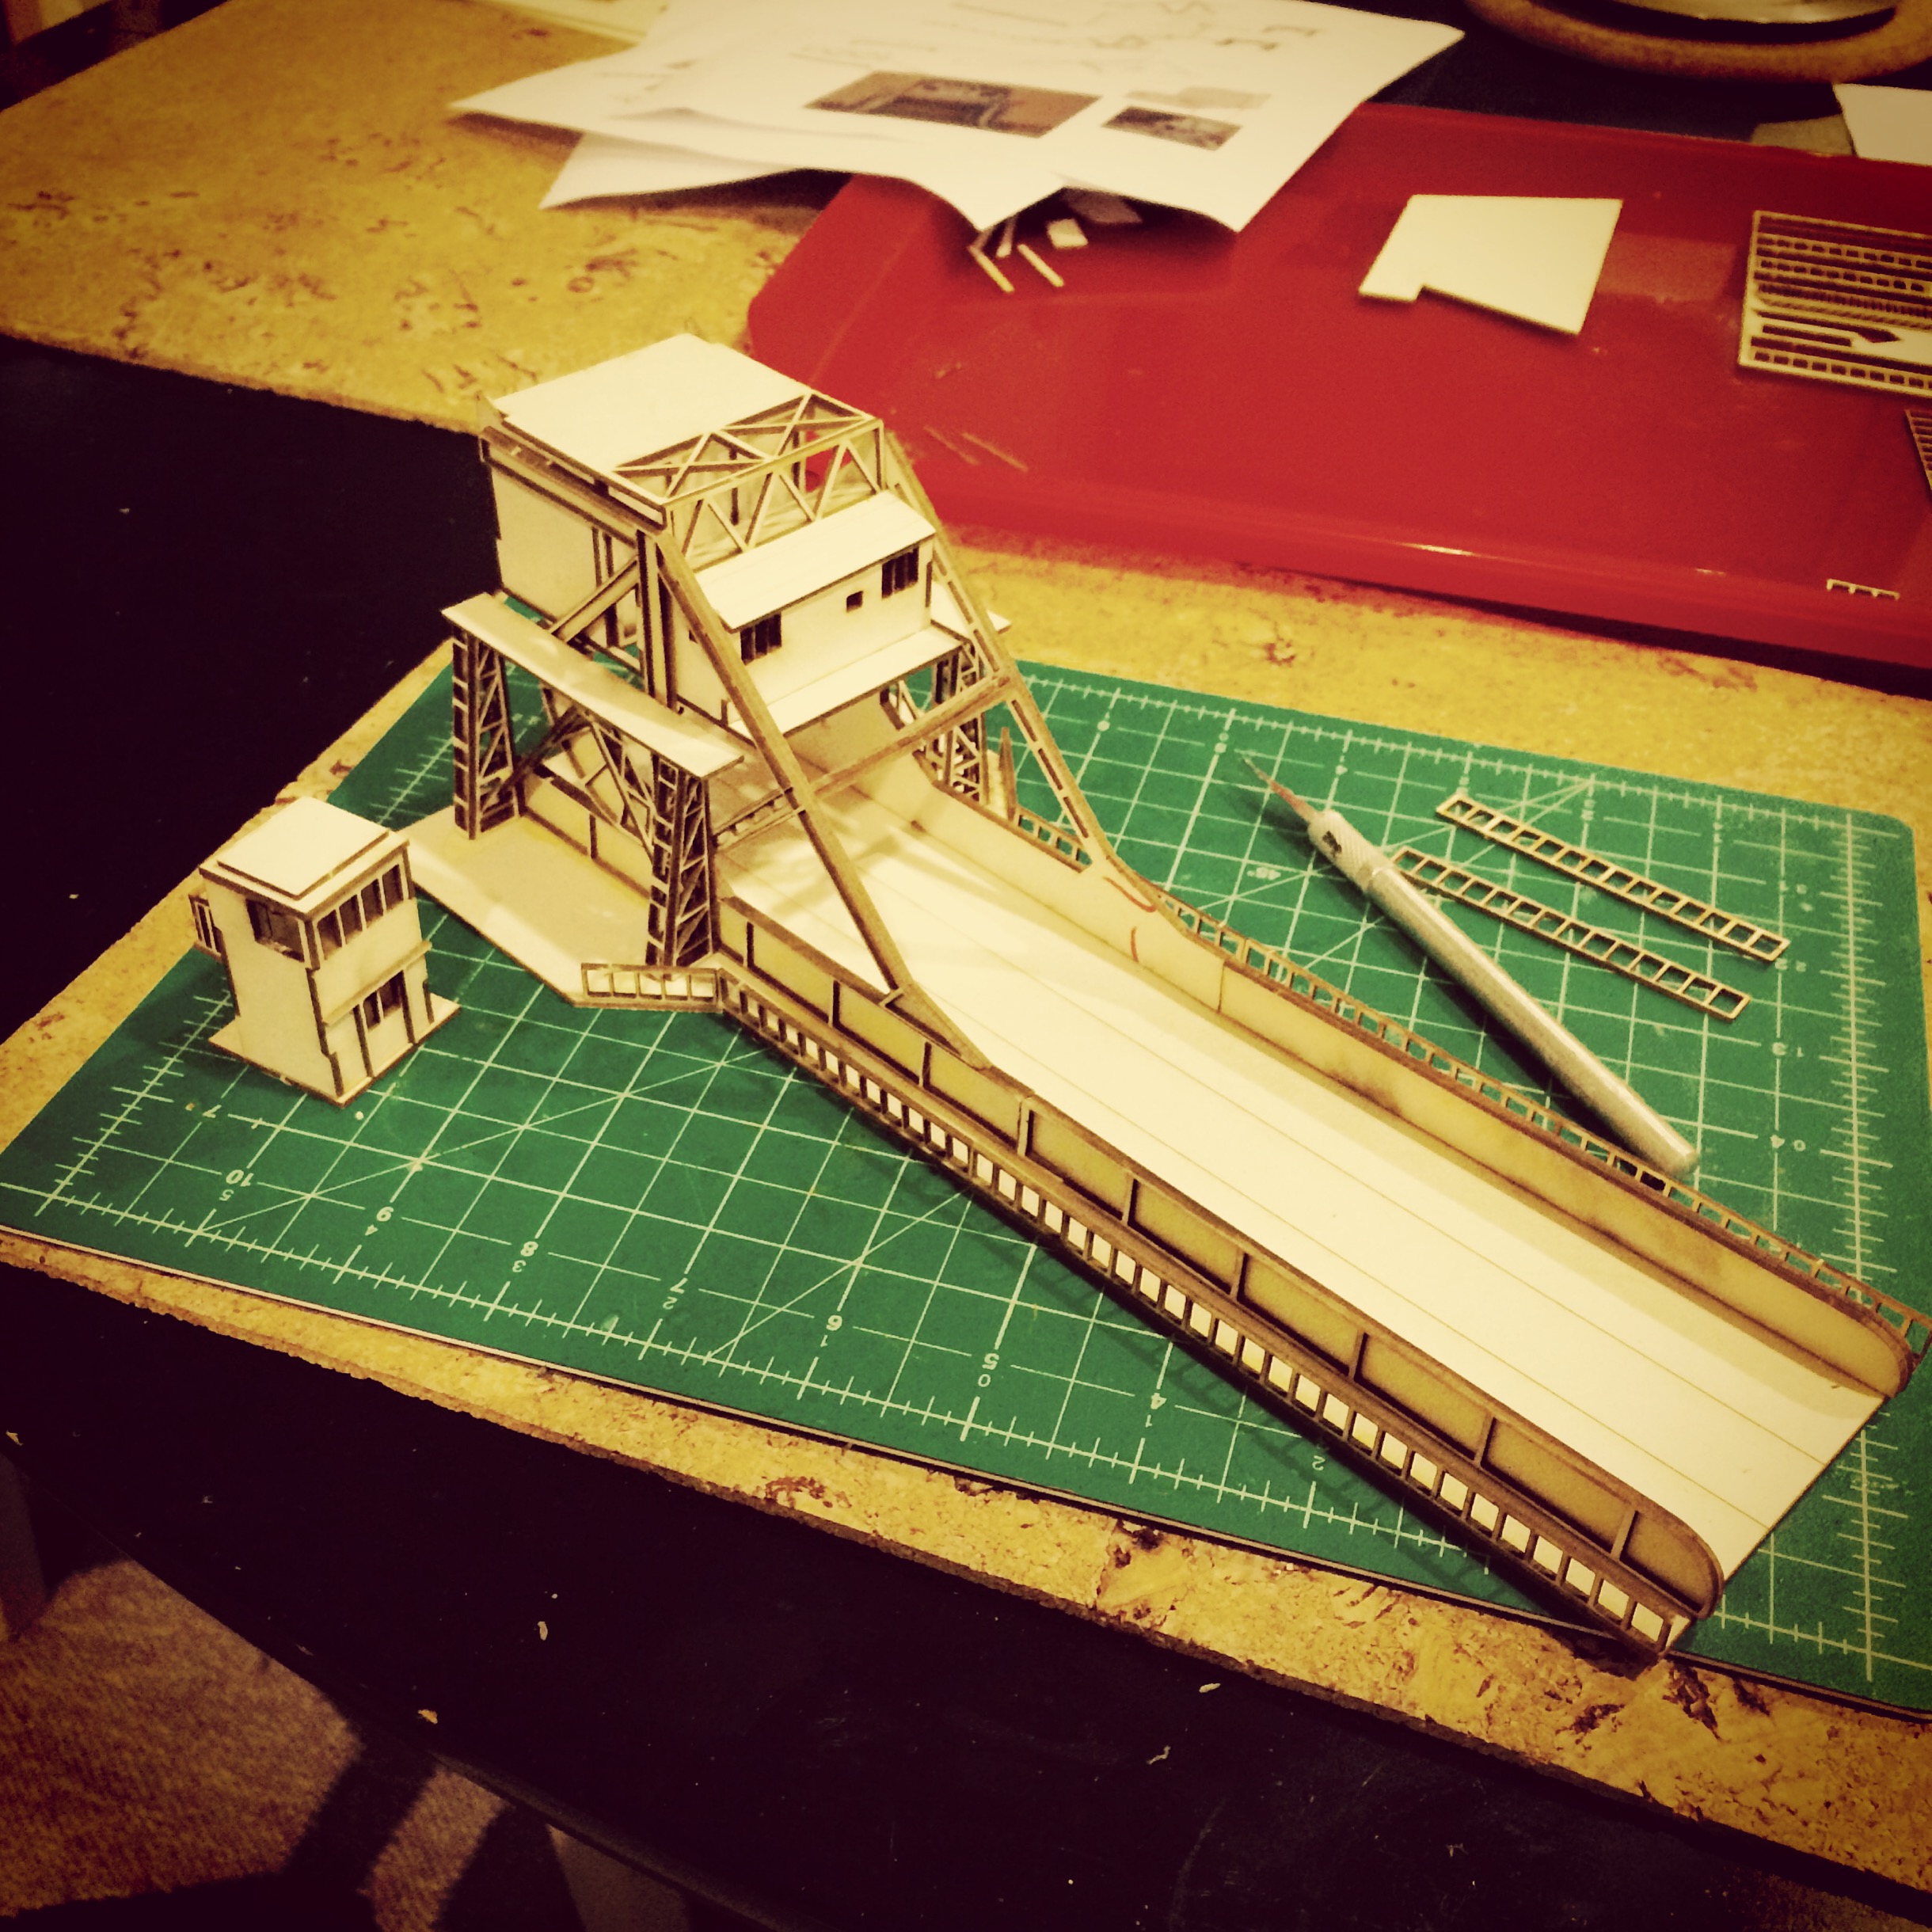
Next, I tackled all the trusses and supporting elements of the main bridge structure. This is where the fine lasercut detail really started to pop as I glued pieces together to resemble the plates and seams of the metal work on the bridge. After each section dried, I glued them to the main deck. The fine railings which run all around the bridge again were a challenge to figure out which went where, but some careful test fitting before gluing everything in the correct place.

IMG_5927

IMG_5928

IMG_5929

IMG_5930

IMG_5931

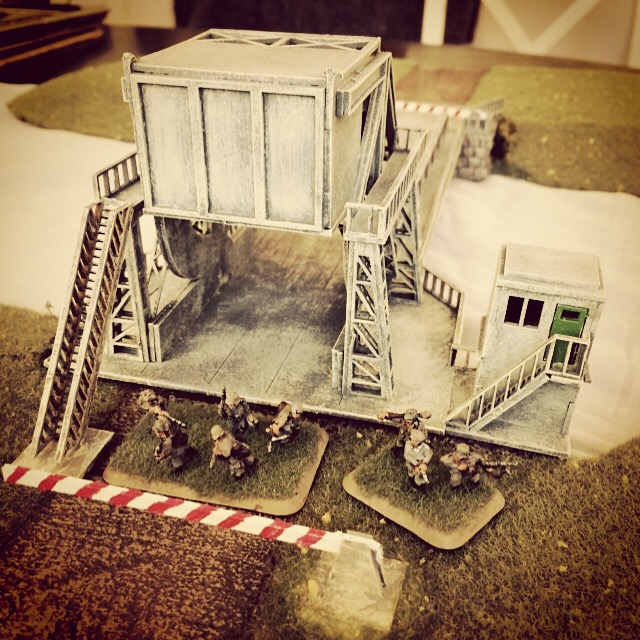
To finish the bridge, I glued the small gatehouse to an extra piece of square basing, attached it to the main bridge and cut some of the railings to fit around the building. The separate piece of the road approach on the other end was glued to the main bridge using a thin piece of cardboard glued to the underside to create a flexible hinge-like connection. The model doesn’t come with crossing guards, so I used extra pieces of the kit’s wood to cut some simple shapes. The cross guards were simply painted white with red stripes. The entire structure got a grey sprayed base coat and was then dry brushed in an off white paint to produce a worn look to the entire bridge.

IMG_5816

IMG_5933

Building the Terrain

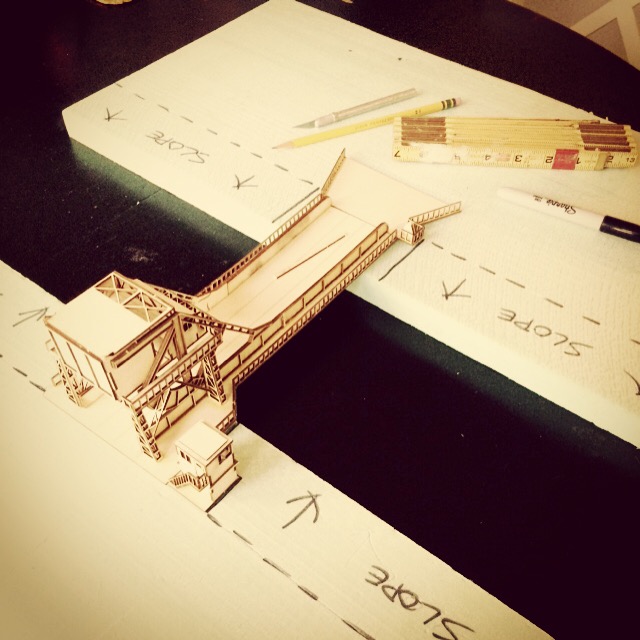
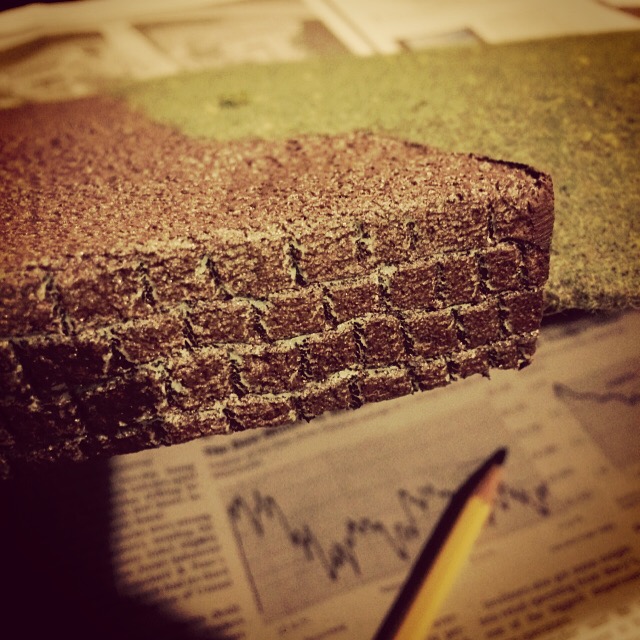
As I was constructing the bridge I quickly realized it was going to need to be elevated off the table to accommodate the graded approach and a span over the canal. I went to the trusty standby of foam sheets in order to create sections of terrain on either side of the canal to create roads to the bridge and banks of the canal.

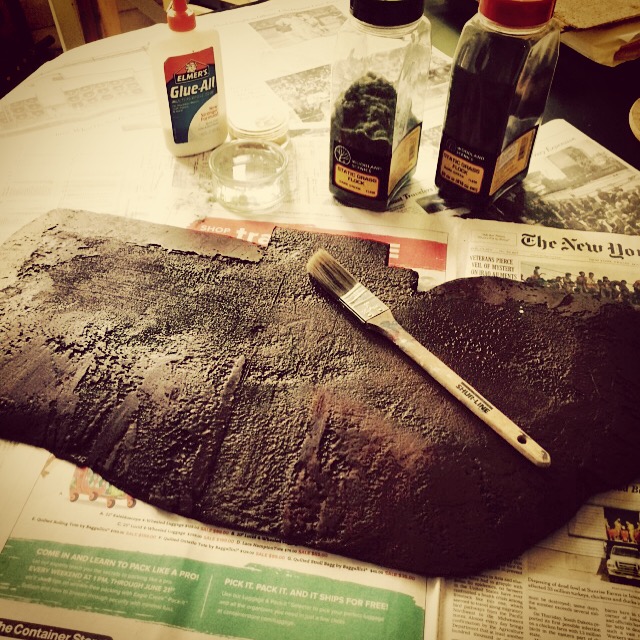
Using a ruler and marker, I outlined the areas to be cut away and sculpted. After making the rough cuts, I smoothed the edges out using wood filler and then sanding everything to a relative smooth shape. The foundation under each side of the bridge would also feature stone sections which I gently carved by using a pencil to create rows of masonry. Everything got an undercoat of brown spray paint followed by a coat of watered-down white glue and mixed flocking. The stone foundations received several coats of gray and off white dry brushed paint to create a realistic. The roads were likewise dry brushed in various shades of browns. Small chunks of foliage were glued here and there around the stone sections to add a little detail.

IMG_5940

IMG_5851

IMG_5941

IMG_5934

IMG_5935

IMG_5936

IMG_5937

IMG_5938

Pegasus Bridge

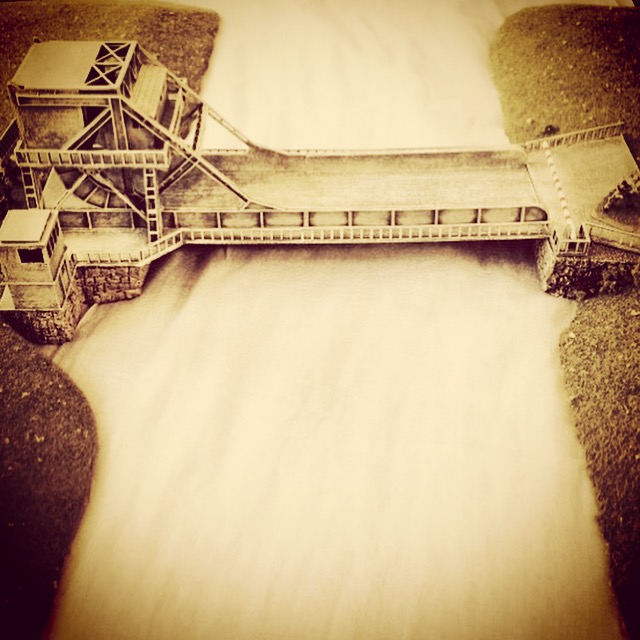
With all the painting and construction done, everything got a dull coat spray to seal the model and terrain. I decided to keep the bridge and two terrain section separate and unglued from each other to ease transport and storage. Laid out on the table, the bridge spans the canal with approaches on either side. The only thing left to do is get the model on the table, and the heroic early morning raid on Pegasus Bridge will be ready to be replayed on the tabletop soon.

IMG_5969

IMG_5971

IMG_5970

IMG_5972

IMG_5973

Flames of War: Novus Design Studio 15mm City Block Ruins

ruinsWar is destructive by its very nature, and World War II was the most destructive war in history. Aside from the tens of millions of military personnel and civilian deaths, the war brought unprecedented ruin to the thousands of villages, towns, cities and industrial areas through and over which the war was fought. The nearly immeasurable physical and financial impacts of WWII rippled for decades to come, including enormous effects on buildings and other physical spaces worldwide.

all15mmterrain

My 15mm European terrain during a recent game

For my 15mm WWII wargaming using Flames of War and I Ain’t Been Shot Mum rules systems, my terrain has been modeled almost entirely on Western Europe using buildings from numerous manufacturers collected over the past few years. In all my 15mm modelling, destroyed buildings have largely been absent so far, so I’ve been really happy to add my new city block ruin models from Novus Design Studio to my terrain collection.

NovusLogo

NDS was founded just about a year ago in April 2014 by Robert and Nancy Rumfelt, the founders and original owners of JR Miniatures. Like many wargamers, I’ve got a long history with models from JR Minis and so in many ways I knew what to expect from NDS when the company’s launch was first announced. I watched their inventory grow in the past year covering 6mm, 15mm and 28mm scales across WWII, sci-fi, fantasy and modern themes, and they’ve continued to add new products in the new year.

IMG_4969A complete set of four 15mm city block ruins from Novus Design Studio

The two and three story 15mm urban ruins retail for $26-31 USD each but I picked up a full set of four in a 40% off deal NDS ran at the end of 2014. The straight and corner buildings match up nicely together in a row or bunched into a city block in various configurations. The models also look great placed among buildings from other manufacturers, especially other city row houses from JR Minis. The castings in a creamy resin require a little flash clean up with a sharp hobby knife and air pocket holes show up here and there but don’t distract from the destroyed nature of the structures.

Novus Sample Front BackFront and rear view depicting multiple removable floors of a typical city block ruin model

All the NDS city block ruins feature removable floors molded with plank floors, piles of rubble, walls and interior doorways. The buildings have staircases and walls on the interior, broken window panes and more rubble on the attached sidewalks at the front. Everything about these make them very usable for 15mm gaming whether it be for 20th-century historical scenarios or contemporary and near-future gaming in European or even American urban settings. Getting multiples of the models on the table would easily allow setting up a truly impressive cityscape ravaged by the impacts of war.

IMG_4987Cleaned and primed corner city block ruin model

After cleaning up the flash on the models, I washed them all in warm soapy water to remove excess casting residue. The main building structures got a spray of flat gray as a base coat followed by layers of dry brushed tan, light gray and off white paint on the exteriors. Sidewalks also received grays and off white to highlight piles of ash and broken masonry heaped on the ground. On building had shutters which were painted in a dark blue and green and then highlighted with the same color mixed with a bit of white.

IMG_5670

IMG_5669

For the interiors, the removable floor levels were base coated in flat black. Plank floors were built up in layers of browns ranging from dark to light in each coat. I went basic on interior walls, using an off white to create a simple plaster look. As with the exterior, the rubble and tile floors on the ground floors were built up in grays and off white.

IMG_5672

IMG_5673

After a finish of a few coats of clear matte spray, the city block ruins were done. Arranged in a square block or stretched out in a row, these models easily blend in with other 15mm terrain manufacturers and add a great bit of variety to a tabletop set up. Bringing a bit of destruction to my overly neat wargaming battlefields is a welcome addition with my first buildings from Novus Design Studio.

IMG_5674

IMG_5671

IMG_5675

I Ain’t Been Shot Mum: Gela July 11, 1943 Scenario

gelaWe continued our play through Operation Husky and the invasion of Sicily in July 1943 this past weekend at Metropolitan Wargamers in Brooklyn, NY. We’re working our way through the events of July 11th in the Sicilian Weekend book by Too Fat Lardies for their I Ain’t Been Shot Mum rules for 15mm World War II play.

HuskyMap2Operation Husky, July-August 1943 (Gela in green)

The scenario represents the northeast section of the town of Gela where ferocious fighting had taken place the day before in the early actions of the Allied invasion of Sicily. The table was set up with a couple dozen buildings from a variety of manufacturers, including JR Miniatures, Battlefront, Mark IV Miniatures, Miniature Building Authority and Games of War. The occupying US troops all began hidden in  Gela with the Italians arriving on blinds at the opposite end of the table over a small railroad cut, bridge and road surrounded by open farm fields dotted with trees. The objective was simple: the Italians had to take back this corner of Gela and the Americans had to hold what they had fought so hard for the previous day.

Sicilianweekendcover‘Sicilian Weekend’ by Too Fat Lardies for their I Ain’t Been Shot Mum WWII rules

The Americans deployed in well-defended positions in the town with two platoons of rifles and light machine gun squads perched in buildings. A combat engineer platoon armed with a 37mm M3 anti-tank gun in tow sat hidden along the main street through town. Off board, 4.2 inch M2 mortars and 105 mm M2A1 howitzers from the 33rd Field Artillery Battalion were available as support to be called in by the captain from the company HQ perched in the tall building at the center of town. Tough and dug into great positions, the Americans looked to have a clear advantage.

IMG_5651The tabletop battlefield for Gela

As in the previous scenario southeast of Butera, the Italians again represented a massing of manpower from the Livorno Division with six small rifle platoons and a machine gun support platoon. Accompanying them this time was Mobile Group E compromised of light French Renault R35 tanks and pre-war Italian CV33 Tankettes. What the Italians lacked in a starting position on the field and quality of equipment and troops, they certainly made up for in volume as they began the game arriving on three blinds per turn.

IMG_5652Italians arrive northeast of Gela

As the Italians neared the town, the Americans bided their time and sought not to reveal their positions until the approaching forces were nearly on top of their positions. Approaching in the open, the Italian blinds were spotted in the open to reveal tanks and infantry closing in at the center and edge of town. With IABSM’s randomly card-activated units mechanic, my US commander was perhaps overly cautious in waiting a turn or two too long to start getting the American cards into the deck. This all but negated off-board US artillery support for the game and allowed the Italian attackers to get dangerously close to seizing a quick victory with nary a shot fired.

IMG_5653Italians swarm the edge of the town and the hidden American positions

On the Italian left, one of their early shots fired down the street took out a crew member of the M3 anti-tank gun, forcing the remaining American crew to haul it back around a corner to safety. In answer, the US engineers opened fire at close range and threw back the initial push by the Italians on the American right. At the center of town, US rifles, machine guns and bazookas firing from within a massive central building ripped into the Italians marching forward in the open. Under heavy fire at their center, the Italians fled for cover to either side as their approach was slowed and their returned rifle and tank shots had little effect on the Americans.

IMG_5654Italians encounter fire from US engineers defending from buildings

IMG_5655Italian infantry duck for cover as they receive heavy combined arms fire from the Americans in the large central building

IMG_5656Italian armor repositions away from American fire

With nowhere to go but forward, an Italian rifle platoon at their left assaulted the US engineers holding down the American right from a building. The Americans took heavy casualties and were thrown backward from their position into the open street to the rear. In response, returned fire from engineers in a nearby building flung the Italians back from their brief victory.

IMG_5657Italian rifles push a US engineer platoon from the building position

Back at the center, another round of combined arms fire from the Americans in the large central building continued to feed shots into the Italians, forcing them to continue to slide into cover to either side of the open field outside town. While pushing the Italians back with casualties and shocking fire provided a short-term positive for the US, it also allowed the Italians the chance to redeploy and set themselves for a move into town on the American left.

IMG_5658Italians slide from the center toward the American left

Meanwhile on the US right, the surviving engineers were chewed up by additional fire in the street which stalled them out of the action. With the main street into town wide open, the first Italian tank positioned itself to roll down the cobblestones. Waiting in the distance was the American anti-tank gun with a clear field of fire down the street looking to stave off an armored assault into the heart of Gela.

IMG_5659Italian armor sneaks around the American right as the US 37mm M3 anti-tank gun waits in the distance

With the Italians abandoning the center, the fight moved to the flanks. One US rifle platoon moved to reposition into buildings further to the edge of town on the American left as two Italian platoons, one already having suffered heavy casualties, snuck between buildings for cover. The American engineers on their right sought to hold down the approaching Italian tanks and three rifle platoons, and the US anti-tank gun crew had yet to fire a shot. The American rifles, machine guns and bazooka crews who had caused so much damage at the center were facing a choice of redeployment as their Italian targets skirted to either side.

IMG_5644Italians mass for an attack on the US engineers

Several hours in, we called the game. The small-scale tactical nature of IABSM is highly contingent on when a platoon or command ‘big man’ card activates. With so many Italian cards in the deck, a run of activated Italian unit cards may have provided the push they needed to get to the main street and victory. That said, each US card drawn was continuing to have devastating results on the somewhat weaker Italians, causing casualties and flinging them into reconsidering different routes. The large number of Italian on the field were still poised to match up with the higher quality American troops, although the US had clearly blown an early opportunity to use their off-board artillery effectively. Good and bad command choices had left Gela contested for the day.

I Ain’t Been Shot Mum: South East of Butera July 11, 1943 Scenario

SicilyJuly1943Operation Husky, the Allied invasion of the island of Sicily, commenced on July 9th 1943 with combined naval, air, airborne and amphibious forces from the United States, England and UK colonial nations attacking a largely Italian force backed by their German allies. Over the next five weeks, the Allies took the arid and rocky island of Sicily and opened up the Mediterranean for the eventual invasion of mainland Italy.

HuskyMapOperation Husky, July-August 1943 (area around Butera in green)

The Sicilian Weekend campaign guide for I Ain’t Been Shot Mum offers 24 scenarios from the opening days of Operation Husky on July 10th and 11th 1943. Like the other scenario books from IABSM publisher Too Fat Lardies, the Sicilian book presents solid historical background and maps, along with force lists and detailed briefings for each side easily adaptable to a number of lines of 15mm WWII miniatures. The scenarios may be played individually or as part of a linked campaign, and so we recently started playing through a few of the Sicily scenarios at Metropolitan Wargamers in Brooklyn, NY.

Sicilianweekendcover‘Sicilian Weekend’ by Too Fat Lardies for their I Ain’t Been Shot Mum WWII rules

We began with the eighth scenario in the book, southeast of Butera on the morning of July 11th 1943. Members of US 3rd Infantry Division are presented with a simple mission of aggressively pushing through the field to link up with their fellow Americans at Gela. The Italian force from the 33rd Infantry Regiment of the Livorno Division, must hold the invading Americans back.The scenario presents the Italian and American forces each entering the table in column on blinds. The counter attacking Italians rolled in mounted in trucks at one road at the table edge, and the Americans arrived on foot at one end of the table.

IMG_5605Initial forces arrive on the field in the early turns

IMG_5606Italians rush to the battle and deploy from a column of trucks

My first to arrive American machine gunners and bazookas quickly took up position on a rocky hill overlooking the road and a crossroads in the distance. Italian trucks moved in with their heavy weapons likewise leading the away with machine guns and 81mm mortars deploying at the road edge. Initial long range fire from the US machine guns pushed some of the Italian line back over the road. The Italians offered several rounds combined of direct mortar and machine gun fire in return, spraying bullets and landing rounds amid the bunched-up US machine guns. The Americans scooted back over the crest of the hill and the bazookas ran off to meet the other Americans arriving by the road to their right.

IMG_5608American machine guns take Italian mortar fire and fall back

IMG_5607US machine gunners rally back to their positions and pour fire into the Italian lines

 As the heavily-damaged US machine guns rallied, the Italian column continued to advance on the board in force. Four Italian rifle platoons spread out from the road to run at the advancing American column ahead and to cover the crossroads overlooked by two rocky hills. As the Americans moved straight on to meet the Italian front line, a recon platoon accompanied by four bazookas made way for the hills and the Italian flank.

IMG_5609Italian rifle platoons sprint ahead through the open field

IMG_5611A US recon platoon moves to take position atop a hill as Italians deploy at the crossroads

IMG_5612A firefight erupts between two hills as American bazookas hump their way around the Italian flank

IMG_5613The Italian line folds back toward the road under US fire in the field

With an Italian front deployed across the field in several lines and more rifles rushing into the hills at their left, the battle settled into two main firefights. American rifles at the center gradually pushed through the field toward the overwhelming number of Italians. Between the two hills on the Italian left, Italian and American rifles echoed back and forth. As gunfire was exchanged across the lines, US bazookas attempted to run to engage the Italian trucks which had made their way to safety beyond the battle at the rear. Despite moderately mounting Italian casualties, the Americans just could not break through.

The US forces ultimately ceded the field to the Italians. Even with superior command quality, the initial deployment of the US machine guns had been a bit premature and was not met by the quick arrival of supporting rifle platoons. Rushing them to the hills at the crossroads might have made a difference. The Italians had also managed to get the vast majority of their troops on the board early in the game, and their neatly arranged front line allowed them to angle directly over a defense of the road. In our refighting of the early hours of July 11th, 1943 the massed Italian counterattack had stalled the US invaders southeast of Butera. What awaited at Gela later in the day would unfold in our next battle.

I Ain’t Been Shot Mum: West Of The Oktiabrski State Farm July 12, 1943 Scenario

t34OktiabrskiThis past week, two of us at Metropolitan Wargamers in Brooklyn, NY headed back to the summer of 1943 and the opening days of what would become known as the Battle of Kursk. The German offensive in Soviet territory, known as “Operation Citadel,” took place southwest of Moscow and led to one of the largest tank battles of all time, the Battle of Prokhorovka. It was south of Prokhorovka at the Oktiabrski State Farm where our game began.

BKCover‘Battlegroup Kursk’ from Iron Fist Publishing

Our 15mm battle was a mash-up of game systems, using Flames of War models, I Ain’t Been Shot Mum rules and a scenario lifted from the Battlegroup Kursk book by Iron Fist Publishing. Aside from its own set of tabletop rules, the Battlegroup Kursk book offers some well-drawn scenarios easily adaptable to a variety of gaming systems and scales. Our scenario, “West Of The Oktiabrski State Farm,” was the second of seven scenarios from the section entitled “The Inglorious 12th July.”

oktMAPMap of the West Of The Oktiabrski State Farm scenario

IMG_5577Soviet blinds deploy and move as T-34s are spotted pushing on the left

Our first Eastern Front and largest IABSM game to date started with the German infantry, Pak 40 anti-tank guns and two StuG III units deployed in hidden on a third of the table. Across a wide field, the Soviets deployed on blinds along the table edge in and around a collective farm complex. The initial Soviet blinds featured three infantry platoons at the center, a T-34 tank platoon to the left flank and one more tank platoon arriving on blinds in the second and third turns. Each side also featured off board artillery and the German side also had air fire to draw on throughout the game, although none of it would play a measurable role during the battle.

IMG_5547Soviet armor rumbles toward their first objective

IMG_5578A Pak 40 reveals itself to the approaching Soviet T-34s

IMG_5569The T-34s and Pak 40 exchange fire across the open field

IMG_5571The Soviet commander exposes Germans dug into the field just as his tank is destroyed

IMG_5575The first wave of Soviet armor burns in the field as reinforcements arrive on a blind to the rear

Soviet objectives sat at the German-defended crossroads, and so the T-34s pushed hard in the initial turns toward the road entry at the edge of the table at the Soviet left. Rolling quickly toward the road, the T-34s encountered a Pak 40 position at a hedge dominating a field of fire at the center of the table. The Pak 40s immediately hit the tanks, damaging the turrets, sights and mobility of the T-34s. Over several turns, fire was exchanged between the T-34s and the German anti-tank crews, leaving several burning tanks and a partially destroyed German gun position. Mid-game, a reinforcing platoon of T-34s moved to support the first wave of nearly-destroyed Soviet armor but were likewise halted in a crossfire from the surviving Pak 40s and three StuGs moving out their hidden positions and toward the road. The Soviet tank commander managed to close gloriously on the objective, but the StuGs and hidden German infantry positions stalled the advance and his tank went up in flames with those of his comrades, too.

IMG_5570Mid-game with Soviet blinds arriving on each flank, infantry at the middle and thick lines of German defenders in the distance

IMG_5572German Pak 40s and MG42s hold the center

With the Soviet attack on the left completely at a standstill, infantry moved from the farm complex toward the crossroads objective in the distance as T-34s maneuvered to their right using a forested area to cover their advance. The Germans moved to strengthen their center with the deployment of MG42s which laid fire into the Soviet infantry. German infantry deployed across the crossroads objective and were buoyed by the support of another StuG platoon on the opposite side of the trees.

IMG_5573T-34s try to push from the right using the forest as cover

IMG_5574T-34s and StuGs duel at the edge of the forest as infantry begins to take heavy casualties on both sides

Between the road and forest, the battle for crossroads began. Soviet infantry were cut down in the open and the Soviet armor moved cautiously around the woods to fire into the German infantry and armor. As the T-34s rounded the edge of the forest, a crossfire of Pak 40 and StuG shots stalled the Soviet tank advance with the Germans suffering a loss of only one StuG in the firefight. With the objectives at the crossroads and road at the table edge still secure, the day tipped to a German win effectively repelling the Soviet attack.

I hardly ever play Soviets, and in a look at the battle afterward I reasoned a consolidated attack to the road on the German right may have provided the critical mass of armor needed to sway the victory. The German anti-tank guns had effectively pinned the center, and a replay with T-34s massing to one side may have provided just enough of a steel wall to allow the other tanks to move to the objective instead of dying in the open. With our largest IABSM battle played out over several hours, we thought having a crack at one of the other Eastern Front scenarios would be worth it to test if Soviet metal might prevail over the German invaders on another day.

28mm: German Infantry And MG 42 HMG By Artizan Designs

waffen After wrapping up my first 28mm US Airborne troops, I set to work on some Germans. I ordered a bunch of Late War German infantry and command, plus an MG 42 team by Artizan Designs from Brigade Games and received them speedily. The detail in the figures really pops, and the personality and variety in the poses make them really engaging at this scale. I particularly like the stern officer in his greatcoat and the other figures screaming out orders and gesturing on the move. ADlogo Painting WWII Germans for the first time at this scale, I really wanted to go for more detail than I do at 6mm or 15mm. Artizan Designs offers some great painting references on their website, including a general uniform guide and a lot of detail on German camoflage patterns. Using paints I had on hand plus a few more colors I picked up from Citadel’s paint line, I came up with a palette and painting scheme that produced some great results on my first go. paintgermanThe Artizan figures require little flash clean up before being glued to metal washers. The three man machine gun crew went on a 60mm plastic base I picked up from Proxie Models. Here’s the steps in detail for painting my German infantry.

Painting 28mm German Infantry

  1. Clean flash from metal models with a sharp knife and glue to metal washer or plastic bases.
  2. Apply filler putty to bases. When dry, scrape off excess with a sharp knife.
  3. Basecoat models and bases with flat black spray primer.
  4. Paint smocks and helmets with Tallarn Sand.
  5. Paint pants, soft hats, officer greatcoat and gas mask containers with Skavenlight Dinge.
  6. Paint camouflage on helmets and smocks with alternating Waaagh! Flesh and Dark Brown.
  7. Paint faces and hands with Tallarn Flesh.
  8. Paint packs with Baneblade Brown.
  9. Paint boots and equipment straps Black.
  10. Paint bases, gun stocks, water bottles and helmet straps with Dark Brown.
  11. Apply Agrax Earthshade wash to uniforms, helmet netting, webbing and packs.
  12. Mix 50/50 Baneblade Brown and Off White and lightly dry brush packs, webbing, socks and holsters.
  13. Dry brush pants, soft hats and officer great coat with Light Grey.
  14. Lightly dry brush bases and gun stocks with Baneblade Brown.
  15. Paint metal gun and water bottle parts with black and finish with a light dry brush of Metallic Silver.
  16. Dry brush gasmask containers with metallic Silver.
  17. Paint eyes with small dots of Off White and Dark Brown. Clean up around eyes with Tallarn Flesh.
  18. Mix 50/50 Tallarn Flesh and Off White and brush highlights on cheekbones, chins, forehead, nose and hands.
  19. Cover bases in white glue and cover in 50/50 mix of fine light green and dark green grass flock.
  20. Glue small pieces of clump foliage to base.
  21. Spray coat completed models with matte finish.

 IMG_4954 Helmets, smocks and pants base coated on the MG 42 team and infantry models

IMG_4958Infantry and officer uniforms base coated

IMG_4955Flesh base coats and helmet camouflage added to infantry and officer

IMG_4959Camouflage painted on helmets, and gun stocks and water bottles painted brown

IMG_5462

Equipment detail being painted

Here’s a round up of my finished German infantry from Artizan Designs…

IMG_0628

IMG_0630

IMG_0637

IMG_0636

IMG_0634

IMG_0632

IMG_0638

IMG_0639

IMG_0642

IMG_0643

IMG_0641

Now that I’ve got my core German and US forces completed, I’ll be looking to fill out forces on both sides with some additional support weapons and some more infantry from some other manufacturers. In no time at all, my 28mm force continues to grow.

I Ain’t Been Shot Mum: Cabourg June 6, 1944 Scenario

LandingatOmahaOn the morning of the Normandy Landings of June 6, 1944, taking the eastern sector of Omaha Beach fell to the United States 1st Infantry Division. Despite some missed targeted landing zones on the beach and heavy losses at the far ends, the exit “draws” were largely secured by mid-morning. As additional troops and supplies began to arrive, the push inland began.

Omaha to CobourgMap of the US push to Cabourg from Omaha Beach, June 6, 1944

(via US Army Center of Military History)

Moving toward the objective of Colleville-sur-Mer, probing forces from the 1st Infantry Division pressed forward through the seaside fields of Normandy and began to encounter German defenders in various states of disarray. Tired from the fighting at the beach, the first group of Americans on patrol moved cautiously into Cabourg from the north and east while the German force scrambled to hold against any additional headway by the invaders. WhereTheHell After a couple of month hiatus, we jumped back into a 15mm World War II game at Metropolitan Wargamers in Brooklyn, NY this past weekend centering on the action at Cabourg. Using the I Ain’t Been Shot Mum rules and a post-D-Day scenario from the Where The Hell Have You Been Boys? book, all from Too Fat Lardies, our table was set to show the American advance and German defense at Cabourg.

IMG_4940Initial advance of US forces on blinds from the east and north toward Cabourg

Playing on the US side, my partner and I divided our force of three rifle platoons under blinds plus three false blinds. I swung two platoons and a false blind directly at the village from the east while my teammate took the other two false blinds and a single platoon around to the north behind a copse of trees. The mass of US blinds hiding a force only half the actual size provided a great simulation of the confusion the Germans felt that morning as they also lay hidden in and around the village in defense.

IMG_4941US forces near Cabourg on blinds from the east

IMG_4942The first US forces are revealed beyond a wood north of Cabourg

After a couple turns of US movement and prodding for Germans outside the town, the Germans spotted the Americans moving cautiously to the north. With two false blinds exposed, the third American blind revealed a rifle platoon armed with a mortar and two officers present. A false blind was also revealed near a farm at the eastern edge of the town as the Germans continued to burn up turn actions trying to find out where the Americans actually were.

IMG_4943American and German forces simultaneously surprise each other near the farm

IMG_4944A close assault erupts in the woods behind the barn

In close proximity to each other to the rear of a barn at the farm, US and German blinds were exposed nearly simultaneously with American gunfire tearing into the outnumbered Germans. A close assault at a hedgerow quickly pushed the first German fire team to the rear and out the action for the game. The remainder of the German platoon stayed to continue on firing from within the first barn and a hede nearby.

IMG_4945The final American blind is exposed just north of the farm

IMG_4946Americans give and take fire at a hedgerow

On the other side of the farm, the final American blind revealed another rifle platoon hunkered behind a hedge lining a road to town. At long-range, shots were exchanged between German defenders in and around the barn and the Americans now shooting from both sides of the barn. The action at the east end of Cabourg settled into a stalemate of fire across the fields and around the barns.

IMG_4947US forces inch toward Cabourg across hedges and fields from the north

IMG_4949US forces stall out to the northeast of Cabourg

Back to the north of town, the lone US platoon on the moved cautiously along a road and over fields, fences and hedgerows. With the Americans creeping toward Cabourg, the Germans opened up with MG 42s positioned in an upper story of a second barn and from the garret of a farmhouse near the entry road to town. With a cross-fire of heavy machine gun pouring into the Americans at the north and east, the US advance stalled somewhat until something could be done about the German fire ripping from building windows.

IMG_4948The remnants of the first German rifle platoon look to reposition to cover

IMG_4950Americans move to assault the German machine guns at the second barn

Back at the two barns, one US platoon swung around to the rear of the barn to assault the German machine gun crew inside. With the MG 42 crew thrown back into a retreat from the barn, the surviving German rifles on the other side of the barn retreated from fire into a nearby house. Firing from their new position, the Germans stalled the Americans pushing around the barns to the village. At the same time, the other MG 42 continued to fire into the other US platoon now pinned with dwindling numbers behind a hedge.

IMG_4951German reserves arrive late in the day to defend against the American push from the north

As the engagement progressed late into the scenario, the game’s referee announced the arrival of reserves on both sides. From the west, a fresh German rifle platoon joined the fight at the road and tree line at the northern edge of town. At full strength, two German platoons focused fire on the lone American platoon which had so cautiously moved toward that end of the village. Taking casualties, the shrinking US force began to fall back over the hedges and fields from where they had just come.

On the far end of the table, three more American platoons arrived from the beach to the east. Looking to advance quickly on the road straight toward town, the US reserves just couldn’t get in the fight fast enough. With the US forces already near Cabourg greatly reduced and in retreat to defensive positions, the game was called with the Germans holding Cabourg from the American assault.

At Normandy in 1944, the result was the same and the German defense halted the US advance which broke off by mid afternoon. The IABSM scenario at Cabourg is a great illustration of the dozens of small inland battles which raged after the morning’s landings along the Normandy coast over 70 years ago, and we’ll be returning to more follow-up actions in the weeks to come.

28mm: US Airborne By Artizan Designs

ABplane

After a lot of modelling and gaming World War II over the years at the 15mm scale and some toes dipped into 6mm last year, I decided to move up to 28mm at the beginning of 2015. At this larger scale, there’s a lot less needed in terms of getting numbers of models on the table and there’s an opportunity for much more detail and personality in the figures, too. At about $2 USD per metal figure on average across a number of manufacturers, a more than healthy sized force for squad level engagements can be had with 30-40 or so figures on a side for under $100 USD.

ADlogo

To get started, I happened a  timely sale deal for Artizan Designs miniatures ordered from Brigade Games. I’m very much a late war post-D-Day player, so I purchased a variety of US Airborne riflemen, officers, characters and a M1919 30 cal. machine gun team. I really like the detail in sculpts on the Artizan figures, so the prospect of getting these guys painted up was pretty exciting.

AB Paint Scheme
Artizan Designs provides a lot of painting reference information on their site, and the US Airborne painting guide gave me a good jumping off point. I have plenty of experience painting the US 101st Airborne Division in 15mm, and the larger 28mm scale gave me the opportunity to work through a lot more detail with my miniatures. My existing paint inventory as well as a few extra colors from Citadel gave me all I needed to whip up a solid painting scheme.

CoBDecals

US 101st Airborne decals from Company B

To finish off my figures, I really wanted to add that last bit of realism at this scale with the appropriate patches and uniform markings. Since my painting skills don’t extend to the level of detail needed in painting patches and insignia, I was pleased to come across decals at this scale from Company B.

After some minimal flash clean-up, the individual figures got glued to metal washer bases. The prone LMG team went on a 60mm plastic base from Proxie Models and the two-man team on the move was glued to a larger metal washer. Here’s the painting guide in detail for my US Airborne:

Painting 28mm US Airborne

  1. Clean flash from metal models with a sharp knife and glue to metal washer or plastic bases.
  2. Apply filler putty to bases. When dry, scrape off excess with a sharp knife.
  3. Base coat models and bases with flat black spray primer.
  4. Paint uniforms and bandages on helmets with Tallarn Sand.
  5. Paint helmets and knee and elbow patches with Waaagh! Flesh.
  6. Paint faces and hands with Tallarn Flesh.
  7. Paint webbing and packs with Baneblade Brown.
  8. Paint bases, boots, gun stocks and helmet straps with Dark Brown.
  9. Apply Agrax Earthshade wash to uniforms, helmet netting, webbing and packs.
  10. Mix 50/50 Baneblade Brown and Off White and lightly dry brush packs, webbing and socks.
  11. Lightly dry brush bases, gun stocks, helmet netting, holsters and elbow and shoulder patches with Baneblade Brown.
  12. Paint metal gun parts with black and finish with a light dry brush of metallic silver.
  13. Paint eyes with small dots of Off White and Dark Brown. Clean up around eyes with Tallarn Flesh.
  14. Mix 50/50 Tallarn Flesh and Off White and brush highlights on cheekbones, chins, forehead, nose and hands.
  15. Apply decals to shoulders and helmets, followed by a coat of Solvaset decal fixative from Walthers.
  16. Cover bases in white glue and cover in 50/50 mix of fine light green and dark green grass flock.
  17. Glue small pieces of clump foliage to base.
  18. Spray coat completed models with matte finish.

IMG_4918

Filler putty applied to US Airborne .30 cal machine gun teams

IMG_4915

Helmet and uniform base coats on US Airborne riflemen

IMG_4914

Flesh base coat on hands and faces on riflemen and command figures

IMG_4957

Uniform, helmet and flesh base coats on the .30 cal machine gun teams

IMG_4956

Washes and dry brush layers added to the .30 cal machine gun models and bases

And now, a whole series of my completed US airborne troops from Artizan Designs…

IMG_0609

IMG_0610

IMG_0611IMG_0614

IMG_0618

IMG_0621

IMG_0620

IMG_0616

IMG_0617

IMG_0615

IMG_0623

IMG_0624

IMG_0626

I still want to fill out my US forces with some additional troops and support weapons, so there will be more to come from Artizan and some other manufacturers. Getting some Germans ready for the table is another pending project on the workbench. Transport and armored vehicles are also very much on my mind. I’m also still debating rule sets, and I’ve been reading up on a variety including the popular Bolt Action from Warlord Games and Nuts! from Two Hour Wargames. With my first 28mm troops ready for action, WWII at a new scale is keeping the period exciting for what I’m certain will be another new year of painting and playing.

Flames of War: 70th Anniversary Battle Of The Bulge Mission

Bulge82nd

This past week marked the 70th anniversary of the Battle of the Bulge fought between Allied and German forces in the snowy, wooded Ardennes region of Western Europe. The six-week German offensive through a frigid December 1944 and January 1945 surprised Allied forces and proved to be costly for all involved. At its conclusion, commanders on both sides counted nearly 100,000 casualties and much of the German ground and air reserves had been smashed as a result of their ill-fated gambit against the Allies.

BulgeMission

The Battle of the Bulge Mission rules from Flames of War

To mark the occasion, several of us met at Metropolitan Wargamers in Brooklyn, NY to run through the big Battle of the Bulge Mission available free online for Flames of War. The simple scenario plays out on a huge 6′ x 8′ tabletop with 4000-point forces on either side drawn from the Nuts! and Devil’s Charge books as well as the Panzers To The Meuse PDF. We set our table using a large off-white canvas with roads crisscrossing the forested field dotted with a few small structures.

101stabbulge

101st Airborne US Parachute Rifle Company from Nuts!

gliderrc

US Glider Rifle Company from Nuts!

On the Allied defending side, I ran my US 101st Airborne Division “Easy Company” list made famous by the book and TV series Band of Brothers. Several special character Warrior figures were included in my list and I also added a hefty group of five M4A3 76mm Shermans and an 81mm mortar platoon. My partner fielded a US Glider Rifle Company, also with 81mm mortars and a 57mm anti-tank platoon. In support, his list was rounded out with M7 Priests, M18 Hellcats and a tank platoon with a Jumbo, two Easy Eights and two more M4A3 76mm Shermans.

 PLJustinBulge
Lehr Panzerkompanie from Panzers To The Meuse

For the armored attacking Germans, both players pulled Lehr Panzerkompanie lists from the Panzers To The Meuse PDF from FOW. Across the lists, a swarm of Panzer IV platoons were accompanied by Panther G and Jagdpanther tanks, Puma armored cars, rocket launchers, Wirbelwinds and two Panzergrenadier platoons. To supplement their massive armored ground forces, the German players also opted for limited air support from a ME 262 A2a Sturmvogel jet plane.

IMG_4830

Initial Battle of the Bulge set up as German players plot their offensive

Per the scenario, the largely infantry US forces were deployed with the exception of our 76mm tank platoon and anti-tank guns which we held in reserve. The US anti tank platoon deployed at the center of the board with their M20 Greyhound scout cars, ready to spring support with the soft but deadly Hellcats to either flank.

IMG_4831

Panzer Lehr forces deploy and move toward the American right

IMG_4832

The German armored assault pushes to the American left

IMG_4833

German ME 262 jet attempts to dig the 101st Airborne out of their positions

The German forces moved quickly onto the board with reconnaissance moves from the Pumas stretching across the table. A mass of Panzer IVs and the Jagdpanthers rolled to the US right. On the American left, Panthers moved to cover in a small wood while the two platoons of mounted Panzergrenadiers pushed down the road toward a US rifle team dug into another woods looking to attack with an armored assault. At the rear, the first run of the Sturmvogel took after the US Airborne in position protecting an objective to no effect.

IMG_4834

The German armored assault on the US rifles in the woods

The German armored assault commenced but was bounced back over the first couple turns with the Americans taking only a few losses from the protection of the trees. Panzer IVs moved in to support from behind the German halftracks and took fire from the Jumbo, Easy Eights and 76mm Shermans sitting in a treeline across the road. The Americans sprang their first ambush, placing anti-tank guns nearby the Panthers. While shots from the US AT platoon were unable to crack the heavy panther armor, their position would go on to strongly limit the maneuverability of the Panthers for the whole game.

IMG_4835

US 76mm tank platoon springs an ambush on the right

IMG_4836

US tanks receive heavy fire from the Panzer Lehr

IMG_4837

US Hellcats move to stop the German armor advance

Over on the German right, the Panzer IV and Jagdpanther force divided around a wooded area and was engaged by the platoon of five 76mm Shermans exposing themselves in ambush. Over the next several turns, armor fire was exchanged as the German tanks sought cover in and around the woods. Three 76mm Shermans were quickly destroyed and the position was quickly reinforced with the US Hellcats deploying from behind a nearby barn. One Jagdpanther quickly bogged and sat stalled over repeated attempts to unbog for the majority of the remainder of the game.

IMG_4838

Panzer IVs are devastated by US armor fire from the woods at the left

Back on the US left flank, the German armored assault was pushed back with most of two platoons destroyed in a crossfire from American rifle infantry in one woods and tank fire from another. the combined fire from the US armor likewise laid waste to the approaching Panzer IVs and Pumas. At mid-game, the American left was holding but the US right was in trouble.

IMG_4839

The ME 262 Sturmvogel takes a run at the US Priests

Supporting fire from both sides proved relatively ineffective throughout the game. The German ME 62 failed to score a hit on multiple runs over the table both to infantry and the rear American Priest platoon. The Priests themselves served to only stall the German armor advance with poor results from multiple bombardments. German rocket fire from their rear also showed little for its repeated efforts once spotting teams were in position on both flanks.

IMG_4840German Panthers are thwarted by smoke rounds at the US left

IMG_4841German armor pushes for the crossroads objective

By the sixth and seventh turns, the game continued to progress steadily on two fronts. At the US left, Panther tanks moved into position after their allied Panzer IVs sat burning all around them. Smoke rounds from two US mortar platoons effectively kept the Panthers out of most of the fight as they crept forward and back in the woods. Finally, a couple of side armor shots from the American anti-tank 57mm guns took a couple of the Panthers out and effectively ended the German threat on one side of the field.

IMG_4843

101st Airborne troops rush forward to contest the crossroads objective

IMG_4842

Panzer Lehr forces attempt to push out the 101st Airborne

IMG_4844

German armor continues to roll to a second objective crossroads at the rear

Things were fairing much better for the Germans all along at the other end of the field. Over several late game turns, the German armor pushed forward, leaving all the US Hellcats in flame and the final surviving 76mm Sherman fleeing the field. The veteran 101st Airborne troops continued to snarl the German advance, remaining static and dug in under wooded cover. With the Americans handily holding their left, two US platoons ran to the right to shore up the defense of two objectives. Just as one platoon of US paratroopers broke, a round of fire from the Priests took out one of the Jagdpanthers. With German armor at one objective and pushing hard at a second, a lot of American troops were poised to go down contesting two crossroads with plenty of mortar support ready to shift their attention across the table.

The written scenario doesn’t call for a turn limit, but after having played for nearly eight hours we called the game at the ninth turn. This was one of the longer and larger FOW battles we had played at the club in Brooklyn in this year. In a year of 70th anniversaries, wrapping up with an exhausting and dynamic Battle of the Bulge game seemed the best way to play some tribute in miniature to the largest battle fought in US history.

Flames of War: Tanksgiving 2014 After Action Report

Tanks2014AAR

This past weekend seven of us gathered at Metropolitan Wargamers in Brooklyn, NY for our second annual Flames of War Tanksgiving event. One new player and six experienced FOW gamers (including two father/son pairs) played through five Late War games using 1750-point companies stretching over three tables — two from Western Europe and one from the Eastern Front. Over the course of the afternoon, British, US, German, Soviet and Hungarian forces fought it out with a mixed results but a slight edge toward the Axis for the day.

IMG_4722

Setting up two Western Europe tables for Tanksgiving 2014

IMG_4723

Western European tables ready to go at Metropolitan Wargamers with an Eastern Front table at the back

British Guards Armoured vs German Schwere SS-Panzerkompanie

The first Western Europe table presented a No Retreat Mission with the Guards Armoured defending a small town from a raiding Tiger-led German force attacking from the open farm area across a river. The Guards deployed an eight 25-pound gun Royal Artillery at the back edge of the table and one objective near the bridge spanning the river to the town. With three other platoons of Sherman and Sherman Firefly tanks in reserve, the initial British force would need to hold fast against the German onslaught.

IMG_4724

Guards Armoured tanks deploy at an objective

IMG_4726

Tigers roll toward the bridge and are covered in smoke rounds

The Germans began the game fully deployed and slowly moving their Tigers toward the bridge and an objective just beyond. With famed tank ace Michael Wittman commanding, the key for the spare British force was to stay away from the deadly guns of the German tanks. At the river ford in the center, the Panzer IVs moved to flank the other side of town with Panzer Grenadiers mounted in half tracks at the rear. The best the British could do was fire smoke rounds into the Tigers across the river and follow-up with long-range shots from the single Firefly deployed at the beginning of the game.

IMG_4727

A Firefly destroys a Tiger at the bridge

IMG_4728

Panzer IVs and Shermans face off in the town streets as a Firefly covers the bridge

Over the next two turns, British reserves arrived and made way for the center of the town, using the tight cobblestone streets and buildings as cover. Artillery spotters stationed in the rooftops of buildings called in several turns of artillery fire but failed to have any effect on the Tigers and destroying only one German halftrack at the river. A crack shot from a Firefly at the center of the town destroyed the first Tiger over the bridge. By the end of the fourth turn, the Panzer IVs wheeled to get into the town at the British left but were pushed back by fire from British Shermans.

IMG_4730

Reserve platoons from the Guards Armoured arrive to engage the Panzer IVs

IMG_4731

Tigers position themselves on two flanks of the town

In the fifth turn, the two remaining platoons from the Guards Armoured arrived to the British left and pushed forward toward the Panzer IVs. With two German tanks quickly lit up, the surviving Panzer IV fell back to the treeline where it was destroyed in the next turn. The British held their left for the moment, but in the cover of the raging tank fight, the dismounted Panzer Grenadiers had managed to slip into the town’s buildings unharmed.

IMG_4732

Firefly Shermans and Tigers face off to protect the objective

IMG_4733

Three Tigers charge hard toward the objective beyond the road

As smoke continued to hold the Tigers from firing at the bridge, a second Tiger was destroyed from a volley from the same Firefly that had sent the first Tiger into flames. While action at the bridge stalled, the three other Tigers had been working their way through wrecking the British tanks which had destroyed the Panzer IVs. All the while, the German infantry had continued to work through the town’s building’s untouched and toward the objective back the rear of town. The British command tanks rolled to stall the advance of the Panzer Grenadiers with machine gun fire and cover the objective.

With most of the British armour ablaze throughout the town, three Tigers rolled toward the objective at the bridge. The surviving British tanks had continued to make successful morale checks with the benefit of their special rerolls. The two surviving Firefly Shermans took a combined shot at a Tiger’s rear and missed. The Tiger’s spun around to return fire, destroying a Firefly. With further ineffective artillery rounds and just one Firefly sitting between three Tigers and the objective, the game was called with a victory for the Germans.

Final Result: Victory for the Germans!

Soviet Tankovy Batalon vs. Hungarian Harckocsizó Század

The day also saw a couple Eastern Front games with Hungarian and Soviet forces facing off on tables set up using a random terrain generator. The Eastern Front table showcased log structures from the excellent Miniature Building Authority Russian Village set along with some rural farm buildings from FOW. Each game saw the Soviets as the attacker, the first taking place on a table representing the bleak steppes of Russia in a Fighting Withdrawal Mission. The defending Hungarians began in prepared positions with a howitzer battery and Panzer IVs to their right, infantry at the center and tanks at the left. The Soviets with T-34 obr 1942 tanks at their extreme  left and right,  SU-100 tank killers and a Gvardeyskiy Tyazheliy Tankovy company at the center and a heavy mortar company at the rear.

IMG_4725The Soviet line moves toward the Hungarian positions

IMG_4719

Soviet tanks roll toward the Hungarian positions

IMG_4720

Hungarian armor proves to be no match for the Soviets

The second Eastern Europe match-up occurred around a collective farm complex with a Dust Up Mission. Starting from opposite corners, both the Hungarians and Soviets positioned themselves into a fantastic series of turns in and around the small farm. With both players moving, dodging for cover and firing at close range, the Hungarians and Soviets sparred for victory as tanks burned all around.

IMG_4721

Game two on the Eastern Front with the central Soviet farm complex

As Hungarian reserves arrived late in the game, infantry climbed out of their trucks and assaulted the Soviet T-34s. Soviet reserves likewise entered the game and made way for the Hungarian howitzers and the objective at the opposite corner. With two intense assaults at either end of the field, the Soviets gained a slight edge and were able to score their second victory on the day.

Final Results: Two Victories for the Soviets!

US 7th Division vs. German Panzer Ausbildungs Abteilung

Back on the other Western Front table a spare rural village anchored by a prominent church and surrounding hill and forests, a deadly force of German Panthers, Tiger Is and Königstigers squared off against the US 7th Division. The Americans rolled into the first Pincer Mission with standard Shermans, M4A3E8 Easy Eights and M4A3E2 Jumbo. At the rear, M7 Priests and 81mm mortars mounted in half tracks were positioned to cover the field in smoke while a P-47 Thunderbolt was on call to swoop in against the German force.

IMG_4742

The US 7th Division deploys in cover on the Western Front

Hoping to avoid German fire, the US tanks crowded into position using the church and other structures for cover as they eased across the field. Once engaged, the Jumbos did their job of eating up fire from the German guns and allowed the other US tanks to advance toward the objectives. Even with smoke cover fired from the rear, air support above and a mass of US armor, the cautious pace of the Americans was no match against the German Tigers firing from the woods. By the time the Americans made a push for the objective in the open, the German tanks were squarely deployed to defend the objective and take the game.

IMG_4740

American tanks bide their time waiting for clear shots at the heavy German armor

IMG_4739

Overwhelming German presence holds the objective

The players switched sides in the second No Retreat Mission on the same table. Again, the Americans came on the table on the far side of the town but this time chose to race aggressively toward their objectives. Defending from the wooded areas again, the Germans were able to fire at will on the advancing Americans. Quickly moving to a close series of short-range duels, tanks on both sides shifted to get into important side armor shot positions. With a tight cluster of models crowding the field near the objectives, American artillery smoke and air support quickly became irrelevant and some lively debate erupted around lines of sight and facings. The second game was a much closer match, but in the end, the thick hulls of the German tanks were no match for the American guns.

IMG_4741

Tanks on both sides jockey for effective shots near an objective

With two victories for the Germans, there was a fair amount of discussion as to whether the Panzer Ausbildungs Abteilung list is an example of a “broken” and unbeatable list in FOW. The Americans tried their best with both cautious and forceful tactics using some great available equipment

Final Results: Two victories for the Germans!

At day’s end, the Axis came out with a slight edge of a 3-2 victory over the Allies across two European fronts. The presence of tough late war German Tiger tanks are a hard force to crack, even with quality American and British armor with lots of air and artillery support. On the other hand, the Russian tank horde always proves to be a formidable Allied opponent whether facing Hungarians or Germans. Force quality, tactics and a bit of luck always play a role, and our five Tanksgiving games were all unique examples of how Flames of War tank battles can go on any given day.