28mm: US Airborne HQ, Jeeps and 57mm Anti-Tank Gun from Warlord Games

Paratroopers of the 82nd Airborne Division load an M1 57mm Anti ...

I took the occasion of the 75th anniversary of VE Day recently to revisit some long-neglected World War II US Airborne models from Warlord Games. I model all my 28mm WWII figures in metal from a variety of manufacturers, preferring the heft, durability, speed to complete and detail to that of miniatures cast in plastic.

Warlord sells their models in conjunction with their Bolt Action game, but I use the miniatures in a variety of systems. The HQ set includes a radio operator, medic and two officers, including one chomping on the stub of a cigar. Each of the jeeps (sold individually) have a group of soldiers piled in and a wire catcher extending up from the front to prevent wire traps from injuring the riders. Finally, the M1 57mm anti tank gun features two loaders I mounted directly to the gun’s base while keeping the command figure separate in case I want to field him separately.

These models paint quickly and I finish them off with appropriate 101st Airborne insignia decals from Company B. As with all Warlord casts, these models all feature some great detail, poses and personality, making them a great mix and addition to my miniature WWII allied forces.

US Airborne HQ (1944-45) from Warlord Games
US Airborne Jeep (1944-45) from Warlord Games
US Airborne 57mm Anti-Tank Gun (1944-45) from Warlord Games

28mm: German Wehrmacht and Mortar By Black Tree Design

GermanMortar

Taking advantage of the frequent sales by Black Tree Design, I’ve added some additional Wehrmacht troops to my 28mm World War II German force. Previously, I had painted up more than thirty of Black Tree’s figures, so this later order filled out my collection with a few more soldiers armed with rifles, another officer and a mortar crew with a nifty spotter with binoculars raised to his eyes.

BTD

When on sale, these metal cast models from Black Tree come in at about $1.50 USD each. This price point makes these miniatures super affordable, quick to get based and ready for painting up using my regular painting process.

Painting 28mm German Infantry

  1. Clean flash from metal models with a sharp knife and glue to metal washer or plastic bases.
  2. Apply filler putty to bases. When dry, scrape off excess with a sharp knife.
  3. Basecoat models and bases with flat black spray primer.
  4. Paint pants, helmets, soft hats, officer greatcoats and gas mask containers with Skavenlight Dinge.
  5. Paint faces and hands with Tallarn Flesh.
  6. Paint packs ans straps with Baneblade Brown.
  7. Paint boots and equipment straps Black.
  8. Paint bases, gun stocks, water bottles and helmet straps with Dark Brown.
  9. Apply Agrax Earthshade wash to webbing and packs.
  10. Dry brush pants, helmets, soft hats and officer greatcoats with Light Grey.
  11. Lightly dry brush bases and gun stocks with Baneblade Brown.
  12. Paint metal gun and water bottle parts with black and finish with a light dry brush of Metallic Silver.
  13. Dry brush gasmask containers with metallic Silver.
  14. Paint eyes with small dots of Off White and Dark Brown. Clean up around eyes with Tallarn Flesh.
  15. Mix 50/50 Tallarn Flesh and Off White and brush highlights on cheekbones, chins, forehead, nose and hands.
  16. Cover bases in white glue and cover in 50/50 mix of fine light green and dark green grass flock.
  17. Glue small pieces of clump foliage to base.
  18. Spray coat completed models with matte finish.

With about 40 of Black Tree’s models now complete, I’ve got a flexible, reliably sized force of simply outfitted Germans ready for deployment in a variety of European tabletop scenarios.

image1(1)

image2(1)

image3(1)

image4(1)

image5

28mm: US Airborne Pathfinders And Willys Jeeps By Warlord Games

PathfindersFecPainting

I recently picked up four US Airborne Pathfinder models from Warlord Games via special order from the good folks at The Brooklyn Strategist. As I sat down to paint them up, I did a little online searching and came across an obituary in the NY Times for Jake McNiece, a leader of the “Filthy 13” of the 101st Airborne Division which riskily night-dropped ahead of the main invasion force on D-Day.

McNiece (featured in a photo above from Stars and Stripes) is credited with coming up with the iconic mohawked shaved heads and face paint worn by many of the hearty Pathfinders, and painting these figures adds some great visual diversity to any US Airborne force representing American paratroopers on D-Day. I had previously painted up Pathfinders from Artizan Designs, and these warlord models fleshed out my Pathfinders squad to a full and fearsome force.

Warlordlogo

My US Airborne painting scheme is quick and gets my models table-ready in just a couple painting sessions. This latest round of painting my US Airborne collection also included a couple Warlord US Army Willys Jeep models I picked up on sale at this year’s HMGS 2016 Cold Wars Convention. I painted the driver and gunner to match my US Airborne, and they fit in nicely with my models while also adding some mobile gun support on the game table.

AB Paint Scheme

Painting 28mm US Airborne Pathfinders

  1. Clean flash from metal models with a sharp knife and glue to metal washer or plastic bases.
  2. Apply filler putty to bases. When dry, scrape off excess with a sharp knife.
  3. Base coat models and bases with flat black spray primer.
  4. Paint uniforms and bandages on helmets with Tallarn Sand.
  5. Paint helmets and knee and elbow patches with Waaagh! Flesh.
  6. Paint faces and hands with Tallarn Flesh.
  7. Paint webbing and packs with Baneblade Brown.
  8. Paint bases, boots, gun stocks and helmet straps with Dark Brown.
  9. Apply Agrax Earthshade wash to uniforms, helmet netting, webbing and packs.
  10. Mix 50/50 Baneblade Brown and Off White and lightly dry brush packs, webbing and socks.
  11. Lightly dry brush bases, gun stocks, helmet netting, holsters and elbow and shoulder patches with Baneblade Brown.
  12. Paint metal gun parts with black and finish with a light dry brush of metallic silver.
  13. Paint eyes with small dots of Off White and Dark Brown. Clean up around eyes with Tallarn Flesh.
  14. Paint thin lines of red and offwhite face paint to cheeks and foreheads of the models.
  15. Mix 50/50 Tallarn Flesh and Off White and brush highlights on cheekbones, chins, forehead, nose and hands.
  16. Cover bases in white glue and cover in 50/50 mix of fine light green and dark green grass flock.
  17. Glue small pieces of clump foliage to base.

After painting, I added a final touch with decals on shoulders and helmets from Company B, followed by a coat of Solvaset decal fixative from Walthers and a spray coat with matte finish.

This little project not only gave me a break from my regular painting but also added a bunch of new models I can field in my Bolt Action and other 28mm World War II skirmish games. Pictures below show the final results ready to drop onto the table and start rolling dice during the invasion of Normandy.

FullSizeRender

FullSizeRender0

FullSizeRender(8)

FullSizeRender(2)

FullSizeRender(3)

FullSizeRender(4)

FullSizeRender(5)

28mm: US Airborne Squad and HQ By Warlord Games

101ABRoad

Despite all the planes, ships, artillery and tanks, the the core of US fighting forces in during World War II was the squad of American men armed with M1 rifles. General George Patton called the weapon “the greatest battle implement ever devised,” and in the hands of a small groups of US Airborne troops the tide of the war tipped after the Normandy invasion in June 1944.

BAParaSquadBox

For my 28mm WWII Bolt Action gaming, I exclusively use metal miniatures and I don’t duplicate poses. What this means is that I’m working my way through all the models available from a few manufacturers. For my latest additions to my US 101st Airborne force, I picked up the US Paratrooper Squad box and the US Airborne HQ package, both from Warlord Games.

IMG_7965

Warlord Games Bolt Action US paratrooper squad and HQ figures

You really can’t beat metal casting for detail and personality, and these models are no different. The HQ set has a nifty medic model on the run and an officer firing his pistol while cradling his Thompson submachine gun in the other arm. A third figure is dropping his binoculars to the side and shouting over his shoulder while another model holds a SMG and barks orders into his radio handset nestled under his chin. The paratrooper squad box gives a good mix of men armed with rifles, a NCO and two others carrying SMGs, and a two-man light machine gun team.

AB Paint Scheme

As always, my painting is straightforward — I want the models to look historical yet unique to my style, and I want to put them to use on the table quickly.

Painting 28mm US Airborne

  1. Clean flash from metal models with a sharp knife and glue to metal washer or plastic bases.
  2. Apply filler putty to bases. When dry, scrape off excess with a sharp knife.
  3. Base coat models and bases with flat black spray primer.
  4. Paint uniforms and bandages on helmets with Tallarn Sand.
  5. Paint helmets and knee and elbow patches with Waaagh! Flesh.
  6. Paint faces and hands with Tallarn Flesh.
  7. Paint webbing and packs with Baneblade Brown.
  8. Paint bases, boots, gun stocks and helmet straps with Dark Brown.
  9. Apply Agrax Earthshade wash to uniforms, helmet netting, webbing and packs.
  10. Mix 50/50 Baneblade Brown and Off White and lightly dry brush packs, webbing and socks.
  11. Lightly dry brush bases, gun stocks, helmet netting, holsters and elbow and shoulder patches with Baneblade Brown.
  12. Paint metal gun parts with black and finish with a light dry brush of metallic silver.
  13. Paint eyes with small dots of Off White and Dark Brown. Clean up around eyes with Tallarn Flesh.
  14. Mix 50/50 Tallarn Flesh and Off White and brush highlights on cheekbones, chins, forehead, nose and hands.
  15. Apply Company B decals to shoulders and helmets, followed by a coat of Solvaset decal fixative from Walthers.
  16. Cover bases in white glue and cover in 50/50 mix of fine light green and dark green grass flock.
  17. Glue small pieces of clump foliage to base.
  18. Spray coat completed models with matte finish

First some finished pictures of the command models:

FullSizeRender

FullSizeRender(2)

FullSizeRender(1)

And some shots of the completed squad:

FullSizeRender(3)

FullSizeRender(5)

FullSizeRender(6)

FullSizeRender(7)

FullSizeRender(8)

FullSizeRender(9)

28mm: US .50 cal M2 HMG By Warlord Games

50calAB

The Browning .50 caliber M2HB heavy machine gun has been around for nearly 100 years, a remarkable feat in a span of years when battlefield technology has evolved immensely. The M2’s deadly flexibility in use as an infantry support weapon and mounting on aircraft, land vehicles and naval vessels has served the US and many other military organizations around the world over its history. Clearly, this gun not only has fire power but also significant staying power.

Warlordlogo

I’ve been gearing up for my first Bolt Action tournament at Nu Brand Gaming in Brooklyn, NY, and the M2 was one the one missing piece to my US 101st Airborne force I really wanted to get ready for the table. I got a deal on the metal cast model from Warlord Games and have chosen to paint it up as an Airborne support weapon unit. Some pics of the finished gun and its four-man crew are found below along with my simple approach to getting models painted up and ready for action.

AB Paint Scheme

Painting 28mm US Airborne Support Weapons

  1. Clean flash from metal models with a sharp knife and glue to metal washer or plastic bases.
  2. Apply filler putty to bases. When dry, scrape off excess with a sharp knife.
  3. Base coat models and bases with flat black spray primer.
  4. Paint uniforms and bandages on helmets with Tallarn Sand.
  5. Paint helmets and knee and elbow patches with Waaagh! Flesh.
  6. Paint faces and hands with Tallarn Flesh.
  7. Paint webbing and packs with Baneblade Brown.
  8. Paint bases, boots, gun stocks and helmet straps with Dark Brown.
  9. Apply Agrax Earthshade wash to uniforms, helmet netting, webbing and packs.
  10. Mix 50/50 Baneblade Brown and Off White and lightly dry brush packs, webbing and socks.
  11. Lightly dry brush bases, gun stocks, helmet netting, holsters and elbow and shoulder patches with Baneblade Brown.
  12. Paint metal gun, bazooka and mortar parts with black and finish with a light dry brush of metallic silver.
  13. Paint eyes with small dots of Off White and Dark Brown. Clean up around eyes with Tallarn Flesh.
  14. Mix 50/50 Tallarn Flesh and Off White and brush highlights on cheekbones, chins, forehead, nose and hands.
  15. Apply Company B decals to shoulders and helmets, followed by a coat of Solvaset decal fixative from Walthers.
  16. Cover bases in white glue and cover in 50/50 mix of fine light green and dark green grass flock.
  17. Glue small pieces of clump foliage to base.
  18. Spray coat completed models with matte finish.

IMG_7896

IMG_7895

IMG_7894

28mm: German Wehrmacht By Black Tree Design

Wehrmacht

I recently got back to my 28mm World War II projects with some Wermacht from Black Tree Design. After painting up a bunch of German troops in camouflage smocks, I wanted to get some more Heer infantry into the mix. And so, on the back of a big sale this summer, I’ve just about doubled my Axis forces at this scale.

BTD

I was really pleased when I received my large order and marveled at all the detail on these figures. Lots of varied poses, weapons, equipment and personality make these casting from Black Tree Design stand as equals with all my other troops. As always, the customer service from the company was superb with nice hand-written notes included in each order boxed up in a little metal tin.

WehrDecalsGerman infantry decals from Company B

Along with my figure order, I also went back to Company B to order up some decals for the helmets. Even though it might not be as historical, I went with the national colors of the double decal helmet configuration which was phased out fairly early in the war. I really just wanted a bit more color on the otherwise monotone color scheme. And, while I’m on the subject of color, I really liked how the Skavenlight Dinge from Citadel Paint captured a nice mix of grey-green-blue tones of the standard German uniform.

IMG_6375A painted figure gets decals applied

Painting 28mm German Infantry

  1. Clean flash from metal models with a sharp knife and glue to metal washer or plastic bases.
  2. Apply filler putty to bases. When dry, scrape off excess with a sharp knife.
  3. Basecoat models and bases with flat black spray primer.
  4. Paint pants, helmets, soft hats, officer greatcoats and gas mask containers with Skavenlight Dinge.
  5. Paint faces and hands with Tallarn Flesh.
  6. Paint packs ans straps with Baneblade Brown.
  7. Paint boots and equipment straps Black.
  8. Paint bases, gun stocks, water bottles and helmet straps with Dark Brown.
  9. Apply Agrax Earthshade wash to webbing and packs.
  10. Dry brush pants, helmets, soft hats and officer greatcoats with Light Grey.
  11. Lightly dry brush bases and gun stocks with Baneblade Brown.
  12. Paint metal gun and water bottle parts with black and finish with a light dry brush of Metallic Silver.
  13. Dry brush gasmask containers with metallic Silver.
  14. Paint eyes with small dots of Off White and Dark Brown. Clean up around eyes with Tallarn Flesh.
  15. Mix 50/50 Tallarn Flesh and Off White and brush highlights on cheekbones, chins, forehead, nose and hands.
  16. Cover bases in white glue and cover in 50/50 mix of fine light green and dark green grass flock.
  17. Glue small pieces of clump foliage to base.
  18. Spray coat completed models with matte finish.

I really like how these models scale with all my previous 28mm miniatures from Artizan Designs and Warlord Games, and my Wermacht forces will fit nicely in the defense of Europe from the tabletop assault of my Allied troops.

IMG_0762

IMG_0767

IMG_0769

IMG_0771

IMG_0773

IMG_0764

IMG_0766

IMG_0768

IMG_0772

IMG_0770

IMG_0765

IMG_0774

IMG_0763

28mm: US Airborne Pathfinders And Characters By Artizan Designs

USABcharacters

Among the US 101st Airborne Division, the volunteer pathfinders were a particularly hearty group. Parachuting into France just after midnight on June 6, 1944, the pathfinders were among the first allied troops to set foot on French soil as the D-Day invasion commenced. Tasked with marking the drop zones, the mission of the pathfinders was hampered by poor weather, heavy German defenses, flooded fields and faulty equipment. Despite the challenges hampering the pathfinders on the ground, the Allied air invasion of more than 13,000 men behind the beaches of Normandy proved key to the day’s success.

ADlogo

In continuing to round out my 28mm US Airborne collection, I went back to Artizan Designs for their pathfinder models as well as some additional characters. Two of the pathfinders feature the signature mohawk hairstyles and I added “war paint” markings on their faces as seen in some historic photographs. The other character models will serve as officers since their poses display confidence in command.

AB Paint Scheme

Painting 28mm US Airborne

  1. Clean flash from metal models with a sharp knife and glue to metal washer or plastic bases.
  2. Apply filler putty to bases. When dry, scrape off excess with a sharp knife.
  3. Base coat models and bases with flat black spray primer.
  4. Paint uniforms and bandages on helmets with Tallarn Sand.
  5. Paint helmets and knee and elbow patches with Waaagh! Flesh.
  6. Paint faces and hands with Tallarn Flesh.
  7. Paint webbing and packs with Baneblade Brown.
  8. Paint bases, boots, gun stocks and helmet straps with Dark Brown.
  9. Apply Agrax Earthshade wash to uniforms, helmet netting, webbing and packs.
  10. Mix 50/50 Baneblade Brown and Off White and lightly dry brush packs, webbing and socks.
  11. Lightly dry brush bases, gun stocks, helmet netting, holsters and elbow and shoulder patches with Baneblade Brown.
  12. Paint metal gun parts with black and finish with a light dry brush of metallic silver.
  13. Paint eyes with small dots of Off White and Dark Brown. Clean up around eyes with Tallarn Flesh.
  14. Mix 50/50 Tallarn Flesh and Off White and brush highlights on cheekbones, chins, forehead, nose and hands.
  15. Cover bases in white glue and cover in 50/50 mix of fine light green and dark green grass flock.
  16. Glue small pieces of clump foliage to base.

To finish my models I’ll be adding decals to shoulders and helmets from Company B, followed by a coat of Solvaset decal fixative from Walthers and a spray coat with matte finish. After that, these guys will relive the heroics of D-Day on a tabletop soon.

IMG_0745

IMG_0747

IMG_0748

IMG_0746

IMG_0750

IMG_0749


28mm: US Airborne By Black Tree Design

101stabonplane

My new 28mm World War II project is marching on, and I’ve recently added some US 101st Airborne models from Black Tree Design. The UK-based BTD offers a diverse line of metal miniatures from various historical eras, fantasy, science fiction and a nifty Doctor Who offering. The WWII US Airborne line offers a nice selection of poses and weapons, so I bought into my first BTD models averaging about $2 USD per figure during one of their frequent online sales.

BTDIMG_4977Nice packaging from Black Tree Miniatures

The BTD miniatures were quickly delivered in the US bagged and packaged in a little tin with a hand-written ‘thank you’ note. Compared to my earlier Airborne from Artizan Designs, the BTD models are a tad smaller and thinner but scale well on the table. Detail is a bit more sparse with less equipment slung on the backs of the paratroopers and rifles which read a bit more like that on toy soldiers. Aside from rifles, the models also came armed with Browning BARs, Thompson submachine guns and one guy hurling a hand grenade. While most of the models are set in generic poses, a few of the models show a lot of individual character with one officer calmly smoking a cigarette and another charging forward without a helmet.

AB Paint SchemeOne minor bummer was the delicate nature of some of the BTD models cast with both feet held tightly together, and one snapped off the base when I attempted to straighten his pose more upright. With the rest of the models successfully glued to bases, I painted up my first group of BTD miniatures using the same quick and simple process from my previous 28mm paratroopers.

Painting 28mm US Airborne

  1. Clean flash from metal models with a sharp knife and glue to metal washer or plastic bases.
  2. Apply filler putty to bases. When dry, scrape off excess with a sharp knife.
  3. Base coat models and bases with flat black spray primer.
  4. Paint uniforms and bandages on helmets with Tallarn Sand.
  5. Paint helmets and knee and elbow patches with Waaagh! Flesh.
  6. Paint faces and hands with Tallarn Flesh.
  7. Paint webbing and packs with Baneblade Brown.
  8. Paint bases, boots, gun stocks and helmet straps with Dark Brown.
  9. Apply Agrax Earthshade wash to uniforms, helmet netting, webbing and packs.
  10. Mix 50/50 Baneblade Brown and Off White and lightly dry brush packs, webbing and socks.
  11. Lightly dry brush bases, gun stocks, helmet netting, holsters and elbow and knee patches with Baneblade Brown.
  12. Paint metal gun, bazooka and mortar parts with black and finish with a light dry brush of metallic silver.
  13. Paint eyes with small dots of Off White and Dark Brown. Clean up around eyes with Tallarn Flesh.
  14. Mix 50/50 Tallarn Flesh and Off White and brush highlights on cheekbones, chins, forehead, nose and hands.
  15. Apply Company B decals to shoulders and helmets, followed by a coat of Solvaset decal fixative from Walthers.
  16. Cover bases in white glue and cover in 50/50 mix of fine light green and dark green grass flock.
  17. Glue small pieces of clump foliage to base.
  18. Spray coat completed models with matte finish.

Finally, a few photos of my finished BTD US Airborne ready to hit the Normandy tabletop.

IMG_0654

IMG_0657

IMG_0659

IMG_0660

IMG_0658  IMG_0744IMG_0662

IMG_0663

28mm: US Airborne Support Weapons By Warlord Games

usairborneweapons

With my first 101st Airborne troops completed in 28mm, I’ve moved on to adding some support weapons. As a relative newcomer to World War II at this scale, I’ve also taken the opportunity to try another manufacturer’s miniatures for the sake of comparison.

WarlordlogoIn 2008, Warlord Games launched a small selection of WWII miniatures acquired from another manufacturer. To compliment the line of models, about three years ago Bolt Action came to the game scene with a slickly-designed rule set published by Osprey Publishing and a now vastly-expanding line of miniatures from multiple nations and combat theaters of WWII. The Warlord Games plastic and metal line of soldiers, artillery, transports and armor, along with the Bolt Action game system, have come to dominate the market and tournament scene for gamers playing tactical-level WWII in the larger 28mm scale.

For my first figures from Warlord Games, I stuck with a few metal models which scale nicely with my figures from Artizan Designs. The castings display a lot of exaggerated poses, animated facial expressions and detailed equipment which look great on a wargaming tabletop and reveal the influence of the designers who hail from the world of Warhammer and Warhammer 40,000 from Games Workshop.

AB Paint SchemeIn painting my first Warlord Games miniatures, I went with my same quick and simple painting scheme I’ve been using so far:

Painting 28mm US Airborne Support Weapons

  1. Clean flash from metal models with a sharp knife and glue to metal washer or plastic bases.
  2. Apply filler putty to bases. When dry, scrape off excess with a sharp knife.
  3. Base coat models and bases with flat black spray primer.
  4. Paint uniforms and bandages on helmets with Tallarn Sand.
  5. Paint helmets and knee and elbow patches with Waaagh! Flesh.
  6. Paint faces and hands with Tallarn Flesh.
  7. Paint webbing and packs with Baneblade Brown.
  8. Paint bases, boots, gun stocks and helmet straps with Dark Brown.
  9. Apply Agrax Earthshade wash to uniforms, helmet netting, webbing and packs.
  10. Mix 50/50 Baneblade Brown and Off White and lightly dry brush packs, webbing and socks.
  11. Lightly dry brush bases, gun stocks, helmet netting, holsters and elbow and shoulder patches with Baneblade Brown.
  12. Paint metal gun, bazooka and mortar parts with black and finish with a light dry brush of metallic silver.
  13. Paint eyes with small dots of Off White and Dark Brown. Clean up around eyes with Tallarn Flesh.
  14. Mix 50/50 Tallarn Flesh and Off White and brush highlights on cheekbones, chins, forehead, nose and hands.
  15. Apply Company B decals to shoulders and helmets, followed by a coat of Solvaset decal fixative from Walthers.
  16. Cover bases in white glue and cover in 50/50 mix of fine light green and dark green grass flock.
  17. Glue small pieces of clump foliage to base.
  18. Spray coat completed models with matte finish.

To begin, I’ve painted up a 60mm mortar team and a bazooka crew. here’s a few photos of the final results:

IMG_0649

IMG_0648

IMG_0646

IMG_0647

I’ll probably add a light machine gun and some other models from Warlord Games soon, but for now my US Airborne forces will be able to pack a bit more punch in upcoming games.

28mm: US Airborne By Artizan Designs

ABplane

After a lot of modelling and gaming World War II over the years at the 15mm scale and some toes dipped into 6mm last year, I decided to move up to 28mm at the beginning of 2015. At this larger scale, there’s a lot less needed in terms of getting numbers of models on the table and there’s an opportunity for much more detail and personality in the figures, too. At about $2 USD per metal figure on average across a number of manufacturers, a more than healthy sized force for squad level engagements can be had with 30-40 or so figures on a side for under $100 USD.

ADlogo

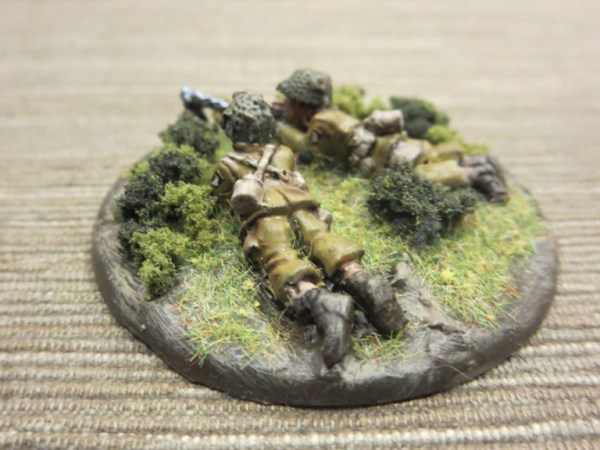
To get started, I happened a  timely sale deal for Artizan Designs miniatures ordered from Brigade Games. I’m very much a late war post-D-Day player, so I purchased a variety of US Airborne riflemen, officers, characters and a M1919 30 cal. machine gun team. I really like the detail in sculpts on the Artizan figures, so the prospect of getting these guys painted up was pretty exciting.

AB Paint Scheme
Artizan Designs provides a lot of painting reference information on their site, and the US Airborne painting guide gave me a good jumping off point. I have plenty of experience painting the US 101st Airborne Division in 15mm, and the larger 28mm scale gave me the opportunity to work through a lot more detail with my miniatures. My existing paint inventory as well as a few extra colors from Citadel gave me all I needed to whip up a solid painting scheme.

CoBDecals

US 101st Airborne decals from Company B

To finish off my figures, I really wanted to add that last bit of realism at this scale with the appropriate patches and uniform markings. Since my painting skills don’t extend to the level of detail needed in painting patches and insignia, I was pleased to come across decals at this scale from Company B.

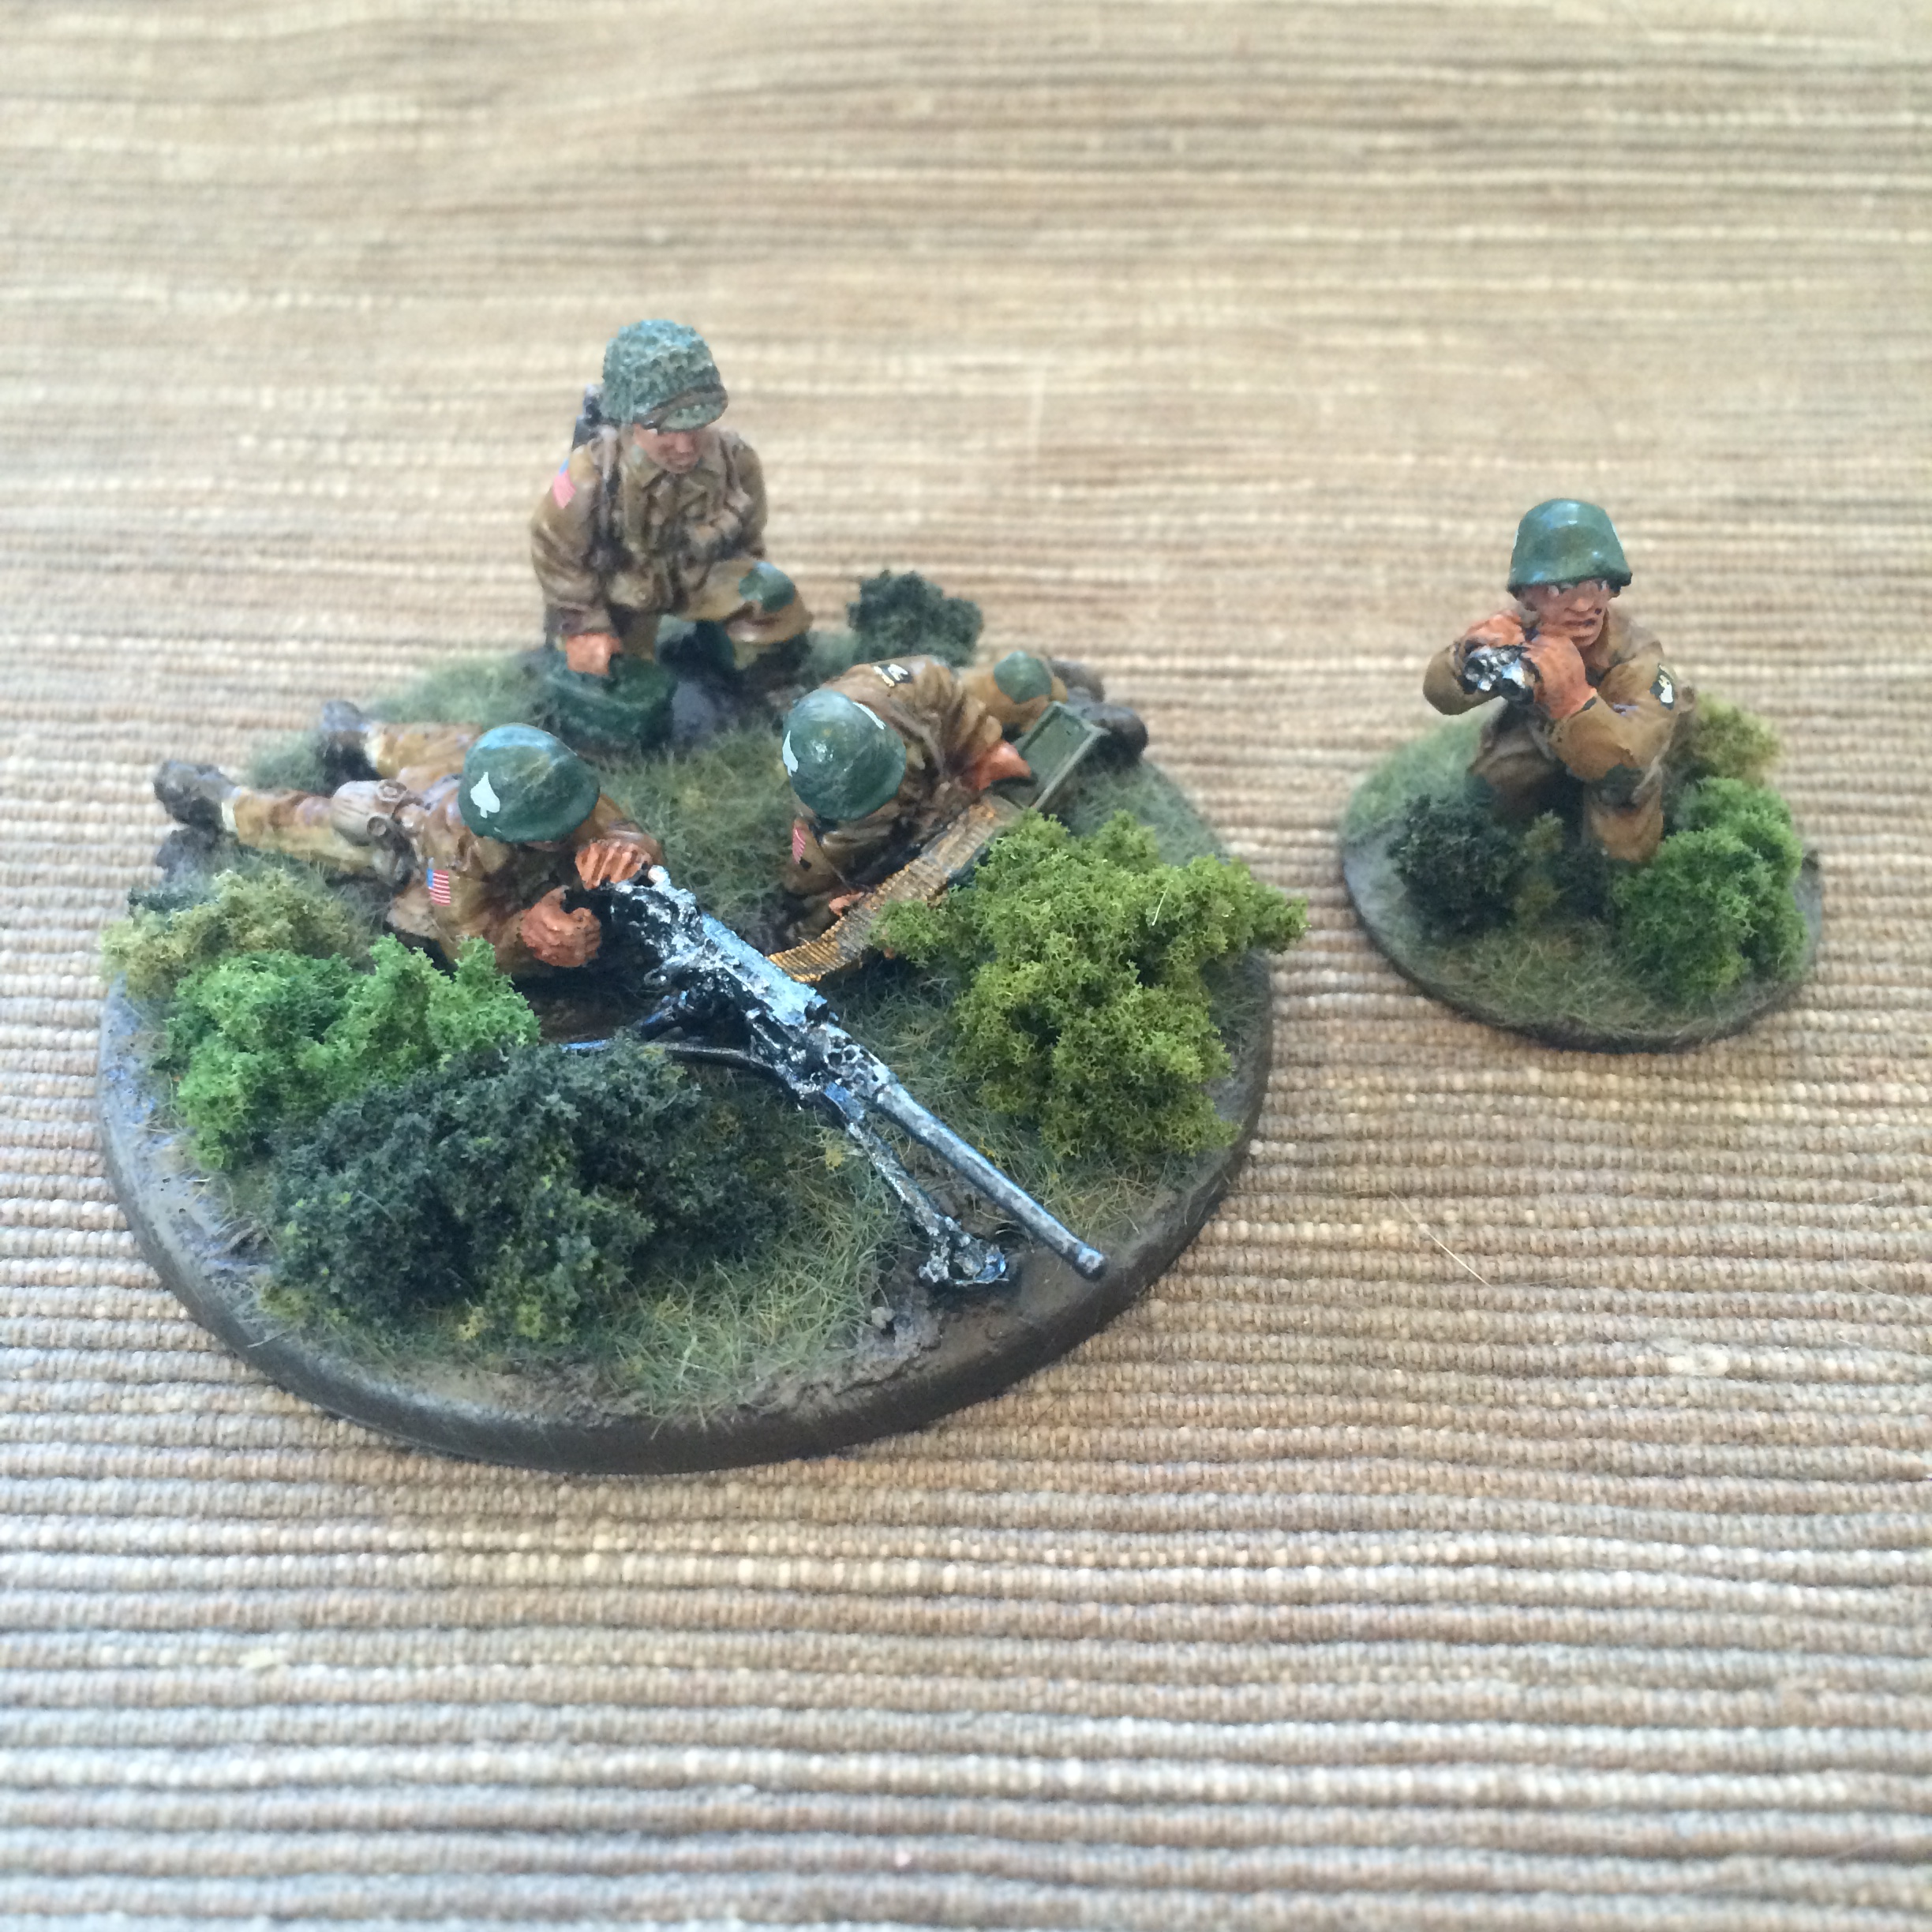
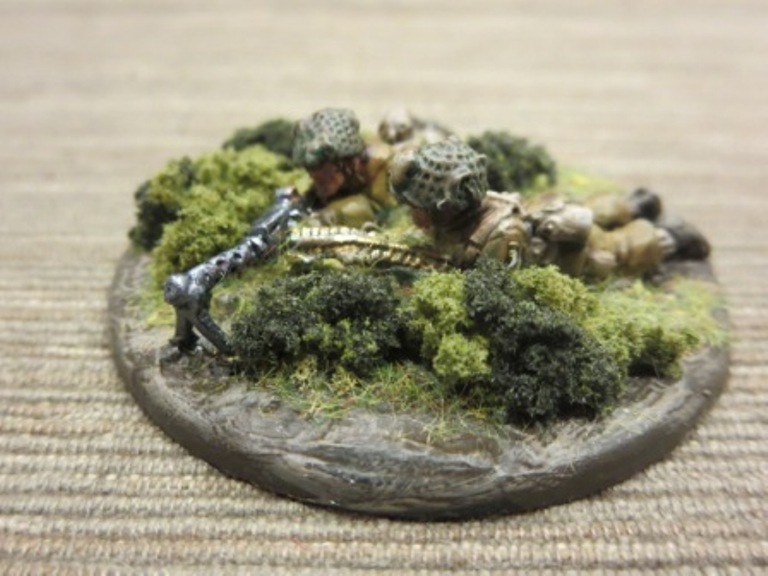
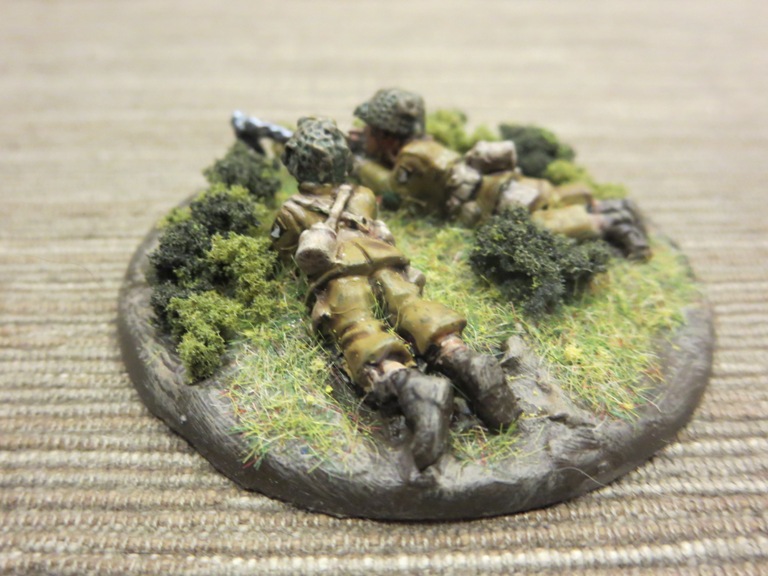
After some minimal flash clean-up, the individual figures got glued to metal washer bases. The prone LMG team went on a 60mm plastic base from Proxie Models and the two-man team on the move was glued to a larger metal washer. Here’s the painting guide in detail for my US Airborne:

Painting 28mm US Airborne

  1. Clean flash from metal models with a sharp knife and glue to metal washer or plastic bases.
  2. Apply filler putty to bases. When dry, scrape off excess with a sharp knife.
  3. Base coat models and bases with flat black spray primer.
  4. Paint uniforms and bandages on helmets with Tallarn Sand.
  5. Paint helmets and knee and elbow patches with Waaagh! Flesh.
  6. Paint faces and hands with Tallarn Flesh.
  7. Paint webbing and packs with Baneblade Brown.
  8. Paint bases, boots, gun stocks and helmet straps with Dark Brown.
  9. Apply Agrax Earthshade wash to uniforms, helmet netting, webbing and packs.
  10. Mix 50/50 Baneblade Brown and Off White and lightly dry brush packs, webbing and socks.
  11. Lightly dry brush bases, gun stocks, helmet netting, holsters and elbow and shoulder patches with Baneblade Brown.
  12. Paint metal gun parts with black and finish with a light dry brush of metallic silver.
  13. Paint eyes with small dots of Off White and Dark Brown. Clean up around eyes with Tallarn Flesh.
  14. Mix 50/50 Tallarn Flesh and Off White and brush highlights on cheekbones, chins, forehead, nose and hands.
  15. Apply decals to shoulders and helmets, followed by a coat of Solvaset decal fixative from Walthers.
  16. Cover bases in white glue and cover in 50/50 mix of fine light green and dark green grass flock.
  17. Glue small pieces of clump foliage to base.
  18. Spray coat completed models with matte finish.

IMG_4918

Filler putty applied to US Airborne .30 cal machine gun teams

IMG_4915

Helmet and uniform base coats on US Airborne riflemen

IMG_4914

Flesh base coat on hands and faces on riflemen and command figures

IMG_4957

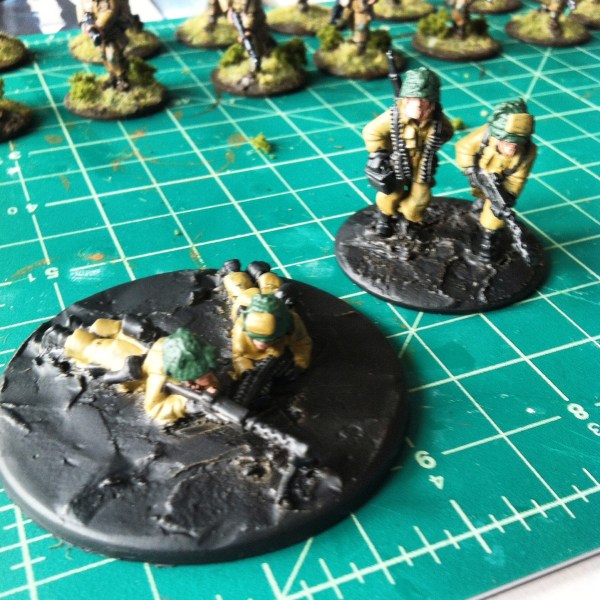
Uniform, helmet and flesh base coats on the .30 cal machine gun teams

IMG_4956

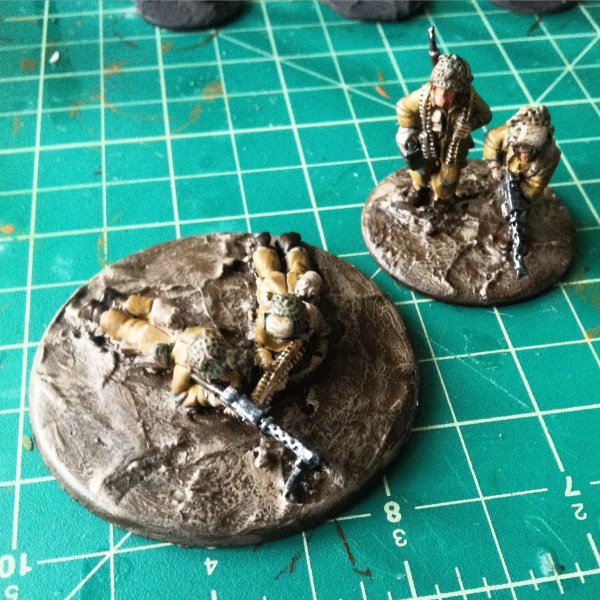
Washes and dry brush layers added to the .30 cal machine gun models and bases

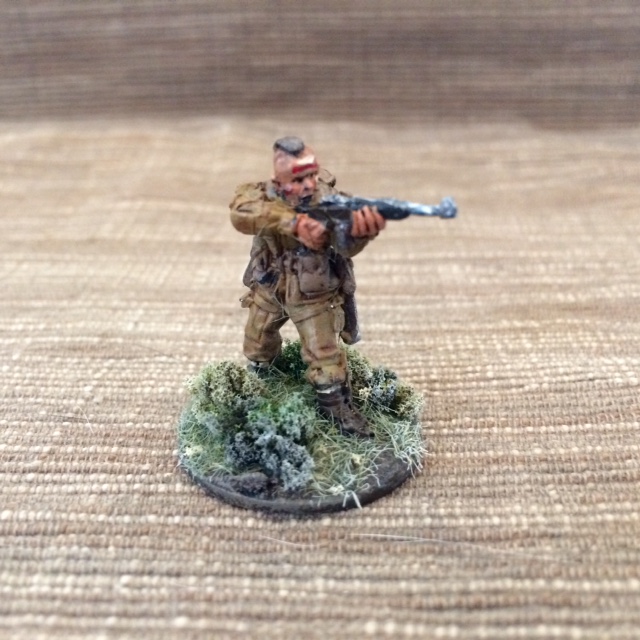
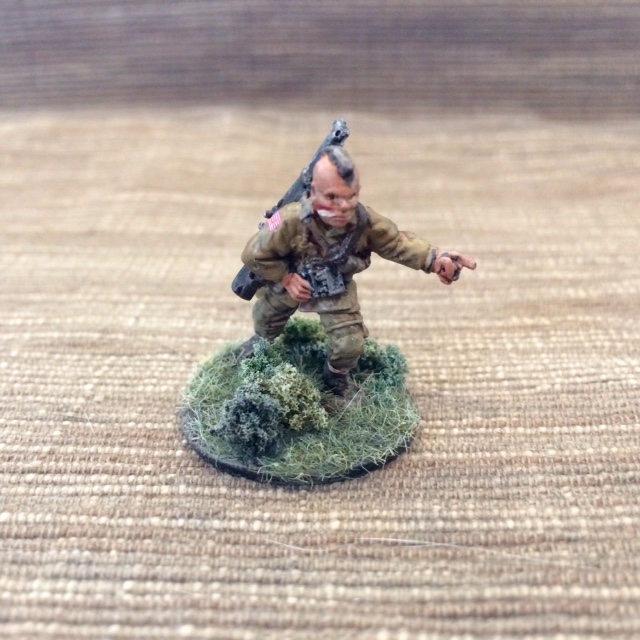
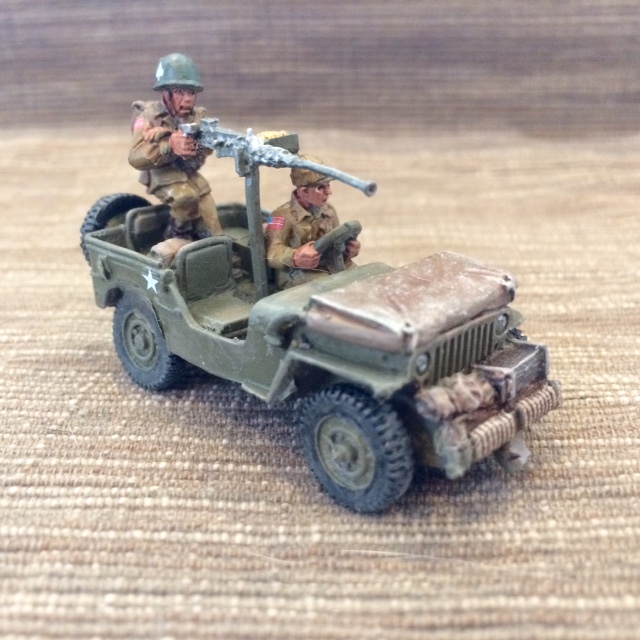
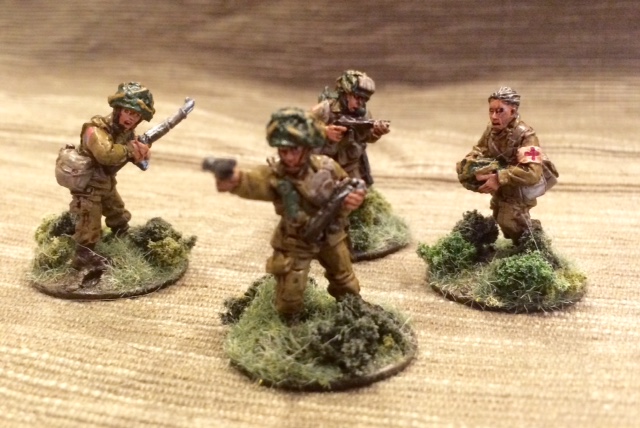
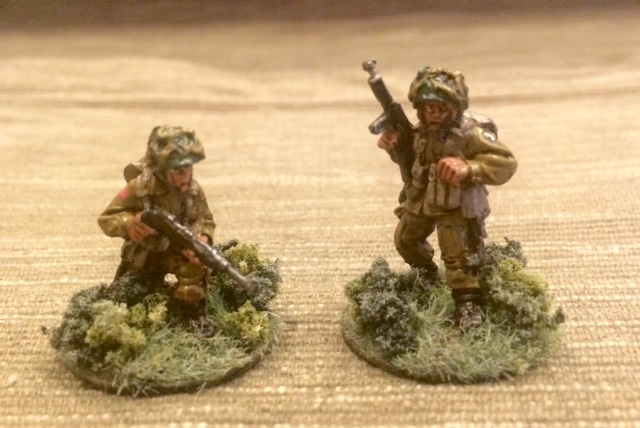
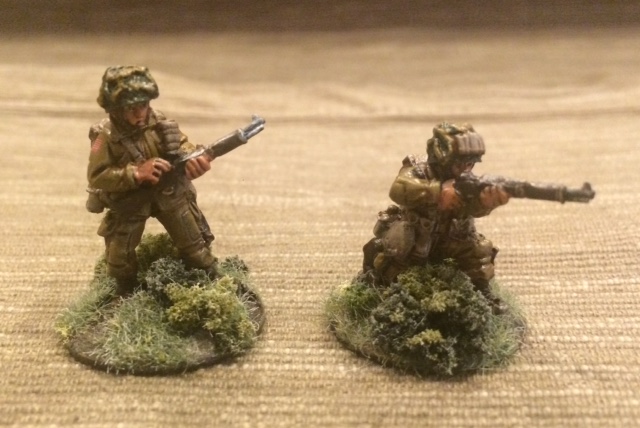
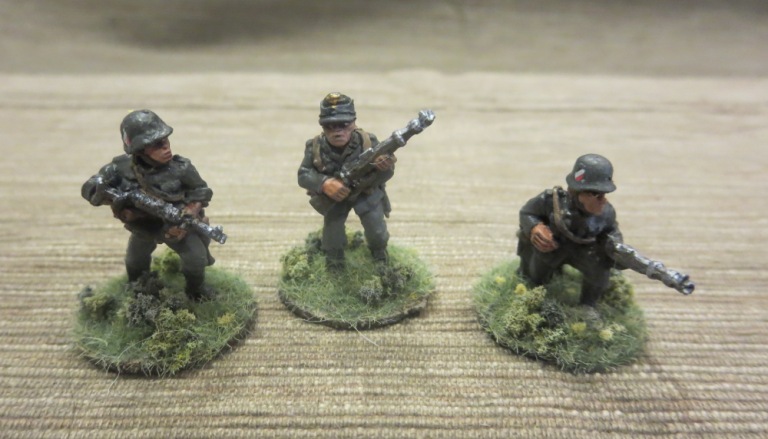
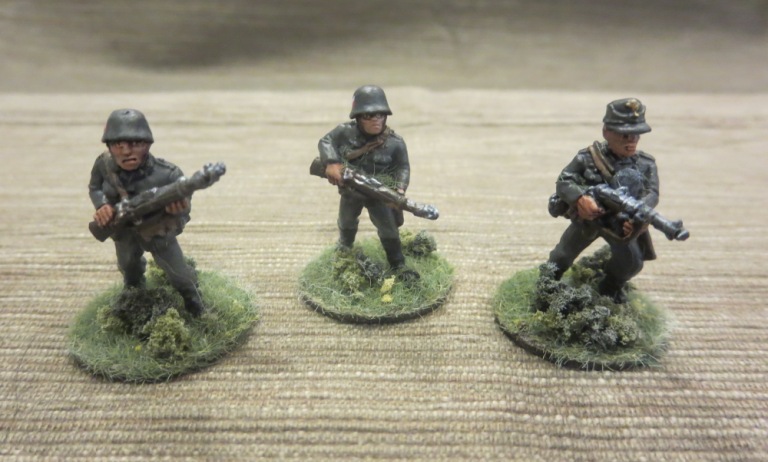
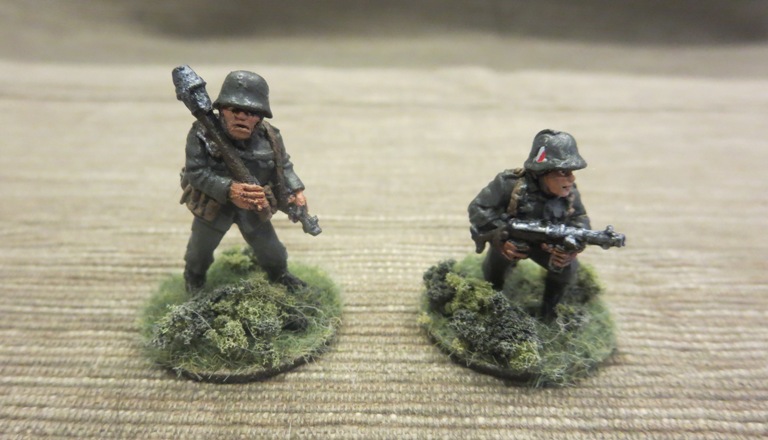
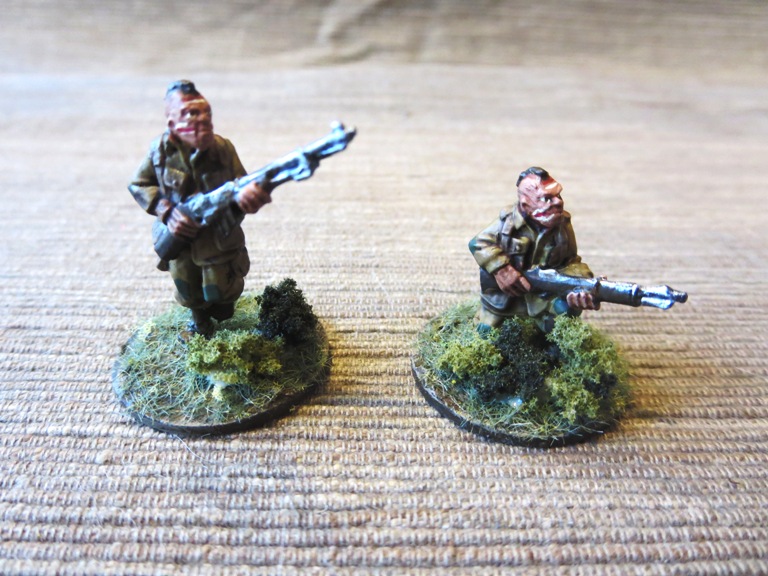
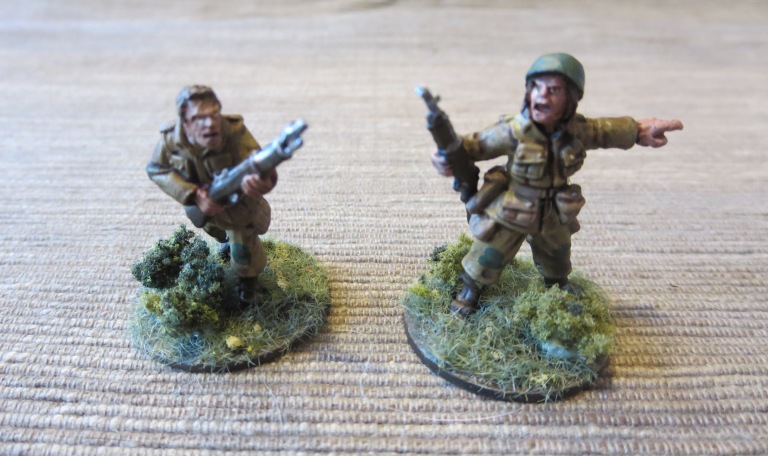
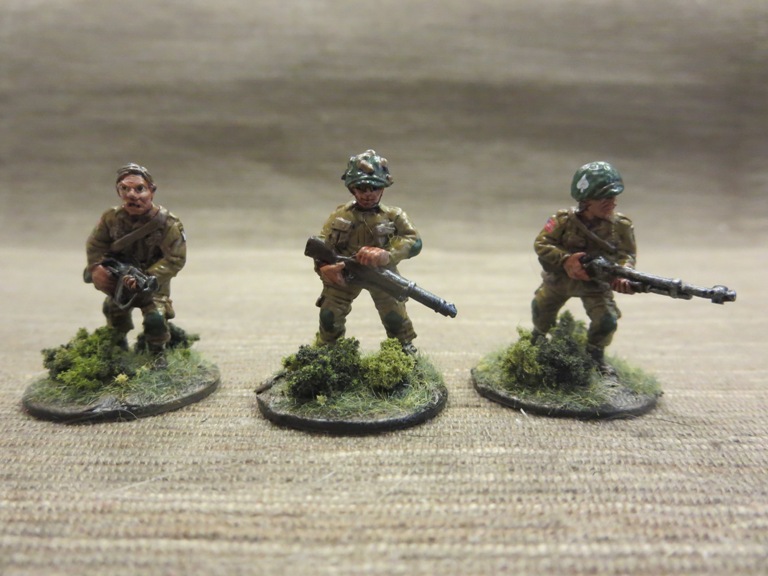
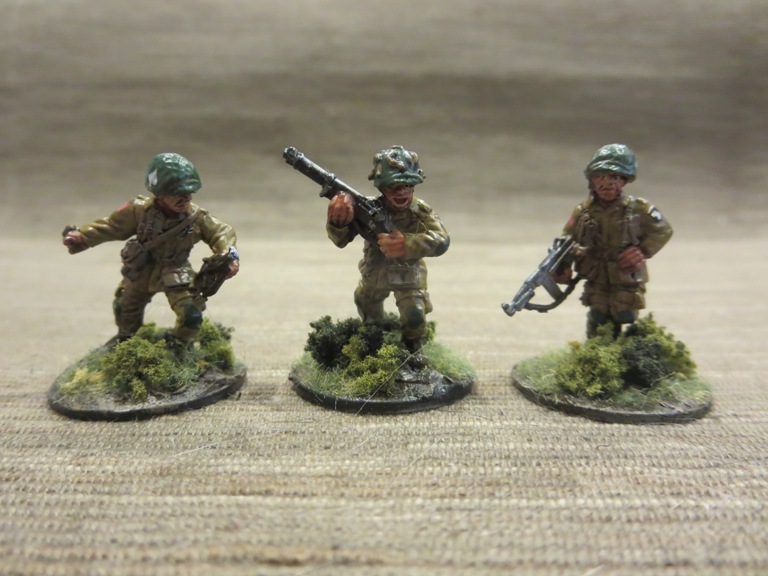
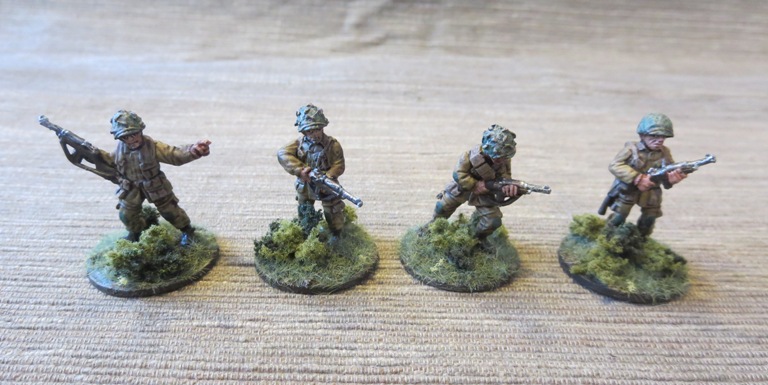
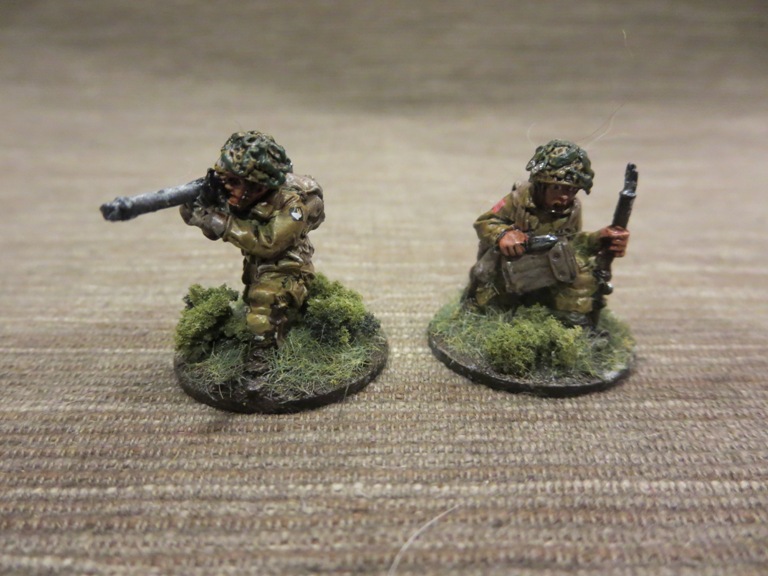
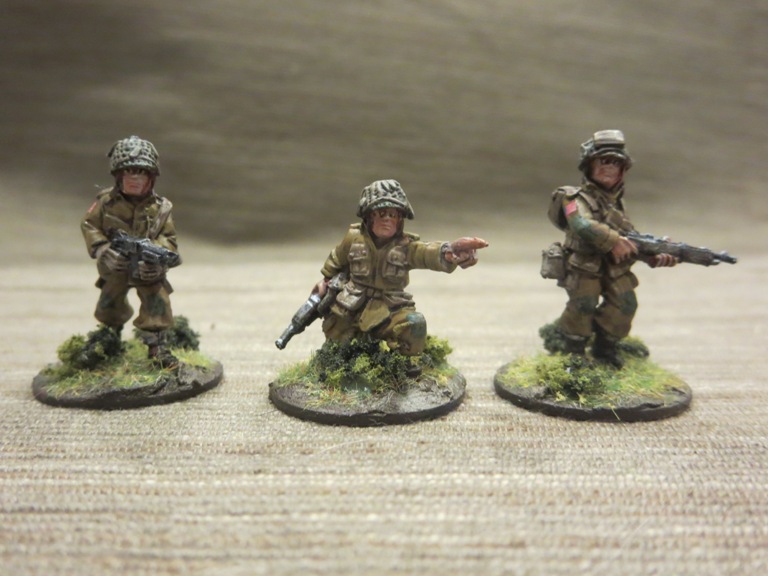
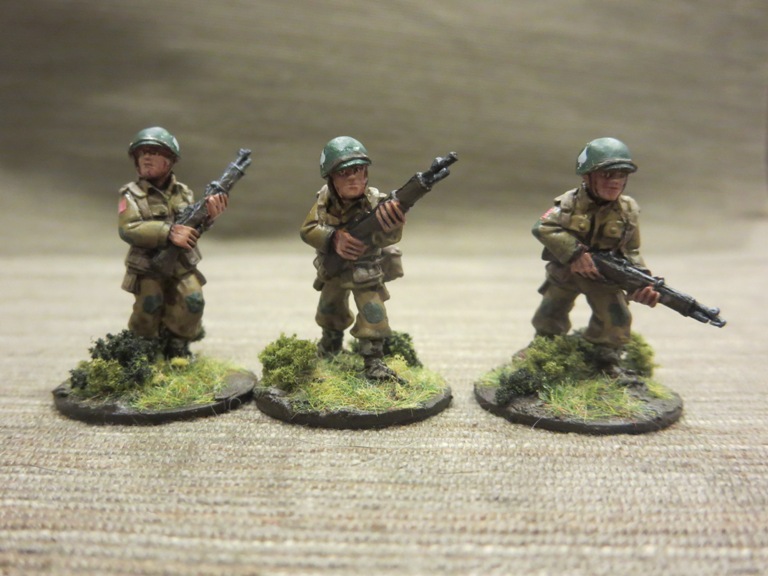
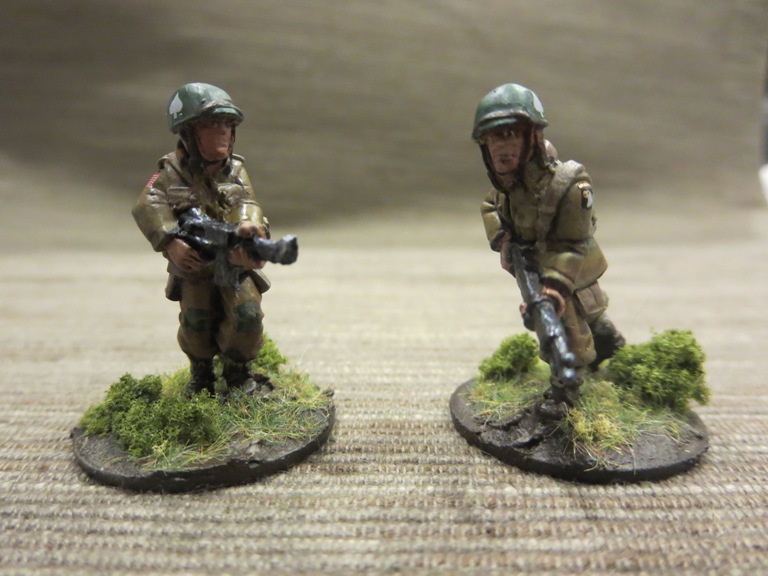
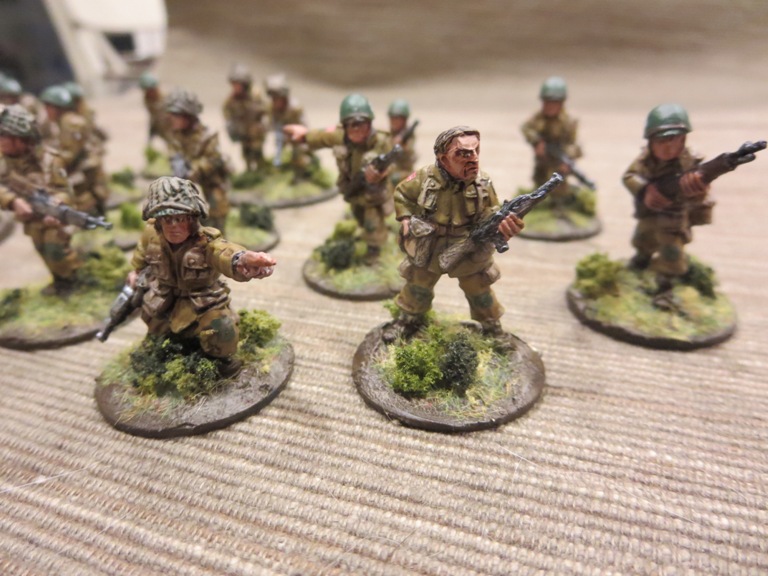
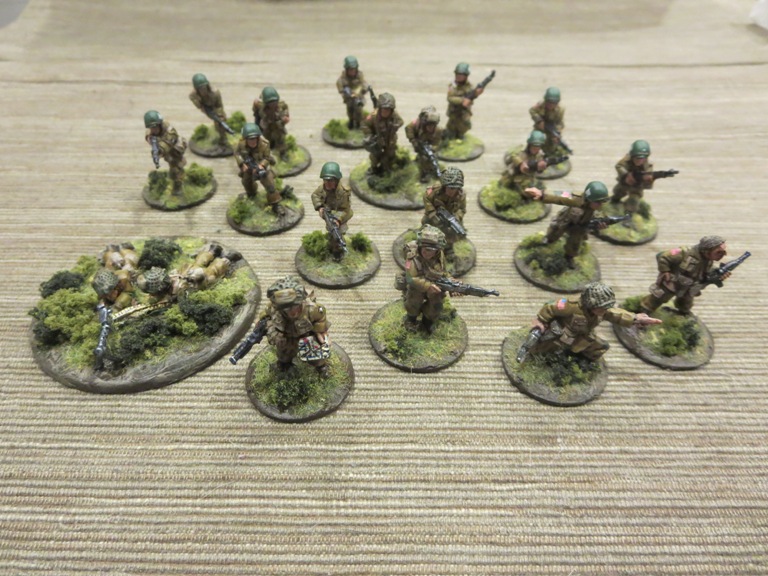
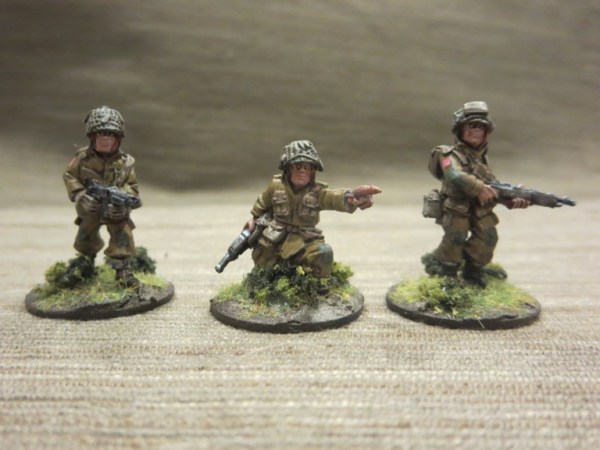
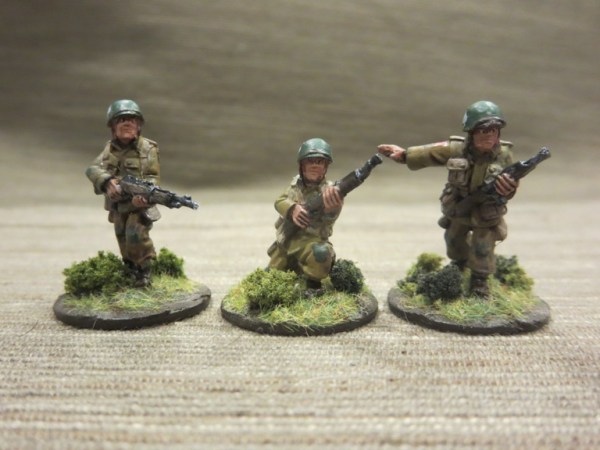
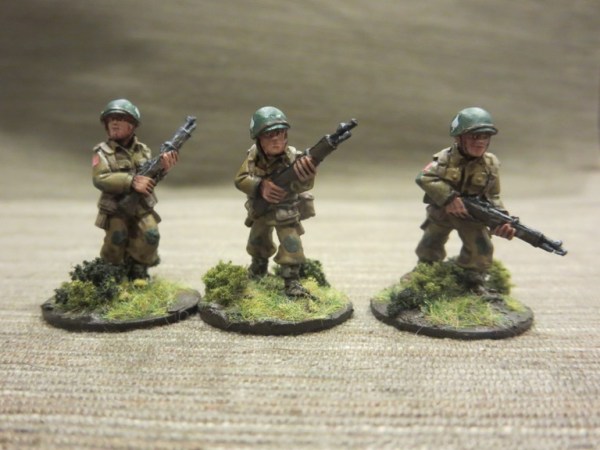
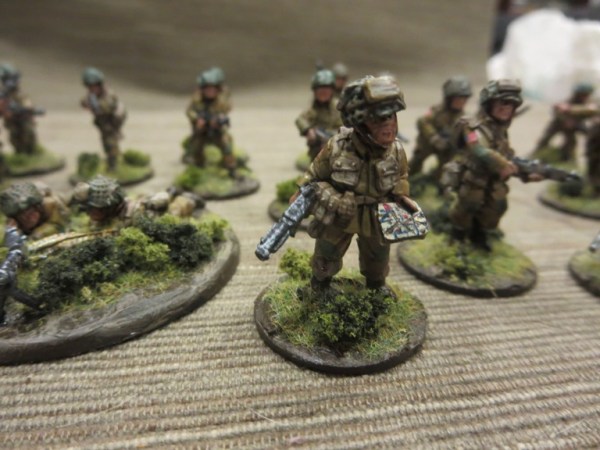
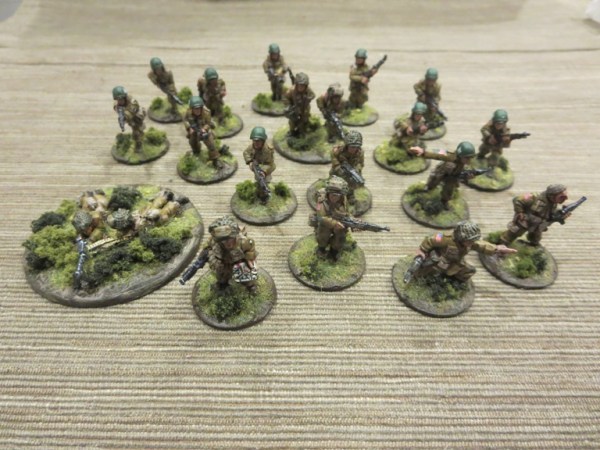
And now, a whole series of my completed US airborne troops from Artizan Designs…

IMG_0609

IMG_0610

IMG_0611IMG_0614

IMG_0618

IMG_0621

IMG_0620

IMG_0616

IMG_0617

IMG_0615

IMG_0623

IMG_0624

IMG_0626

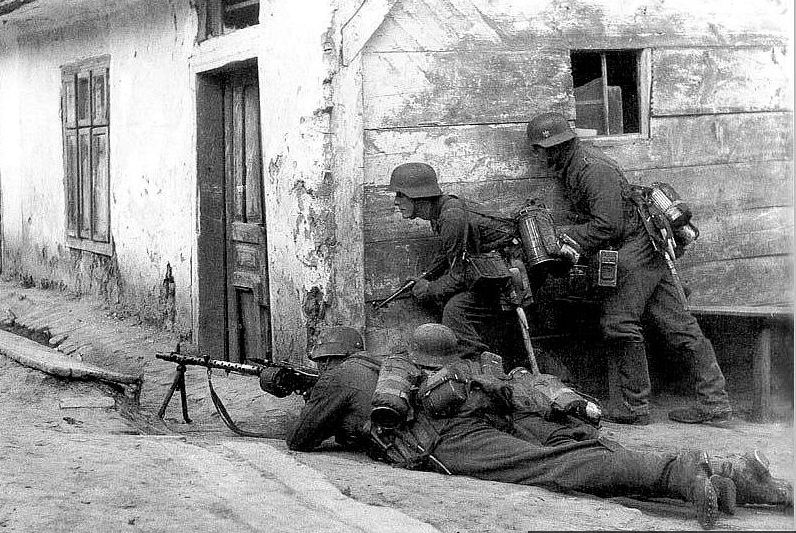
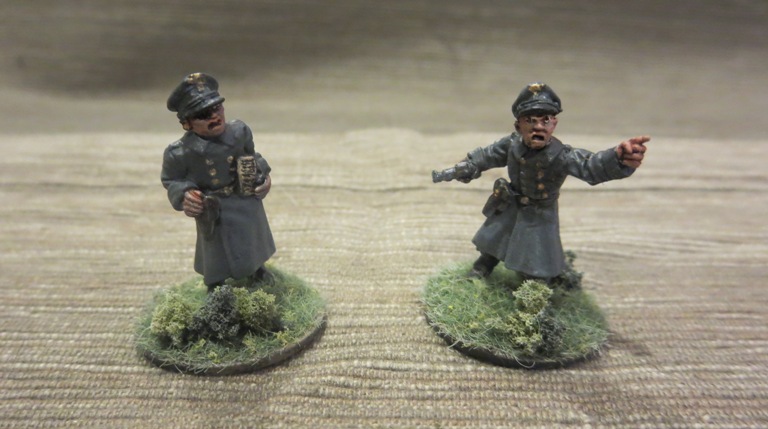
I still want to fill out my US forces with some additional troops and support weapons, so there will be more to come from Artizan and some other manufacturers. Getting some Germans ready for the table is another pending project on the workbench. Transport and armored vehicles are also very much on my mind. I’m also still debating rule sets, and I’ve been reading up on a variety including the popular Bolt Action from Warlord Games and Nuts! from Two Hour Wargames. With my first 28mm troops ready for action, WWII at a new scale is keeping the period exciting for what I’m certain will be another new year of painting and playing.