28mm: Panzer IV By Rubicon Models

PzIVWWII

With 8000-9000 Panzer IV models rolling around over the course of World War II, this German tank was ubiquitous in engagements throughout. The tank itself went through a number of evolutions in terms of guns and armor, and the chassis wound up serving in many capacities as the carriage for other ant-tank and anti-aircraft guns. If you’re a wargamer like me fielding a WWII German force, chances are you’re eventually going to need a few Panzer IVs.

IMG_8768Unboxing the Rubicon Models Panzer IV kit

I’ve had a bit of experience in the past modelling the Panzer IV in 15mm with a kit from Plastic Soldier Company. For my 28mm models, I turned back to Rubicon Models which I had used in modelling a US M4A3 Sherman a while back. I chose Rubicon again for a consistency of scale, the clean casting of their kits and the deal I found on a pair of their Panzer IVs for under $50 USD. Unboxing their models is a real pleasure with separate sprues individually wrapped in protective plastic, clear instructions and decals included with the kits.

IMG_8776

Cutting and sorting pieces as construction begins

The clear step-by-step instructions make assembly a breeze as long as pieces are organized and the model is done in stages. The kit includes options for building the Panzer IV in its evolution from F2, G and H models. Uniquely, the kit allows the finished model to swap out the 75mm KwK L/43 and L/48 gun barrels with a friction fitting pin. The Schürzen on both the sides and turret are likewise removal, allowing you to effectively field two versions of the tank. For now I’m leaving the guns and Schürzen removable but I may decide to permanently glue them in the future.

Here’s my quick guide to getting the models assembled and painted:

Painting 28mm German Armor

  1. Carefully cut kit pieces from plastic sprues with small pliers.Keep pieces organized as you go and assemble the model in stages per manufacturer instructions
  2. Basecoat the model with flat black spray primer.
  3. Using three progressive coats of dry brushed greys, paint the entire model. I use Skavenlight Dinge, Mechanicus Standard Grey and Dawnstone (all from Citadel).
  4. Paint tracks Black.
  5. Paint wooden tool handles Dark Brown and metals parts with metallic Silver.
  6. Using a flat brush with only the very slightest amount of the same metallic Silver, dry brush the tracks. Use the same method on raised plates, hatches and edges of the entire model to create raised highlights.
  7. Paint the rear muffler a rust color by mixing Dark Brown and Red.
  8. Apply decals to the model and set the decals with Solvaset or some other decal sealer.
  9. Use a watered down Agrax Earthshade (Citadel) and add a muddy wash at edges, plate and hatch seams, muffler and on the Schurzen.
  10. Very, very lightly dry brush the entire model with Baneblade Brown (Citadel) to create a general muddied and weathered effect.
  11. Spray coat completed models with matte finish. Make sure you remove the turret so it does not stick to the main chassis during the spray coat.
  12. Rub pencil graphite on the edges where the turret meets the chassis to ensure free rotation.

IMG_8803

Dry brush coats of greys gradually lighter greys provide most of the color

IMG_8815

Included decals provide a lot of modelling options

IMG_8817

Watery mud is applied to the Schürzen

IMG_8814

Rubbing pencil graphite where the chassis meets the turret to ensure easy rotation

Aside from the drying time between steps, my tanks were finished in just a couple hours work over the course of a few week nights. I really love how slick the Rubicon Models kits assemble, paint up and look when completed. More views of the finished models are below, but I can’t wait to get these on the table at Metropolitan Wargamers in Brooklyn, NY and see how they perform in pushing back the Allies.

IMG_8821

IMG_8822

IMG_8823

IMG_8827

IMG_8825

28mm: German Wehrmacht and Mortar By Black Tree Design

GermanMortar

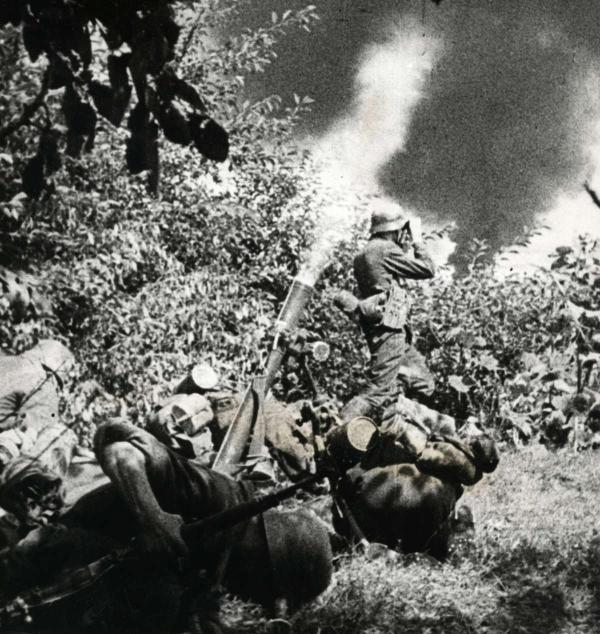
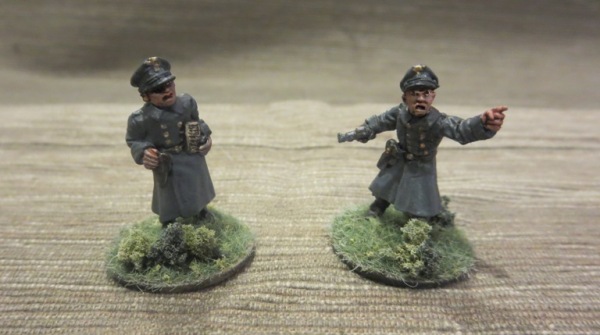
Taking advantage of the frequent sales by Black Tree Design, I’ve added some additional Wehrmacht troops to my 28mm World War II German force. Previously, I had painted up more than thirty of Black Tree’s figures, so this later order filled out my collection with a few more soldiers armed with rifles, another officer and a mortar crew with a nifty spotter with binoculars raised to his eyes.

BTD

When on sale, these metal cast models from Black Tree come in at about $1.50 USD each. This price point makes these miniatures super affordable, quick to get based and ready for painting up using my regular painting process.

Painting 28mm German Infantry

  1. Clean flash from metal models with a sharp knife and glue to metal washer or plastic bases.
  2. Apply filler putty to bases. When dry, scrape off excess with a sharp knife.
  3. Basecoat models and bases with flat black spray primer.
  4. Paint pants, helmets, soft hats, officer greatcoats and gas mask containers with Skavenlight Dinge.
  5. Paint faces and hands with Tallarn Flesh.
  6. Paint packs ans straps with Baneblade Brown.
  7. Paint boots and equipment straps Black.
  8. Paint bases, gun stocks, water bottles and helmet straps with Dark Brown.
  9. Apply Agrax Earthshade wash to webbing and packs.
  10. Dry brush pants, helmets, soft hats and officer greatcoats with Light Grey.
  11. Lightly dry brush bases and gun stocks with Baneblade Brown.
  12. Paint metal gun and water bottle parts with black and finish with a light dry brush of Metallic Silver.
  13. Dry brush gasmask containers with metallic Silver.
  14. Paint eyes with small dots of Off White and Dark Brown. Clean up around eyes with Tallarn Flesh.
  15. Mix 50/50 Tallarn Flesh and Off White and brush highlights on cheekbones, chins, forehead, nose and hands.
  16. Cover bases in white glue and cover in 50/50 mix of fine light green and dark green grass flock.
  17. Glue small pieces of clump foliage to base.
  18. Spray coat completed models with matte finish.

With about 40 of Black Tree’s models now complete, I’ve got a flexible, reliably sized force of simply outfitted Germans ready for deployment in a variety of European tabletop scenarios.

image1(1)

image2(1)

image3(1)

image4(1)

image5

28mm: US Airborne Pathfinders And Willys Jeeps By Warlord Games

PathfindersFecPainting

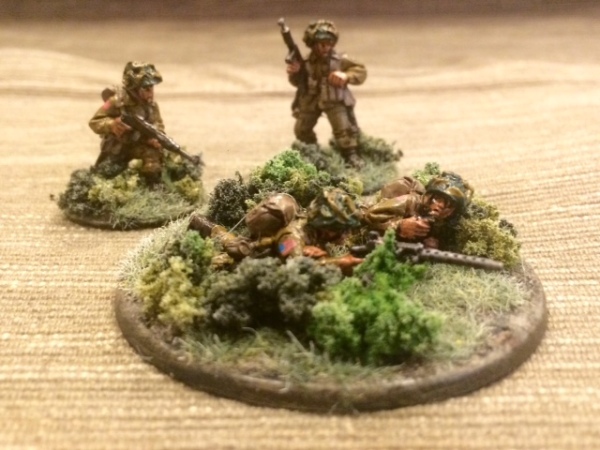
I recently picked up four US Airborne Pathfinder models from Warlord Games via special order from the good folks at The Brooklyn Strategist. As I sat down to paint them up, I did a little online searching and came across an obituary in the NY Times for Jake McNiece, a leader of the “Filthy 13” of the 101st Airborne Division which riskily night-dropped ahead of the main invasion force on D-Day.

McNiece (featured in a photo above from Stars and Stripes) is credited with coming up with the iconic mohawked shaved heads and face paint worn by many of the hearty Pathfinders, and painting these figures adds some great visual diversity to any US Airborne force representing American paratroopers on D-Day. I had previously painted up Pathfinders from Artizan Designs, and these warlord models fleshed out my Pathfinders squad to a full and fearsome force.

Warlordlogo

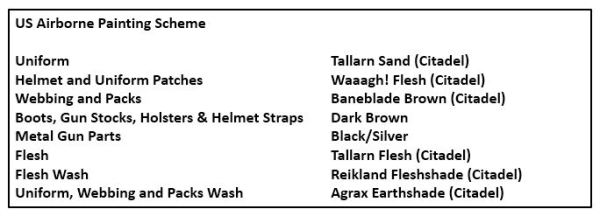
My US Airborne painting scheme is quick and gets my models table-ready in just a couple painting sessions. This latest round of painting my US Airborne collection also included a couple Warlord US Army Willys Jeep models I picked up on sale at this year’s HMGS 2016 Cold Wars Convention. I painted the driver and gunner to match my US Airborne, and they fit in nicely with my models while also adding some mobile gun support on the game table.

AB Paint Scheme

Painting 28mm US Airborne Pathfinders

  1. Clean flash from metal models with a sharp knife and glue to metal washer or plastic bases.
  2. Apply filler putty to bases. When dry, scrape off excess with a sharp knife.
  3. Base coat models and bases with flat black spray primer.
  4. Paint uniforms and bandages on helmets with Tallarn Sand.
  5. Paint helmets and knee and elbow patches with Waaagh! Flesh.
  6. Paint faces and hands with Tallarn Flesh.
  7. Paint webbing and packs with Baneblade Brown.
  8. Paint bases, boots, gun stocks and helmet straps with Dark Brown.
  9. Apply Agrax Earthshade wash to uniforms, helmet netting, webbing and packs.
  10. Mix 50/50 Baneblade Brown and Off White and lightly dry brush packs, webbing and socks.
  11. Lightly dry brush bases, gun stocks, helmet netting, holsters and elbow and shoulder patches with Baneblade Brown.
  12. Paint metal gun parts with black and finish with a light dry brush of metallic silver.
  13. Paint eyes with small dots of Off White and Dark Brown. Clean up around eyes with Tallarn Flesh.
  14. Paint thin lines of red and offwhite face paint to cheeks and foreheads of the models.
  15. Mix 50/50 Tallarn Flesh and Off White and brush highlights on cheekbones, chins, forehead, nose and hands.
  16. Cover bases in white glue and cover in 50/50 mix of fine light green and dark green grass flock.
  17. Glue small pieces of clump foliage to base.

After painting, I added a final touch with decals on shoulders and helmets from Company B, followed by a coat of Solvaset decal fixative from Walthers and a spray coat with matte finish.

This little project not only gave me a break from my regular painting but also added a bunch of new models I can field in my Bolt Action and other 28mm World War II skirmish games. Pictures below show the final results ready to drop onto the table and start rolling dice during the invasion of Normandy.

FullSizeRender

FullSizeRender0

FullSizeRender(8)

FullSizeRender(2)

FullSizeRender(3)

FullSizeRender(4)

FullSizeRender(5)

28mm: US Airborne Squad and HQ By Warlord Games

101ABRoad

Despite all the planes, ships, artillery and tanks, the the core of US fighting forces in during World War II was the squad of American men armed with M1 rifles. General George Patton called the weapon “the greatest battle implement ever devised,” and in the hands of a small groups of US Airborne troops the tide of the war tipped after the Normandy invasion in June 1944.

BAParaSquadBox

For my 28mm WWII Bolt Action gaming, I exclusively use metal miniatures and I don’t duplicate poses. What this means is that I’m working my way through all the models available from a few manufacturers. For my latest additions to my US 101st Airborne force, I picked up the US Paratrooper Squad box and the US Airborne HQ package, both from Warlord Games.

IMG_7965

Warlord Games Bolt Action US paratrooper squad and HQ figures

You really can’t beat metal casting for detail and personality, and these models are no different. The HQ set has a nifty medic model on the run and an officer firing his pistol while cradling his Thompson submachine gun in the other arm. A third figure is dropping his binoculars to the side and shouting over his shoulder while another model holds a SMG and barks orders into his radio handset nestled under his chin. The paratrooper squad box gives a good mix of men armed with rifles, a NCO and two others carrying SMGs, and a two-man light machine gun team.

AB Paint Scheme

As always, my painting is straightforward — I want the models to look historical yet unique to my style, and I want to put them to use on the table quickly.

Painting 28mm US Airborne

  1. Clean flash from metal models with a sharp knife and glue to metal washer or plastic bases.
  2. Apply filler putty to bases. When dry, scrape off excess with a sharp knife.
  3. Base coat models and bases with flat black spray primer.
  4. Paint uniforms and bandages on helmets with Tallarn Sand.
  5. Paint helmets and knee and elbow patches with Waaagh! Flesh.
  6. Paint faces and hands with Tallarn Flesh.
  7. Paint webbing and packs with Baneblade Brown.
  8. Paint bases, boots, gun stocks and helmet straps with Dark Brown.
  9. Apply Agrax Earthshade wash to uniforms, helmet netting, webbing and packs.
  10. Mix 50/50 Baneblade Brown and Off White and lightly dry brush packs, webbing and socks.
  11. Lightly dry brush bases, gun stocks, helmet netting, holsters and elbow and shoulder patches with Baneblade Brown.
  12. Paint metal gun parts with black and finish with a light dry brush of metallic silver.
  13. Paint eyes with small dots of Off White and Dark Brown. Clean up around eyes with Tallarn Flesh.
  14. Mix 50/50 Tallarn Flesh and Off White and brush highlights on cheekbones, chins, forehead, nose and hands.
  15. Apply Company B decals to shoulders and helmets, followed by a coat of Solvaset decal fixative from Walthers.
  16. Cover bases in white glue and cover in 50/50 mix of fine light green and dark green grass flock.
  17. Glue small pieces of clump foliage to base.
  18. Spray coat completed models with matte finish

First some finished pictures of the command models:

FullSizeRender

FullSizeRender(2)

FullSizeRender(1)

And some shots of the completed squad:

FullSizeRender(3)

FullSizeRender(5)

FullSizeRender(6)

FullSizeRender(7)

FullSizeRender(8)

FullSizeRender(9)

28mm: US .50 cal M2 HMG By Warlord Games

50calAB

The Browning .50 caliber M2HB heavy machine gun has been around for nearly 100 years, a remarkable feat in a span of years when battlefield technology has evolved immensely. The M2’s deadly flexibility in use as an infantry support weapon and mounting on aircraft, land vehicles and naval vessels has served the US and many other military organizations around the world over its history. Clearly, this gun not only has fire power but also significant staying power.

Warlordlogo

I’ve been gearing up for my first Bolt Action tournament at Nu Brand Gaming in Brooklyn, NY, and the M2 was one the one missing piece to my US 101st Airborne force I really wanted to get ready for the table. I got a deal on the metal cast model from Warlord Games and have chosen to paint it up as an Airborne support weapon unit. Some pics of the finished gun and its four-man crew are found below along with my simple approach to getting models painted up and ready for action.

AB Paint Scheme

Painting 28mm US Airborne Support Weapons

  1. Clean flash from metal models with a sharp knife and glue to metal washer or plastic bases.
  2. Apply filler putty to bases. When dry, scrape off excess with a sharp knife.
  3. Base coat models and bases with flat black spray primer.
  4. Paint uniforms and bandages on helmets with Tallarn Sand.
  5. Paint helmets and knee and elbow patches with Waaagh! Flesh.
  6. Paint faces and hands with Tallarn Flesh.
  7. Paint webbing and packs with Baneblade Brown.
  8. Paint bases, boots, gun stocks and helmet straps with Dark Brown.
  9. Apply Agrax Earthshade wash to uniforms, helmet netting, webbing and packs.
  10. Mix 50/50 Baneblade Brown and Off White and lightly dry brush packs, webbing and socks.
  11. Lightly dry brush bases, gun stocks, helmet netting, holsters and elbow and shoulder patches with Baneblade Brown.
  12. Paint metal gun, bazooka and mortar parts with black and finish with a light dry brush of metallic silver.
  13. Paint eyes with small dots of Off White and Dark Brown. Clean up around eyes with Tallarn Flesh.
  14. Mix 50/50 Tallarn Flesh and Off White and brush highlights on cheekbones, chins, forehead, nose and hands.
  15. Apply Company B decals to shoulders and helmets, followed by a coat of Solvaset decal fixative from Walthers.
  16. Cover bases in white glue and cover in 50/50 mix of fine light green and dark green grass flock.
  17. Glue small pieces of clump foliage to base.
  18. Spray coat completed models with matte finish.

IMG_7896

IMG_7895

IMG_7894

28mm: German Wehrmacht By Black Tree Design

Wehrmacht

I recently got back to my 28mm World War II projects with some Wermacht from Black Tree Design. After painting up a bunch of German troops in camouflage smocks, I wanted to get some more Heer infantry into the mix. And so, on the back of a big sale this summer, I’ve just about doubled my Axis forces at this scale.

BTD

I was really pleased when I received my large order and marveled at all the detail on these figures. Lots of varied poses, weapons, equipment and personality make these casting from Black Tree Design stand as equals with all my other troops. As always, the customer service from the company was superb with nice hand-written notes included in each order boxed up in a little metal tin.

WehrDecalsGerman infantry decals from Company B

Along with my figure order, I also went back to Company B to order up some decals for the helmets. Even though it might not be as historical, I went with the national colors of the double decal helmet configuration which was phased out fairly early in the war. I really just wanted a bit more color on the otherwise monotone color scheme. And, while I’m on the subject of color, I really liked how the Skavenlight Dinge from Citadel Paint captured a nice mix of grey-green-blue tones of the standard German uniform.

IMG_6375A painted figure gets decals applied

Painting 28mm German Infantry

  1. Clean flash from metal models with a sharp knife and glue to metal washer or plastic bases.
  2. Apply filler putty to bases. When dry, scrape off excess with a sharp knife.
  3. Basecoat models and bases with flat black spray primer.
  4. Paint pants, helmets, soft hats, officer greatcoats and gas mask containers with Skavenlight Dinge.
  5. Paint faces and hands with Tallarn Flesh.
  6. Paint packs ans straps with Baneblade Brown.
  7. Paint boots and equipment straps Black.
  8. Paint bases, gun stocks, water bottles and helmet straps with Dark Brown.
  9. Apply Agrax Earthshade wash to webbing and packs.
  10. Dry brush pants, helmets, soft hats and officer greatcoats with Light Grey.
  11. Lightly dry brush bases and gun stocks with Baneblade Brown.
  12. Paint metal gun and water bottle parts with black and finish with a light dry brush of Metallic Silver.
  13. Dry brush gasmask containers with metallic Silver.
  14. Paint eyes with small dots of Off White and Dark Brown. Clean up around eyes with Tallarn Flesh.
  15. Mix 50/50 Tallarn Flesh and Off White and brush highlights on cheekbones, chins, forehead, nose and hands.
  16. Cover bases in white glue and cover in 50/50 mix of fine light green and dark green grass flock.
  17. Glue small pieces of clump foliage to base.
  18. Spray coat completed models with matte finish.

I really like how these models scale with all my previous 28mm miniatures from Artizan Designs and Warlord Games, and my Wermacht forces will fit nicely in the defense of Europe from the tabletop assault of my Allied troops.

IMG_0762

IMG_0767

IMG_0769

IMG_0771

IMG_0773

IMG_0764

IMG_0766

IMG_0768

IMG_0772

IMG_0770

IMG_0765

IMG_0774

IMG_0763

28mm: US Airborne Pathfinders And Characters By Artizan Designs

USABcharacters

Among the US 101st Airborne Division, the volunteer pathfinders were a particularly hearty group. Parachuting into France just after midnight on June 6, 1944, the pathfinders were among the first allied troops to set foot on French soil as the D-Day invasion commenced. Tasked with marking the drop zones, the mission of the pathfinders was hampered by poor weather, heavy German defenses, flooded fields and faulty equipment. Despite the challenges hampering the pathfinders on the ground, the Allied air invasion of more than 13,000 men behind the beaches of Normandy proved key to the day’s success.

ADlogo

In continuing to round out my 28mm US Airborne collection, I went back to Artizan Designs for their pathfinder models as well as some additional characters. Two of the pathfinders feature the signature mohawk hairstyles and I added “war paint” markings on their faces as seen in some historic photographs. The other character models will serve as officers since their poses display confidence in command.

AB Paint Scheme

Painting 28mm US Airborne

  1. Clean flash from metal models with a sharp knife and glue to metal washer or plastic bases.
  2. Apply filler putty to bases. When dry, scrape off excess with a sharp knife.
  3. Base coat models and bases with flat black spray primer.
  4. Paint uniforms and bandages on helmets with Tallarn Sand.
  5. Paint helmets and knee and elbow patches with Waaagh! Flesh.
  6. Paint faces and hands with Tallarn Flesh.
  7. Paint webbing and packs with Baneblade Brown.
  8. Paint bases, boots, gun stocks and helmet straps with Dark Brown.
  9. Apply Agrax Earthshade wash to uniforms, helmet netting, webbing and packs.
  10. Mix 50/50 Baneblade Brown and Off White and lightly dry brush packs, webbing and socks.
  11. Lightly dry brush bases, gun stocks, helmet netting, holsters and elbow and shoulder patches with Baneblade Brown.
  12. Paint metal gun parts with black and finish with a light dry brush of metallic silver.
  13. Paint eyes with small dots of Off White and Dark Brown. Clean up around eyes with Tallarn Flesh.
  14. Mix 50/50 Tallarn Flesh and Off White and brush highlights on cheekbones, chins, forehead, nose and hands.
  15. Cover bases in white glue and cover in 50/50 mix of fine light green and dark green grass flock.
  16. Glue small pieces of clump foliage to base.

To finish my models I’ll be adding decals to shoulders and helmets from Company B, followed by a coat of Solvaset decal fixative from Walthers and a spray coat with matte finish. After that, these guys will relive the heroics of D-Day on a tabletop soon.

IMG_0745

IMG_0747

IMG_0748

IMG_0746

IMG_0750

IMG_0749


28mm: German Anti-Tank Weapons And Command By Artizan Designs

GermanAT

After a few months taking a break from painting, I came back to my 28mm World War II Germans by adding some anti-tank weapons and command figures.

ADlogo

I’ve been so pleased with the German infantry from my first and second platoons using models from Artizan Designs that I returned to their miniatures again to round out my collection. The panzerfaust and panzerschreck teams gave a nice mix of poses on the move and in firing positions. Likewise, the command molds make for a nice grouping including a radio operator and a stern officer with battle plans in one hand and the other hand planted confidently on his hip.

paintgerman

As always, the Artizan figures required little flash clean up before being glued to metal washers. Here’s my battle-tested steps in detail for painting my latest Germans.

Painting 28mm German Infantry

  1. Clean flash from metal models with a sharp knife and glue to metal washer or plastic bases.
  2. Apply filler putty to bases. When dry, scrape off excess with a sharp knife.
  3. Basecoat models and bases with flat black spray primer.
  4. Paint smocks and helmets with Tallarn Sand.
  5. Paint pants, soft hats, officer greatcoat and gas mask containers with Skavenlight Dinge.
  6. Paint camouflage on helmets and smocks with alternating Waaagh! Flesh and Dark Brown.
  7. Paint faces and hands with Tallarn Flesh.
  8. Paint packs with Baneblade Brown.
  9. Paint boots and equipment straps Black.
  10. Paint bases, gun stocks, water bottles and helmet straps with Dark Brown.
  11. Apply Agrax Earthshade wash to uniforms, helmet netting, webbing and packs.
  12. Mix 50/50 Baneblade Brown and Off White and lightly dry brush packs, webbing, socks and holsters.
  13. Dry brush pants, soft hats and officer great coat with Light Grey.
  14. Lightly dry brush bases and gun stocks with Baneblade Brown.
  15. Paint metal gun and water bottle parts with black and finish with a light dry brush of Metallic Silver.
  16. Dry brush gasmask containers with metallic Silver.
  17. Paint eyes with small dots of Off White and Dark Brown. Clean up around eyes with Tallarn Flesh.
  18. Mix 50/50 Tallarn Flesh and Off White and brush highlights on cheekbones, chins, forehead, nose and hands.
  19. Cover bases in white glue and cover in 50/50 mix of fine light green and dark green grass flock.
  20. Glue small pieces of clump foliage to base.
  21. Spray coat completed models with matte finish.

So, with some simple steps I’ve got a bit more punch and leadership for my Germans as they hit the table soon.

IMG_0739

IMG_0740

IMG_0737

IMG_0736

IMG_0743

28mm: Artizan Designs US Airborne Support Weapons

BazookaOne of my favorite blogs, War Is Boring, had a very timely article this past week on the history of the M-9 bazooka. I had just sat down to work on a small project of outfitting my growing US 101st Airborne 28mm force with some additional support weapons, and the article provided some great inspiration for getting my force outfitted with more explosive back-up with some two-man bazooka crews and a 60mm mortar from Artizan Designs.

ADlogoI’d recently finished a bazooka team and mortar from Warlord Games, so two more bazookas and another mortar from AD not only fills out my gaming options but also allowed me to compare the metal models from two great manufacturers. The mortar stands look nearly indistinguishable side by side. As for the bazookas, the Warlord weapon is a bit thinner than the bulkier AD sculpts but the soldiers themselves look perfect together when painted using the consistent process below.

AB Paint Scheme

Painting 28mm US Airborne Support Weapons

  1. Clean flash from metal models with a sharp knife and glue to metal washer or plastic bases.
  2. Apply filler putty to bases. When dry, scrape off excess with a sharp knife.
  3. Base coat models and bases with flat black spray primer.
  4. Paint uniforms and bandages on helmets with Tallarn Sand.
  5. Paint helmets and knee and elbow patches with Waaagh! Flesh.
  6. Paint faces and hands with Tallarn Flesh.
  7. Paint webbing and packs with Baneblade Brown.
  8. Paint bases, boots, gun stocks and helmet straps with Dark Brown.
  9. Apply Agrax Earthshade wash to uniforms, helmet netting, webbing and packs.
  10. Mix 50/50 Baneblade Brown and Off White and lightly dry brush packs, webbing and socks.
  11. Lightly dry brush bases, gun stocks, helmet netting, holsters and elbow and knee patches with Baneblade Brown.
  12. Paint metal gun, bazooka and mortar parts with black and finish with a light dry brush of metallic silver.
  13. Paint eyes with small dots of Off White and Dark Brown. Clean up around eyes with Tallarn Flesh.
  14. Mix 50/50 Tallarn Flesh and Off White and brush highlights on cheekbones, chins, forehead, nose and hands.
  15. Apply Company B decals to shoulders and helmets, followed by a coat of Solvaset decal fixative from Walthers.
  16. Cover bases in white glue and cover in 50/50 mix of fine light green and dark green grass flock.
  17. Glue small pieces of clump foliage to base.
  18. Spray coat completed models with matte finish.

I really love the detail in the AD miniatures. The two bazooka teams each uniquely portray guys on the move or ready to fire. The figure kneeling with a radio to his ear is a new favorite of mine and will probably be used as a spotter to call in mortar support. Check out all the photos below for the results from the AD miniatures waiting to provide additional back-up to my US Airborne troops.

IMG_0678

IMG_0679

IMG_0681

IMG_0682IMG_0680

IMG_0683

28mm: German Infantry and MG 42 HMG By Artizan Designs

GermanwithMG42

With my first set of German infantry and MG 42 machine gun complete, I’ve doubled my 28mm Axis force with more models from Artizan Designs. In just a few words, I’m loving the models from AD and my only complaint is that I’m quickly working my way through their figures so I’ll soon have a complete selection of their basic late war Germans.

ADlogo

paintgermanThis time around, there are a number of animated infantry figures in a mix of helmets and soft caps plus another MG 42 machine gun to supplement my arsenal. My German paint scheme has remained consistently fast and satisfying as per the below.

Painting 28mm German Infantry

  1. Clean flash from metal models with a sharp knife and glue to metal washer or plastic bases.
  2. Apply filler putty to bases. When dry, scrape off excess with a sharp knife.
  3. Basecoat models and bases with flat black spray primer.
  4. Paint smocks and helmets with Tallarn Sand.
  5. Paint pants, soft hats, officer greatcoat and gas mask containers with Skavenlight Dinge.
  6. Paint camouflage on helmets and smocks with alternating Waaagh! Flesh and Dark Brown.
  7. Paint faces and hands with Tallarn Flesh.
  8. Paint packs with Baneblade Brown.
  9. Paint boots and equipment straps Black.
  10. Paint bases, gun stocks, water bottles and helmet straps with Dark Brown.
  11. Apply Agrax Earthshade wash to uniforms, helmet netting, webbing and packs.
  12. Mix 50/50 Baneblade Brown and Off White and lightly dry brush packs, webbing, socks and holsters.
  13. Dry brush pants, soft hats and officer great coat with Light Grey.
  14. Lightly dry brush bases and gun stocks with Baneblade Brown.
  15. Paint metal gun and water bottle parts with black and finish with a light dry brush of Metallic Silver.
  16. Dry brush gasmask containers with metallic Silver.
  17. Paint eyes with small dots of Off White and Dark Brown. Clean up around eyes with Tallarn Flesh.
  18. Mix 50/50 Tallarn Flesh and Off White and brush highlights on cheekbones, chins, forehead, nose and hands.
  19. Cover bases in white glue and cover in 50/50 mix of fine light green and dark green grass flock.
  20. Glue small pieces of clump foliage to base.
  21. Spray coat completed models with matte finish.

And now, more photos of my Germans as my force builds up and looks toward hitting the table soon.

IMG_0670

IMG_0668

IMG_0672

IMG_0674

IMG_0675

IMG_0676