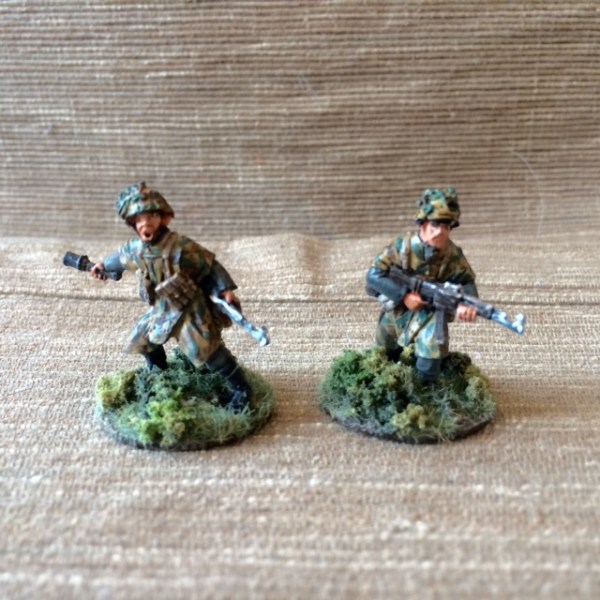
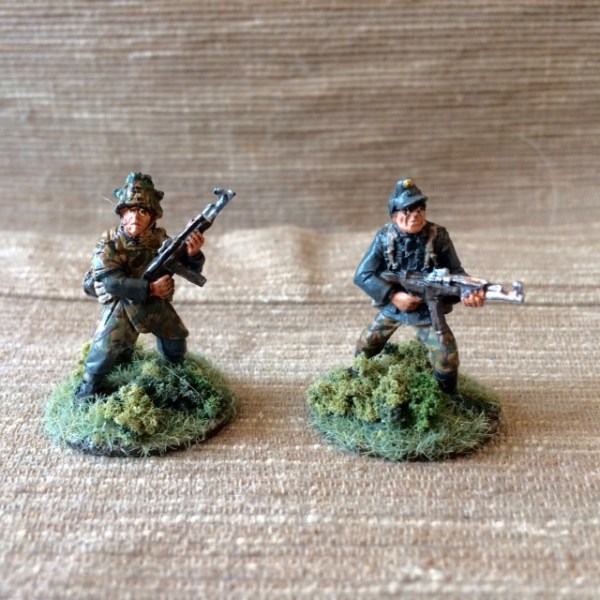
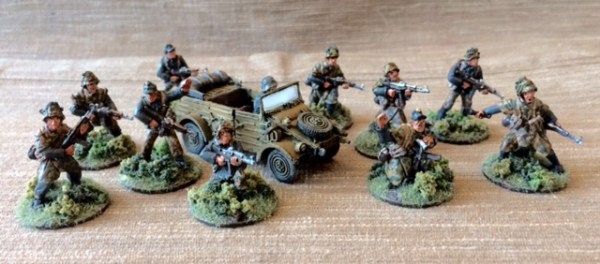
28mm: German Veteran Grenadier Squad and Kubelwagen from Warlord Games

GermanGrenadiersLineUp

By 1942 the term Panzergrenadier was applied widely to German infantry. In support of Panzer divisions and then deploying on their own, the abbreviated Grenadier became the widely used term for World War II German forces. In mixed uniforms and organized into divisions utilizing combined arms, the Grenadiers were the main fighting force on the ground as Germany defended the eventual invasions by the Allies on the Eastern and Western fronts.

WGGrenadiersBox

To round out my metal German collections, I picked up the Warlord Games German Veteran Grenadiers boxed set with a gift voucher at a recent convention. The ten cast figures are each armed with the Sturmgewehr 44 (StG 44) assault rifle from late in the war. I like the variety in the uniforms and kit with a mix of camouflaged pants, ponchos and helmets making each a very unique model. I could be a little happier with the face detail which comes off a bit unrealistically exaggerated at times. That said, the models all scale nicely with my other Grenadiers from Artizan Designs.

paintgerman

Painting 28mm German Grenadiers

  1. Clean flash from metal models with a sharp knife and glue to metal washer or plastic bases.
  2. Apply filler putty to bases. When dry, scrape off excess with a sharp knife.
  3. Basecoat models and bases with flat black spray primer.
  4. Paint smocks and helmets with Tallarn Sand.
  5. Paint pants, soft hats, officer greatcoat and gas mask containers with Skavenlight Dinge.
  6. Paint camouflage on helmets and smocks with alternating Waaagh! Flesh and Dark Brown.
  7. Paint faces and hands with Tallarn Flesh.
  8. Paint packs with Baneblade Brown.
  9. Paint boots and equipment straps Black.
  10. Paint bases, gun stocks, water bottles and helmet straps with Dark Brown.
  11. Apply Agrax Earthshade wash to uniforms, helmet netting, webbing and packs.
  12. Mix 50/50 Baneblade Brown and Off White and lightly dry brush packs, webbing, socks and holsters.
  13. Dry brush pants, soft hats and officer great coat with Light Grey.
  14. Lightly dry brush bases and gun stocks with Baneblade Brown.
  15. Paint metal gun and water bottle parts with black and finish with a light dry brush of Metallic Silver.
  16. Dry brush gasmask containers with metallic Silver.
  17. Paint eyes with small dots of Off White and Dark Brown. Clean up around eyes with Tallarn Flesh.
  18. Mix 50/50 Tallarn Flesh and Off White and brush highlights on cheekbones, chins, forehead, nose and hands.
  19. Cover bases in white glue and cover in 50/50 mix of fine light green and dark green grass flock.
  20. Glue small pieces of clump foliage to base.
  21. Spray coat completed models with matte finish.

Aside from my  quick painting method of my new Grenadiers as per the above, I’ve added in the Kubelwagen model from Warlord. I love this neat little metal vehicle cast with some nice detailing and a variety of heads to choose from for the driver. The metal model glues of fast, but I was disappointed that the finicky machine gun mount broke during construction. I added a little bit of plastic to the windshield frame to add both some strength and a dash of realism to the car.

Despite a couple minor criticisms, my new Warlord Germans are a nice addition to my growing Axis force.

image1(1)

image2(1)

image3(1)

image4

image5

image6

image7

Flames of War: 70th Anniversary Battle Of The Bulge Mission

Bulge82nd

This past week marked the 70th anniversary of the Battle of the Bulge fought between Allied and German forces in the snowy, wooded Ardennes region of Western Europe. The six-week German offensive through a frigid December 1944 and January 1945 surprised Allied forces and proved to be costly for all involved. At its conclusion, commanders on both sides counted nearly 100,000 casualties and much of the German ground and air reserves had been smashed as a result of their ill-fated gambit against the Allies.

BulgeMission

The Battle of the Bulge Mission rules from Flames of War

To mark the occasion, several of us met at Metropolitan Wargamers in Brooklyn, NY to run through the big Battle of the Bulge Mission available free online for Flames of War. The simple scenario plays out on a huge 6′ x 8′ tabletop with 4000-point forces on either side drawn from the Nuts! and Devil’s Charge books as well as the Panzers To The Meuse PDF. We set our table using a large off-white canvas with roads crisscrossing the forested field dotted with a few small structures.

101stabbulge

101st Airborne US Parachute Rifle Company from Nuts!

gliderrc

US Glider Rifle Company from Nuts!

On the Allied defending side, I ran my US 101st Airborne Division “Easy Company” list made famous by the book and TV series Band of Brothers. Several special character Warrior figures were included in my list and I also added a hefty group of five M4A3 76mm Shermans and an 81mm mortar platoon. My partner fielded a US Glider Rifle Company, also with 81mm mortars and a 57mm anti-tank platoon. In support, his list was rounded out with M7 Priests, M18 Hellcats and a tank platoon with a Jumbo, two Easy Eights and two more M4A3 76mm Shermans.

 PLJustinBulge
Lehr Panzerkompanie from Panzers To The Meuse

For the armored attacking Germans, both players pulled Lehr Panzerkompanie lists from the Panzers To The Meuse PDF from FOW. Across the lists, a swarm of Panzer IV platoons were accompanied by Panther G and Jagdpanther tanks, Puma armored cars, rocket launchers, Wirbelwinds and two Panzergrenadier platoons. To supplement their massive armored ground forces, the German players also opted for limited air support from a ME 262 A2a Sturmvogel jet plane.

IMG_4830

Initial Battle of the Bulge set up as German players plot their offensive

Per the scenario, the largely infantry US forces were deployed with the exception of our 76mm tank platoon and anti-tank guns which we held in reserve. The US anti tank platoon deployed at the center of the board with their M20 Greyhound scout cars, ready to spring support with the soft but deadly Hellcats to either flank.

IMG_4831

Panzer Lehr forces deploy and move toward the American right

IMG_4832

The German armored assault pushes to the American left

IMG_4833

German ME 262 jet attempts to dig the 101st Airborne out of their positions

The German forces moved quickly onto the board with reconnaissance moves from the Pumas stretching across the table. A mass of Panzer IVs and the Jagdpanthers rolled to the US right. On the American left, Panthers moved to cover in a small wood while the two platoons of mounted Panzergrenadiers pushed down the road toward a US rifle team dug into another woods looking to attack with an armored assault. At the rear, the first run of the Sturmvogel took after the US Airborne in position protecting an objective to no effect.

IMG_4834

The German armored assault on the US rifles in the woods

The German armored assault commenced but was bounced back over the first couple turns with the Americans taking only a few losses from the protection of the trees. Panzer IVs moved in to support from behind the German halftracks and took fire from the Jumbo, Easy Eights and 76mm Shermans sitting in a treeline across the road. The Americans sprang their first ambush, placing anti-tank guns nearby the Panthers. While shots from the US AT platoon were unable to crack the heavy panther armor, their position would go on to strongly limit the maneuverability of the Panthers for the whole game.

IMG_4835

US 76mm tank platoon springs an ambush on the right

IMG_4836

US tanks receive heavy fire from the Panzer Lehr

IMG_4837

US Hellcats move to stop the German armor advance

Over on the German right, the Panzer IV and Jagdpanther force divided around a wooded area and was engaged by the platoon of five 76mm Shermans exposing themselves in ambush. Over the next several turns, armor fire was exchanged as the German tanks sought cover in and around the woods. Three 76mm Shermans were quickly destroyed and the position was quickly reinforced with the US Hellcats deploying from behind a nearby barn. One Jagdpanther quickly bogged and sat stalled over repeated attempts to unbog for the majority of the remainder of the game.

IMG_4838

Panzer IVs are devastated by US armor fire from the woods at the left

Back on the US left flank, the German armored assault was pushed back with most of two platoons destroyed in a crossfire from American rifle infantry in one woods and tank fire from another. the combined fire from the US armor likewise laid waste to the approaching Panzer IVs and Pumas. At mid-game, the American left was holding but the US right was in trouble.

IMG_4839

The ME 262 Sturmvogel takes a run at the US Priests

Supporting fire from both sides proved relatively ineffective throughout the game. The German ME 62 failed to score a hit on multiple runs over the table both to infantry and the rear American Priest platoon. The Priests themselves served to only stall the German armor advance with poor results from multiple bombardments. German rocket fire from their rear also showed little for its repeated efforts once spotting teams were in position on both flanks.

IMG_4840German Panthers are thwarted by smoke rounds at the US left

IMG_4841German armor pushes for the crossroads objective

By the sixth and seventh turns, the game continued to progress steadily on two fronts. At the US left, Panther tanks moved into position after their allied Panzer IVs sat burning all around them. Smoke rounds from two US mortar platoons effectively kept the Panthers out of most of the fight as they crept forward and back in the woods. Finally, a couple of side armor shots from the American anti-tank 57mm guns took a couple of the Panthers out and effectively ended the German threat on one side of the field.

IMG_4843

101st Airborne troops rush forward to contest the crossroads objective

IMG_4842

Panzer Lehr forces attempt to push out the 101st Airborne

IMG_4844

German armor continues to roll to a second objective crossroads at the rear

Things were fairing much better for the Germans all along at the other end of the field. Over several late game turns, the German armor pushed forward, leaving all the US Hellcats in flame and the final surviving 76mm Sherman fleeing the field. The veteran 101st Airborne troops continued to snarl the German advance, remaining static and dug in under wooded cover. With the Americans handily holding their left, two US platoons ran to the right to shore up the defense of two objectives. Just as one platoon of US paratroopers broke, a round of fire from the Priests took out one of the Jagdpanthers. With German armor at one objective and pushing hard at a second, a lot of American troops were poised to go down contesting two crossroads with plenty of mortar support ready to shift their attention across the table.

The written scenario doesn’t call for a turn limit, but after having played for nearly eight hours we called the game at the ninth turn. This was one of the longer and larger FOW battles we had played at the club in Brooklyn in this year. In a year of 70th anniversaries, wrapping up with an exhausting and dynamic Battle of the Bulge game seemed the best way to play some tribute in miniature to the largest battle fought in US history.

Flames of War: Tanksgiving 2014 After Action Report

Tanks2014AAR

This past weekend seven of us gathered at Metropolitan Wargamers in Brooklyn, NY for our second annual Flames of War Tanksgiving event. One new player and six experienced FOW gamers (including two father/son pairs) played through five Late War games using 1750-point companies stretching over three tables — two from Western Europe and one from the Eastern Front. Over the course of the afternoon, British, US, German, Soviet and Hungarian forces fought it out with a mixed results but a slight edge toward the Axis for the day.

IMG_4722

Setting up two Western Europe tables for Tanksgiving 2014

IMG_4723

Western European tables ready to go at Metropolitan Wargamers with an Eastern Front table at the back

British Guards Armoured vs German Schwere SS-Panzerkompanie

The first Western Europe table presented a No Retreat Mission with the Guards Armoured defending a small town from a raiding Tiger-led German force attacking from the open farm area across a river. The Guards deployed an eight 25-pound gun Royal Artillery at the back edge of the table and one objective near the bridge spanning the river to the town. With three other platoons of Sherman and Sherman Firefly tanks in reserve, the initial British force would need to hold fast against the German onslaught.

IMG_4724

Guards Armoured tanks deploy at an objective

IMG_4726

Tigers roll toward the bridge and are covered in smoke rounds

The Germans began the game fully deployed and slowly moving their Tigers toward the bridge and an objective just beyond. With famed tank ace Michael Wittman commanding, the key for the spare British force was to stay away from the deadly guns of the German tanks. At the river ford in the center, the Panzer IVs moved to flank the other side of town with Panzer Grenadiers mounted in half tracks at the rear. The best the British could do was fire smoke rounds into the Tigers across the river and follow-up with long-range shots from the single Firefly deployed at the beginning of the game.

IMG_4727

A Firefly destroys a Tiger at the bridge

IMG_4728

Panzer IVs and Shermans face off in the town streets as a Firefly covers the bridge

Over the next two turns, British reserves arrived and made way for the center of the town, using the tight cobblestone streets and buildings as cover. Artillery spotters stationed in the rooftops of buildings called in several turns of artillery fire but failed to have any effect on the Tigers and destroying only one German halftrack at the river. A crack shot from a Firefly at the center of the town destroyed the first Tiger over the bridge. By the end of the fourth turn, the Panzer IVs wheeled to get into the town at the British left but were pushed back by fire from British Shermans.

IMG_4730

Reserve platoons from the Guards Armoured arrive to engage the Panzer IVs

IMG_4731

Tigers position themselves on two flanks of the town

In the fifth turn, the two remaining platoons from the Guards Armoured arrived to the British left and pushed forward toward the Panzer IVs. With two German tanks quickly lit up, the surviving Panzer IV fell back to the treeline where it was destroyed in the next turn. The British held their left for the moment, but in the cover of the raging tank fight, the dismounted Panzer Grenadiers had managed to slip into the town’s buildings unharmed.

IMG_4732

Firefly Shermans and Tigers face off to protect the objective

IMG_4733

Three Tigers charge hard toward the objective beyond the road

As smoke continued to hold the Tigers from firing at the bridge, a second Tiger was destroyed from a volley from the same Firefly that had sent the first Tiger into flames. While action at the bridge stalled, the three other Tigers had been working their way through wrecking the British tanks which had destroyed the Panzer IVs. All the while, the German infantry had continued to work through the town’s building’s untouched and toward the objective back the rear of town. The British command tanks rolled to stall the advance of the Panzer Grenadiers with machine gun fire and cover the objective.

With most of the British armour ablaze throughout the town, three Tigers rolled toward the objective at the bridge. The surviving British tanks had continued to make successful morale checks with the benefit of their special rerolls. The two surviving Firefly Shermans took a combined shot at a Tiger’s rear and missed. The Tiger’s spun around to return fire, destroying a Firefly. With further ineffective artillery rounds and just one Firefly sitting between three Tigers and the objective, the game was called with a victory for the Germans.

Final Result: Victory for the Germans!

Soviet Tankovy Batalon vs. Hungarian Harckocsizó Század

The day also saw a couple Eastern Front games with Hungarian and Soviet forces facing off on tables set up using a random terrain generator. The Eastern Front table showcased log structures from the excellent Miniature Building Authority Russian Village set along with some rural farm buildings from FOW. Each game saw the Soviets as the attacker, the first taking place on a table representing the bleak steppes of Russia in a Fighting Withdrawal Mission. The defending Hungarians began in prepared positions with a howitzer battery and Panzer IVs to their right, infantry at the center and tanks at the left. The Soviets with T-34 obr 1942 tanks at their extreme  left and right,  SU-100 tank killers and a Gvardeyskiy Tyazheliy Tankovy company at the center and a heavy mortar company at the rear.

IMG_4725The Soviet line moves toward the Hungarian positions

IMG_4719

Soviet tanks roll toward the Hungarian positions

IMG_4720

Hungarian armor proves to be no match for the Soviets

The second Eastern Europe match-up occurred around a collective farm complex with a Dust Up Mission. Starting from opposite corners, both the Hungarians and Soviets positioned themselves into a fantastic series of turns in and around the small farm. With both players moving, dodging for cover and firing at close range, the Hungarians and Soviets sparred for victory as tanks burned all around.

IMG_4721

Game two on the Eastern Front with the central Soviet farm complex

As Hungarian reserves arrived late in the game, infantry climbed out of their trucks and assaulted the Soviet T-34s. Soviet reserves likewise entered the game and made way for the Hungarian howitzers and the objective at the opposite corner. With two intense assaults at either end of the field, the Soviets gained a slight edge and were able to score their second victory on the day.

Final Results: Two Victories for the Soviets!

US 7th Division vs. German Panzer Ausbildungs Abteilung

Back on the other Western Front table a spare rural village anchored by a prominent church and surrounding hill and forests, a deadly force of German Panthers, Tiger Is and Königstigers squared off against the US 7th Division. The Americans rolled into the first Pincer Mission with standard Shermans, M4A3E8 Easy Eights and M4A3E2 Jumbo. At the rear, M7 Priests and 81mm mortars mounted in half tracks were positioned to cover the field in smoke while a P-47 Thunderbolt was on call to swoop in against the German force.

IMG_4742

The US 7th Division deploys in cover on the Western Front

Hoping to avoid German fire, the US tanks crowded into position using the church and other structures for cover as they eased across the field. Once engaged, the Jumbos did their job of eating up fire from the German guns and allowed the other US tanks to advance toward the objectives. Even with smoke cover fired from the rear, air support above and a mass of US armor, the cautious pace of the Americans was no match against the German Tigers firing from the woods. By the time the Americans made a push for the objective in the open, the German tanks were squarely deployed to defend the objective and take the game.

IMG_4740

American tanks bide their time waiting for clear shots at the heavy German armor

IMG_4739

Overwhelming German presence holds the objective

The players switched sides in the second No Retreat Mission on the same table. Again, the Americans came on the table on the far side of the town but this time chose to race aggressively toward their objectives. Defending from the wooded areas again, the Germans were able to fire at will on the advancing Americans. Quickly moving to a close series of short-range duels, tanks on both sides shifted to get into important side armor shot positions. With a tight cluster of models crowding the field near the objectives, American artillery smoke and air support quickly became irrelevant and some lively debate erupted around lines of sight and facings. The second game was a much closer match, but in the end, the thick hulls of the German tanks were no match for the American guns.

IMG_4741

Tanks on both sides jockey for effective shots near an objective

With two victories for the Germans, there was a fair amount of discussion as to whether the Panzer Ausbildungs Abteilung list is an example of a “broken” and unbeatable list in FOW. The Americans tried their best with both cautious and forceful tactics using some great available equipment

Final Results: Two victories for the Germans!

At day’s end, the Axis came out with a slight edge of a 3-2 victory over the Allies across two European fronts. The presence of tough late war German Tiger tanks are a hard force to crack, even with quality American and British armor with lots of air and artillery support. On the other hand, the Russian tank horde always proves to be a formidable Allied opponent whether facing Hungarians or Germans. Force quality, tactics and a bit of luck always play a role, and our five Tanksgiving games were all unique examples of how Flames of War tank battles can go on any given day.

Flames of War: Lingevres 1944 Scenario

lingevres1944

By D-Day +8 on June 14, 1944, the British 50th Infantry Division had pressed about 5 miles inland from Gold Beach to the outskirts of Lingevres. Dug in at the town were elements from the Panzer Lehr Division with several Panther tanks ready to force back the looming British attack. With 6-pdr anti-tank guns in tow, the British pushed into town mid-morning following a bombardment by 25-pound artillery and runs from supporting Typhoons above. A ferocious battle commenced between the 4th/7th Royal Dragoon Guards and the German Panthers. When the smoke cleared, several Panthers sat burning as victims of Sherman Firefly and anti-tank gun fire. At day’s end, the British controlled Lingevres.

lingevresAT

British 6-pdr anti-tank gun deployed outside Lingevres, June 14, 1944

The WWPD website has a Lingevres scenario available which two of us adapted for play this past weekend at Metropolitan Wargamers in Brooklyn, NY. Using the scenario as a guideline, we laid out the tabletop battlefield with cornfields stretching outside the town occupying two-thirds of the table. With our 1750-point forces on each side, the Germans began with two platoons of infantry and a heavy machine gun platoon inside two buildings and the church at the center of Lingevres. The British then deployed with their artillery battery, two rifle companies and a recon patrol. All other forces were held off table, with German delayed reserves set to arrive in turn three and British reserves eligible to arrive immediately at the beginning of the game.

Victory conditions as presented were simple — the British needed to take three buildings in the town and the Germans needed to drive the British from the field. How the game played was not simple and once again revealed my need to sink more work into creating accurate, playable scenarios for FOW.

IMG_3163Germans dug in at Lingevres in the town’s buildings while British artillery and infantry deployed from the cornfields in the distance

IMG_3164

Initial movement of British forces into Lingevres with recon carriers moving left and infantry moving into the woods near the church

The first two turns of the game saw the British marching from their edge of the table toward Lingevres. At the town, a German machine gun platoon sat waiting in a building at the crossroads while two other infantry platoons took up position in the church and shops across the road. By turn three, British artillery had opened fire on the machine gunners and pinned them. The first British tank platoon also rumbled onto the table, as did the German Panthers which made way for the center of town.

IMG_3165

Panther reserves roll into the center of Lingevres

IMG_3173

British infantry in the woods take fire and are pinned as armored reserves move from the rear

The first British infantry platoon made way through the woods at the center of the table but were pinned and cut down over two consecutive turns of fire from nearby Germans. The British recon patrol, edging its way through the bocaged fields near the church, was chased away with the appearance of the Panthers.

IMG_3167A British Sherman takes up position to spot for the artillery battery

IMG_3166

British infantry move from the farmhouse across the field

IMG_3169

Panthers destroy a Firefly and the Sherman spotter tank at the edge of town

IMG_3170

British infantry fall back after taking fire from the German half-tracks

On the main road to town, the British ran their Sherman spotter tank and lead Firefly toward the nearby farmhouse. On the other side of the farmhouse, a British infantry platoon moved into position using the building and nearby bocage as cover as they made way for the open field. The heavy British push around the farm was stymied with the arrival of German halftracks which fired machine guns into the field. By turn five, the Sherman spotter tank and spearheading Firefly also lay in flames after some quick shots from the German Panthers.

IMG_3168

British machine gun carriers and tank reserves roll on

IMG_3171

Armored reserves move to support infantry

IMG_3172 British infantry reserves move in near their artillery battery

By turns six and seven the inital British assualt had been repulsed at a safe distance from town. All German infantry platoons remained safely bunkered up in the town’s buildings, and the spotter for the German’s reserve 12cm mortar platoon was now camped out in the church’s bell tower. The three Panthers prowled back and forth at the center of town, and the incoming fire from the British artillery in the distance was the only real agitation to the occupying Germans. The Britsh rolled on their final reserves of machine gun carriers, Sherman/Firefly tanks and a fresh infantry platoon.

Even with all reserves on the table, the British attack was stumped. With one rifle platoon destroyed and a second whittled down, the British had just one intact infantry platoon on the field. One tank platoon struggled through the fields to one side of town, while the second sat idling on the road to town. Clear lines of fire around the church and town center presented open killing zones for the Germans in the town’s buidings and the three Panthers. All the Germans needed to do was sit in place and mow down the coming British.

I love playing wargames for historical scenarios, but our game this past weekend at Lingevres presented some serious limitations to the FOW rules as written. Playing an even match of 1750-point forces per side ultimately did not allow for a satisfying game for either player. What works for a head’s up FOW tournament game or randomly-rolled mission simply does not play well in recreating historic engagements.

In our Lingevres game, the British simply didn’t have enough units to create a critical mass to advance into town under what was sure to be withering fire from the Germans. We decided we liked the scenario, but perhaps the British needed a 50% increase in points, perhaps with additional rifle and tank platoons and a Typhoon providing air support.

With a three-day D-Day weekend being planned at our club this June, we’ve got multiple historic airborne, beach and inland fights to sketch out in the coming months. There’s going to be a lot of playtesting and tweaking to get our historic games to play well. With wargaming, striking the balance between a game that provides both historic accuracy and the potential for different outcomes is the real challenge that lies beyond just the roll fo the dice.

Flames of War: Utah Beach “Uncle Red” 1944 Scenario

utah1944

When most people think of the D-Day invasion at Normandy on June 6th, 1944, the deadly images from the US landings at Omaha Beach in popular movies like The Longest Day or Saving Private Ryan generally come to mind. Utah Beach was added as an objective for US forces late in the invasion planning and occupied the far right of the Allied coastal assault. The beach was divided into three sectors (Tare Green, Uncle Red and Victor), and the landing of some 23,000 troops and armor support started the day’s invasion at 6:30am. Awaiting the invasion was the German 709th Infantry Division.

utahmap2Map of US 4th Infantry Division at Utah Beach June 6, 1944 (“Uncle Red” circled)

The US 4th Infantry Division at Utah Beach, including Gen. Theodore Roosevelt Jr. and author J.D. Salinger, came ashore with relatively few US casualties of just 400 compared to the 3000 at nearby Omaha Beach. The success of the assualt is credited largely to the effective landing of more Sherman tank support, relatively light German fortifications covering the exits from the beach and early inland actions by the 101st and 82nd Airborne Divisions earlier in the morning.

ussandtable

US 17th Airborne Division using a sand table before Operation Varsity in 1945

 Metropolitan Wargamers in Brooklyn, NY is pretty well known for the sand tables which occupy our space, and some of our founding members have won several awards for presenting sand table games at conventions over the years. Sand tables have been used by military planners since ancient times when sticks and stones were simply laid out in the sand on the ground.

modern sand table

NY Army National Guard troops train with a sand table at Fort Irwin, CA in 2011

Despite all our military technological advancements, modern war colleges and even troops deployed in the field today still use sand tables for training and planning real-world actions. Gaming on a sand table provides a great amount of flexibility and realism in shaping the contours found in real-life battlefields, adding tremendous playability to just about any scenario.

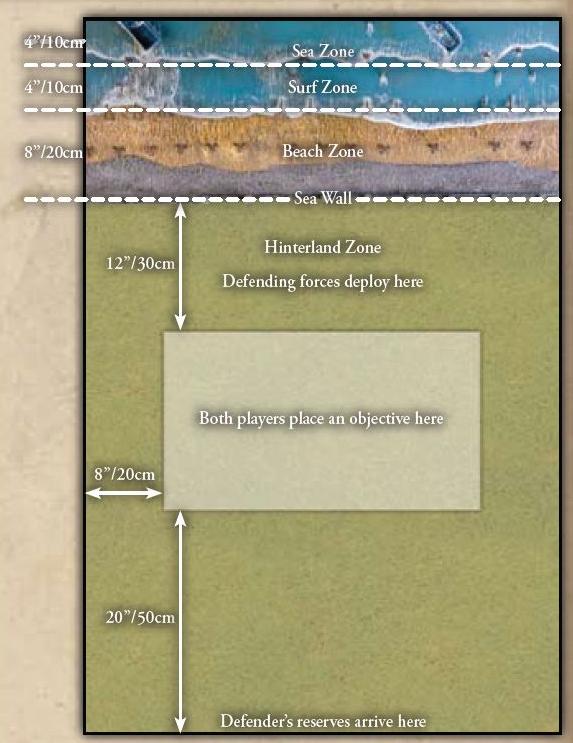
HitthebeachmapFlames of War “Hit the Beach” scenario set-up

This past weekend a few of us ran an Uncle Red beach assault scenario on one of the club’s sand tables using the Flames of War Amphibious Assault rules and ‘Hit the Beach’ scenario.The 4′ x 5′ table I set up featured a sculpted surf landing zone, sea wall and two beach exits leading to an inland area. Each player placed an objective. The German player then deployed their coastal defenses at the beach including barbed wire, two bunkers, tobruk machine gun nests and a Grenadier platoon. At the rear of the table, the Germans deployed an artillery battery and another machine gun platoon in a nearby house defending their objective. Half their 1500-point force remained off the table in reserve.

IMG_2813The US landing begins against the fortified coast and German artillery at the rear

The Americans began with a naval gun barrage pinning every German platoon but only detsroying one stand at the beach. With the first turn, two boat assualt platoons and a pioneer platoon landed at their left and center area of the beach. Choosing to shoot rather than move at the double, the first three American platoons were quickly pinned and subsequently destroyed in the first two turns of the game.

IMG_2814View from the German rear with Americans landing

Choosing to still keep their D-Day tanks off the beach, the Americans attempted another landing in turns three with only two boats able to land. Naval guns and P-47 air support attempting to hit the rear German artillery proved completly ineffective as troops at the beach continued to be pinned and detsroyed.

IMG_2816

US waves struggle to get off the beach

IMG_2819

Remanants of US platoons get over the sea wall in turn four

With still more delayed landing reinforcements and no tanks heading for the beach, two US platoons breached the sea wall in turn four. Moving at the double and under heavy machine gun fire, the short-lived progress was stalled and the platoons lay pinned with heavy casualties.

IMG_2821

Swimming Shermans finally come ashore with more infantry

Switching tactics in turn five, the Americans went for the right side of the beach. Two boat crews hit the beach moving at the double with three Shermans coming ashore in support. Two tanks immediately bogged, creating two targets stuck on the beach for the next round of incoming German artillery.

IMG_2822

Shermans pour fire into the German defenses

With turn six, one more Sherman made it to the beach while another was swamped and lay destroyed in the surf offshore. Just one more boat of infantry landed to support a pinned and heavily-damaged platoon already on the beach. Progress was made over the sea wall with US troops moving out of range of much of the German machine gunners on the far right edge of the table. Finally, the US did some damage with fire from the Shermans destroying several Grenadier units and a tobruk nest. At the bottom of the turn, the Germans brought on their first reserves with a Nebelwerfer battery at the back of the table. One Sherman was hit and destroyed by German artillery and another’s crew bailed out.

The US looked to be making a bit of progress as turn seven began with their M7 Priest arillery platoon landing with half of the platoon bogging right off the boat. The remaining three guns, along with three Shermans, took  shots at the German defenses and destroyed two more Grenadier stands. German infantry reserves began rushing on the table in front of the artillery to cover the American objective. On the beach, another monstrous German barrage left the Priests in flames and just one surviving Sherman. At turn eight, the Americans ceded the table after only one additional landing craft of troops made it to the beach to join their final Sherman.

This was our first FOW beach landing at the club, and a big learning experience for us. The US players chose to play way too conservatively from the outset with troops moving too slowly off the boat in the first two turns. Leaving the Shermans off the beach until the fifth turn was also a huge mistake, as getting them on sooner would’ve provided greater pinning support and potential for smoke cover for the boat infantry. US air support was frustrating, as often seems the case, and use of the naval guns was likewise botched. The US also suffered from poor luck with too many landing craft either not getting back off the beach to grab more reserves or failing to land existing floating reserves. In many turns, just one of three boats were able to arrive, making it impossible to hit a critical mass of troops on the beach.

Several of us at the club are planning a weekend-long D-Day series to celebrate the 70th anniversary of the Normandy campaign this June, so look for more practice scenarios and a lot more on the anniversary event in the coming months. As Gen. Roosevelt said at Utah Beach, “We’ll start the war from right here!”

Flames Of War: Encounter Mission

IMG_2697

The official FOW website makes all the missions from the third edition rules available online, and they’re a quick way to throw together a game and practice tactics without putting all the work needed into a historic scenario. Having been away from a Flames of War table for a week or two, a couple of us at Metropolitan Wargamers in Brooklyn, NY threw together a quick, non-historic Encounter Mission last weekend.

IMG_2698Encounter Mission table (German deployment to right and US to the left)

My opponent, playing as Germans, rolled as attacker and chose the long side of the table with the church on his right and a farm and wooded area to his left. This left my US 101st Airborne with the bridged river at my right and a farm at my left as defender. As per scenario rules, we each began by placing an objective on either long edge of the table, placing half our platoons in reserve and deploying the remainder of our starting units along our edges.

IMG_2699

Germans Stugs move to control the center

The Germans won the roll to go first and immediately pressed toward the center around the church yard with their Stug platoon and on their left toward the river with Panzergrenadiers. It was clear the Germans hoped to make  speedy run to the objective just on the other side of the stone bridge and ford on the river.

IMG_2700US anti-tank platoon rolls to seal the German advance at the bridge

In my first turn, I moved my M-18 Hellcat tank destroyers to the bridge and hoped to get some quick kills in on the advancing German Stugs from the bridge.

IMG_2701

Members of the 101st Airborne take position in the woods

On the other side of the road to the bridge, my US Airborne hustled into the two sets of woods. Hiding among the trees, the paratroopers looked to seal the flank against the advancing German mounted troops on the other side of the river.

IMG_2702

One Hellcat burns at the foot of the bridge while another fires from the bridge

With my Hellcats missing their shots on the advancing Stugs, the German guns rolled to the intersection just beyond the bridge and destroyed one of my anti-tanks. While the loss of the Hellcat halved my anti-tank capabilities, the burning hulk effectively shut down the German path to the bridge.

IMG_2703

US Airborne and German Panzergrenadiers exchange fire over the river

Across the river, the 101st troops safely fired from the treeline toward the mechanized Germans across the river. With combined fire from a a nearby remaining Hellcat, Jeep and armored car from the tank destroyer platoon, a German halftrack was destroyed and forced its troops to dismount. Returning fire, the Germans destroyed the armored car and Jeep.

IMG_2706

Stugs cross the field as an Airborne platoon lies behind the bocage beyond

With the road to the bridge shut down, the Stugs turned to speed their way across the fields at the center of the board. An Airborne platoon took up position on the other edge of the field, lying in wait for the advancing Stugs.

IMG_2707

The US P-47 hits the Stugs in the open field

The Stugs sitting in the open field made for a quick target for the P-47 Thunderbolt which flew on in turn four, leaving one Stug in flames and a second with its crew bailed out.

IMG_2708

The Stugs reach the gap at the field edge and destroy the remaining Hellcat

I their next turn, the Stugs remounted and made their way to the gap at the far edge of the field. A couple quick shots to the side armor of the remaining Hellcat destroyed the remaining US tank destroyer which had been busying itself pouring fore into the still-mounted Panzergrenadiers. It looked bad for the Americans with nothing standing between the German Stugs and the objective just beyond the river ford.

IMG_2709

US Shermans make quick work of the remaining Stugs

Luck switched back for the Americans as they successfully rolled for their Sherman tank reinforcements in turn five. The Shermans moved to the river’s edge and destroyed the remaining three Stugs. Not only had the German armored advance to the objective been thwarted, but yet another easy path had been closed-up with a burning Stug clogging the exit from the field.

IMG_2710Panzer IV reinforcements move to take the US left

By turn six, the German Panzer IV reinforcements were rolling down the road looking to run around the far edge of the field and attack the US left flank. The left side was only held by a US light machine gun and rifle platoons, so armored support was badly needed if the Germans were to be stopped.

IMG_2716The first turn at the battle of the crossroads on the US left

At the intersection on the US left, ferocious fighting erupted as an assault from the usually stalwart 101st Airborne was repelled. The Shermans moved in and destroyed a Panzer IV.

IMG_2717

The second turn of the battle of the crossroads on the US left

With space and options getting tight, the Panzer IV’s returned fire and Sherman was left burning. With a two-on-two fight. the Shermans destroyed another Panzer IV in the sixth turn and the final German tank fled the field after failing a morale test for the pummeled platoon. With German armor destroyed across the field, the US rifle and light machine gun platoons scurried to the German right toward their objective behind the church.

IMG_2714

German half tracks struggle to cross the river on the weakening American right

The final turns of the game played out back at the river with the reinforced Germans struggling across the river. Fire continued to be exchanged with the US rifle platoon in the forest which eventually fell back into the treeline at the road.

IMG_2715

The Thunderbolt engages German transports at the river crossing

Another run from the Thunderbolt threw more Germans from destroyed transports. Remaining Germans trucked over the river and around the woods with only only a few US rifles between them an victory with capture of the objective.

IMG_2720

The final showdown at the contested objective

On the eight turn, it all came down to the contested objective. With a full US parachute rifle platoon in the woods and another heavily-damaged one nearby, the final battle looked like it was going to be decided with some bloody assaults. It looked like anyone’s game, but the Germans were now at half-strength on the table, and a failed motivation test caused the Germans to cede the battle.

German artillery never played a factor in the game, and the heavy terrain shut down use of US air support except for in two deadly runs of the game. Tanks on both sides wound up serving more as roadblocks at some key points on the road, and the river also played an important role in the US defense against the German advance.

We’ve got a couple historic scenarios at the club I’ll be reporting on soon, including a landing at Utah Beach and a scenario from the first day of the Battle of the Bulge. What makes FOW flexible and so enjoyable as a system is the ability to play historic and non-historic engagements, something I experienced last week and am certain to see more of in my after-action reports soon to come.