Flames of War: Fielding the Guards Armoured Division Part II

UKguards

Since starting with 15mm World War II Flames of War gaming a number of years ago now, my Allied modelling has focused exclusively on United States forces. Beginning with basic US infantry rifle, artillery and armored companies, I eventually added in some US Airborne forces plus some air support. Recently I’ve felt maxed-out on the US, so I’ve taken to looking to build out my Allies with another country’s army.

eagUARDSTEMP

After a bit of research and reading, I’ve settled on the British Guards Armored Division. I began this new journey with the plastic Guards Armored Sherman and Firefly models included in the excellent Open Fire! starter game box set. While these can be played as Allied support to my existing US Airborne, I really wanted to give the British their own space on the board.

IMG_2737

Along with my existing plastic Shermans and Fireflies I already have painted-up, I bought another set from a fellow member at Metropolitan Wargamers in Brooklyn, NY. This gives me a full four-platoon armoured squadron with four Shermans in the command section.

IMG_2738

 To fill out my Guards Armored Division, I’ve also added the special Lieutenent Colonel Joe Vandeleur warrior character. As a leader of the Irish Guards during such famed actions as Operation Market Garden, Vandeleur proved to be a solid field commander known for his by-the-book leadership.

Caine

 Michael Caine as Lt. Col. Joe Vandeleur in ‘Bridge Too Far’

I’m a big fan of 1977’s A Bridge Too Far in which Michael Caine co-stars as Vandeleur during Market Garden, so I couldn’t help but add this model to my new force with the colonel riding upright in his armoured car.

IMG_2735

IMG_2734

IMG_2733

In the coming month or so I’ll be filling out my British force. I have one completed Royal Artillery section and another on the workbench, enabling me to field a full eight-battery platoon. I’ve also got Battlefront’s British Rifle Company box allowing me to march three full platoons on the table of what was known affectionately during WWII as the PBI – Poor Bloody Infantry.

IMG_2732

I’m really looking forward to playing with my new British units this coming year, along with all their special national rules. The Brits are really going to open possibilities with new scenarios and new fronts. As Caine says as Vandeleur in A Bridge Too Far, “I’ve got nothing else planned.” At least for now.

Related articles

2014: Opening New Fronts

wraondsnyIn the middle of 2013 I somewhat unexpectedly re-launched Brooklyn Wargaming with a new design and a renewed posting vigor. Since then, I’ve had more than 10,000 visits from readers all over the world. Together with these folks I’m sure to never know, we share a continued passion for gaming I am committed to infusing in every one of my postsings here.

My World War II Flames of War posts are clearly the favorites for visitors to the site. My FOW After Action Reports continue to garner a lot of daily views, and people in particular seem to love the Barkmann’s Corner scenario I played in July at Metropolitan Wargamers in Brooklyn, NY. More AARs and building-out my various national forces in my FOW Modelling posts will be a big part of 2014.

As for other stuff on the site, my few posts on Warfare In The Age of Reason are quickly shooting to the top of popularity. I really enjoy writing up my plays a variety of board and card games through my New Game Weekend posts, and taking a look backward at Retro Gaming The 70s & 80s often result in emails from people like me who have fond memories of hours spent at play in the past.

Looking to 2014, here’s where my focus will continue and grow on Brooklyn Wargaming and the tabletop each week.

World War II

For years, I’ve played a lot of FOW with a big focus on Western Europe. To start the year, I’ll be playing a beach landing or two as a way to prep for the 70th anniversary of D-Day this summer, and I’ve also got a handful of other historic scenarios I’ve been working-up over the past few months.

a3ee242c52

Over Thanksgiving, my brother (another lifelong gamer like myself) handed me a copy of Antony Breevor’s Stalingrad and told me it was the best military history book he’d ever read. The highly-readable account of the vicious siege of Stalingrad has gotten my hooked on the idea of expanding my WWII gaming into the Eastern Front in the new year.

Desperate-Measures

As a first step toward this front of the war, I picked up the new FOW Desperate Measures book. While this intelligence briefing is centered on the closing months of the war battled among German and Soviet forces, there’s also a newly-released updated edition of the FOW Red Bear book which gives a broader look at the Allied forces on the Eastern Front. These resources coupled with my historical reading on Stalingrad have whet my appetite for fielding some large masses of Russian forces on the table. A couple other guys at the club in Brooklyn have already started putting together some of Stalin’s finest and I’m very much looking forward to the Eastern Front opening up my WWII gaming with some scenarios this year.

716532

I spent a chunk of the past year reading Rick Atkinson’s Guns At Last Light, the third book in his World War II Liberation Trilogy. The book’s focus on the D-Day landings through the campaigns in Western Europe to the fall of the Third Reich squares with the majority of my FOW gaming from the past year. Working my way back through Atkinson’s books, I’m just starting in on The Day Of Battle for Christmas. As with my new swing in interest toward the Soviets and Eastern Front, I’m looking to Atkinson’s second WWII book to fill in my knowledge on the southern European campaigns in Sicily and Italy. Whether I get some Italian troops on the table by year’s end remains to be seen, but I’m really looking to 2014 as another big year of WWII gaming and learning.

Seven Years War

I grew up in Western New York State and then lived for a period of time in Western Pennsylvania, so the French and Indian War has always lingered as an interest but has never found its way into my gaming.

lastmohicanpen

James Fenimore Cooper’s The Last of the Mohicans and other books in his Leatherstocking Tales series have also been favorites since boyhood. These colorful stories are set within the wilderness backdrop of the colonial wars of the Americas fuel much of my love for the French and Indian War period, and my visits to historic sites like Fort Niagara and Fort Necessity have added physical understanding to the frontier conflicts of the period.

ageofreasonrules

Toward the end of 2013, a fellow club member introduced me to the Warfare In the Age Of Reason rules and the Seven Years War. While my experience gaming battles from the period have thus far had a European focus, my long-time interest in what most consider the world’s first global-scale war holds tremendous interest for me. To this end, I hope to make wargaming the Americas front with the FIW a project for the coming year. Modelling 15mm miniatures of colonists, French, British and Native Americans, along with requisite early American frontier terrain, is sure to be making an appearance here in the coming months.

World War I

While I’m on the subject of world wars, I can’t help but acknowledge the calendar and the 100th anniversary of the beginnings of World War I this coming July.keegan_first_l

My only real exposure to the war so far has been with John Keegan’s excellent The First World War. I’ve read a half-dozen of Keegan’s books, and his 1999 overview of the Great War gave me a solid introduction to a war that’s often overlooked by most Americans like myself. Clearly this is a major period in modern warfare I could stand to learn more about.

9780385351225_p0_v1_s260x420

To get myself back into the period, I’m planning on reading Max Hasting’s Catastrophe 1914: Europe Goes To War which made many top nonfiction lists at the end of 2013. I’ve only gamed WWI once with a 28mm French-German trench warfare scenario at a convention back in 2011, but there are a number of club members with miniatures from the period I may prod into using in some games this year. There are also rumors afoot that the makers of FOW are expanding into WWI just in time for this year’s anniversary, but for now I think some time with a few good books should be enough tribute from me in 2014.

And…

I can’t really tell with complete certainty where this coming year in gaming will take me. Like with most battle plans, a grand strategy can be laid out but actual events often unfold very differently in the fog of war. I can say there will be more miniatures, more scenarios and more completely fresh games to come here on Brooklyn Wargaming by New Year’s Day 2015. For now, here’s to old fronts not forgotten from 2013 and new fronts to come in 2014.

Warfare In The Age Of Reason: Battle of Kolin 1757

drillmanual18th-century European military drill manual

Now that I’ve had my interest sparked in the Seven Years War (SYW) period, I’ve been doing some homework. For background, a lot of people point to the outstanding Wiki-style Kronoskaf SYW Project website for more than 2200 articles and 5500 pictures relating to the period. I’ve found the maps collection to be particularly compelling since I have a huge interest in how landscapes shape warfare in all periods.

I’ve also laid out a small initial investment on the very popular Warfare In The Age Of Reason rulebook written by Tod Kershner and Dale Wood, published by Emperor’s Press and available at On Military Matters. I also found a Facebook page dedicated to the rules which I plan on using for visual inspiration and gaming information in the coming months. At some point, tracking down a copy of the out-of-print Uniforms of the Seven Years War 1756-63 by John Mollo and Malcolm McGregor sounds like thing to do if I want a collection of handy plates on my bookshelf.

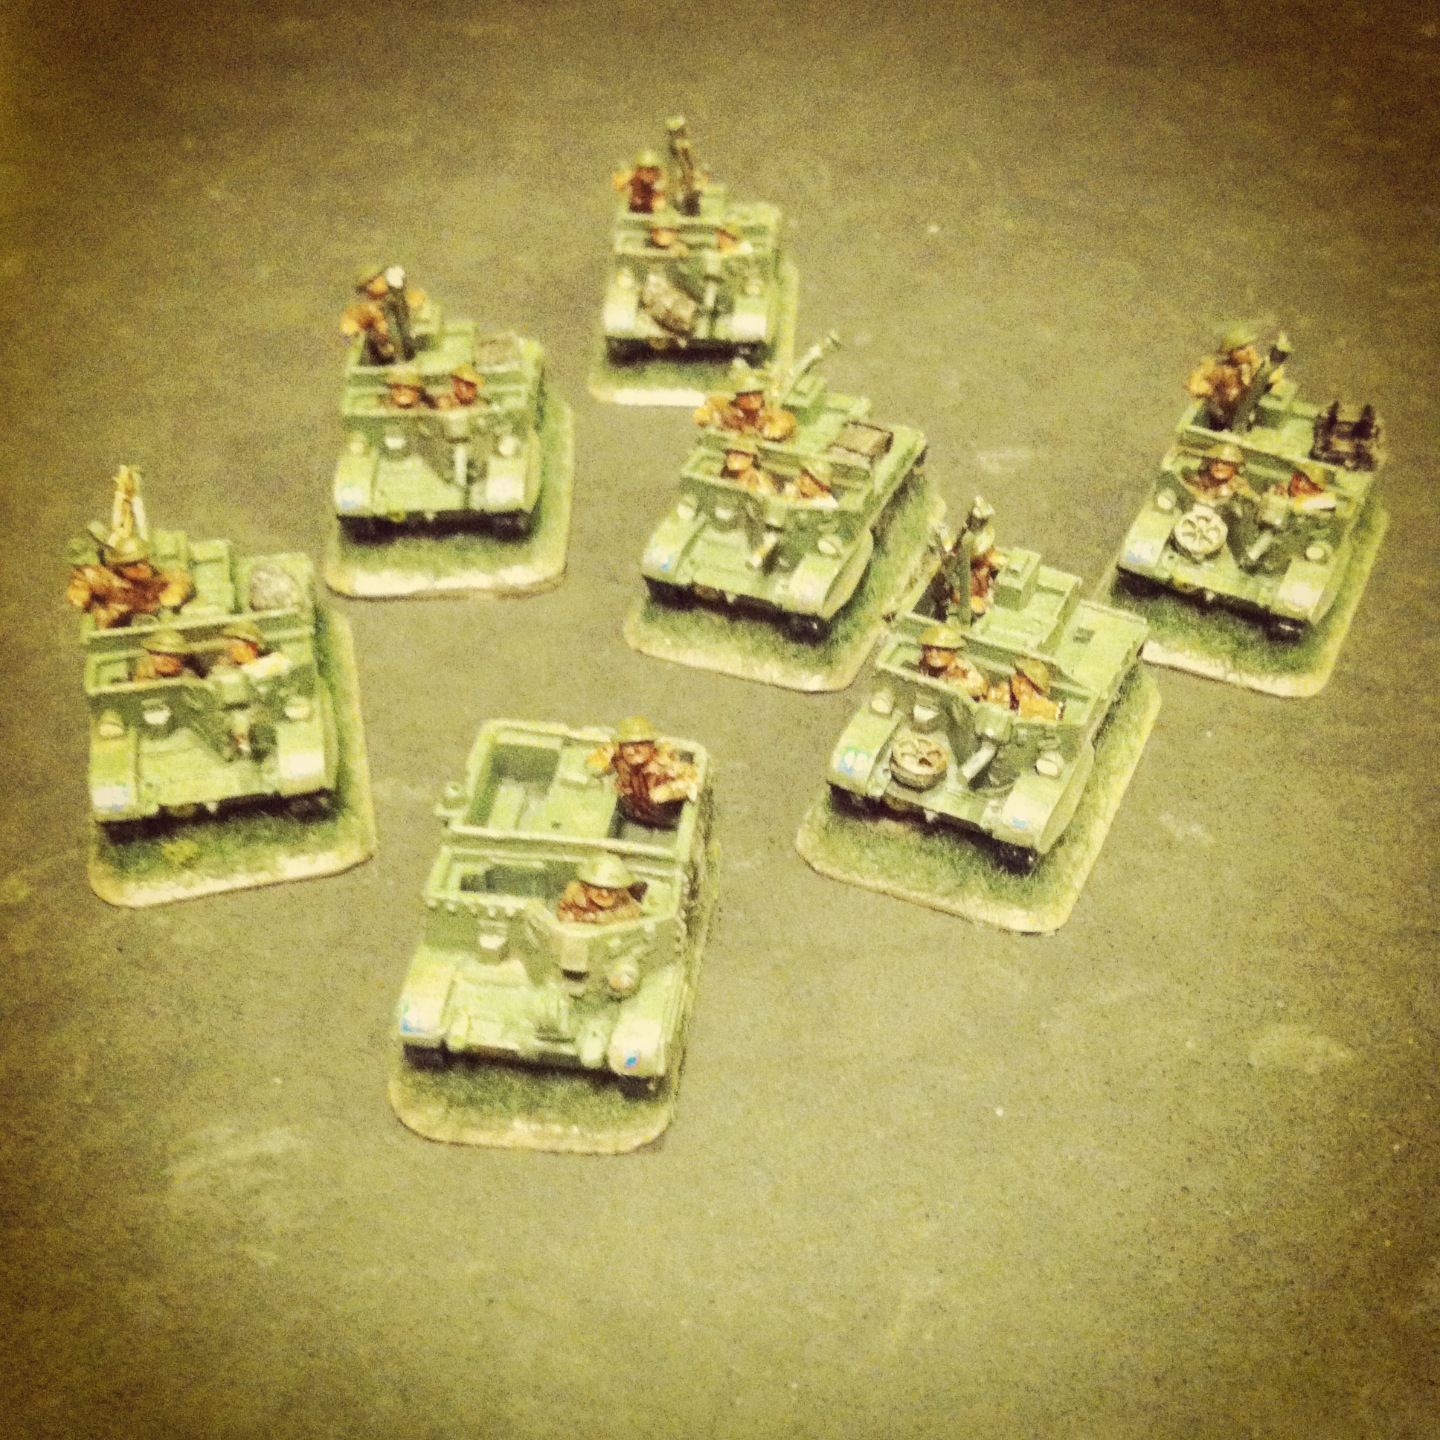
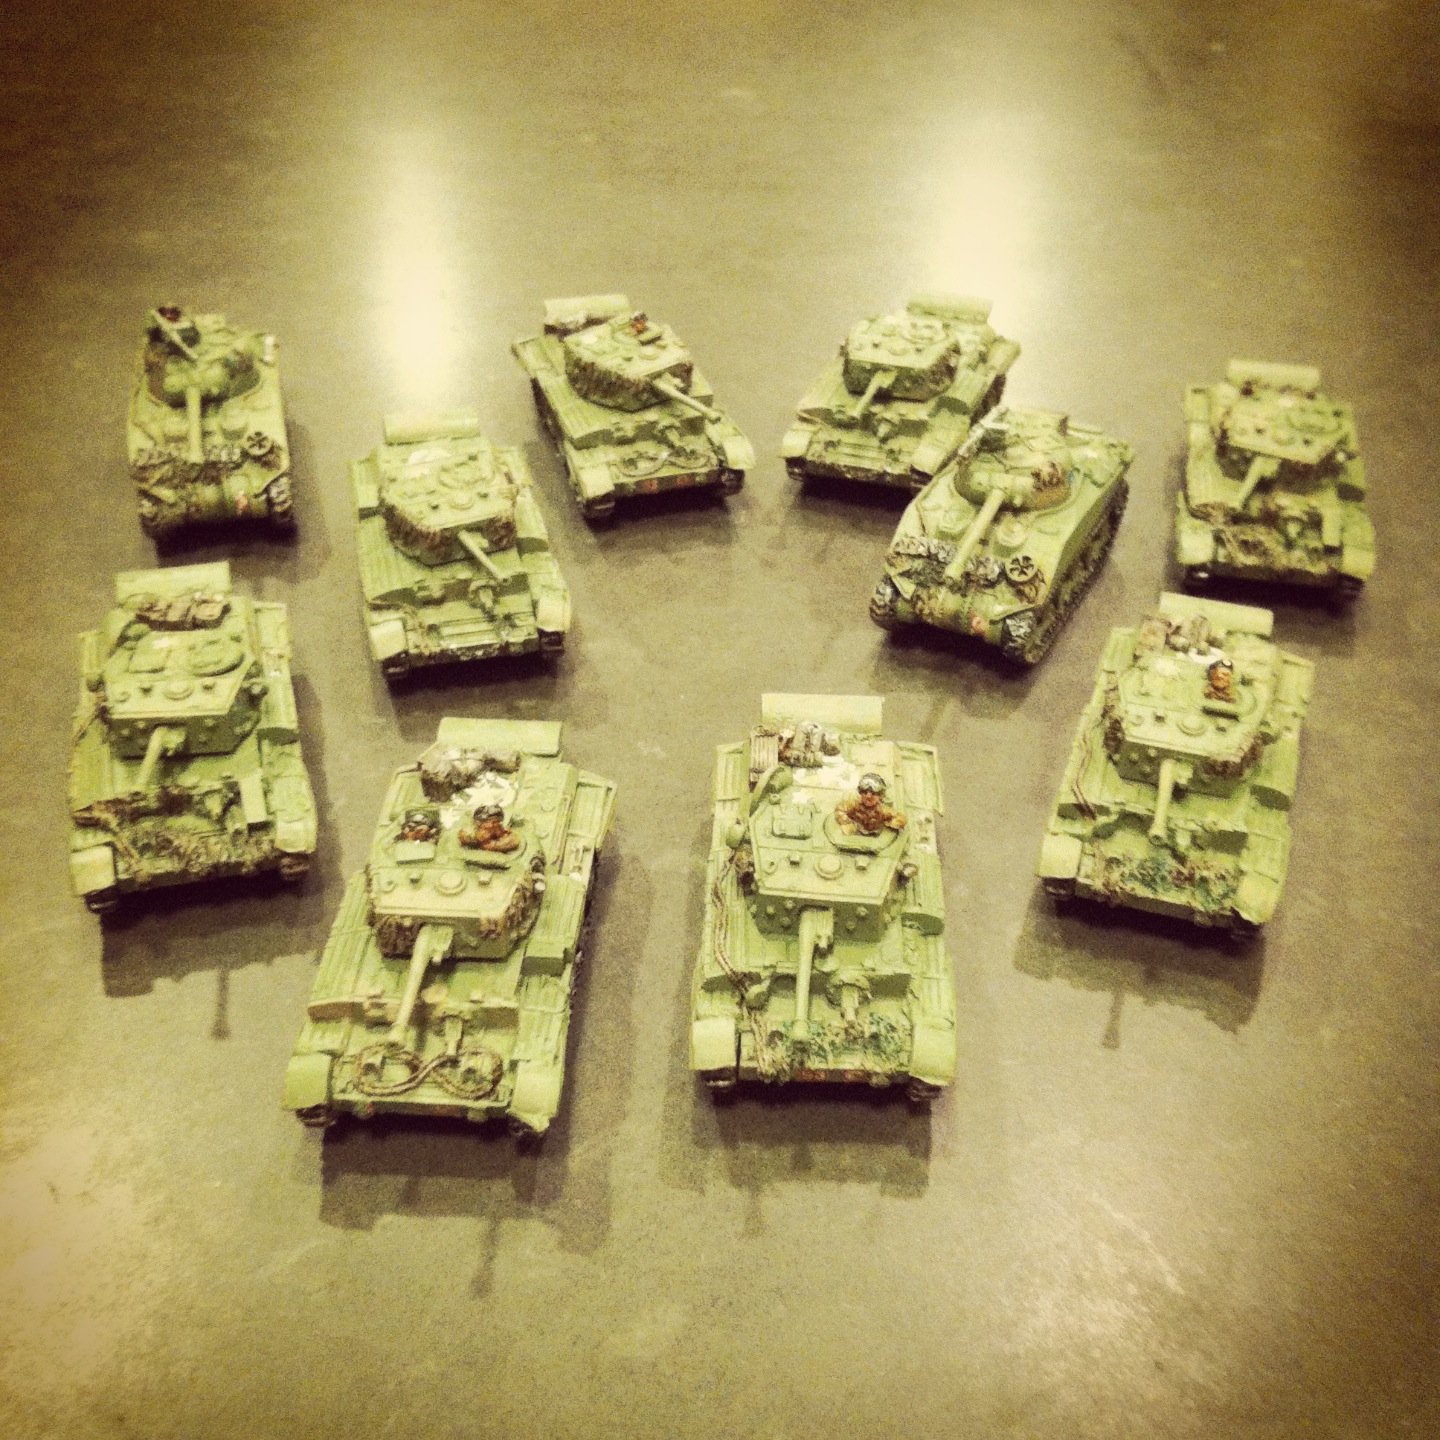
Fortunately there are a few players at Metropolitan Wargamers in Brooklyn, NY who already have pretty sizable collections of SYW 15mm miniatures from a represenative cross-section of period armies. Some guys at the club also have figures from the period in 28mm, and one of the newer members is talking about running a campaign-style SYW game next year. Even with models at the ready for gaming at our club, I’m already eyeballing the 18th-century 15mm figures available from Old Glory Miniatures and Essex Miniatures as one of my projects for 2014.

Kolin1757

Battle of Kolin, June 18, 1757

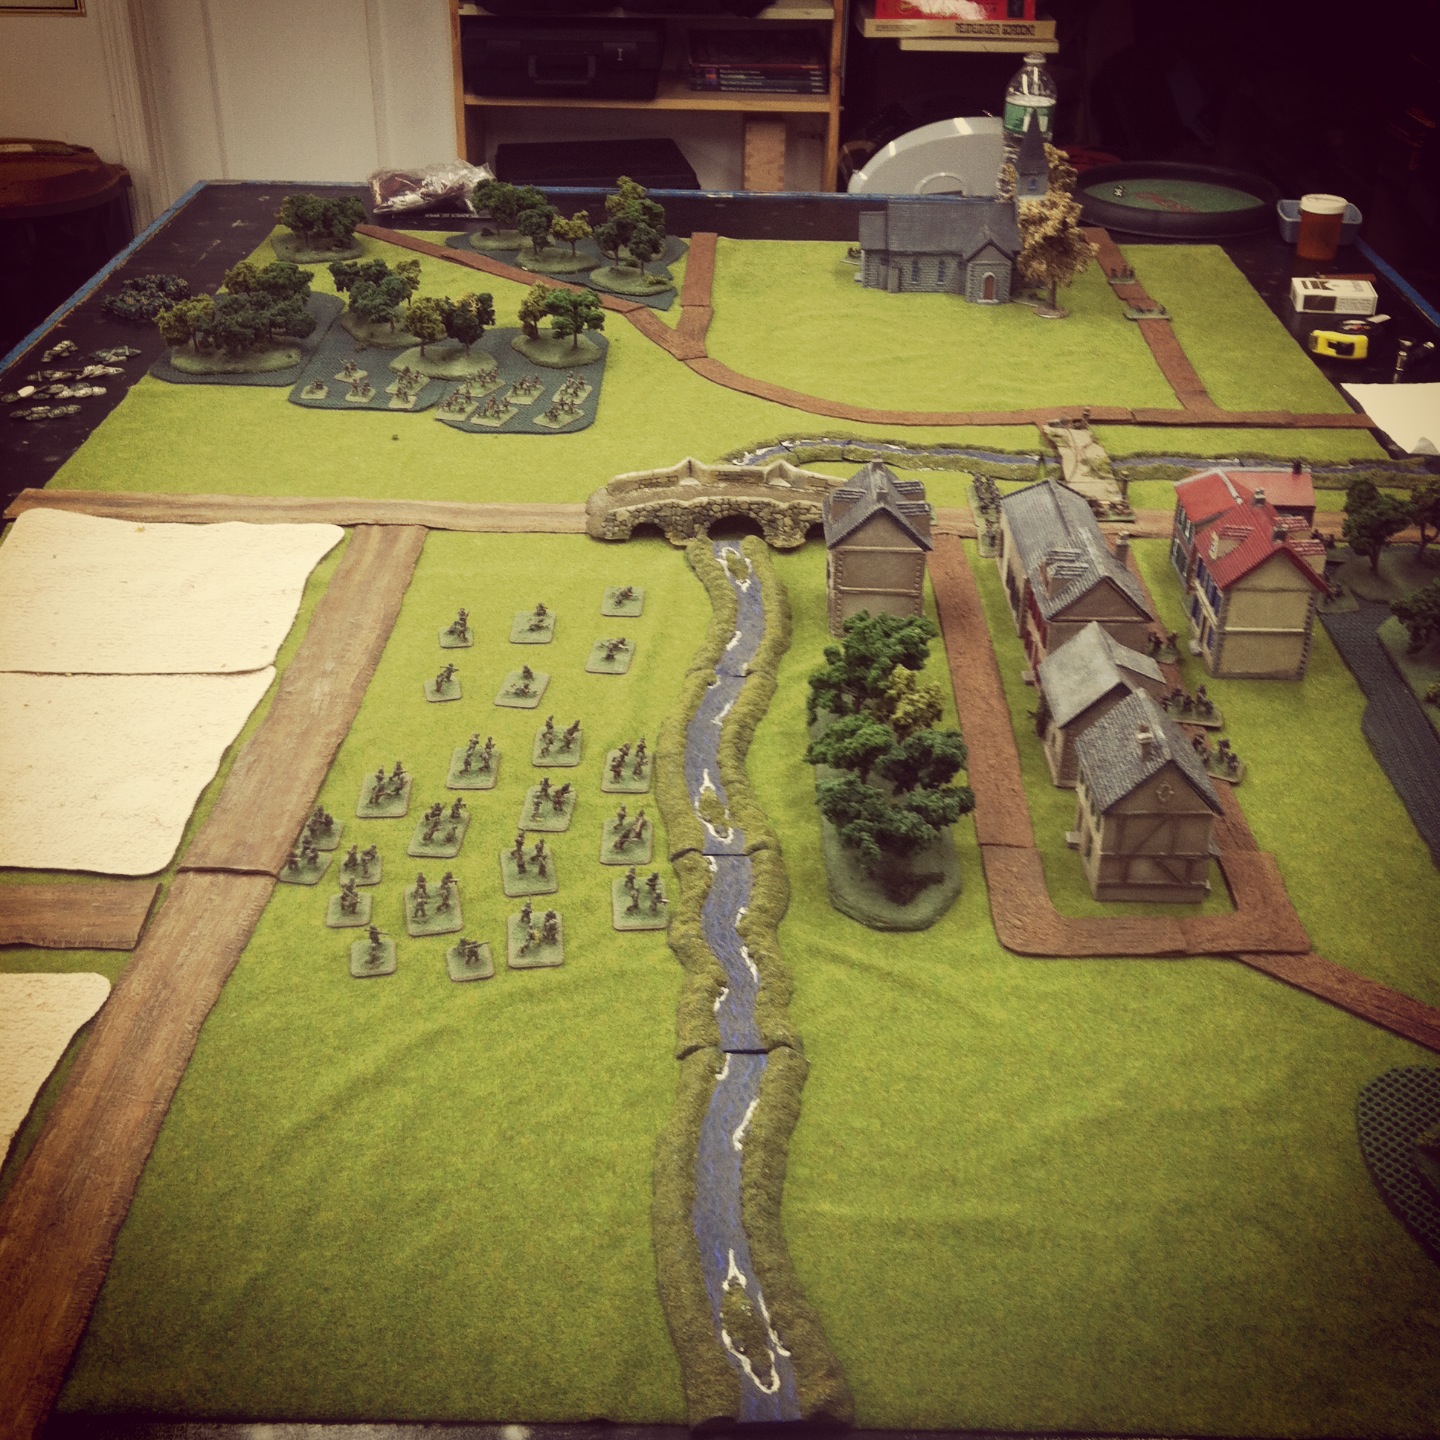
This past weekend, my son and I got together with some club members in Brooklyn for another SYW game, this time the Battle of Kolin June 18th, 1757. The battle came a couple months prior to our previously-played scenario of Moys from September 1757, and proved to be the first defeat experienced by King Frederick II of Prussia.

Admired by contemporaries and scholars today as one of the greatest military leaders in history, Frederick The Great and his Prussian forces were viewed at the dawn of the SYW period as the greatest standing army in Europe. Aligned with Great Britain and surrounded by Austrian-aligned adversaries on the continent, Frederick’s tactical innovations led his often outnumbered forces to numerous victories.

At Kolin in the present day Czech Republic, Frederick led some 34,000 Prussians in a march hoping to destroy the Austrian army seeking to reinforce the besieged city of Prague. Unfortunately for Frederick, he chose to confront the superior force of 44,000 Austrians on their home turf defending from the rolling hills near Kolin. On the hot summery day in June, Frederick’s aggressive gamble would result in his undoing.

 IMG_2605
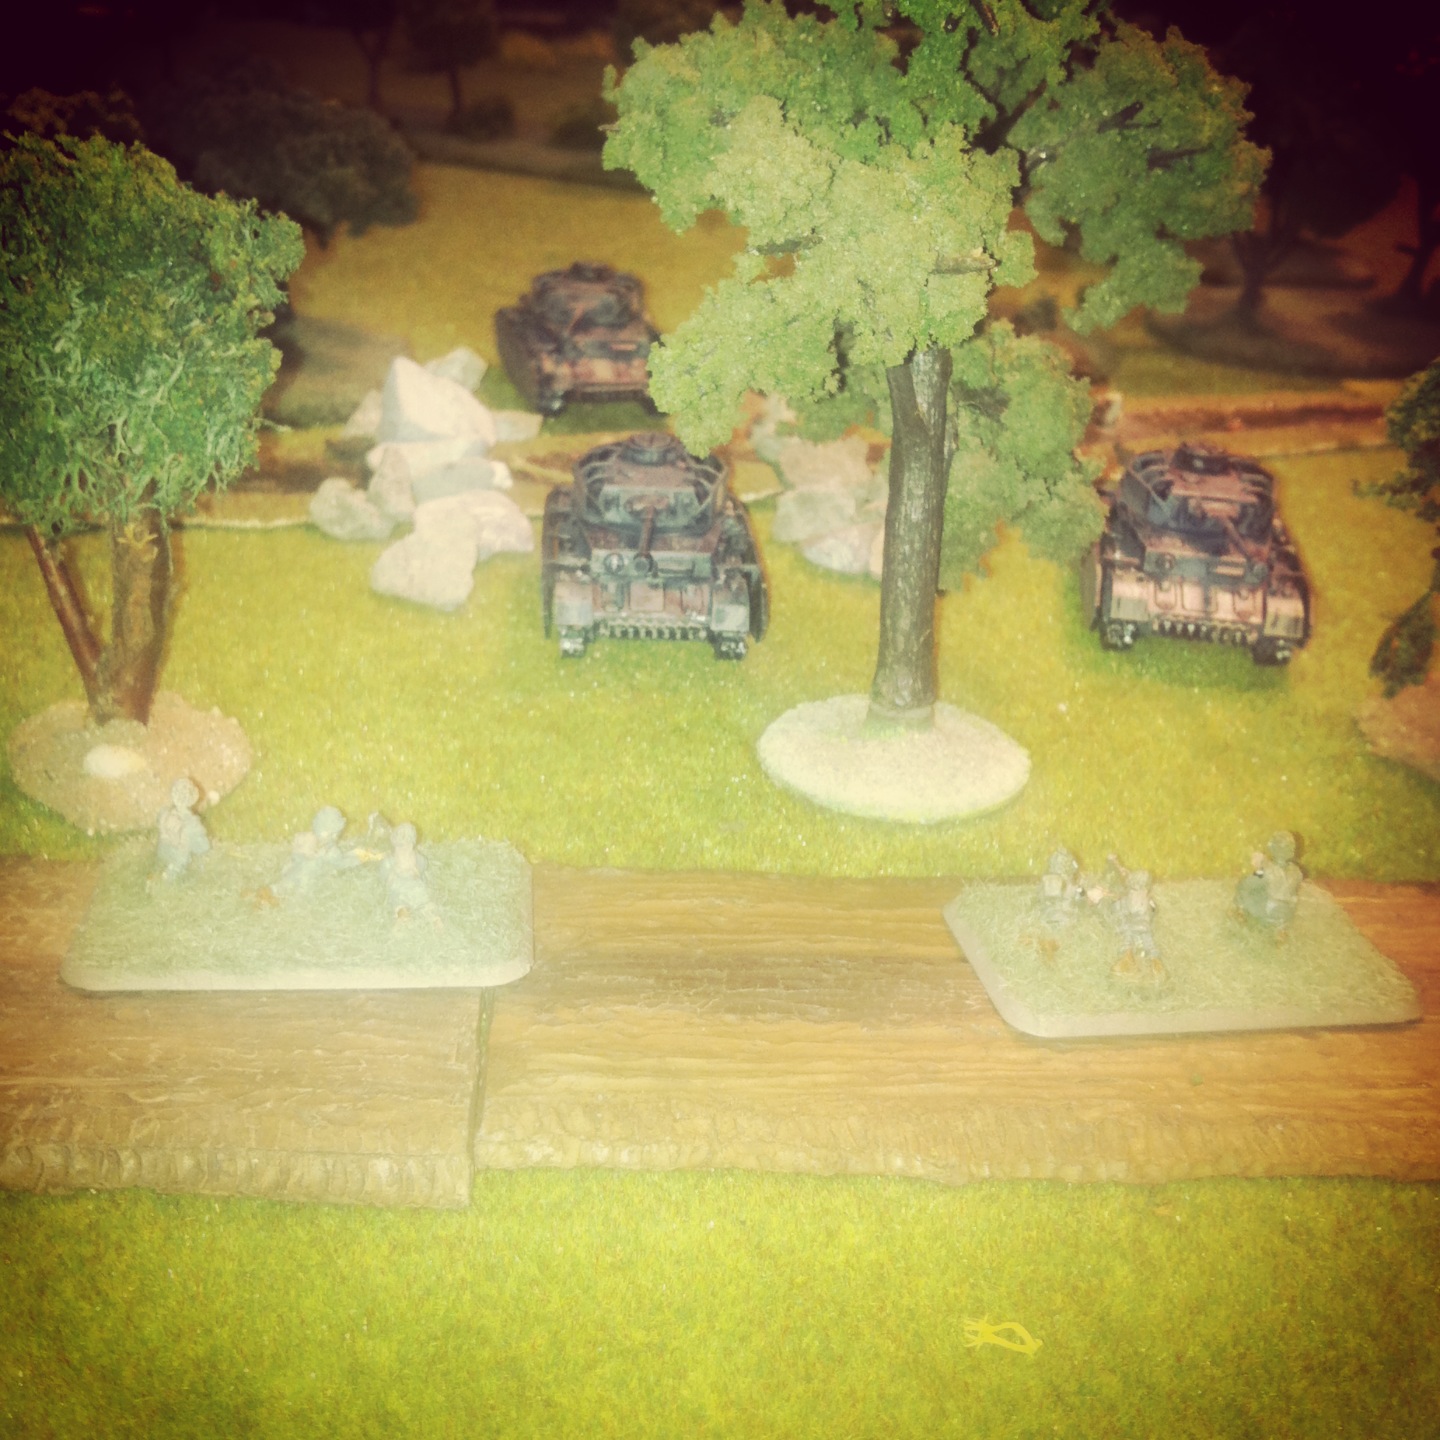
Starting hilltop positions of the Austrians with the oak wood to their right and the Prussian lines before them

IMG_2591The central Austrian defenses with heavy guns at the front, cavalry in reserve and skirmishers in the town beyond

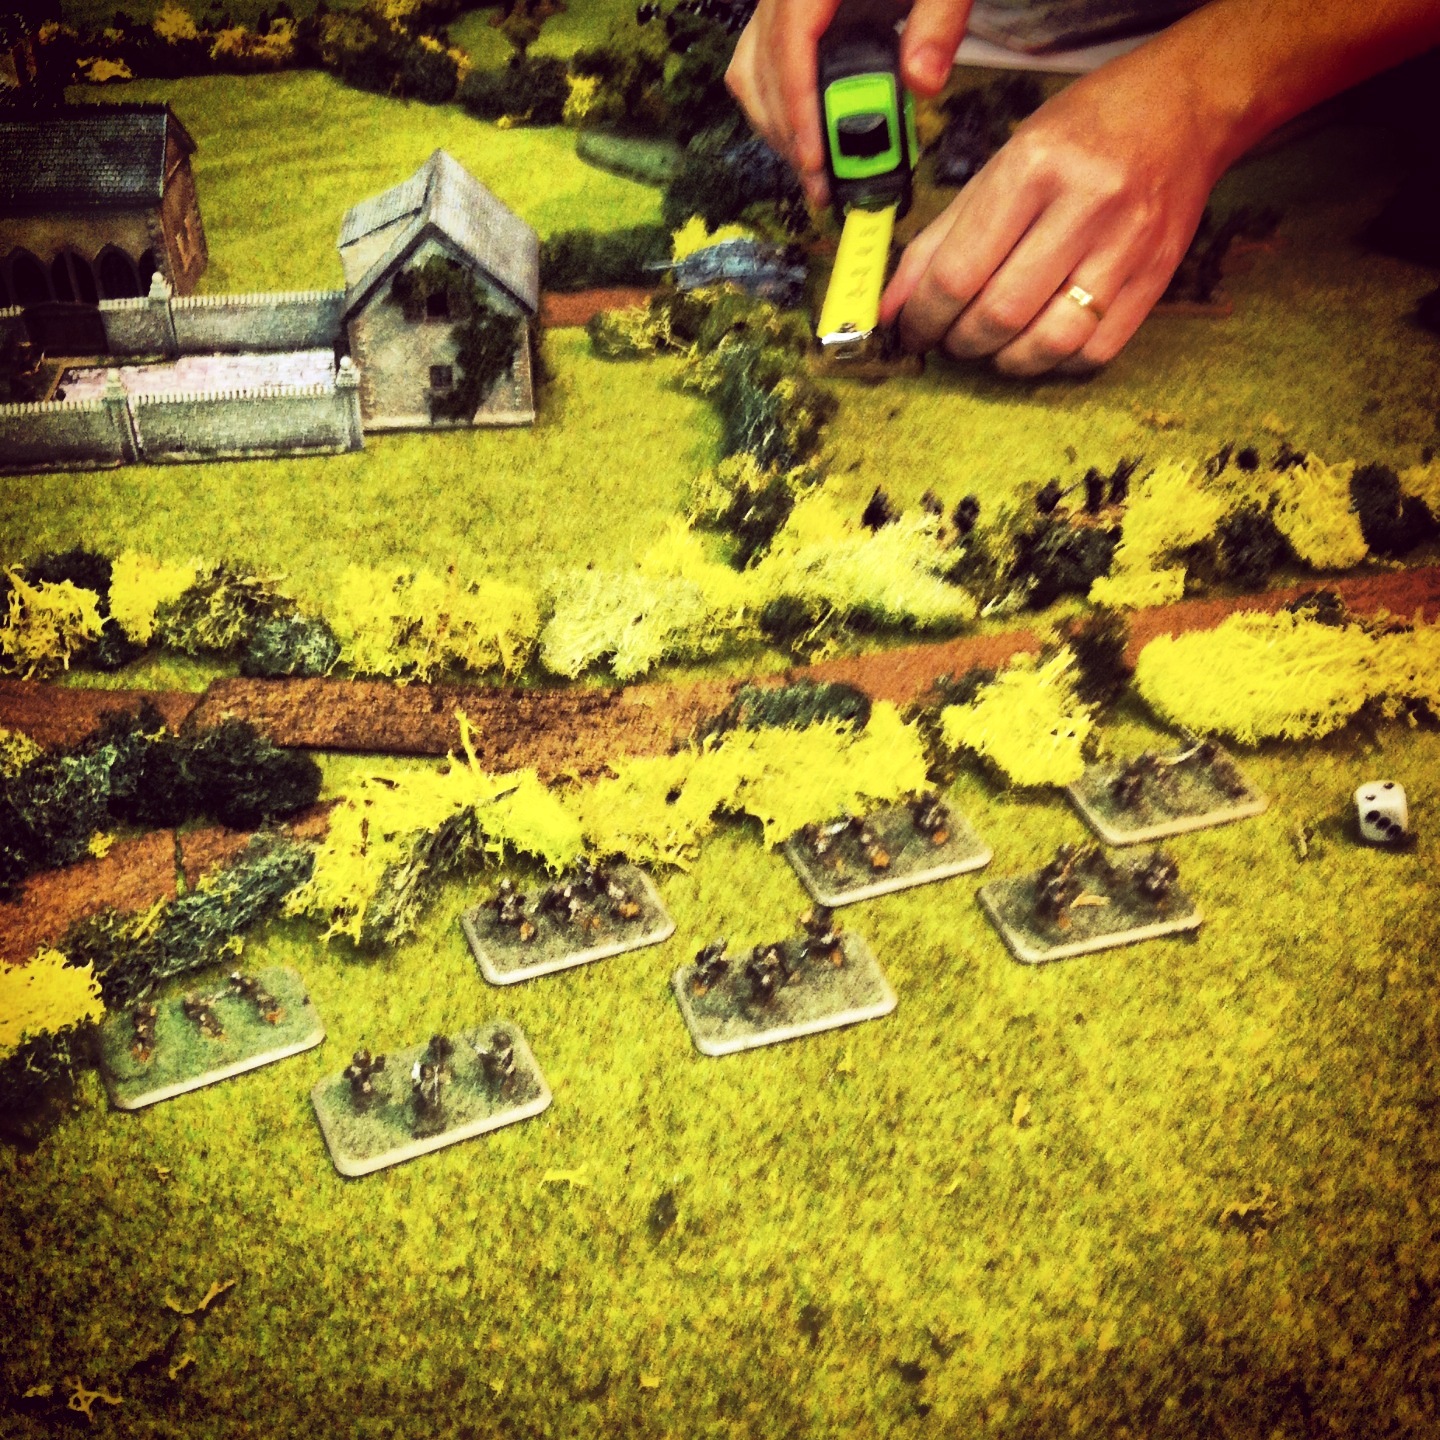
Our battle started historically with the Austrian infantry aligned across the defending hills, three heavy gun batteries at the center and cavalry to either end of the line. The Prussian advance began with a cavalry push on their left around a small town held by Austrian allied skirmishers. Frederick, near the center of the line, began a slow and cautious march to the hill objectives toward the center.

IMG_2597
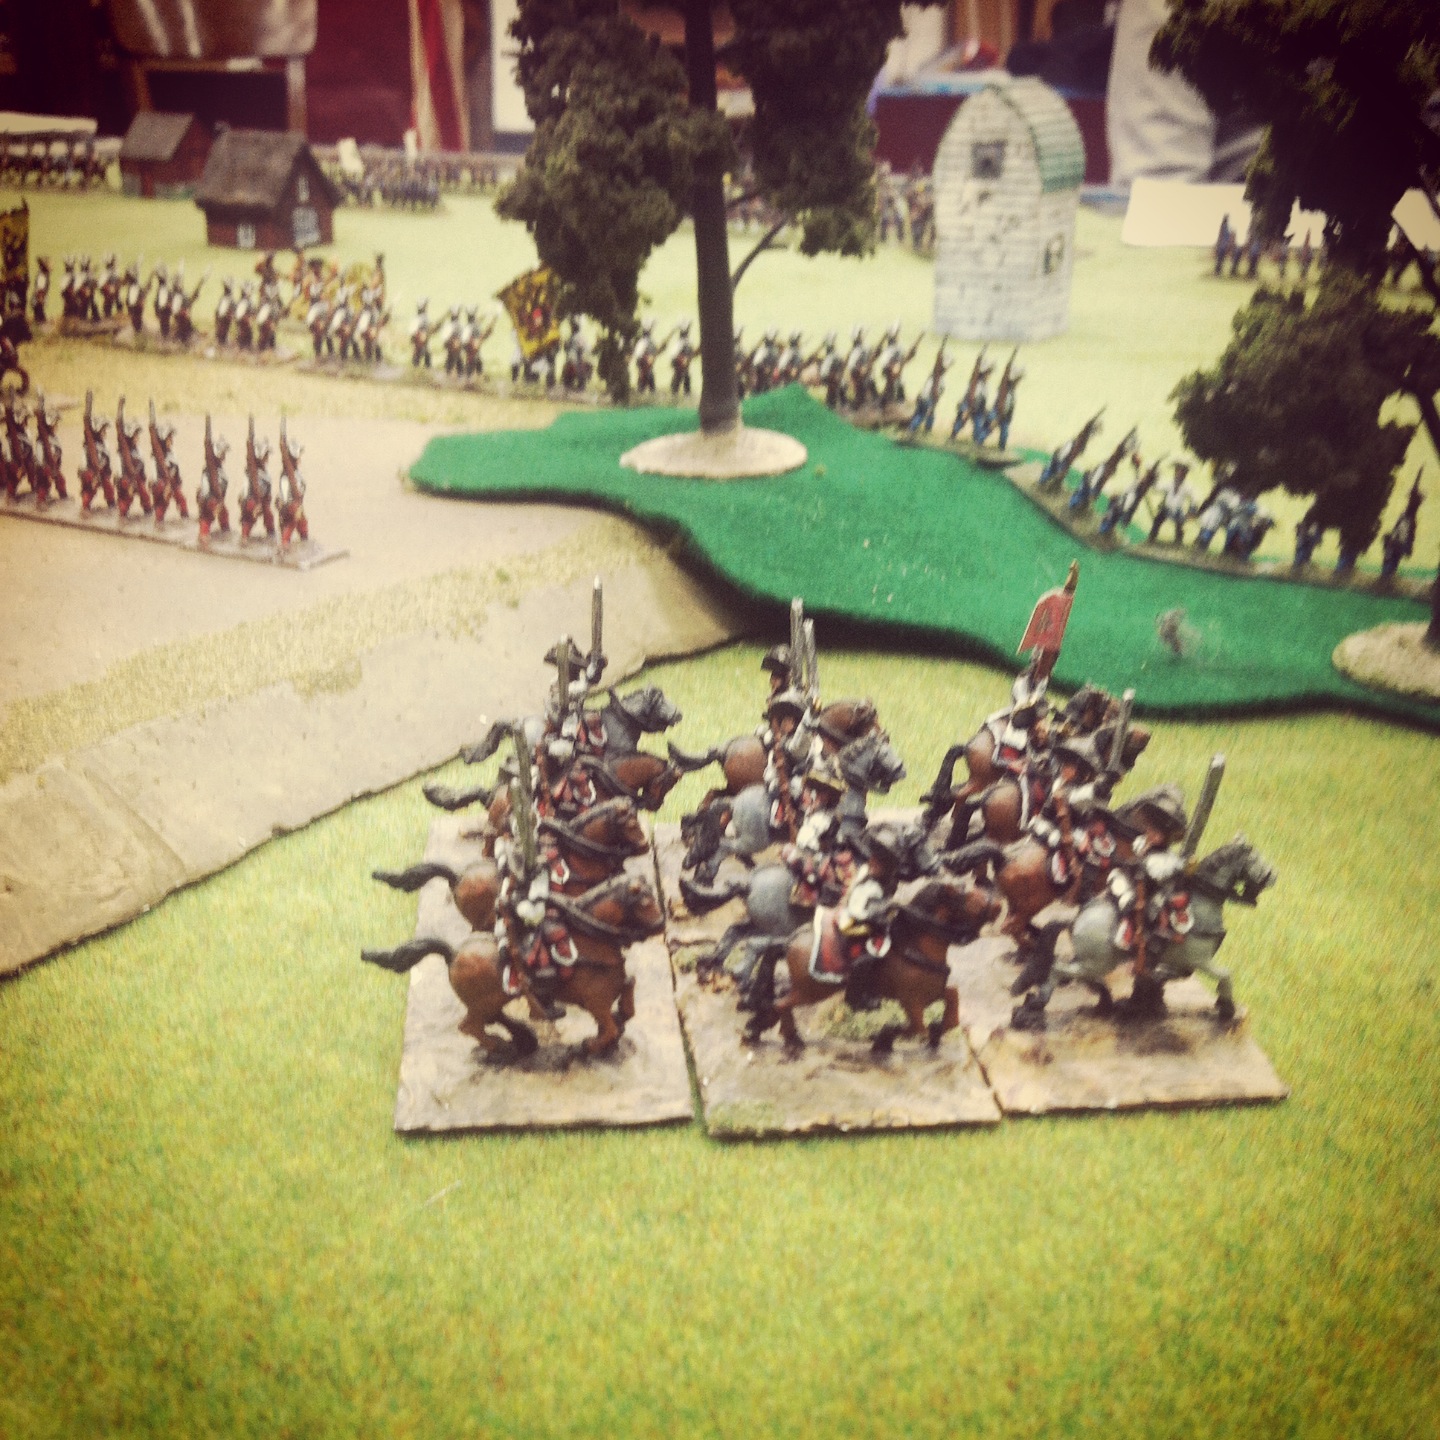
Prussian cavalry charge into the Austrian right

IMG_2596
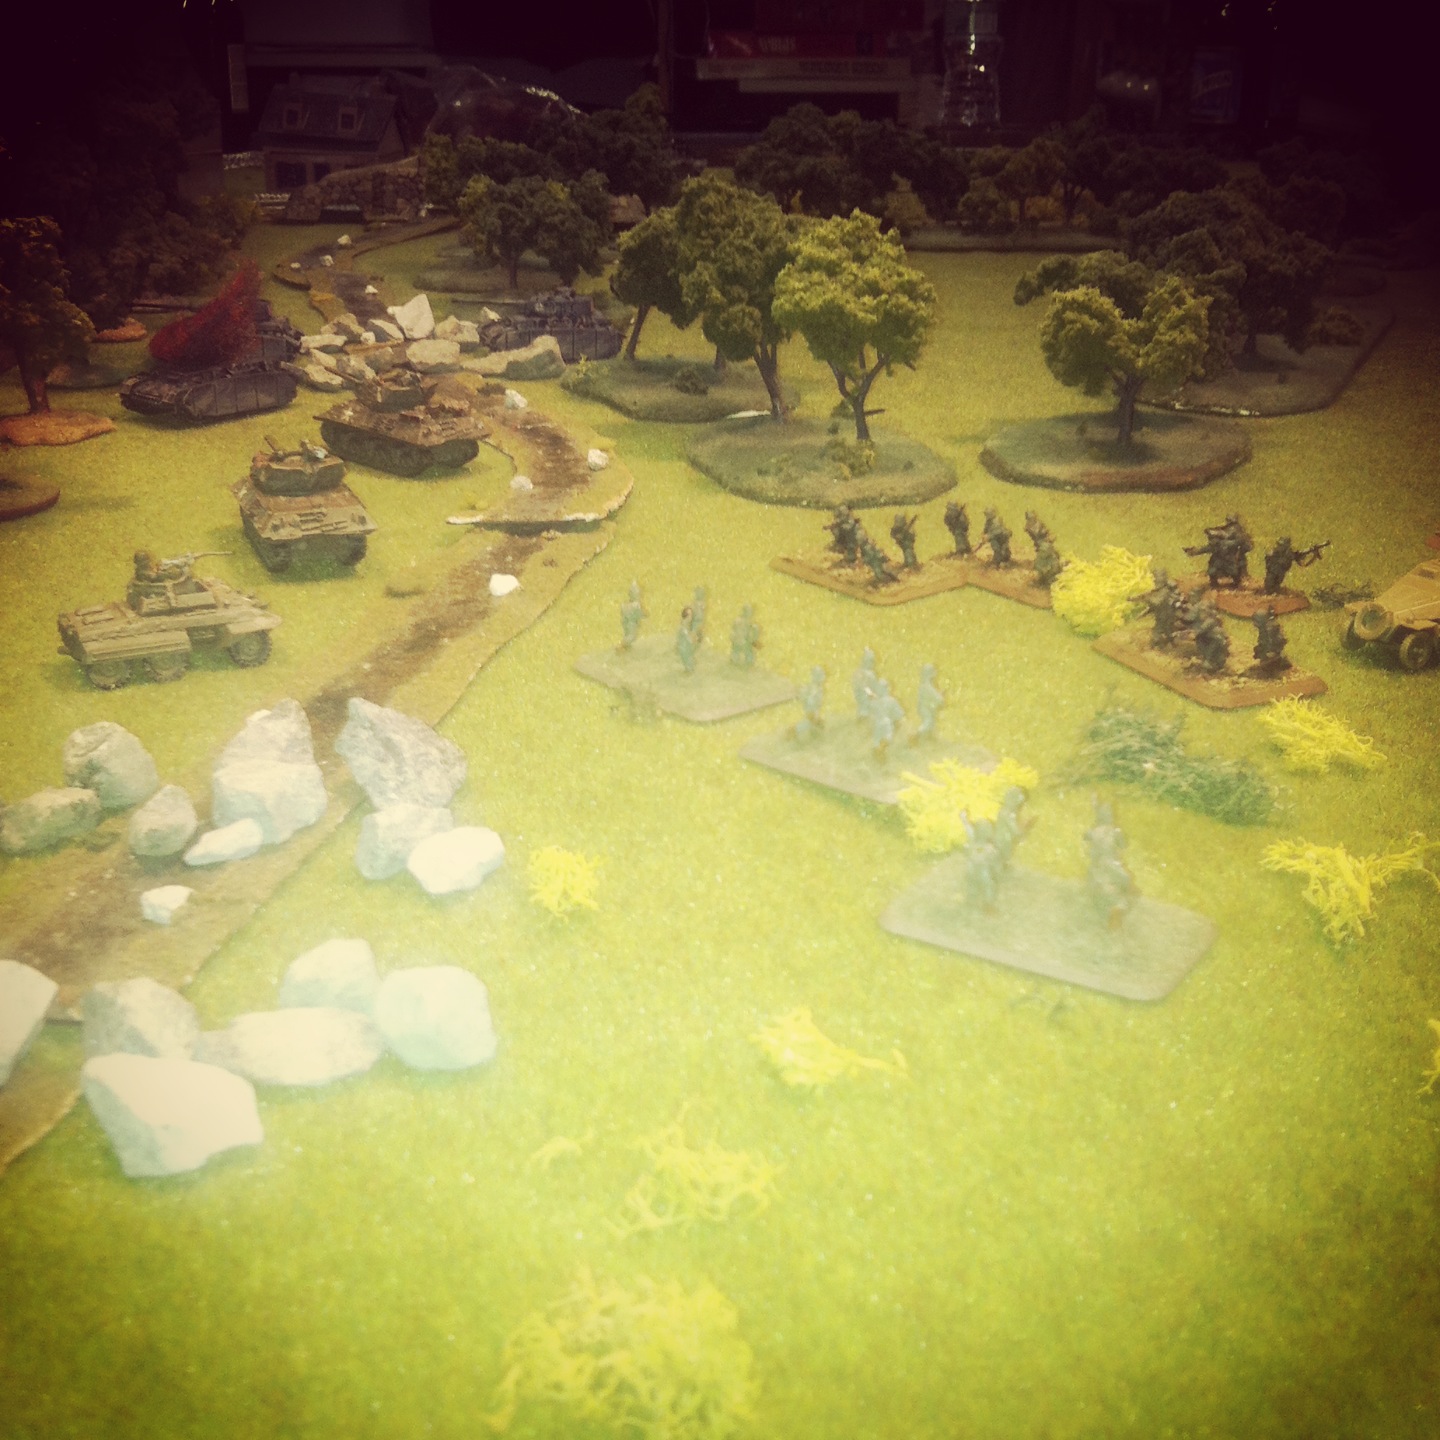
Austrians advanced on the skirmishers in the village

On the Prussian left, a cavalry charge was met with a counter charge from the Austrian-aligned Hussars. Nearby, Austrian line infantry advanced in the hopes of driving skirmishers out of the nearby town. If the initial Austrian press worked, the entire Prussian right flank would fold.

IMG_2602As disordered Hussars retreat, Austrian heavy cavalry ride to answer the Prussian charge

IMG_2593Austrian heavy cavalry gallop to defend their right

As the Hussars folded under the attack and retreated in disorder, Austrian heavy cavalry charged back toward the advancing Prussians. With the Prussian charge repulsed with losses on both sides, the Austrian cavalry now looked to turn the Prussian left flank with more heavy cavalry rushing from the rear.

IMG_2592Gun batteries at the Austrian center

IMG_2604Prussians advance on the Austrian center and receive cannon fire

IMG_2600Prussian lines continue the advance as cavalry reserves in the distance rush to buoy their softening left flank

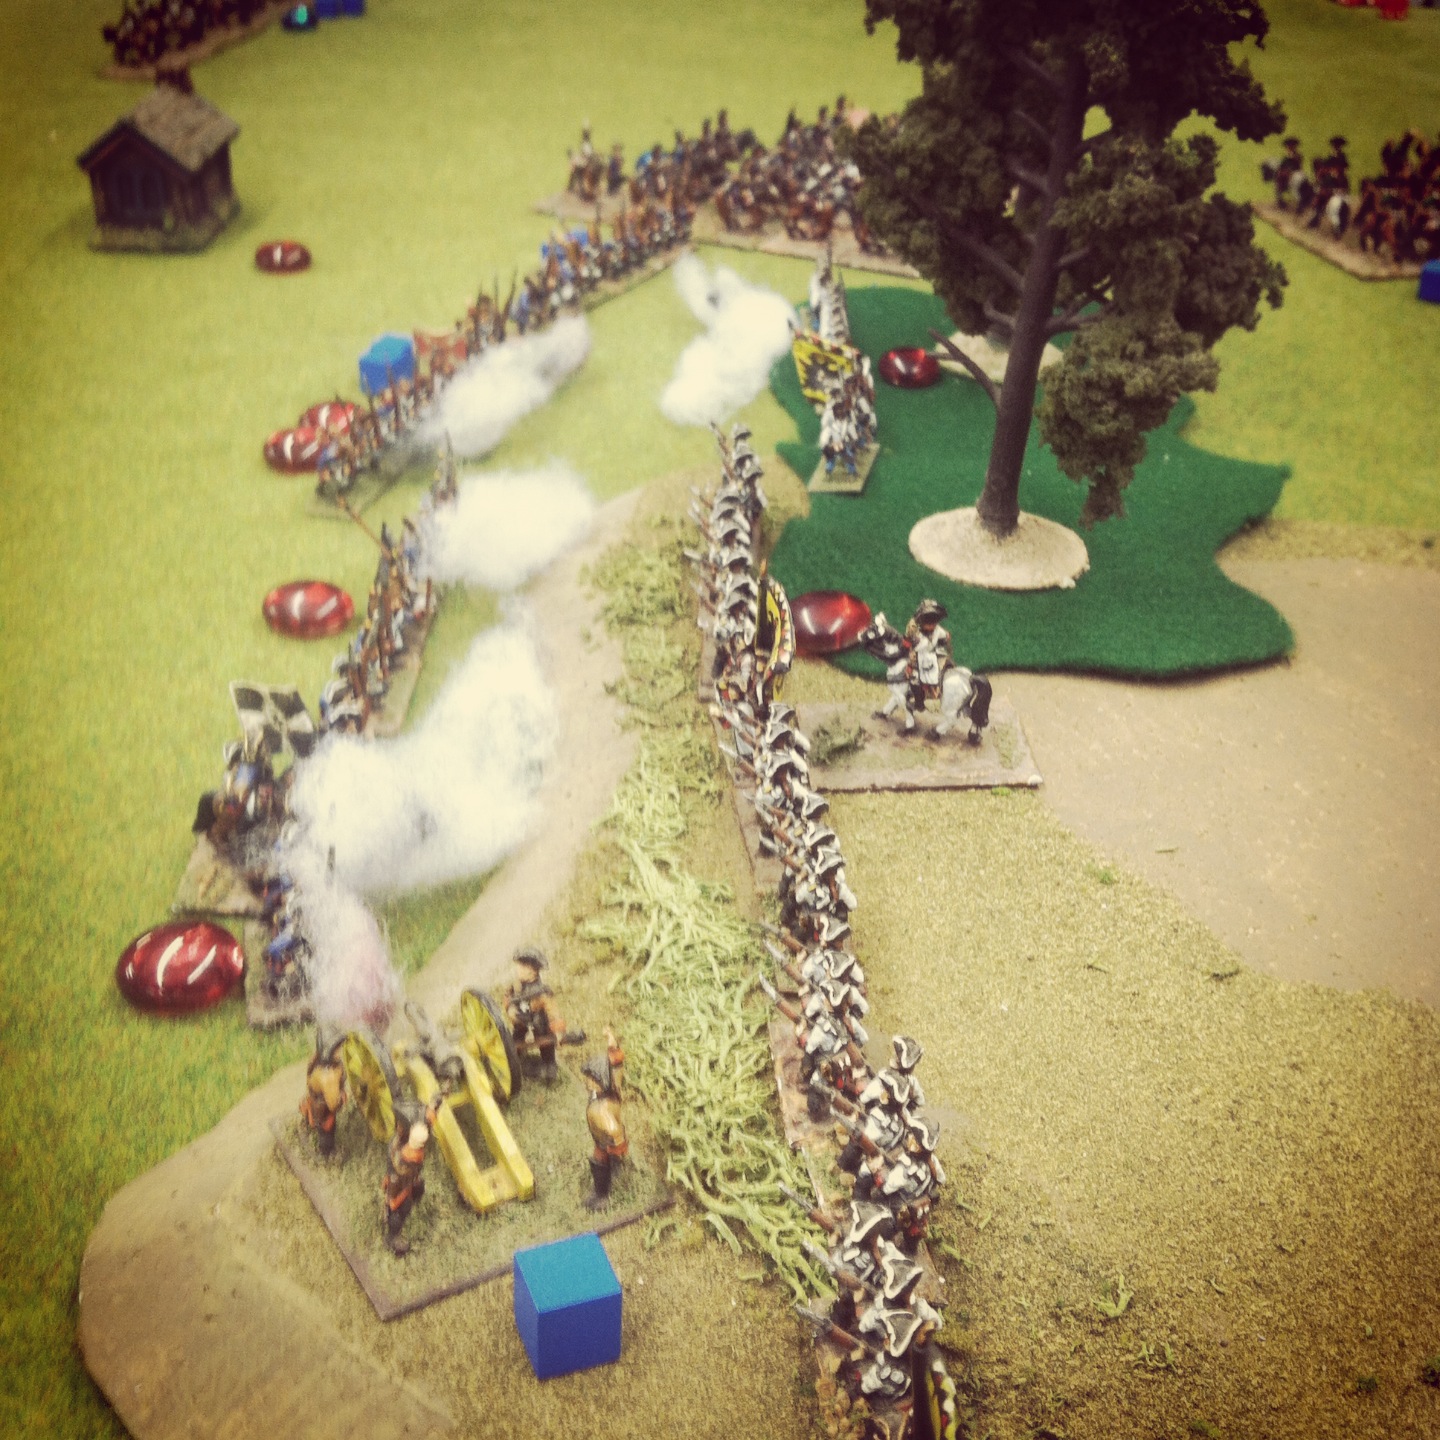
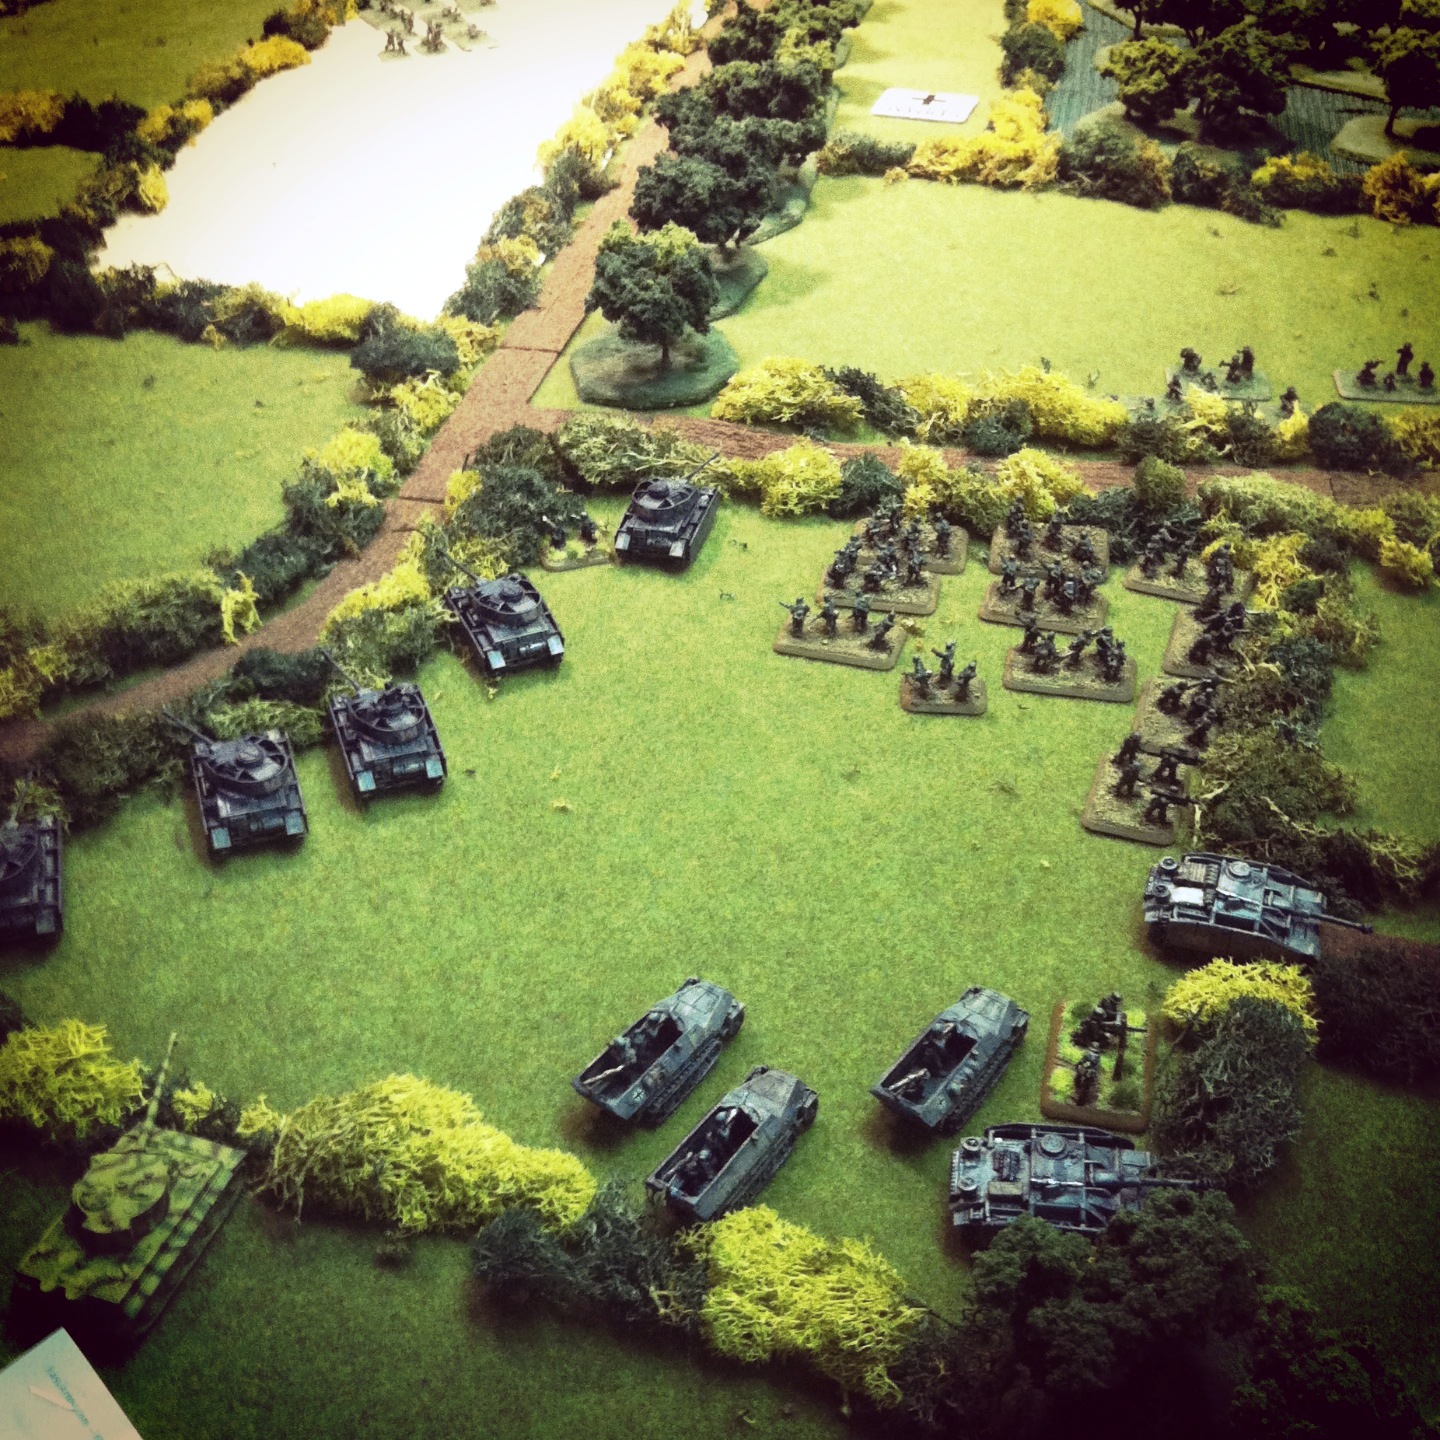
At the center of the table, the Austrian lines held their ground and pulled into the nearby woods to defend against the coming Prussian advance. As Prussian infantry advanced several lines deep, they were met with several turns of cannon fire yet continued their press forward with Fredrick attached at the rear. If you listened carefully, I think you could hear Fredrick’s famed shout of “do you want to live forever?” echoing from the tabletop as he urged his Prussians onward.

IMG_2603The Austrian battery takes casualties from the advancing Prussians

IMG_2601The Austrian battery is overrun in a Prussian charge

Eventually, the  overwhelming force of the Prussian lines closed on the Austrian batteries at the front of the line. One battery was destroyed and a second fled the field following a charged assault. With Austrian infantry now staring down from on the hill, the Prussians marched uphill to their objective and closed within charge distance.

IMG_2598
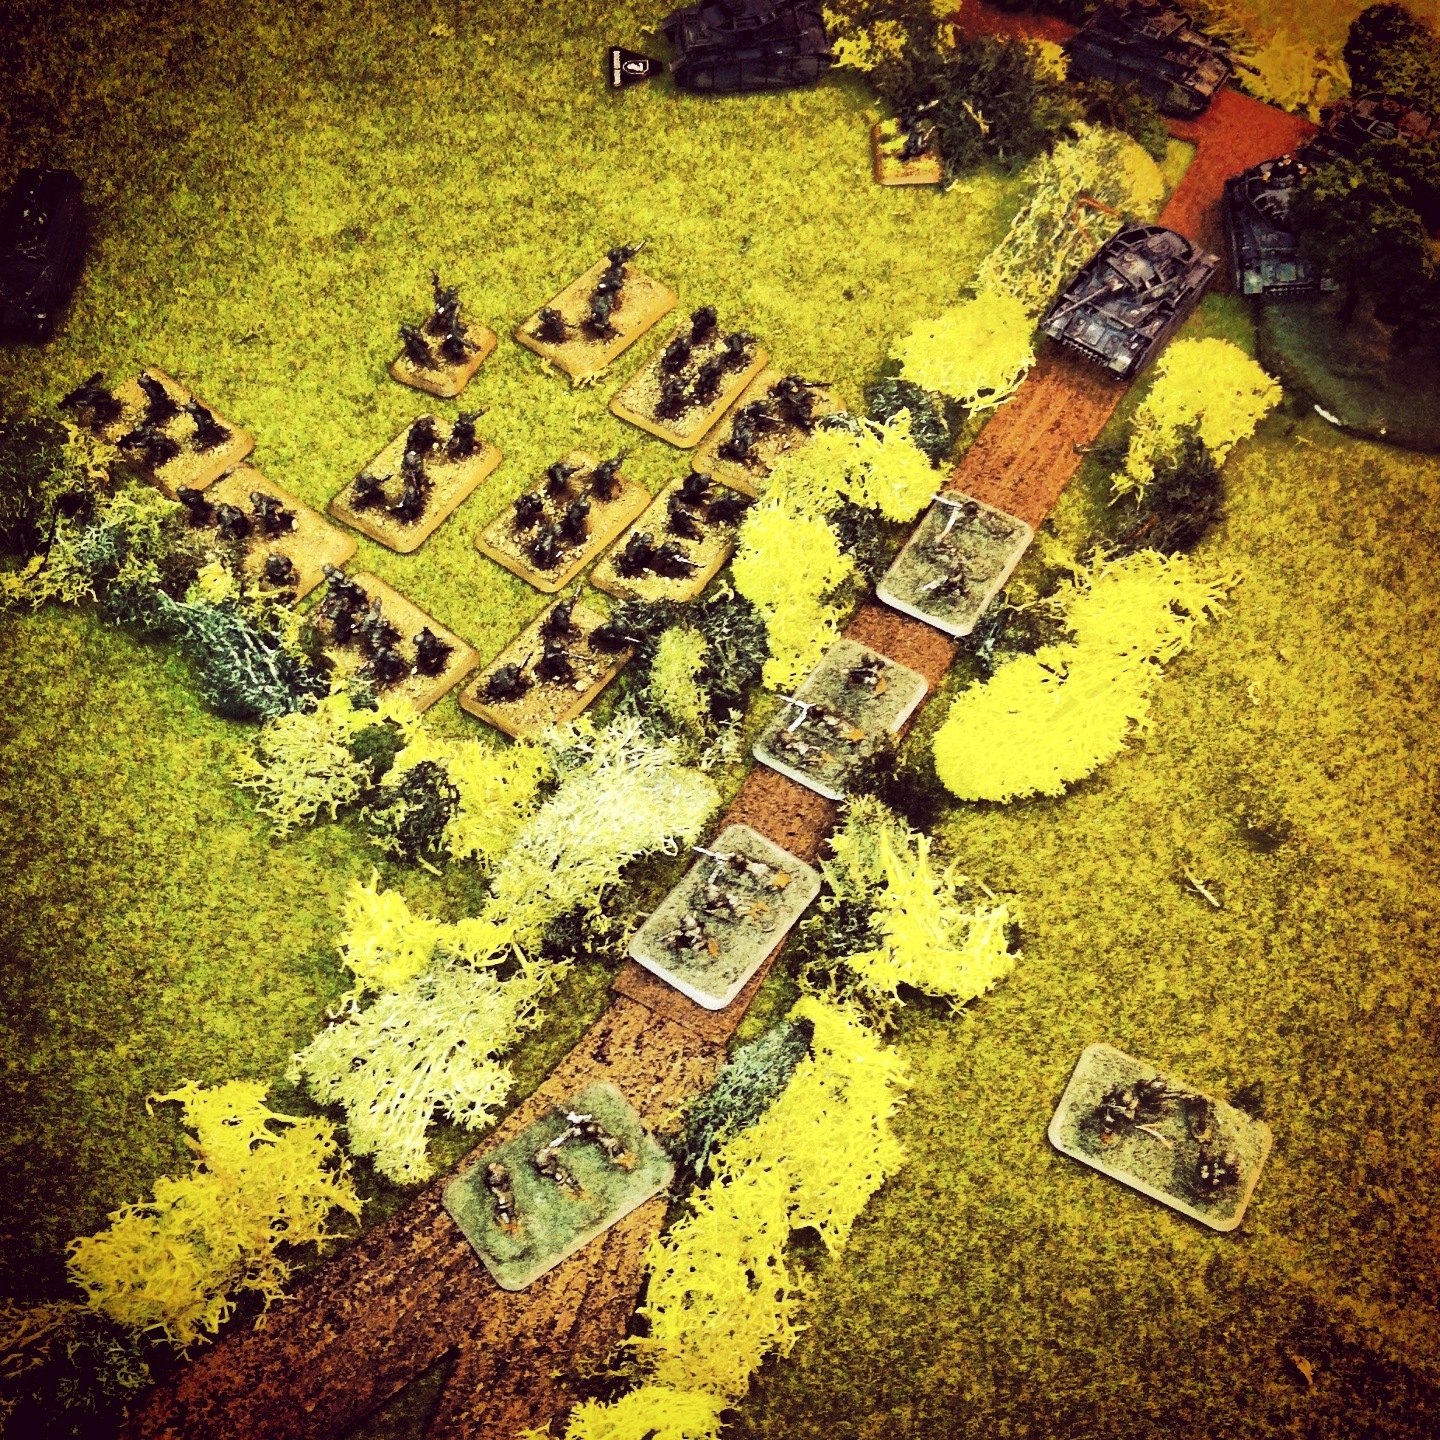
Prussians press the attack into the woods and up the hill

IMG_2599The wood becomes a locked melee as firing erupts all along both lines and into the distance on the Austrian left

A charge and counter charge locked lines in melee in the woods at the Austrian right as Prussians pressed their advance now all along the line. On the center hill, an Austrian line wheeled down the hill to envelope the Prussian lines in fire both to the front and at their flank. The one remaining Austrian battery continued to pummel the Prussian lines scrambling for the center hill. On the far hill on the Austrian left, lines finally made a move on the Prussians.

With the cavalry charges at a stalemate on the Austrian right and the Prussian lines split into two losing combats at the hills, the Prussians failed a morale test under heavy losses and ceded the field to the Austrian army. Once again, Frederick’s gambit at Kolin had resulted in defeat.

fredIIkolin
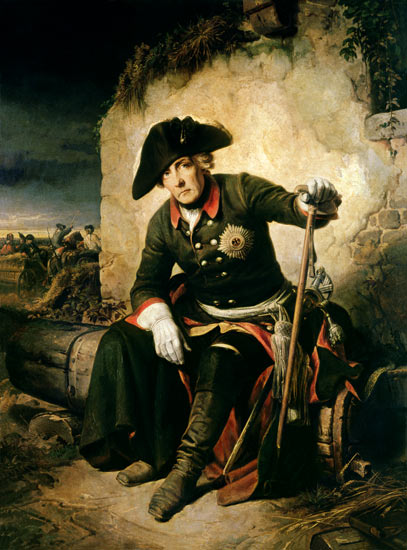
‘ Frederick the Great After the Battle of Kolin’ by Julius Schrader (1859)

After two games in the Seven Years War period in as many weeks, I’m hooked on the era. The games begin cautiously with slowly-deployed movements but quickly erupt into vicious volleys of fire, swift charges and hand-to-hand combats. Even with thoughtful strategic planning at the outset, the battles quickly evolve into chaotic back-and-forth tactical blood baths. The constant morale checks as the battlefield shifts and fire is taken becomes as much a path to outcome as men falling on the field. And, as with the original battle at Kolin, the Austrians defenders proved to be too much a match again for the Prussian invaders this past weekend.

Flames of War: Metropolitan Wargamers Tanksgiving 2013

Tanksgiving PicAbout ten of us at Metropolitan Wargamers in beautiful Park Slope, Brooklyn kicked off the holiday season this past weekend with a day of WWII armored action in conjunction with our first Flames of War Tanksgiving event. The official rules for the event called for 1500-point companies facing off in multiple games throughout the day. Given we had so many new players interested in playing their first games of Flames of War, a few of the more experienced players decided to play host with our own forces brought along for the day over two tables.

FFAMissionThe bigger of the two tables featured Allied forces facing off against Germans in a Late War Western Europe scenario. The Flames of War website offers a group of basic missions of increasingly-complex scenarios, each easily playable in about three hours. Given we were dealing with an entry-level game, we went with a beginner-friendly Free-For-All mission with two 1500-point companies on each side.

IMG_2442Allied defenders (left) and German attackers (right) deployed

Since this was a tank-focused game, we went easy on terrain with just a smattering of wooded areas, buildings and fields spread over the table. The Allied forces defended, beginning on the side of the table defined primarily by a small river crossing bridge on the Allied right and a field and nearby farmhouse on the Allied left.  On the attacking German side of the table, a walled farm complex surrounded by a tree-lined road sat to the German left and a group of wooded areas to their right. A small town was situated squarely at a crossroad at the center of the field.

IMG_2446Guards Armoured and 101st Airborne started in the farm field

The British Guards Armoured Company began near the farm at their left, deploying its Sherman and Firefly tanks along with one platoon from the US 101st Airborne. Near the bridge, the US 4th Armored Company set its 75mm and 76mm tanks and finally deployed its 105mm artillery platoon at the center of the table edge hidden behind a copse of trees. The Germans deployed Panzer IVs, two Tiger tanks and a Grenadier platoon near a forest at their right. A large group of Panthers started near the center behind the small town with a supporting dismounted Panzergrenadier platoon on their left and a two-tank Panther command platoon at their extreme left.

IMG_2444US 75mm and 76mm Shermans tanks at the bridge near the German objective

With the German player starting things off, their main thrust of Panthers moved toward the center of the table while their Panzer IVs and Tigers made a move looking to shutdown to the advance of the Guards Armoured and US airborne troops. The Panzergrenadiers made their way for the walled farm and the treeline at the neighboring road, and the commanding Panthers looped around the farm toward the river and the American right flank.

IMG_2448A Tiger sits burning after being hit by a Firefly

On the Allied first turn, the 101st Airborne made a beeline for the neighboring forest across from the field while tanks rolled into the gap between the forest and the field. A lucky opening shot from a British Firefly took out a German Tiger, providing one of the only bright spots for the Allies during the entire afternoon. The spotter for the US howitzers ran for the cover of the town’s buildings while the mass of American tanks on the right split to hold off the center German advance as well as the German command section’s coming end-run at the river.

IMG_2453The Armoured Guards take ferocious fire from the German tanks

In the second and third turns, the German players began running the table to their victory. A concentration of fire into the town destroyed the US artillery spotter, effectively shutting down any good chance of Allied artillery support. The Tigers began laying waste to the line of advancing Shermans in the field and rolling in the open. A failed assault on the German tanks by the 101st Airborne out of the woods stalled under a hail of machine gun before it began, but the Guards Armoured managed to route the Panzer IVs off the board and whittle-down the Grenadiers making their way between the town and farm house nearby.

IMG_2460Panzer IVs and Shermans aflame as the 101st Airborne sprints across the field

By the fourth turn, German infantry making their way through the open both for the bridge and objective near the American artillery were mowed down under heavy machine gun fire from the US Shermans. Finding a gap amid the tank fight around them, the 101st made a dash to the next forested area while German tanks poured more fire into the British armor at the rear. At the bridge, American 76mm guns managed to destroy one command tank and bail the crew from the other. Unfortunately, the remnants of the American armor were outgunned and entangled in the burning shells of their comrade’s tanks. With nothing left to stop the advance, German tanks rolled to the center and seized their objective.

IMG_2458Nothing left to stop the German advance to victory

While things raged away on the European table, an Early War showdown between 1500-point British and Italian forces in Africa dustily clamored away one table over. You couldn’t get a more different game with less advanced equipment and differently skilled troops battling in a desert environment laced with prepared defensive positions. Since most of my gaming has focused on Late War Europe, the earlier war stuff fascinates me and I’m definitely going to make some time to try my hand at this other period soon.

IMG_2440Early War Italian and British desert action at Tanksgiving in Brooklyn

As it turned out, the Italians took the game on the Africa table, making our first Tanksgiving event a 2-0 victory for the Axis powers. I learned a mass of German armor is really hard nut to crack unless you’ve got some effective artillery and enough infantry to assault and push to an objective. Every game under my belt gives me ideas for the next. Win or lose, I think a few hours of playing may have hooked a couple new players on Flames of War. For that, we’ll all be thankful as we deploy our platoons for another game very soon.

Flames of War: Fielding the FOW Universal Carrier

UniversalC

British Universal Carriers in Normandy 1944

Used extensively by Commonwealth forces in all theaters throughout WWII, the Universal Carrier served as a transport, a towing vehicle and a quick-response weapons platform for machine guns, flamethrowers, anti-tank guns and mortars. So popular were these agile and flexible vehicles that production ran until 1960 and over 100,000 eventually rolled off the assembly line, making them the most-produced armoured combat vehicle ever produced.

With my new British forces moving along, I picked up a few inexpensive packages of Universal Carriers in the flea market at Fall In! this past weekend. The models from Battlefront come three to a carded package in solid-cast resin with metal crew and gun options. The packs I got were the early war models but I decided for gaming purposes I’d fudge them a bit to make them work in my late war gaming. Along with a carrier from my Royal Artillery battery I’m also working on, I’d wind up with seven vehicles to start.

IMG_2432

Carrier example with rear gun mounted

I chose to model my inital six carriers with extra 50 cal. machine guns, hoping to use them to quickly get into a fight and pin down German infantry with a hail of bullets. Adding the 50 cal. gun was a field modification during WWII, but without any extra parts on hand I simply clipped the barrels on the guns at the front and added a bit of plastic to make some semblence of a machine gun manned in the front seat.

IMG_2430

Carrier example with the rear gun carried in the back

Since construction is minimal, these glue-up fast. I modelled a couple of the guns in the back thrown in the back seat as if those guys were moving fast to get into action before re-mounting their guns. After a quick spray of green armor basecoat, the crew get hit with some drab, brown and flesh paints and washes. Tracks get a black base followed on with some metallic dry-brushing. Guns and other details added from some leftover tank stowage get some gun metal, browns and weathering. I decalled the carriers with the Guards Armoured markings, and then everything got a splatter of muddy earth tones.

IMG_2427

Guards Armoured carrier platoon ready for the roads and fields of Europe

With so many British troops cruising around Europe in these vehicles during the war, adding just a few of these to my growing menu of options in creating British company lists for my FOW gaming at Metropolitan Wargamers in Brooklyn, NY was a good place to start. I’ll fill in these early war models with another three of the late war models at some point, making it into a nine carrier transitional platoon of old and new model vehicles. One of the reasons I wanted to expand my Allies with UK forces was the chance to model different infantry, armour and artillery. Getting these nifty little Universal Carriers into the mix will definitely give my games some new interest on the tabletop and hopefully wreak havoc on my German opponents.

Related articles

Flames of War: Fielding the FOW Cromwell and Firefly Tank

dratsBy the time of the Normandy Invasion in June 1944, the British 7th Armoured Division had already seen plenty of war. The division first distinguished itself early in the war in the dusty North African campaign, going brutally head-to-head with General Erwin Rommel’s tough Afrika Korps and earning the nickname “Desert Rats.” In the mid-war invasion of Italy, the division adapted to the southern terrain of Salerno and Naples and helped in securing the Allied push northward.

cromwellA British Cromwell in WWII Europe

fftankSherman Firefly on a street during WWII

Back in the UK following its successes in Africa and Italy, the 7th Armoured rested and retrofitted with new Cromwell and Sherman Firefly tanks in preparation as a follow-on force in the D-Day landings in mid-1944. Over the next six months, the division’s 75mm-armed Cromwells and 17-pound-gunned Fireflies were present during Operation Perch, Operation Goodwood, the Battle of Villers-Bocage, Operation Spring, Operation Bluecoat, Operation Cobra and the final pushes into the Low Countries and Germany. By the war’s end, the battle-weary Desert Rats had cemented themselves as one of the most celebrated divisions in World War II.

fowcromwellAfter being introduced to British Armoured forces with the excellent plastic Sherman and Firefly models included in Flames of War Open Fire! box set, I’ve recently swung some significant focus on building-out a decent amount of UK late-war forces. Modelling the storied 7th Armoured Division seemed like a logical next step in bringing the UK to my Allied forces on the table.

Through some serendipity, I happened to score a couple of half-price box sets of the FOW Cromwell Armoured Platoon from a fellow club member at Metropolitan Wargamers in Brooklyn, NY. Between the two boxes, I’ve been able to assemble a company command of two Cromwells plus two platoons of three Cromwells and one Firefly each. The models feature individually-cast resin tanks, each with their own detail of stowage and ragged camouflage, along with cast metal treads, gun barrels, crew and other details. Compared to curvaceous US Sherman tanks, I also really enjoy the flatter hull profile and boxy riveted turrets on the Cromwells. Although pricier than alternatives from makes like Plastic Soldier Company and Command Decision from Old Glory Miniatures, official FOW models are generally hard to beat for their heft and historical accuracy.

IMG_2334Primer and base coat on treads and stowage

After assembly, my models were hit with a green armor base coat. Tank treads start with a black coat followed a slight wash of metal. Tools, stowage, ropes and the other stuff on the tanks all get a mix of built-up layers of browns, greens and metallic colors. I especially liked the tiny tennis rackets strapped to a couple of the tanks, a nod to the British gentlemen who came to Europe not only equipped for war but for hopeful yet unlikely leisure pursuits. These details really create a lot of depth, interest and personality among the tanks which can otherwise get very visually redundant en masse on the table. Finally, the exposed crews get a a bit of brown-drab uniform color and some flesh tones to finish off those brave Brits.

IMG_2344Decals being applied (grrrrrr….)

I do have to say, the red-and-white Desert Rats vehicle marking has a really big cool factor for me. The FOW kits conveniently come with appropriate decals for the 7th Armoured Division, making finishing off the tanks one step easier than with competitor model-makers that don’t generally supply decals with their models. That said, I find the FOW decals to be incredibly finicky and fragile, and I found myself re-applying several to get them on just right. Once the decals are dry, all the tanks got splashed with mud here and there with some earthy dry-brushing.

IMG_2350Cromwell command section

IMG_2352One platoon of three Cromwells and one Sherman Firefly

IMG_2354Cromwell close-up

IMG_2356Sherman Firefly close-up

In terms of gameplay, I can’t wait for the 7th Armoured Division to go up against some Germans. The combined one-two punch of the faster-moving Cromwells and the hefty-gunned Fireflies should reinvigorate my games away from the sameness I’ve had in just playing with my large group of US Shermans for a couple years. Already, I want more of these platoons to really get the division bulked-out. I’m thinking a follow-up with Cromwells and Fireflies from the Plastic Soldier Company will supplement the finished FOW models nicely. Until then, the 7thArmoured are ready to roll and there’ll be more to report soon on my post-D-Day British force project.

IMG_2348The Desert Rats ready for action in France and beyond…

Related articles

Flames of War: Sint-Oedenrode 1944 Scenario

StOAB

Like many cities in the Low Countries, the Dutch city of Sint-Oedenrode was occupied by German forces after their invasion of France, Belgium and the Netherlands in the spring of 1940. The southern Netherlands and Belgium were the area of focus for the Allied Operation Market Garden in September 1944 which hoped to take several river crossings before the push on to Germany. At Sint-Oedenrode, the famed US 101st Airborne Division seized the bridge over the Dommel River but were met with a counterattack by German Fallschrimjäger regiments and other supporting forces. The battle that would take place at the crossing of the Dommel was typical of the action of the Allied push along what became known as Hell’s Highway. While Market Garden would ultimately prove to be a fiasco for the Allies overall, the grateful people of Sint-Oedenrode were liberated by US troops after a week of brutal fighting against the German occupiers.

StOMap

The Flames of War website has a scenario for the engagement at St. Oedenrode available in their list of historical scenarios on their website. The forces in the scenario were originally covered in the now out-of-print Hell’s Highway and A Bridge Too Far FOW books now available as Market Garden for the US, UK and Canadian forces and Bridge By Bridge for the Germans.

This past weekend at Metropolitan Wargamers in Brooklyn, NY we ran a modified Sint-Oedenrode scenario with the US 101st Airborne facing off against the German Fallschirmjägers. My paratroopers deployed in the fields and woods across the river with two rifle platoons and a light machine gun platoon. In reserve were US mortar and parachute howitzer platoons along with a delayed reserve Sherman and Firefly tank platoon from the Guards Armoured Division. The Germans started defending the two objectives at the bridges with a mortars, heavy machine guns and a rifle-machine gun platoon dug in around the town buildings.

IMG_2324In the first two turns, the Airborne units made way for the river and first bridge while avoiding shots coming from the defending Germans. The US light machine guns poured fire into the houses across the river, but shots missed on all accounts but did manage to pin the units. With little US progress toward the objectives, my German opponent remained solidly in control of the bridge points in the early third of the game.

IMG_2322By the third turn, the Germans successfully rolled on their a reserve rifle-machine gun platoon as well as their PaK 40 anti-tank guns. While the US lacked tanks of the board, the US platoon crossing the bridge took heavy combined arms fire from the German artillery outside of the town and the infantry platoons hidden among the town’s houses. Another US platoon made their way across the Dommel, through a small wood and attempted a quick assault on the Germans defending from the nearby buildings. Under heavy fire, the US charge was repulsed with some losses pushing them back into the treeline.

IMG_2326With the Airborne rifle companies pinned on the bridge and in the  trees over the river, I finally threw a successful roll for reserves on the fourth turn and brought in my mortars and howitzers. Firing at a distance from the fields, all my artillery missed their hard-to-hit German targets hidden in the buildings across the river. The platoon on the bridge took an additional round of combined German fire and fled the field. The US light machine guns to one side of the bridge likewise encountered heavy fire, finding themselves pinned and still unable to effectively knock the Germans from their defending positions in the town.

IMG_2328By turn four, things went from bad to worse for the Allies. With the Guards Armoured forces finally rolling in, they did quickly take out one of the German anti-tank guns. This was unfortunately quickly answered with two Allied tanks being destroyed with return fire from the crack shots from the German PaK 40s. With the beginning of the fifth turn, the US attempted a final series of artillery barrages and tank fire to chase the Germans from the town. Still at nearly full strength, the Germans had clearly overwhelmed the US and I conceded the game.

Even without their Panzer IVs on the table, the German position within the town proved hard to route. In retrospect, a concentrated Airborne end-run over the river and through the town might’ve proved more effective in chasing the Germans out of their defending positions near the bridge entry points. A lack of armoured and artillery reserves until late in the game also left the 101st outgunned and running on their own as German reserve strength mounted. Luckily for the Dutch people of Sint-Oedenrde things went much better for the Allies in 1944, but my replay of the attack just didn’t go my way this day.

Flames of War: Fielding the PSC German Heavy Weapons and FOW Artillery Command

ger8cmmortar

After focusing on my Flames of War (FOW) Allied forces for a while, I decided to throw some energy back into beefing-up and diversifying my late war Germans. Although my German troops seldom see play, getting some infantry punch on the table led me to a number of mortar and other support weapons platoons the FOW rules offer.

Battlefront, the maker of FOW, has a number of good platoons which run anywhere from about $12-20 each. Having recently tried my hand at the Allied Stuart Tank set from the growing line of 15mm WWII kits from the Plastic Soldier Company (PSC), I spotted the Late War German Heavy Weapons box. At around $25, the set looked to be an excellent and economic way to get a lot more German infantry on the table at perhaps a quarter to one-third the cost of the official FOW models.

pscgerhw

The PSC box comes with four MG 42 teams, four 8 cm mortar teams, four 12 cm mortar teams, eight Panzerschrecks and eight Panzerfausts. Also included are four Panzerschreck loaders and four ammo carriers. With about 70 bits on the sprues, this set was going to add a lot of action to my already extensive German infantry collection.

pscgerhwsheet

Cutting out and gluing-up the tiny pieces from the PSC sprues is a bit of nerve-racking task harkening back to my early years wrangling with assembling soft plastic HO scale Airfix soldiers. That said, following PSC’s simple assembly diagram (above) and keeping all the parts carefully organized on the workbench is key to getting the job done right and not losing anything along the way. Flames of War rules call for basing Panzerschreck teams in groups of four miniatures per medium stand, allowing for four total teams to be constructed from the PSC set with two Panzershrecks plus a loader and ammo carrier per team. The 8 cm mortar and MG teams likewise went on medium bases and the big 12 cm mortar teams were glued-up on larger bases. I had a few extra plastic FOW Germans on hand from a bonus promotional sprue I received from the Open Fire! box set, and adding those to the 12 cm mortar stands helped finished those off.

artycmdhw

With a bunch of new mortars in the field, I also needed to add some additional command and spotters to make them playable. FOW offers an artillery command headquarters blister pack which I added to the mix. The set comes with enough models that I was able to create three two-man spotting teams, a few command stands (adding in Panzerfausts from the PSC kit) and a nifty HQ vignette with a four figures surrounding a table with a radio operator.

IMG_2214

Painting Germans is a simple process for me with a base spraycoat in flat black followed by a darkish grey uniform and details picked out in flesh, blacks, browns and gun metal. The stands get finished off with some simple grass flocking and a matte varnish spray. Getting a consistent finish on the PSC models made them blend in nicely with my FOW models.

IMG_2226

For comparison’s sake, the PSC figures do tend to be a tad smaller and thinner than the typically-chunky FOW figures. Since most my PSC figures are being fielded on separate stands, I don’t see the minor scale differences being an issue at arm’s length on the tabletop battlefield. In addition, the extra poses in the PSC casting add some nice variety and animation in the troops once deployed.

IMG_2224

IMG_2217My FOW German force has long-relied on the strength of deploying large numbers of tanks in my games, so these new additions should be a nice compliment to getting more action from my German infantry. Now that it’s fall, I’m anxious to rush my new PSC and FOW Germans to the tables at Metropolitan Wargamers in Park Slope, Brooklyn and add a new season of playablity to my battleworn forces.

Flames of War: Breakthrough Mission

bocageShortly after fighting ashore and in the iair drop zones on D-Day, the Allies quickly discovered a new enemy awaiting them: bocage.

Lacing the Normandy countryside, bocage was a tight overgrown network of hedgerows of shrubbery, stone walls and copses of trees lining the rural French fields. All but impassable by Allied armor and difficult to fight through for infantry, bocage slowed the push inland and delayed the taking of key objectives. It was only through the quick-thinking and inventiveness of the Allies that new tactics were hastily developed. To free-up the passage of tanks, hedgerow cutters were welded to the front of armored platoons and demolition crews blasted gaps to continue the forward march. Fighting amidst the bocage would prove to be deadly for both sides, as recounted in the 1988 paper by Captain Michael Doubler. It’s required reading for anyone interested in the tactics of bocage warfare.

This past weekend at Metropolitan Wargamers in Brooklyn, four of us got together to slog it out in the bocage tabletop of a Breakthrough Mission as provided in the Flames of Wars rules. The mission scenario calls for use of the Mobile Reserves rule for the defenders and the Delayed Reserves rule for the attackers. The Germans chose to field a 1250-point Fallschirmjager company backed with heavy machine guns, a Nebelwerfer rocket battery, Stugs and Pak 40 anti-tank guns plus a 1250-point tank company armed with mechanized infantry, Panzer IVs, Stugs and one imposing Tiger tank. We Americans also fielded two companies beginning with a 1250-point rifle company with three infantry platoons, Shermans, a weapons platoon of light machine guns and mortars and a P-47 Thunderbolt for air support. The other US company was pulled from the 82nd Airborne with a Priest mobile artillery battery and Stuart light tanks. To aid in navigation of bocage, the US armor were outfitted with hedgerow cutters. The Germans had six turns to take an objective and it would be the Americans’ job to stop them.

BTMapThe table was laid out thick with bocage surrounding a small village and a nearby farm. Americans rolled as the defenders meaning all our mobile units — all the tanks and artillery we had — were going to be held off the board as reserves. I hid all my rifle platoons in the town’s buildings and stuck the machine guns and mortars in the field between the Germans and their nearest objective. In the opposite corner, the Airborne platoons deployed near the farm hoping to camp out on the German objectives for the duration of the game.

As the attackers, the Germans deployed in their assigned corner of the table. Their rocket battery, anti-tank guns, heavy machine guns and the majority of their infantry dug into the field outside of the town. The large tank company deployed in the adjacent field. Held off-table was a Stug and a Fallschirmjager platoon, hoping for the a delayed reserves roll beginning on the third turn to put them right on top of one of their objectives at the opposite corner.

IMG_2177As the attackers, the Germans got the first turn, quickly pressing their armor toward the center of the table while the rocket battery, heavy machine guns and anti-tank cannons poured fire into the town, pinning one US platoon. Reserves failed to arrive on the first US turn and the P-47’s first run came up empty. As per the plan, the US Airborne pushed into the farm buildings to hold the nearest objective.

IMG_2179

IMG_2181In the second turn, the Germans continued to light up the town with the US companies pinned in the buildings. A Stug opened fire down a lane but the Americans avoided being hit. US bazooka teams moved into the barn at the edge of town and took shots on the a German Stug and approaching half tracks but to no effect. The US machine gunners attempted to fire and then assault the nearing Germans but were thwarted by the thick bocage and failed terror test against a nearby Panzer. The Thunderbolt once again on did nothing its second run while the Airborne units at the farm ran across the road into the treeline, securing the second German objective.

IMG_2183

IMG_2185

IMG_2191In turn three, the German players thankfully failed their first attempt at calling in reserves. Pressing on, German half tracks raced through the town toward the American weapons platoon which took heavy casualties and lost the machine gunners to fire from both sides. Stugs and artillery continued to pound the American rifle platoons in the town. At the top of their turn, the Shermans arrived and made a hasty path to cut a hole in the bocage standing between the rest of their reserves and the nearby road.

IMG_2185

IMG_2189Things really heated up in turn four as the Germans rolled on their first reserved Stug platoon near one of the objectives and the awaiting US Airborne. German infantry and Panzers pushed into the next field, knocking out the US mortars and eliminating their first platoon. The Americans pulled in the rest of their reserves but immediately created a bottleneck of Shermans and Stuarts as paths were cleared through the bocage. The P-47 came in hard on the Germans in the field, knocking out several units and destroying a Panzer. Finally, the fearless Airborne did what they’re trained to do and burst from the treeline to assault the newly-arrived Stug platoon. Two Stugs were destroyed and the third fled the field after a failed morale test. The objective was still held by the Americans but things were looking dicey with Germans coming in from all sides.

IMG_2196

IMG_2187

IMG_2198

IMG_2193

IMG_2200The fifth turn started with the final German reserve platoon arriving amid their burning tanks and assaulting the US Airborne. Through a series of attacks and counterattacks, the two groups whittled each other down. The Germans were eventually ground down to two remaining stands, lost their morale check and were destroyed. The victory for the Americans was short-lived, however, and the heavily-damaged Airborne platoon also failed a morale save and likewise fled the battle. With the game nearing it’s end, a Sherman was destroyed and blocked the road. All the US armor and artillery was effectively shut-out of the game. As the Germans covered an objective, the American P-47 made one final run to force a German morale check but to no avail. The Germans had won the day.

IMG_2208

IMG_2210There were a number of things that had gone wrong for the Americans. The rifle platoons never got out of the town, contributing almost nothing to the battle. Had they hauled their way toward the forest in the middle of the board, pressure would been greater on one of the objectives. The restrictions on the reserves also hurt the Americans, with nearly half their force never getting a chance to get in the fight. The US Airborne were typically deadly in their assaulting enemy armor and ground troops and proved to be the one positive for the Allies. On the German side of the table, much of its large armor platoon, including the Tiger, was sidelined for much of the battle as they navigated the hedgerows and roads.

The game was a new experience for one of the German players who typically games in the wide-open spaces of the Northern Africa theater from earlier in the war. As in 1944, bocage played the role of a third unmovable enemy on the table. The bocage was frustrating for all players but this time sided more with the Germans in their breakthrough victory.

Flames of War: La Fiere Causeway 1944 Scenario

lafiere1944

In the late evening of June 5th and pre-dawn hours of June 6th, 1944, a steady flow of Allied paratroopers began dropping throughout the French countryside to clear the inland way for the D-Day beach landings to come later that morning. Like elsewhere, scheduled US Airborne drops near Sainte-Mère-Église left paratroopers scattered around the countryside. To the southwest of the town’s target area, a contingent from the 82nd Airborne found itself near a quaint French farm compound and a small bridge over the Merderet River. Recognizing the river crossing as a key defensive line, the assembled paratroopers established a perimeter along the river. A few hours later, the US troops were met by a German Grenadier and armored battallion hoping to stall the Allied invaders from moving inland. The battle that erupted at the river would rage for three days until the German force withdrew in time for the arrival of US infantry and Sherman forces rolling in from Utah Beach on June 9th.

causewaygamemap

The Flames of War website offers a basic scenario of the encounter at La Fiere Causeway suitable for 1500 point forces on either side. This past weekend a visitor to Metropolitan Wargamers and I had a go at the scenario with my US Airborne facing off against his Germans. As with the historical record, my force held closely to the scenario’s outline with two parachute rifle platoons with plenty of bazookas supported by a platoon of light machine guns, parachute engineers, a glider artillery platoon and M18 tank destroyers. On the German side of the table, my opponent lacked the primitive French tanks that historically fought at the battle. Instead, he filled his force with a number of Grenadier platoons mounted in half tracks backed by two small platoons of Panzer IVs and a Nebelwerfer rocket battery.

IMG_2161

IMG_2163

As per the scenario rules, each of us chose half of our platoons to be held in off-table reserve. Beginning with the Germans, we alternated deploying our starting forces on the table. My American engineers took up position in the courtyard of the farm on my left flank, the machine guns lined the hedge on the other side of the bridge and a rifle platoon deployed on my far right flank. As expected, the Germans deployed a tank platoon at the road entry point and the rocket battery and a mounted Grenadier platoon in the field on their left flank.

IMG_2165With the Germans taking the first turn, the first Panzer IV platoon made way for the river crossing at the middle of the table while the half tracks rolled for the ford on the American right flank. Deployed in and around the farm buildings, the US engineers quickly laid down mines at the foot of the bridge and an Airborne platoon crossed the river to meet the approaching Grenadiers and the rocket battery beyond.

IMG_2169

IMG_2167With turn three, German tank and Grenadier reserves appeared on the table edge opposite the farm and pointed their way toward the French buildings and the nearby bridge. Four US bazookas bailed one Panzer in the clearing across  the river but three other Panzers made it across at the middle ford. US tank destroyer reserves came on the table and immediately poured machine gun fire into the half tracks across the river. The Grenadiers bailed from their transports and the half tracks raced to the rear while the Nebelwerfers failed to score effective shots in the hearty US Airborne troops.

IMG_2171With the Grenadiers on the run back to defend the rocket battery, the US tank destroyers turned their attention on the Panzers and quickly destroyed one while the others continued to push on unharmed due to the protection of their side Schurzen armor. At the farm, the approaching Panzer and Grenadier platoons exchanged fire with the engineers and riflemen defending behind the stone walls. Even with heavy casualties, the engineers repelled a direct assault by two Panzers as a fresh rifle platoon rushed to reinforce the farmyard strongpoint.

Alas, by the fifth turn the game was effectively over for the Americans as the late-arriving US howitzers once again failed to hit in one final volley against the Panzers rushing to seize the objective. The Americans had chased both Grenadier platoons from the field and destroyed a couple Panzers, but the Airborne focus on defending rather than seizing objectives allowed the Germans to take the table.

At the game’s outset, both of us shook our heads with the difficult mission ahead of us. The Airborne never effectively engaged in a close-quarters assault that might’ve taken out more of the tanks sooner on in the game, and artillery on both sides contributed nothing to the game. As with the last few FOW games I’ve played, the engagement at La Fiere once again pointed out the strength and tactical importance that infantry played in WWII. Keeping men moving and in the fight is key to victory, and this time around the German troops got the better of the day.