Bringing Modelling Into Focus

IMG_4465

As a wargamer and scale miniatures modeller working my way through the latter half of my 40s, eyesight has become more of an issue for me. It’s a reality of just getting older (I like to think, more experienced) as I’ve aged through about 30 years in the hobby.

Recently, I picked up the magnifying visor from Sharper Image and it’s become a welcome addition to my modelling tool kit. Retailing for about $60 (and less expensive with an additional 10% off for new customers), the visor brings a number of great features which separates it from other magnifiers I’ve seen. The adjustable visor comes with four lenses at  1.5x, 2x, 2.5x and 3x strengths stored in a separate small plastic case. Each lens snaps into the visor and flips up and down easily with a flick of the wrist while painting. Most visors or magnifying eyeglasses used by hobbyists come with just one fixed lens strength, so being able to adjust the level of magnification depending on the project adds a lot of use to the Sharper Image’s visor.

Living in an a Brooklyn apartment, I do most of my modelling projects in natural light at the dining table flanked by a tall set of large windows. For a lot of other hobbyists relegated to painting in basements or small, darker rooms, lighting is often supplemented with workbench lights or a separate camping-style headlamp. For hobbyists like me without a permanent workspace, tabletop lights just aren’t practical and adding a headlamp is just one more thing to store. With these factors in mind, the added feature of a powerful LED light on the Sharper Image visor is also a welcome addition. The light adjusts easily to angles which can direct a beam of cool, white light directly to the area needed. Again, this kind of thing just isn’t found on lesser magnifiers.

I got the Sharper Image visor just as I started going to a smaller scale with 6mm World War II microscale models from GHQ. Whether painting or applying decals, the visor makes details pop on these tiniest of models. At this scale, I found the 2.5x lens to be the best option. The smallest bits of equipment and other features on models practically jump out at me when wearing the visor, and I feel I could practically apply paint with a house painting brush if I had to. I’ve got some other 15mm projects coming up in the coming months, and I’ll be using the visor at that scale for the first time, too.

Regardless of the scale and veteran status in the miniatures hobby, the outlay for the magnifying visor from Sharper Image is a solid investment. As I soon head into another decade in the hobby, I’m grateful to have this new tool to keep my future projects in focus.

A Gamer’s Guide to Manhattan’s Hobby Shops

PolksHobbiesGF

I’ve mentioned here more than once that my childhood was full of hobbies including model rocketry, model railroading, plastic kit building, Dungeons & Dragons, comic books and miniatures wargaming. Like generations before me, hobby stores and the now-vanished hobby areas of large department stores and five-and-dimes were where I felt at home from an early age.

I moved to New York City in the mid-1990s when much of Old New York started breathing its last gasps. Along with the closings of many storied NYC bars, restaurants, clubs, book stores, comic shops and movie theaters, hobby shops of all types are becoming more and more a thing of the past here in the Five Boroughs. The causes of the decline of hobby shops in the city are many, including rising rents, loss of customer interest, the growth of online hobby retail and many owners simply retiring or passing away.

PolksHobbiesLogo

The New York Times recently did a great little story on Rudy’s Hobby and Art in Astoria, Queens, and I’ve also become a semi-frequent visitor to Trainworld just a few subway stops away from my apartment in Brooklyn. These outposts in the outer boroughs hold on, but many of the classic shops in Manhattan have not. At the top of many city hobbyist memories is Polk’s Hobby Department Store which once occupied five floors at 314 5th Avenue. Like many businesses, Polk’s was a family-run affair headed up by two brothers beginning in the 1930s. The iconic store carried radio controlled boats and planes, slot cars, plastic model kits, trains and all matter hobby supplies which fueled the imaginations for generations of kids and adults. For the observant nostalgic, a quick glimpse of Polk’s survives in a scene from 1972’s The Godfather (photo at top).

Like Polk’s, most of Manhattan’s other hobby stores, like Carmen Webster’s on 45th Street and America’s Hobby Center on West 22nd Street, have likewise vanished from the city’s streets in recent years. At the same time, Brooklyn has seen a surge in gaming-specific stores and play spaces such as Kings Games, Brooklyn Game Lab, Twenty-Sided Store, The Brooklyn Strategist and Nu Brand Gaming. In Greenwich Village, The Uncommons now sits along the old “Chess Row” south of Washington Square, and a Games Workshop can be found a few blocks away well stocked with Warhammer and 40K players on any given weekend.

For the dedicated scale model hobbyist and gaming enthusiast, a few remnants of the traditional densely stocked hobby store of the past still live on in Manhattan. In almost all cases, online suppliers are a more economical option than purchasing from a local hobby or gaming brick-and-mortar store. However, it’s still hard to beat the experience of browsing a shop in person and having conversations with fellow customers and proprietors who share a passion for a hobby. I recently spent a sunny late summer day poking around in a few of my favorite NYC hobby shops that tap into that unique experience that still lives on.


Jan’s Hobby Shop

1435 Lexington Avenue

(212) 987-4765

IMG_4284
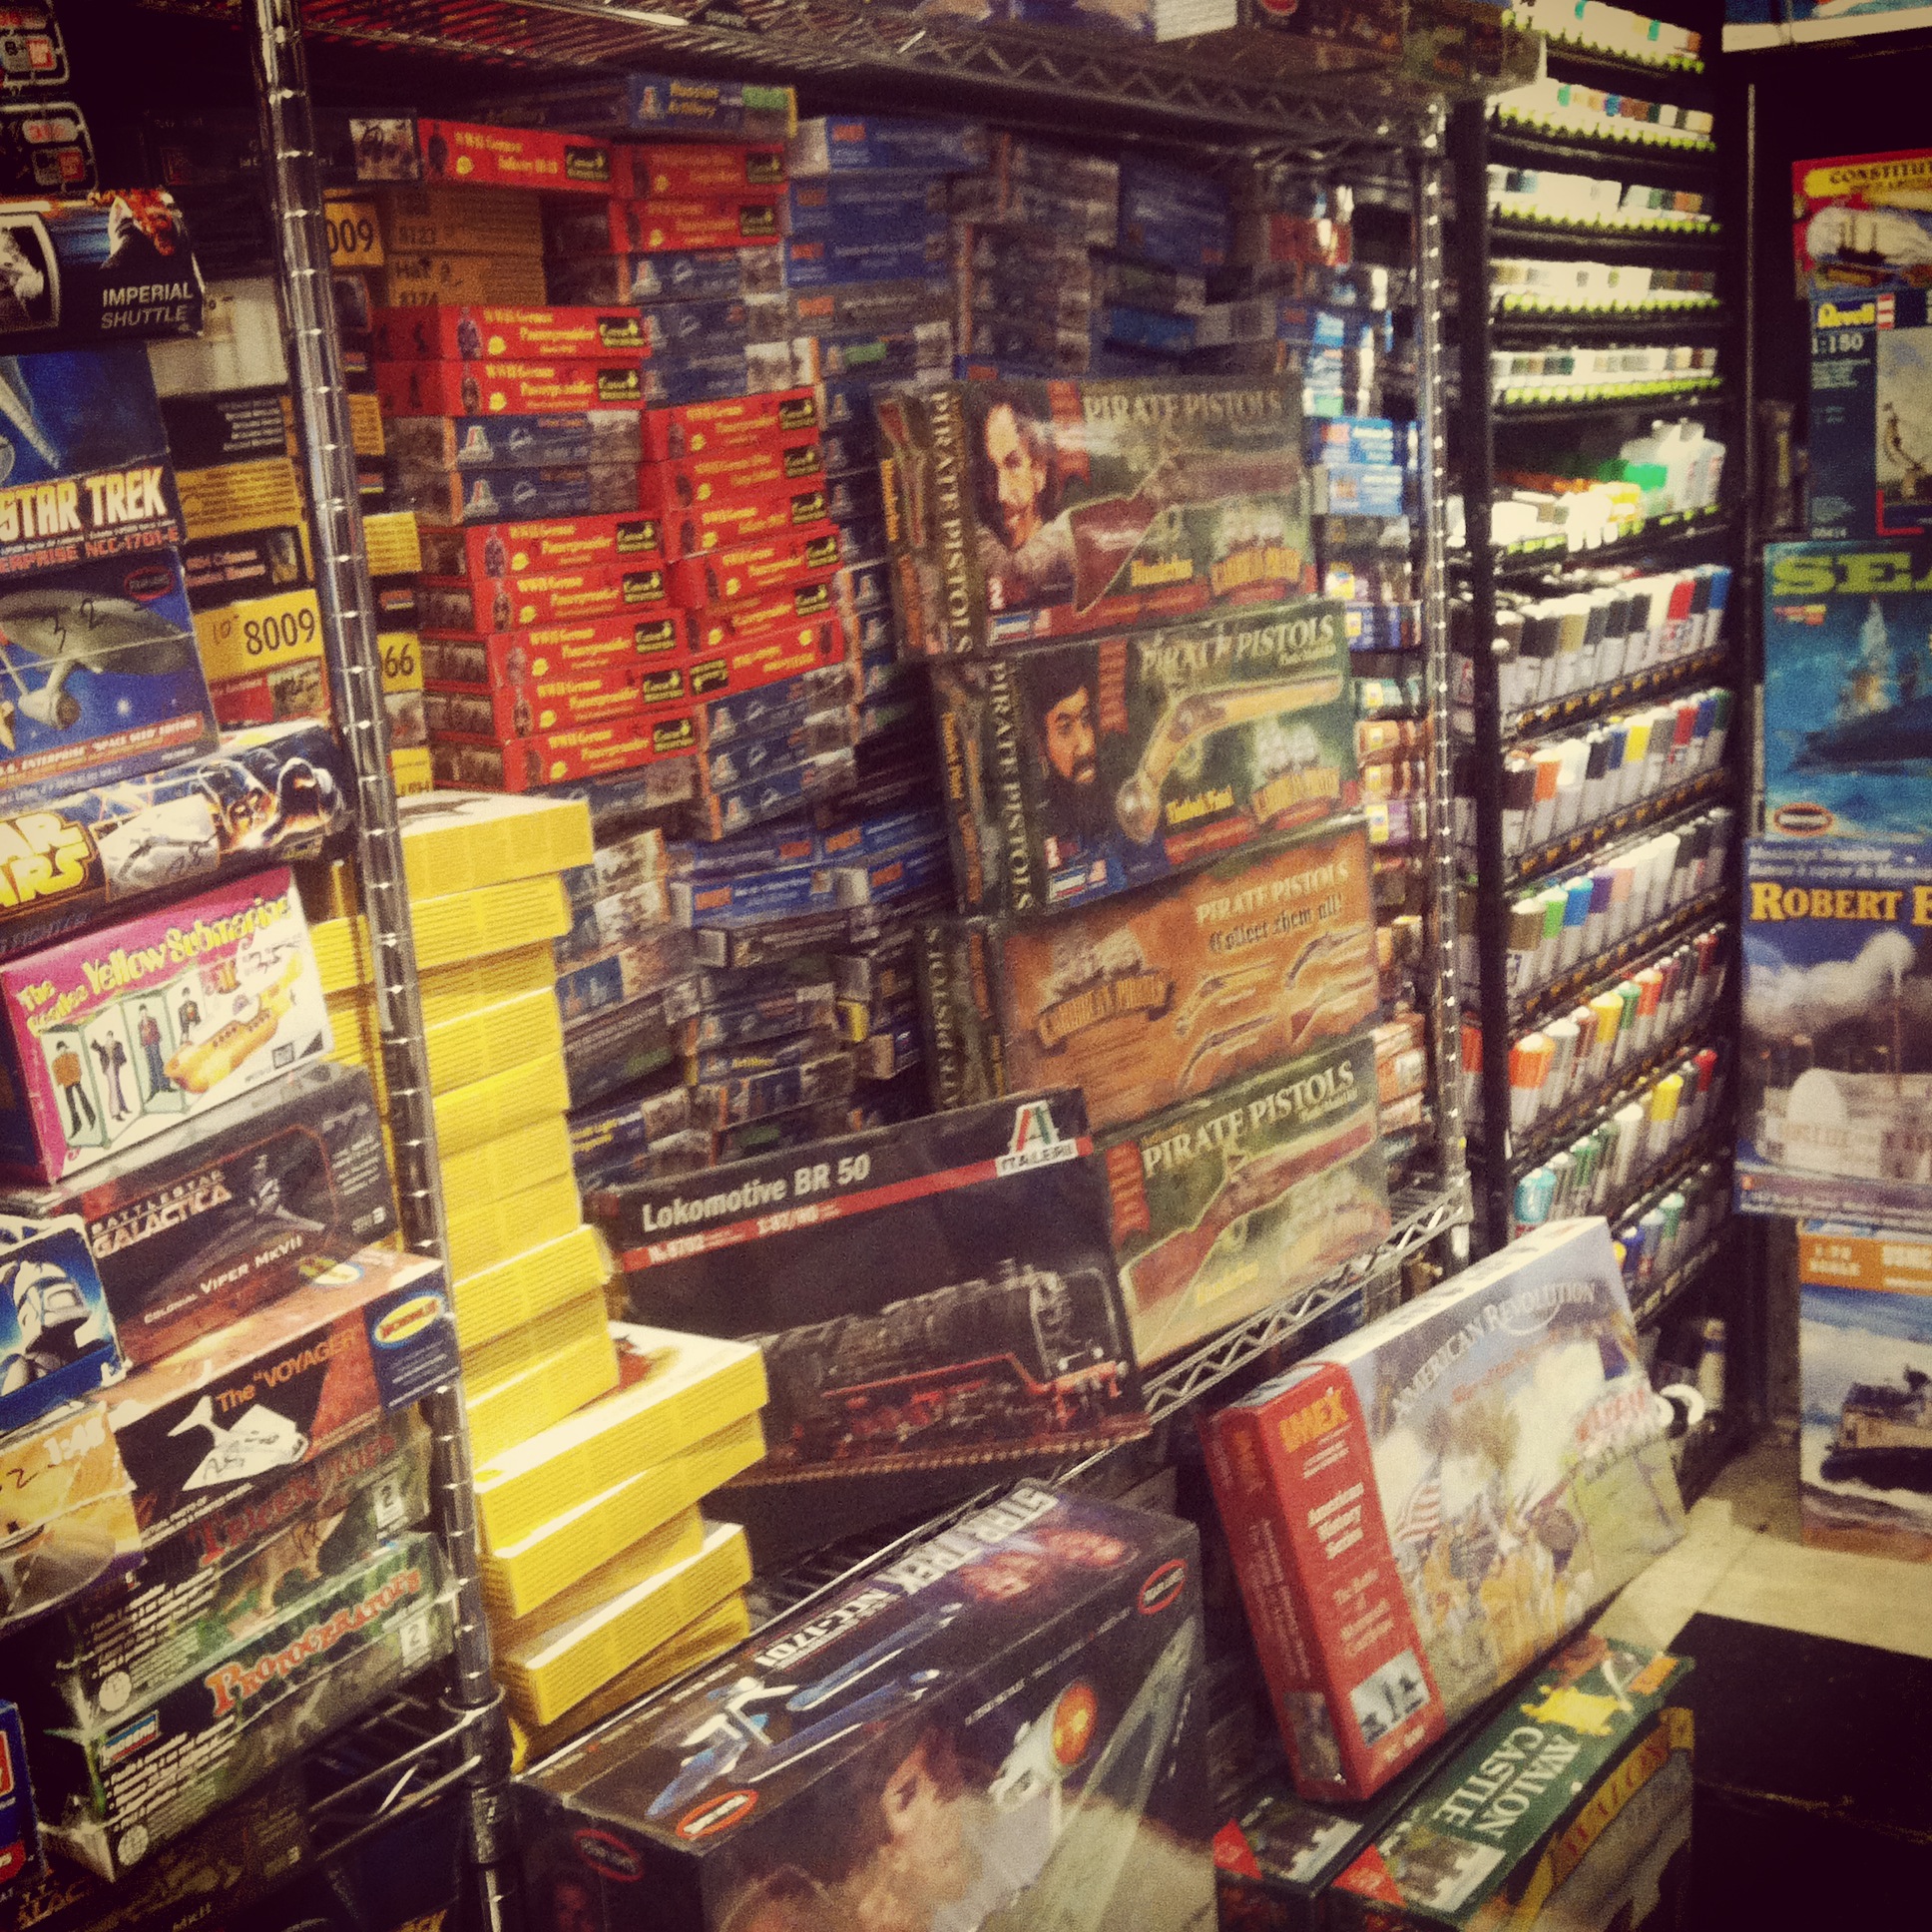
Way up on Lexington Avenue in the East 90s,  Jan’s Hobby Shop is just the kind of store that fired my youthful imagination. Plastic soldiers, model kits, model rockets, paints, brushes, videos, books and hobby magazines are stacked floor to ceiling in the tight space of this classic hobbyist’s paradise. Kits from hundreds of manufacturers from around the world, from the common to the obscure, cover all eras, skill levels, scales and price ranges. Ships from the Age of Sail sit across from Star Wars X-Wings, ancient siege weapons are just down the aisle from Cold War artillery and all manner of cars, tanks, ships and planes fill every bit of space between. For the more advanced scale modeller, a handy selection of balsa, plastic styrene, brass tubing and specialized glues and construction materials sit at the ready.

IMG_4286Plastic soldiers from a variety of manufacturers, eras and scales at Jan’s

IMG_4287
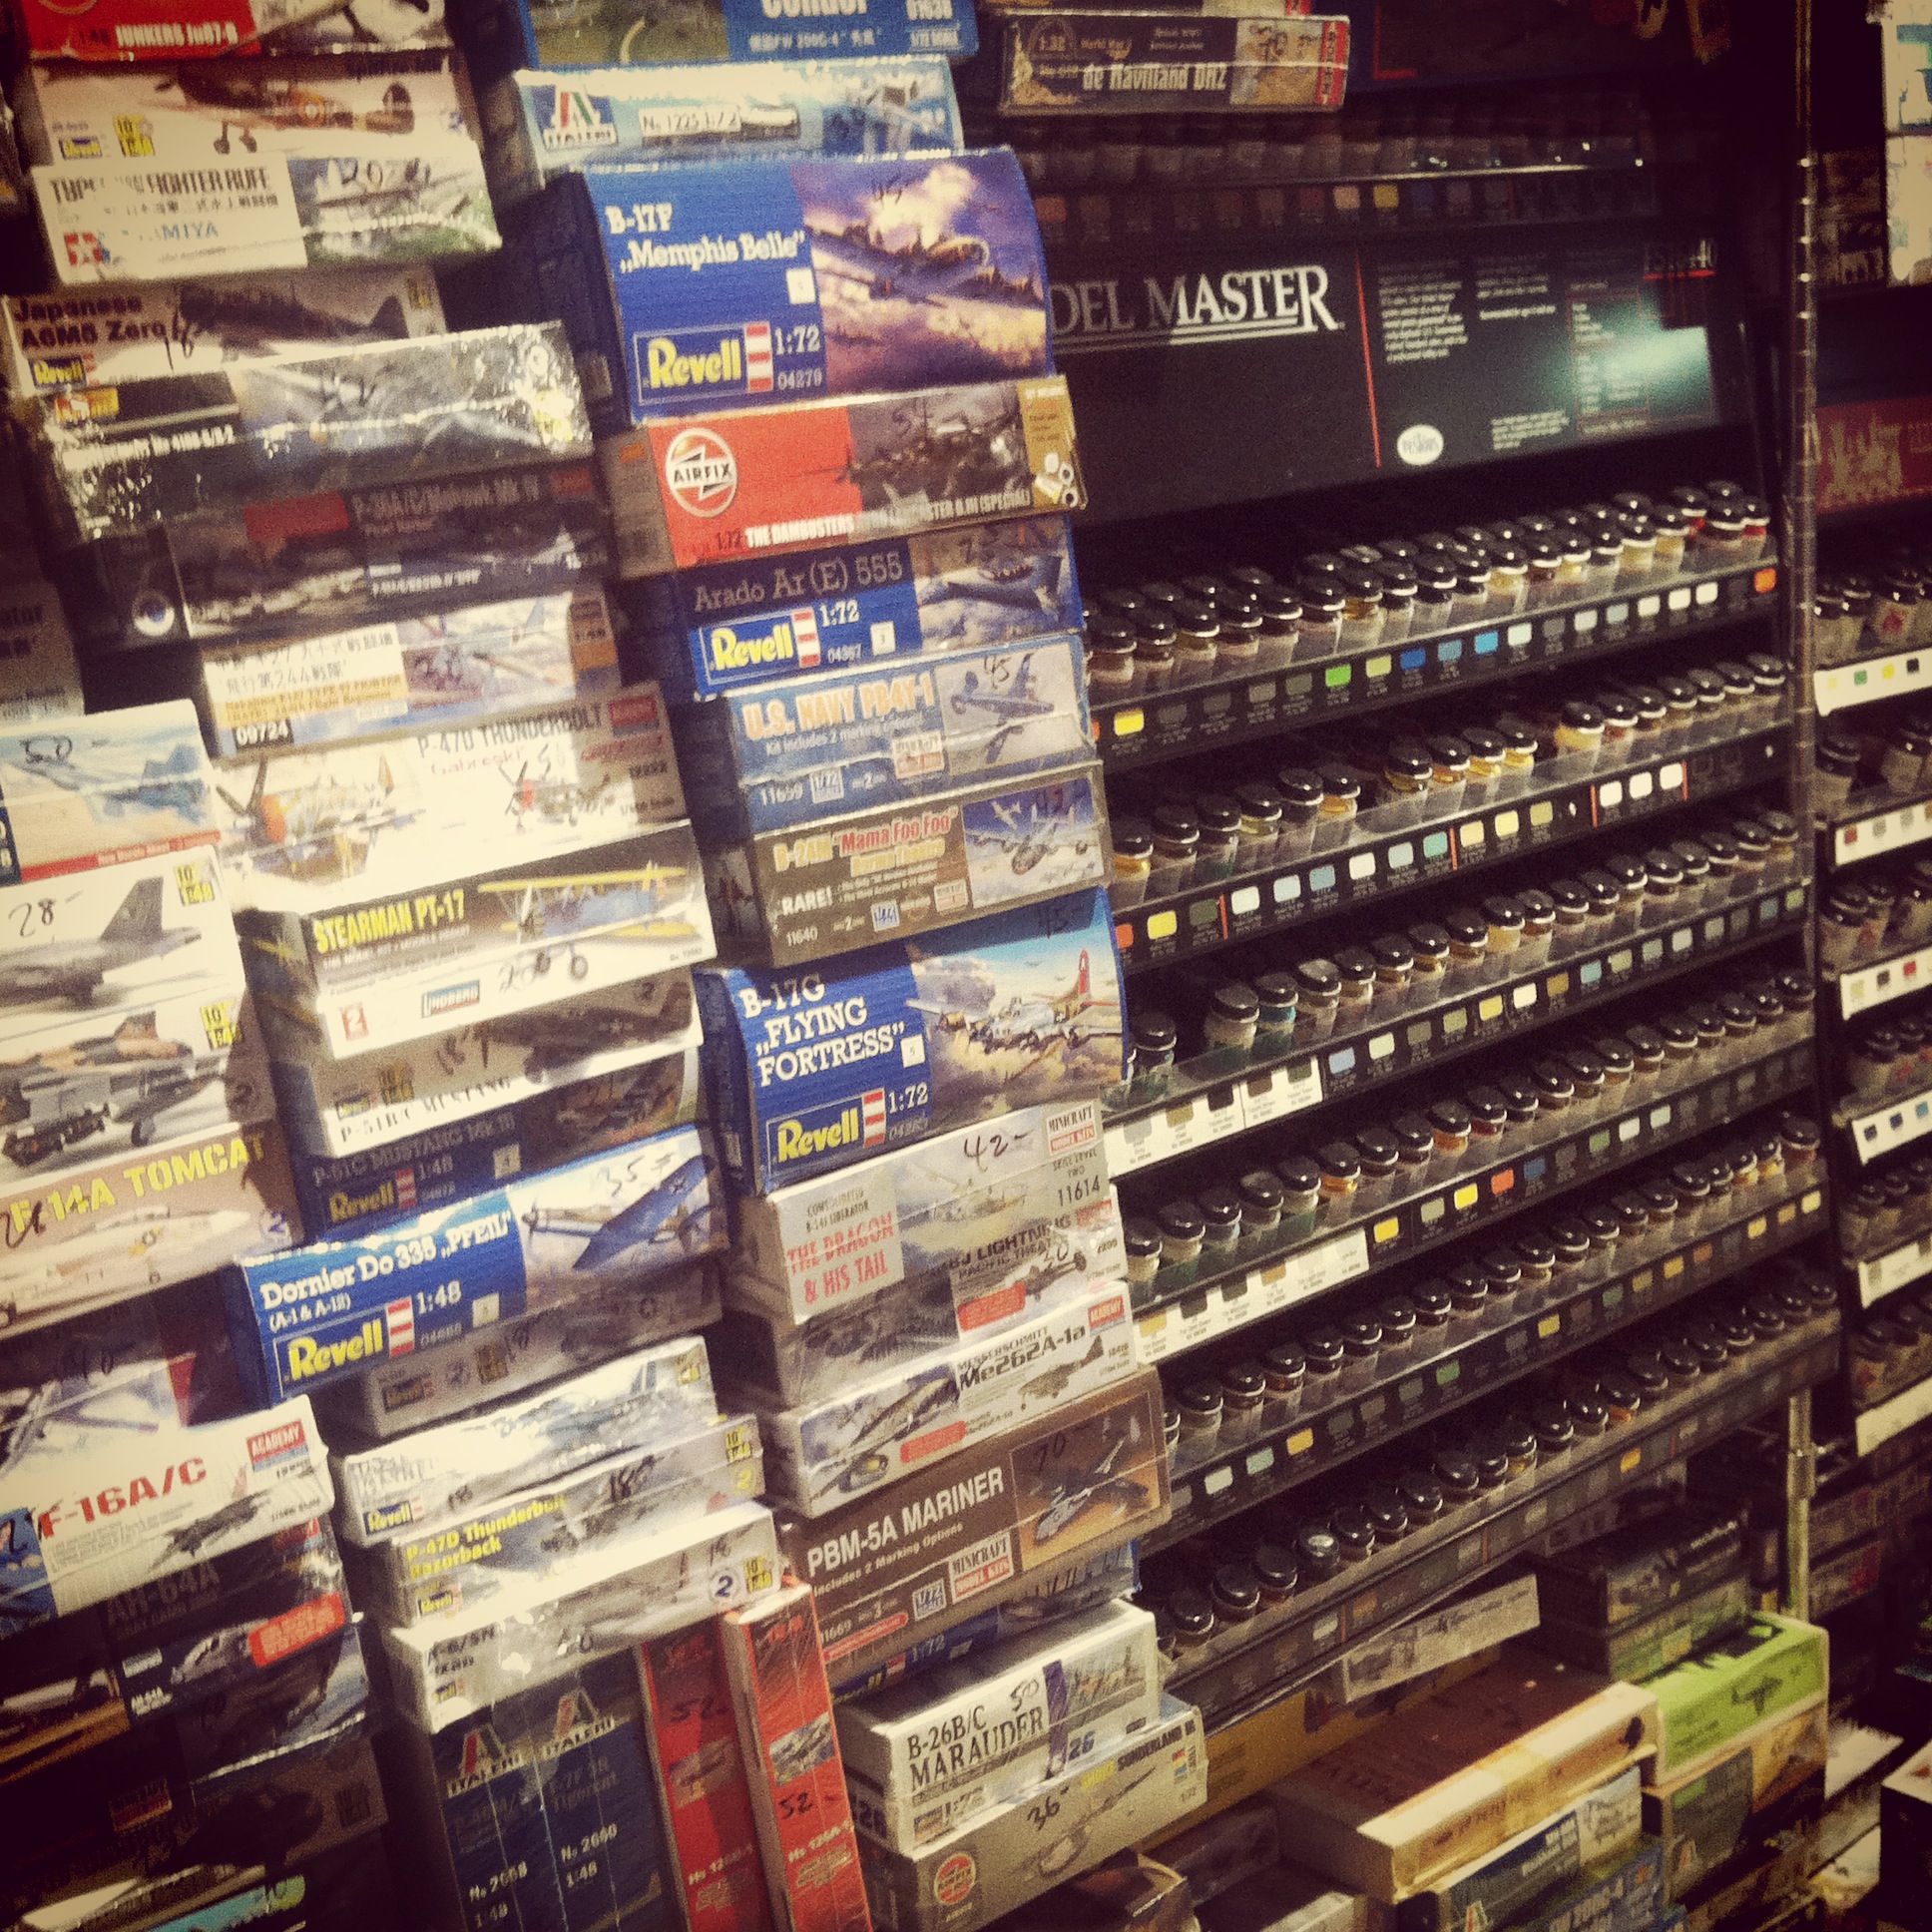
Paints and plastic model kits line the walls at Jan’s

IMG_4285Fred Hutchins’s WWII era experimental aircraft models

At the heart of the store on any given morning, store manager Fred Hutchins sits behind his workbench working away on his latest project. In my short visit with Fred, I learned of his lifelong love and work in aeronautical engineering. His ongoing project, at the rate of 30-50 models per year, is to build to scale every experimental aircraft built during World War II. In the cases nearby, much of Fred’s exquisite work is on display, and if you are a polite and patient visitor, he is more than happy to engage in a brief history lesson. Conversation with Fred, modeller-to-modeller, is just the kind of experience only found in a hobby shop and makes a visit to Jan’s worth the trip.


The Red Caboose

23 West 45th Street

(212) 575-0155

www.theredcaboose.com

IMG_4282

For a hobbyist like me, basements are portals to secret worlds of play hidden away from the normal world above. That’s where you’ll find The Red Caboose, tucked at the end of an easy-to-miss entry hall and then down some narrow stairs to a subterranean hobby wonderland. Focused largely on N and HO scale model railroading, The Red Caboose is lined with glass cases of rolling stock and engines from the steam era to today. Tourists may also find their way here to buy up some authentic scale New York MTA subway cars which may be special ordered to reflect specific routes past or present.

IMG_4283Cases of trains and row upon row of model kits at The Red Caboose

The Red Caboose is a place beyond trains, too.  Rows of shelves are devoted to kits for all sorts of buildings, bridges, industrial complexes and natural scenery, some of which have made their way to my wargaming tables over the years. Rotating racks of scale scratch building plastic, metal and wood parts, along with paints, brushes and other supplies provide a solid inventory for miniature modellers. A decent selection of military and civilian plastic kits and pre-built die-cast scale models can likewise by found, making a stop at The Red Caboose about much more than just trains.


The Compleat Strategist

11 East 33rd Street

(212) 685-3880

www.thecompleatstrategist.com

IMG_4280

As a budding role playing gamer in the 70s and 80s, I was fortunate to live near a college town where the local bookstore and five-and-dime each stocked a handy selection of Dungeons & Dragons books, miniatures and magazines. Tucked in the pages of later issues of those magazines, I occasionally saw ads for The Compleat Strategist with an inventory which sounded like a dream for my hungry gaming appetite. As a resident New Yorker today, a quick visit to “The Strat” over a lunch hour or on a weekend is an amazing escape for a quick purchase or just time spent browsing the latest in gaming.

IMG_4281The Compleat Strategist is NYC’s destination for serious gamers

The store is long, narrow and deep, with shelves of games, books, miniatures and accessories piled to the ceiling. Boardgames, chess sets and puzzles occupy the rear half of the store. A massive selection of boxed historical strategy games stretch down one wall toward an inventory of paints and miniatures ranging from Games Workshop and other fantasy lines to collectible games like Heroclix. RPG books and reference materials fill out the front of the shop along with buckets of dice, stacks of collectible cards like Magic: The Gathering and two large racks of gaming periodicals. Downstairs, the Compleat Strategist also hosts mini gaming tournaments most weekends, rounding out the total experience for the city gamer looking to stay connected to a vital hobby community.


Gotham Model Trains

224 West 35th Street, 13th Floor

(212) 643-4400

www.gothammodeltrains.com

IMG_4278

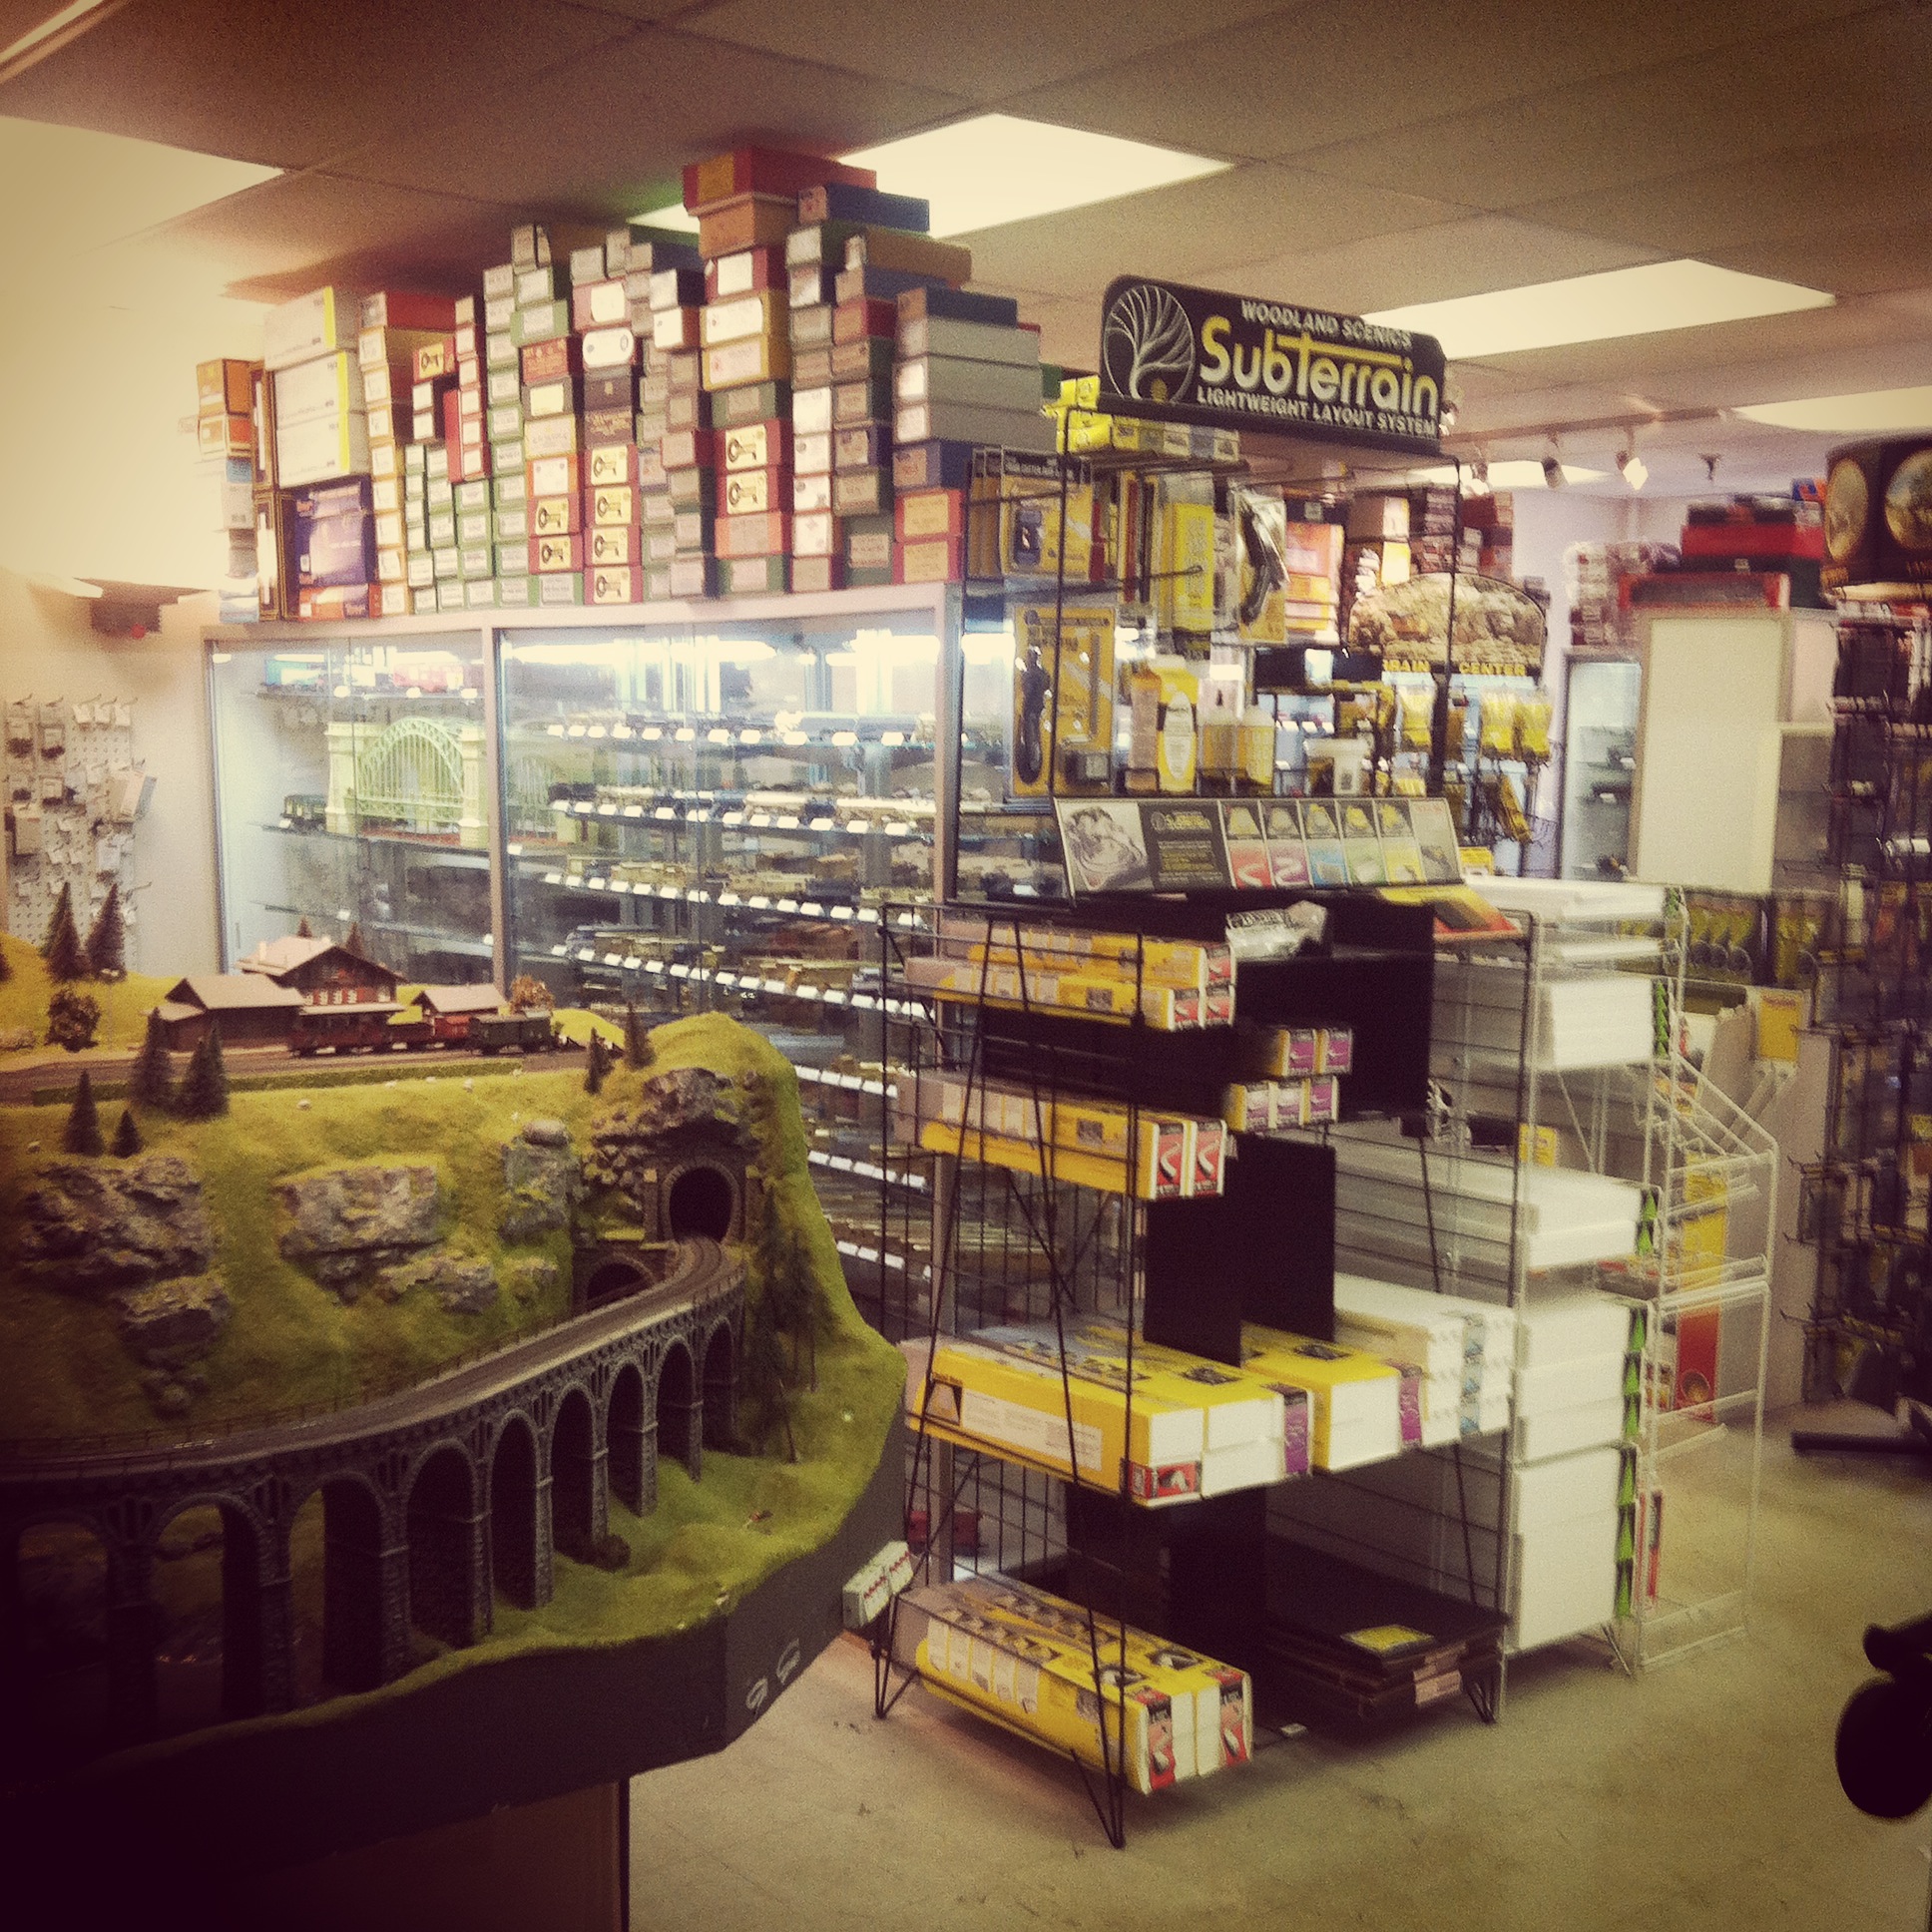
Down a generic block just north of Penn Station, the tiny and well kept Gotham Model Trains occupies a thirteenth floor space in a building housing a jumble of small businesses and professional offices. The shop is mostly about trains, and the tight inventory offers a well-edited counterpoint to the sprawling warren of shelves at The Red Caboose. I like the nice selection of Woodland Scenics ground cover, shrubbery, trees, gravel and other scratch-building materials in plastic, metal and wood on the walls and racks.

IMG_4279The well-curated inventory of Gotham Model Trains

But trains are the thing at Gotham Model Trains, and over the years this has been my local go-to for a few pieces of track needed in getting a little circular railroad running under my Christmas tree. Multiple scales, controllers, buildings, scale figures and a small selection of railfan books round out the inventory surrounding the sweet little N scale layout greeting you at the shop’s entrance. Stopping in at Gotham Model Trains, like a visit to any of Manhattan’s surviving hobby shops, you can’t help but have the irreplaceable experience of a living breathing hobby.

Flames of War: Fielding the CD and FOW M13/M16 MGMC AA

M1650cal AA

One of my favorite blogs, War Is Boring, recently ran an article about the famed Browning M2 machine gun. Introduced in the 1930s, the .50 cal machine gun went on to become one of the most common heavy weapons used in the field by US infantry, mounted on ground vehicles and installed in aircraft. Whether used on the ground or against air targets, the gun is beloved by troops for its ferocious stopping power. Installed in combinations in half tracks as anti-aircraft guns, the weapon earned affectionate nicknames like the “Ma Deuce,” the “Quad 50” or simply “The Fifty.” To this day, the .50 cal is still in wide use wherever US forces deploy.

IMG_4295M13/M16 MGMC AA model comparisons with Flames of War (left) and Command Decision (right)

My recent projects for  my 15mm World War II gaming have focused on filling in extra support units, and adding some AA was key to filling a gap in my forces. Needing four models for a full platoon, I was faced with a choice of manufacturers. Flames of War sells their M13 MGMC models separately for about $13 each. Old Glory Miniatures offers a 3-pack of M16 Quad AA SP Halftracks for $25. So, I was looking at choices of purchasing four of the FOW models for $52, buying two of the CD sets for $50 (and having two leftover, unused models) or ordering from each manufacturer and getting exactly the four models I needed for $38.

I opted for the economical route and wound up with some pretty different models. Side-by-side, the FOW resin and plastic truck is taller, longer and wider than the CD all-metal castings. Everything glued-up nicely, but the guns for both companies proved to be very delicate and prone to bending. The FOW model has crisper lines, but the rougher CD half tracks have a fair amount more detail.

IMG_4296My completed M13/M16 MGMC AA platoon

With four half tracks in the platoon, the larger FOW model literally stands out among the other three smaller CD models. With its bigger profile, I’ve decided to take advantage of its differences and use the FOW half track as the command model in the unit. Since I won’t be fielding the platoon all the time, the delicate gun barrels are less of concern as they are bound to sit comfortably in one corner of the table and blaze away at any Axis aircraft or unfortunate ground forces who dare get too close.

Flames of War: Fielding the FOW L-4 Grasshopper AOP

L4Grasshopper1944

Piper Aircraft was founded in the late 1920s with an eye toward building planes for general civilian use. From 1938 to 1947, Piper sold nearly 30,000 of their relatively inexpensive J-3 Cub models, making the plane one of the most ubiquitous non-commercial planes soaring over the United States by the mid-20th-century.

1943 industrial film of the building of a Piper Aircraft J-3 Cub

During World War II, Piper supplied the US Army Air Forces with nearly 6000 of their J-3 Cub planes in a modified military version known as the L-4 Grasshopper. The main modification of the light plane was the installation of wide banks of plexiglass windows, making it usable as a radio observer and reconnaissance plane during key missions like the Allied invasion of Normandy in June 1944. The Grasshopper also found varied service transporting supplies to the front, carrying wounded to the rear and ferrying military and political dignitaries. In rare cases later in the war, the plane was also equipped with light weapons for use as an air-to-ground attack platform.

IMG_4250My completed Flames of War US AOP Grasshopper

My modelling for Flames of War has been focusing as of late on filling in some odd little gaps in my forces. Since I run some US artillery from time to time, adding an air observation plane not only allowed me to add to my gaming but also take a break to model another plane. This time around I also decided to pay a bit more attention to basing my plane to add a bit of visual interest to an otherwise simple model. I like the quick work on the base so much that I’m going to go back and add the same to my US P-47 Thunderbolt and British Hawker Typhoon models. While relatively inexpensive and easy to assemble and paint like my other aircraft, my one criticism of the FOW Grasshopper model is the lack of decals.

Even with the one shortcoming in markings, my new Grasshopper will be a welcome addition to my FOW games. In most American army lists, adding an AOP is a cheap point spend while also greatly expanding the effectiveness of the already devastating US 105mm howitzer battery. Getting this little plane zipping over the heads of my Axis opponents on the tabletop battlefield may not prove to be a total game changer. It is, however, going to give the enemy one more thing to worry about and may just provide an edge like this classic of American engineering did some 70 years ago in the skies of Europe.

Micro Armour: How To Apply Decals To 6mm Models

tankfactory

I’m working my way through my new 6mm micro armor modelling project using models from GHQ. After painting I arrived at the stage of applying decals which I also ordered from GHQ. Like many hobbyists, I have a love-hate relationship with decals at any scale. Cutting and applying decals can be frustrating as they fold, tear or wind up in the wrong positions on models. On the other hand, getting decals successfully applied to models adds a ton of personality to a paint job and can allow for easier identification during play on the tabletop.

An experienced micro armor modeller and player at Metropolitan Wargamers in Brooklyn, NY turned me on to his technique for applying decals to 6mm models which I’ve found to be fast and easy with great results. Being organized and methodical in an assembly line manner is key. Having the right equipment is also a necessity. Magnifying reading glasses keeps all the tiny decals and models in focus. Working off a clean, flat hobby mat provides an ideal surface to cut decals and also keeps things easy to see. A sharp hobby knife with a fresh blade, some very fine brushes, clean water, white glue, paper towels and a cotton swab round out the basic equipment. Finally, using a decal fixative (I use Walthers Solvaset) gives a good bond for decals once applied, nestling them into the uneven surfaces of the model.

Applying 6mm Decals

  1. Carefully cut around the shape of each decal with a very sharp hobby knife.
  2. Using a finger tip, dot several small beads of  clean water in a row on the work surface.
  3. Apply a small amount of watered-down white glue to the surface of the model where the decal will be applied.
  4. Carefully push a decal into a bead of water using a small brush.
  5. After a few seconds, roll the decal off its paper backing using a fine brush.
  6. Roll the decal onto the model’s surface and gently push it into position.
  7. After a few minutes of drying time, dab the decal area with a cotton swab to remove any excess water.
  8. Coat the decal and the immediate area with a decal fixative solvent.
  9. Once models are completely dry, spray with a protective matte finish.

IMG_4079Applying decals to 6mm American armor

Historic markings varied a lot during World War II, so I largely came up with my own simple plan for my decals. Each one of my half tracks got encircled white air-observation stars on the hood. My Shermans each received two stars, one plain star on the front hull and an encircled white star on the rear deck of the tank. The M10 Wolverines and armored cars likewise received white stars in circles on the rear deck area.

IMG_40776mm US armor and transports with decals applied

I was able to complete all my decals in just two evenings, totaling  just about two hours. I couldn’t be more pleased with the results, and I didn’t lose a single decal in the process. Now that I’ve got my newly-learned technique down, it’s on to my German armor and then the battlefield.

Flames of War: Omaha Beach “Easy Green” 1944 Scenario

OmahaBeachSandwiched between tall bluffs on either end, a five-mile stretch of Normandy coastline was designated Omaha Beach near the center of the Allied D-Day landings on June 6th, 1944. Landing at Omaha was the relatively fresh US 29th Infantry Division. With British and Canadian troops landing on beaches to the left and other US men landing at Omaha Beach to the right, the 40,000 Americans at Omaha met with the highest rate of casualties of the day with some 3,000 falling in the French surf and sand.

OmahaEasyGreen“Easy Green” sector on Omaha Beach, Normandy 1944

Lying in wait at Omaha was a mix of green recruits and older veterans in the German 352nd Infantry Division. Dug in at the coast in a wall of pillboxes, bunkers, gun pits and trenches, the German men (and unknown number of boys) met the US invaders with a storm of machine gun, artillery, mortar and rocket fire. For the US, little went right as landing craft drifted off course and special floating DD M4 Sherman tanks were swamped and sank offshore. Only through improvised efforts and a slow, methodical pace under withering fire did the American infantry finally make it through the German lines to control the beach by the close of the day.

EasyGreenFOWMap set-up for the Flames of War “Easy Green” scenario

In preparation for our upcoming D-Day Plus 70 weekend at Metropolitan Wargamers in Brooklyn, NY on June 6th-8th, a couple of us have been playing out beach landing practice games. Flames of War offers a specific outline for coastal assaults with their “Hit The Beach” rules, but we’ve found them to be very difficult to play with US invaders losing more often than not. Last summer we ran through our first beach landing on one of the club’s sand tables with a Utah Beach “Easy Red” scenario in which the US failed horribly. Since then we’ve been studying up, tweaking our forces and diving deep into the particular rules for a tabletop beach landing game.

German352

29thinf

This past week we ran through the Omaha Beach “Easy Green” scenario to what was probably our most evenly matched and played game to date. The scenario sticks pretty closely to the situation at Easy Green with one beach exit road guarded by lines of barbed wire, trenches, mines and anti-tank obstacles. Finally, a combined defense of heavy machine guns, a 5 cm KwK 39 gun bunkered at the coast and Nebelwerfer rockets at the rear provide a daunting nut for the US infantry to crack. For our game, my German opponent was able to field forces as outlined in the published FOW scenario but I had to modify my American list slightly to fit my model collection. Even with slight changes, our final lists had the US at a few more points stronger than the Germans as per the mission outline and the game rules.

IMG_3452The first US boats land and platoons rush ashore

After an initial US naval bombardment which destroyed one stand of German infantry, my boats and DD tanks headed for the beach. In the initial wave, one DD tank sank in the water offshore and one boat was delayed in the bouncing surf. With two platoons of US infantry on French ground, they made way for the barb-wired seawall. Further down the beach to the right, my three surviving Shermans rolled to the one exit causeway from the beach.

IMG_3453DD Sherman tanks make it across the beach toward the exit ramp

In the opening salvo from the Germans, rocket fire came in from the rear of the table as entrenched guns fired from the beach defensive lines. US troops did well with dice roll saves and lost just a few teams before ending the turn pinned high on the beach.

IMG_3454German Nebelwerfers sit atop a hill overlooking the Allied objective

In the next couple turns, landing craft continued to meet mixed success in landing and stalling on the sea. Luckily, most boats didn’t drift too far down the beach, allowing me to execute my general plan of running infantry to the left while my tanks dealt with the heavier nests and pillbox to the center and right. One tank bogged in the sand but the other two rolled over the barbed wire to take up position at the line of minefields, sending fire into the Tobruk nests and gun bunker. A couple turns in, the bunker was in flames and the German machine guns had been dealt with. The way was clearing for the US infantry to push inward.

IMG_3455The 5 cm KwK burns in its bunker as US troops push over the seawall

IMG_3456DD tanks struggle through the coastal defenses and take heavy combined fire

With several US platoons whittled-down in their struggle through several tiers of barbwire, one platoon of German infantry arrived and made way for the row houses near the objective and remaining rockets on the hill. In the open, the Germans took fire from naval guns but most survived to find shelter in the buildings. Back on the beach, my final US reserves of M7 Priests landed at the center of the beach and one heavy machine gun section tramped forward at the extreme left. With these late arrivals so far back from the main action, it was up to the forces already inland to get the job done.

IMG_3475German defenders rain mortar and machine gun fire into oncoming US troops

IMG_3476With German defenders destroyed at the beach, the 29th Infantry Division hustles inland

With the major defenses eliminated at the beach, the Shermans turned their machine guns on the remaining German infantry manning the trench line high on the central hill. At the same time, US infantry began pushing into the German position after spending turns alternately being pinned by rocket and mortar fire, removing barbwire and shooting back with light machine gun, rifle and direct mortar fire. Despite their losses, the combined arms of my US troops really shined, as was often the fateful experience of their German opponents 70 years ago.

As the game moved into the second-to-last turn, the Americans were ultimately just too far away and too weakened to make the final push to the objective still held by the remaining German infantry comfortably defending from the nearby houses. It had been a pretty even match, but timing was everything. Luckily for the Allies on June 6th, 1944, the only limits on the day’s outcome at “Bloody Omaha” was the grit and dedication of the storm of humanity hitting the beach.

Metropolitan Wargamers D-Day Plus 70 Event – June 6th-8th 2014

MWGDDay

This June is the 70th Anniversary of the Allied D-Day landings at Normandy, and New York City’s oldest and largest wargaming club Metropolitan Wargamers is celebrating with a full weekend of events.

IMG_2161

La Fiere Causeway at Metropolitan Wargamers in Brooklyn, NY

Whether you’re new to the hobby or an experienced gamer, there will be plenty of WWII action the entire weekend. On the evening of Friday June 6th we’ll begin with Flames of War airborne landing scenarios. Saturday June 7th kicks off at noon with a FOW beach landing scenario on one of the club’s famed sand tables. Sunday wraps up the weekend with a couple FOW breakthrough battles and a large Memoir ’44 board game. Other WWII-themed games will run throughout the weekend.

IMG_2816

Utah Beach on one of the sand tables at Metropolitan Wargamers

We’ll have FOW scenarios set up for the weekend with plenty of miniatures and stunning terrain on the club’s tables, so all you need to bring is your passion for wargaming and history. Our FOW miniatures games are fun and a feast for the eyes, and you can get a sense of what’s in store for the weekend by viewing some of our past scenarios at the club here.

Admission for the full weekend of gaming is just $10 and a great opportunity to visit a very unique community of gamers in the heart of Brooklyn’s Park Slope neighborhood.

For more information and to RSVP for the D-Day Plus 70 weekend, check the Metropolitan Wargamers website or join our Yahoo group.

Flames of War: Fielding the FOW M10 Tank Destroyer Platoon

m10

The Blitzkreig of German armored forces is one of the more enduring tactics introduced in World War II. Swarmed masses of German tanks and mechanized forces in the early war period rolled through Poland, France, Belgium and the Netherlands in Western Europe and punched into the Soviet Union with Operation Barbarossa in 1941. With early Panzer and later Panther and Tiger tanks ruling the battlefields of Europe, Allied forces struggled for solutions to crack the German tide of iron.

m10normandy

A US M10 tank destroyer comes ashore in Normandy after D-Day in 1944

By mid-war, the Americans had a solution with the M10 tank destroyer. Introduced first into the battlefields of North Africa in 1943, the M10 GMC (“gun motor carriage”) carried a big 3-inch/76mm gun and on a Sherman hull. After success in Africa against earlier model German tanks, M10s became part of the post-D-Day Allied breakthrough campaign. While effective against Panzer III and IV tanks, more heavily-armored Panther and Tiger tanks still proved problematic. Luckily, the M10 was supplemented by the British-modified Sherman 76mm Firefly and the later US-built M18 Hellcat which was quicker on the field. The combination of these three tank destroyers, along with the stalwart work of Allied infantry and deadly air support, turned the tide in Europe.

fowm10set

One of my earliest 15mm WWII purchases years ago, and somewhat at random, was the now-discontinued M10 Tank Destroyer Platoon set from Flames of War. I think at the time, I just liked the look of the models and I was looking to fill-out my new US forces with more variety. To get to a full platoon of four M10s, a fellow club member at Metropolitan Wargamers in Brooklyn, NY recently gave my two more M10s to which I’ve added an additional M20 scout car.

IMG_3389New M10 tank destroyer and M20 scout car

IMG_3388New M10 tank destroyer

IMG_3387New M20 scout car

IMG_3390US tank destroyer platoon with new models (left) and older models (right)

With my existing and new section sections, I now can field a full tank destroyer platoon using a variety of Allied Late War European lists. Anti-tank tactics in the game provide multiple opportunities for the M10 platoon to be used in combination with infantry and other Allied armor on the game table. With optional deployment as a recon platoon using the M20 scout cars, the M10s can create ambushes to wreak havoc on German tanks. Admittedly, using this full platoon will take some practice but I’m certain they’ll be causing headaches for my German opponents in the very near future.

Micro Armour: Getting Started

GHQlogo

After years of wargaming World War II with Flames of War, I’ve been looking for a change of pace for the period. I’ve recently caught up on the vast majority of my modelling projects, including fairly extensive American, British and German Late War forces as well as a bunch of terrain. I’ve also been interested in playing larger battles, something that becomes a bit unwieldy with FOW. In looking for a way to expand my WWII gaming experience, I’ve been weighing factors of scale, cost, storage and time. After a lot of thought, I’m going small and getting started with WWII in micro scale.

The standard in micro scale gaming is GHQ. Founded in the late 1960s and based just outside Minneapolis, Minnesota, GHQ manufactures an extensive line of pewter miniatures for WWII, Modern, Napoleonic, American Civil War and various naval eras. In the early 1990s, GHQ also began offering N and HO scale vehicles targeting model railroading enthusiasts. Along with their gaming models, the company has developed a number of rulesets and terrain-building supplies appropriate for various eras of combat at the micro scale level. For over 40 years GHQ’s models have been held in high regard by wargamers as well as the US military which uses the company’s products for training and planning excercises.

WWIIscales

World War II miniatures scale comparisons (from www.historicalwargames.net)

The 1/285th (6mm) scale of GHQ’s WWII models offers a number of differences and potential advantages to larger scales, such as 1/100th (15mm) FOW miniatures and 1/56 (28mm) models from the expanding Bolt Action game line from Warlord Games.

  • Scale: In 6mm micro scale, an entire infantry platoon can be represented with approximately 3-5 figures mounted to a small square or round base. An inch on the table approximates 100 yards on the battlefield. This allows for larger multi-company or battalion level games compared to smaller single company and platoon skirmish games at a 15mm or 28mm scales.
  • Cost: Wargaming at any scale is an investment, but micro scale allows for the depiction of large battles for a fraction of the cost of larger scales. The starter sets from GHQ provide around twenty tanks for $40, making individual armour models just a couple bucks each compared to the 15mm scale where tanks can run easily to triple that cost. Fielding an entire 6mm infantry and armor company might run just $10-20 while that same company at 15mm could run hundreds of dollars. And, since each micro scale tank represents a platoon and a platoon in FOW may run to maybe six tank models (or more), the game scales cheap and fast into grand scale engagements.
  • Storage: As the website says, I live in Brooklyn, NY, so storage is always an issue for my board games, cards games, miniatures, terrain and hobby supplies. I keep a lot of my miniatures at my local club, Metropolitan Wargamers, but I like having stuff around the apartment for when the gaming mood hits. At the micro scale level, dozens of tanks, infantry and vehicles can be carried in a shoulder bag or kept in a drawer. Compared to my FOW collection which sprawls over multiple bags and boxes, micro scale makes for some quick and easy game deployment just about anywhere.
  • Time: Painting micro scale takes a fraction of time compared to larger scales. A quick spray of white primer followed by a thinned color basecoat, a couple dots of detail, a wash and maybe a tiny decal is all that’s needed to get forces on the table and ready to game.

IMG_3211GHQ’s US Shermans vs. German Panzer IVs box set

IMG_3210GHQ’s US Armoured Infantry Command 1944 box set

To get started at the micro scale, I ordered two sets from GHQ. The Shermans vs. Panzer IVs Battle Box comes with ten tanks per side, a storage case and a set of rules — everything needed to get a game started. To this, I added the US Armoured Infantry Command 1944 set with additional tanks, half-tracks, jeeps, armoured cars and a bunch of infantry. To get some Germans into action, I think I’ll be going for the German Kampfgruppe 1944 for a nice mix of infantry, transport, Marders and even some horse and wagon teams.

IMG_3214Assembly of my first GHQ micro armour sets

In well under less than an hour’s initial work, my first sets of micro armour glued up fast with some careful organization of parts and assembly with superglue and tweezers. Already I’m loving getting so many models ready for paint and then on to the table in no time at all. The saying is “go big or go home” but my new micro armour project looks like its already going to be a massive amount of fun in a very small package.

Flames of War: Fielding the FOW Hawker Typhoon

Typhoon

The story of the British Hawker Typhoon in WWII is one best told in two acts. Its early use beginning  in 1941 met with very mixed service results against superior planes in the German Luftwaffe  and production of the plane was nearly scrapped by the Royal Air Force. However, with a bit of re-purposing, the Typhoon’s speed was soon coupled with increasingly-heavy bomb payloads to become an effective fighter bomber against ground targets.

In 1943, the Typhoon really came into its own when armed with wing-mounted rockets and fuel tanks providing greater flight range. While of questionable effectiveness against tough-armored German tanks, a run from a squadron of  Typhoons with rockets firing struck fear into German forces and devastated supply lines and production facilities in Western Europe. The Typhoon’s role in D-Day, Operation Goodwood, Operation Varsity and other engagements was both disruptive and deadly in support of ground campaigns all the way to the war’s end.

fowtyphoon

Flames of War offers a model of the Typhoon as well as a short online guide to painting their model. With my British ground forces fairly well built out with artillery, tanks, infantry and support weapons, adding some air support seemed to be the next natural step as well as another interesting modelling project.

IMG_3206

I picked up my model online at a slight discount online and went straight to work. I painted the plane in a RAF grey and green camouflage pattern with yellow details to the nose and leading wing edges. Next, I added black and white “invasion stripes” which had been used on Typhoons since earlier in the war, although my plane was going to be flying over late war Normandy. The decals included with the kit finished off the plane with “V” markings, subtly allowing me to add my own initial to my completed plane. Finally, a little watery rusty brown wash brushed along the seams in the fuselage added a weathered look of many previously-flown missions.

IMG_3207

With my existing American P-47 Thunderbolt, having the Typhoon in my miniature Allied arsenal is sure to add more depth and choice to my Late War Western Europe gaming. With the Typhoon hitting the table in the near future, my hope is its presence above the battlefield will rain rocket-fueled terror and distraction on my German opponents just as they did over Europe some 70 years ago.