Flames of War: Utah Beach “Uncle Red” 1944 Scenario

utah1944

When most people think of the D-Day invasion at Normandy on June 6th, 1944, the deadly images from the US landings at Omaha Beach in popular movies like The Longest Day or Saving Private Ryan generally come to mind. Utah Beach was added as an objective for US forces late in the invasion planning and occupied the far right of the Allied coastal assault. The beach was divided into three sectors (Tare Green, Uncle Red and Victor), and the landing of some 23,000 troops and armor support started the day’s invasion at 6:30am. Awaiting the invasion was the German 709th Infantry Division.

utahmap2Map of US 4th Infantry Division at Utah Beach June 6, 1944 (“Uncle Red” circled)

The US 4th Infantry Division at Utah Beach, including Gen. Theodore Roosevelt Jr. and author J.D. Salinger, came ashore with relatively few US casualties of just 400 compared to the 3000 at nearby Omaha Beach. The success of the assualt is credited largely to the effective landing of more Sherman tank support, relatively light German fortifications covering the exits from the beach and early inland actions by the 101st and 82nd Airborne Divisions earlier in the morning.

ussandtable

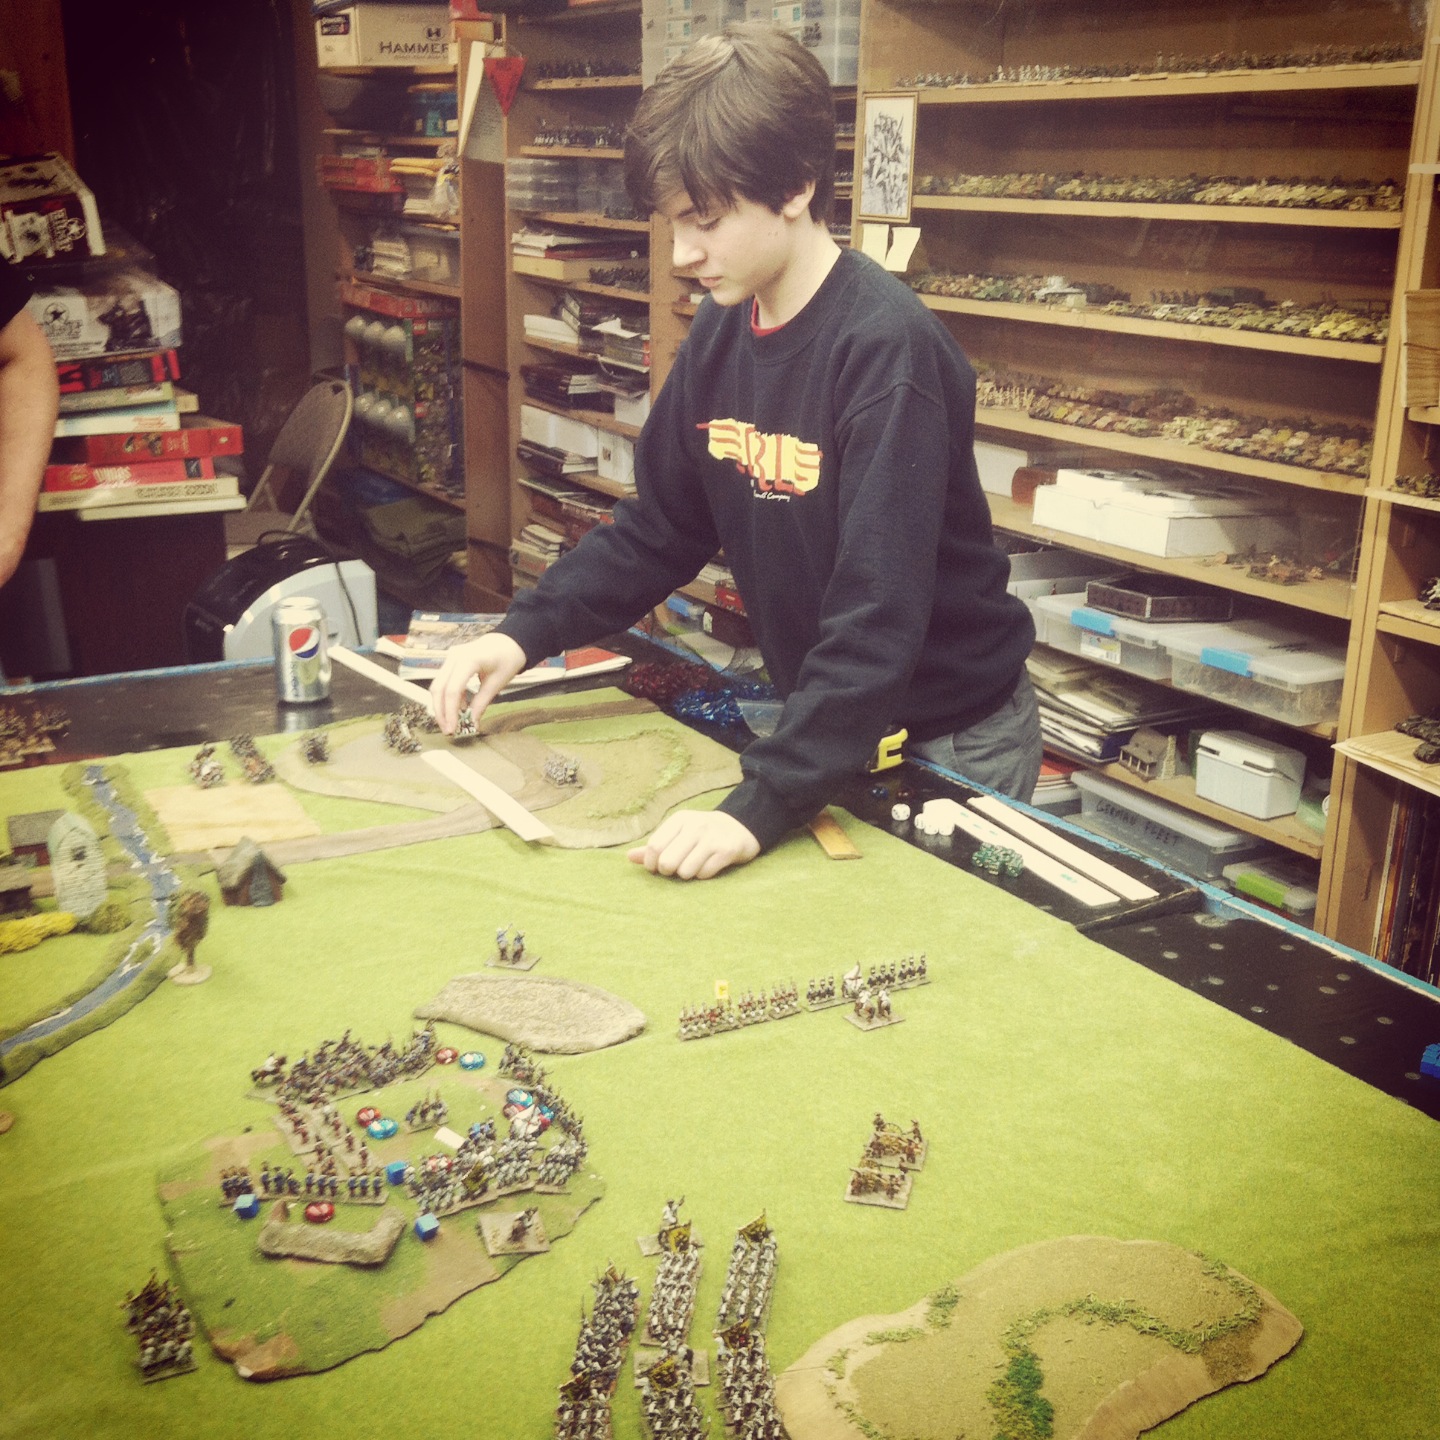
US 17th Airborne Division using a sand table before Operation Varsity in 1945

 Metropolitan Wargamers in Brooklyn, NY is pretty well known for the sand tables which occupy our space, and some of our founding members have won several awards for presenting sand table games at conventions over the years. Sand tables have been used by military planners since ancient times when sticks and stones were simply laid out in the sand on the ground.

modern sand table

NY Army National Guard troops train with a sand table at Fort Irwin, CA in 2011

Despite all our military technological advancements, modern war colleges and even troops deployed in the field today still use sand tables for training and planning real-world actions. Gaming on a sand table provides a great amount of flexibility and realism in shaping the contours found in real-life battlefields, adding tremendous playability to just about any scenario.

Hitthebeachmap
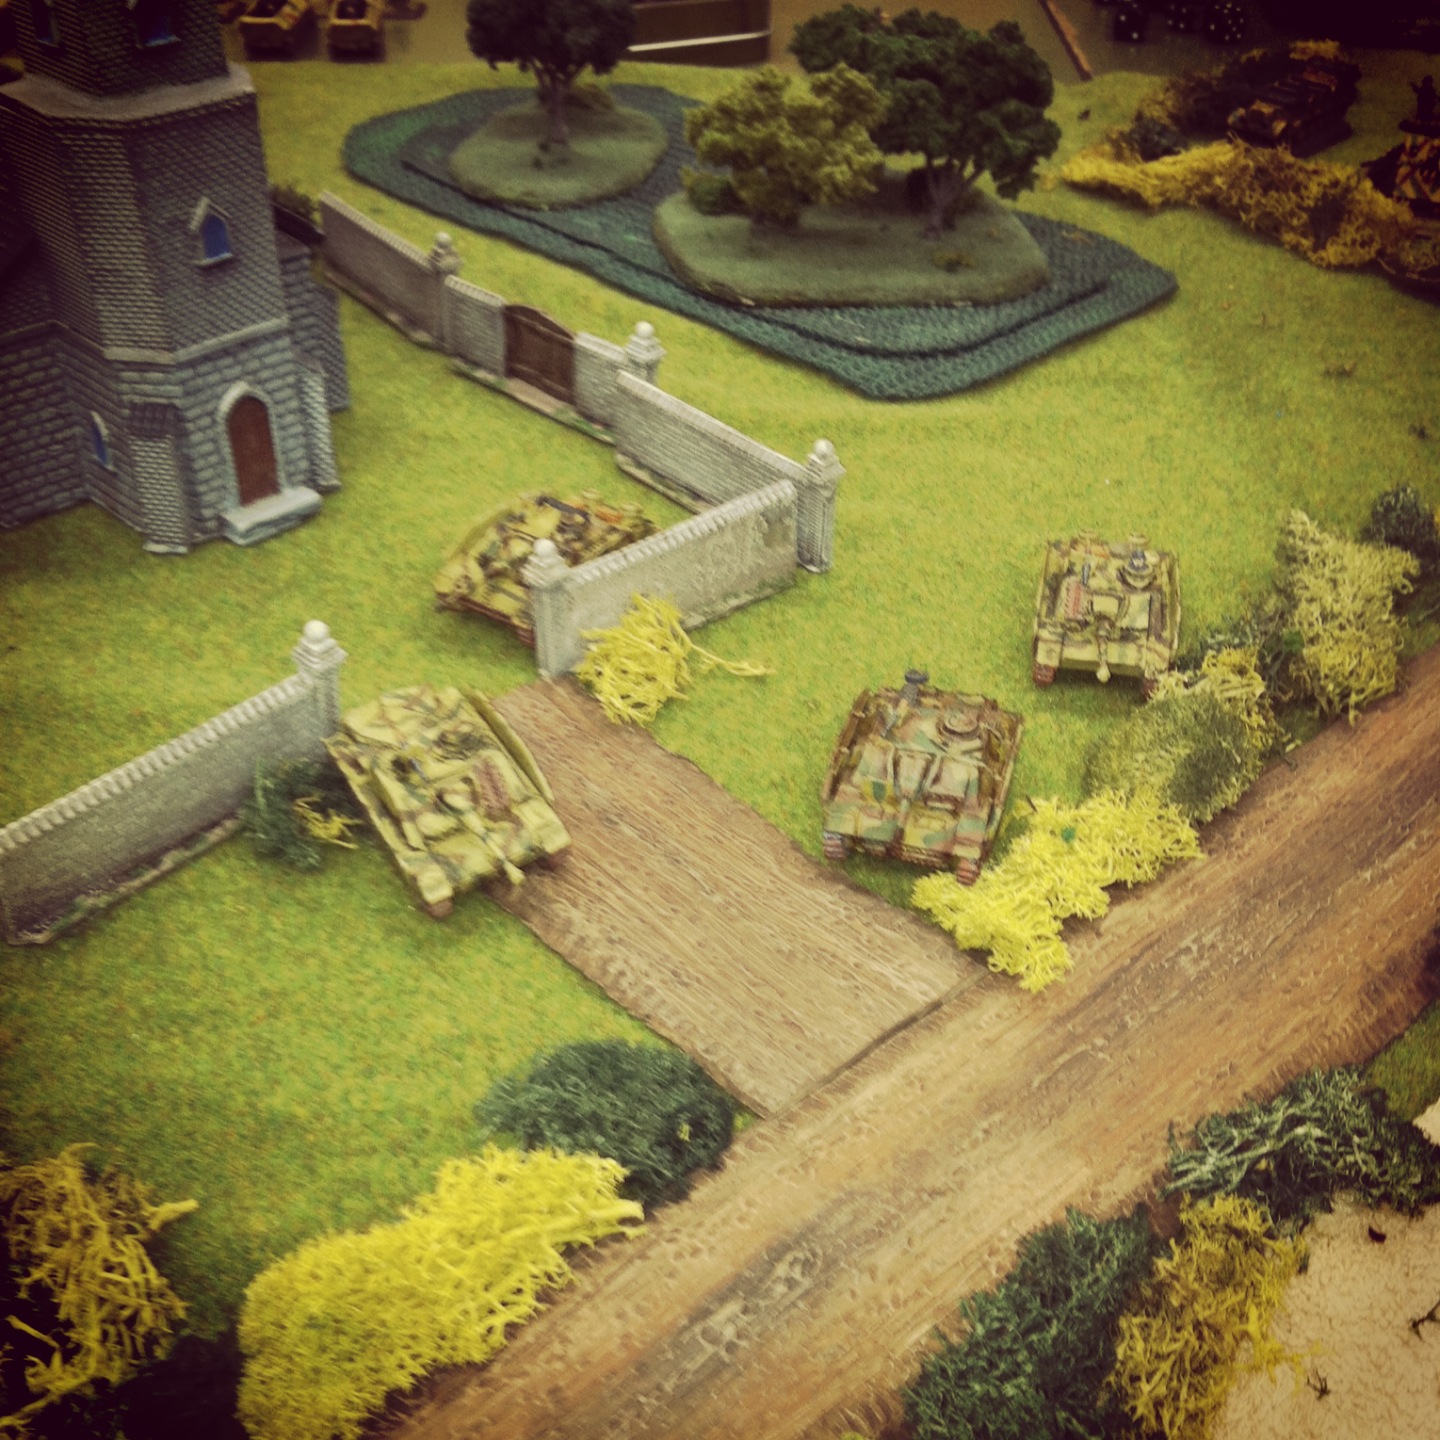
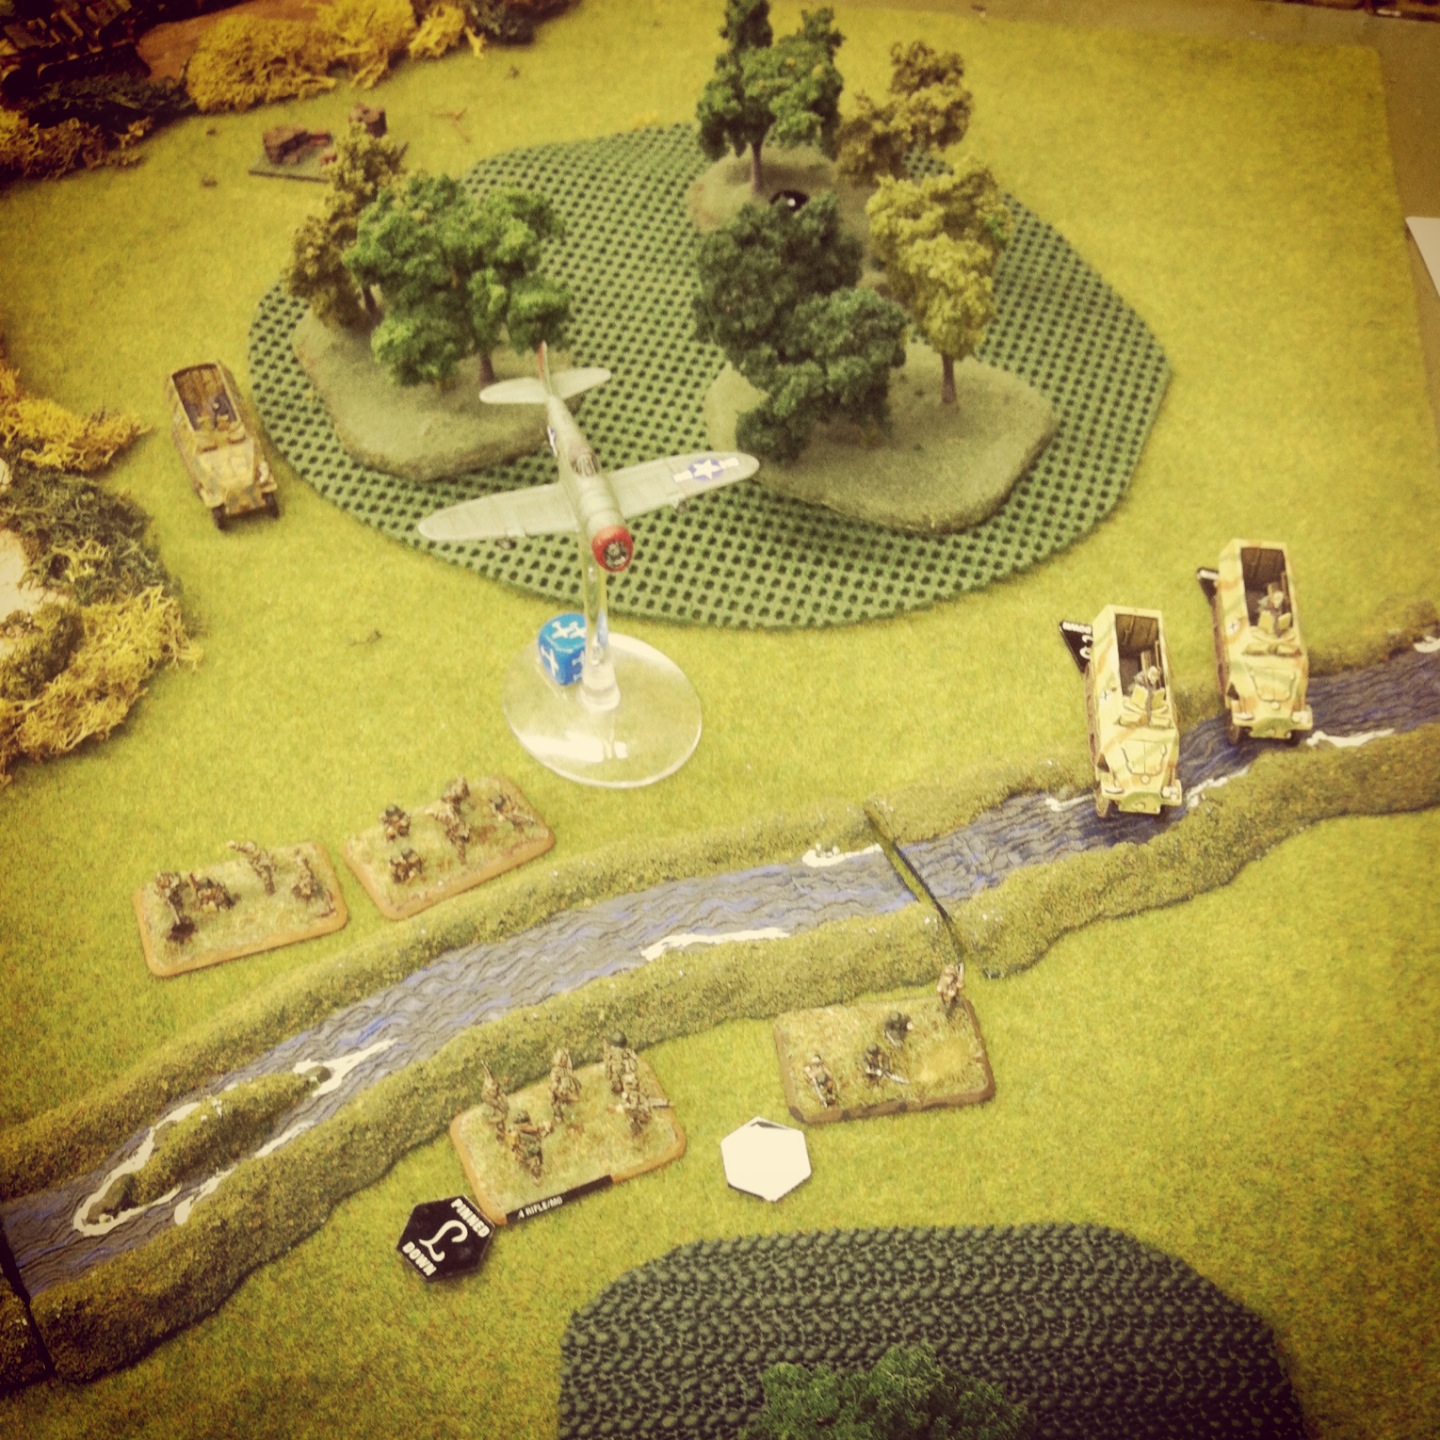
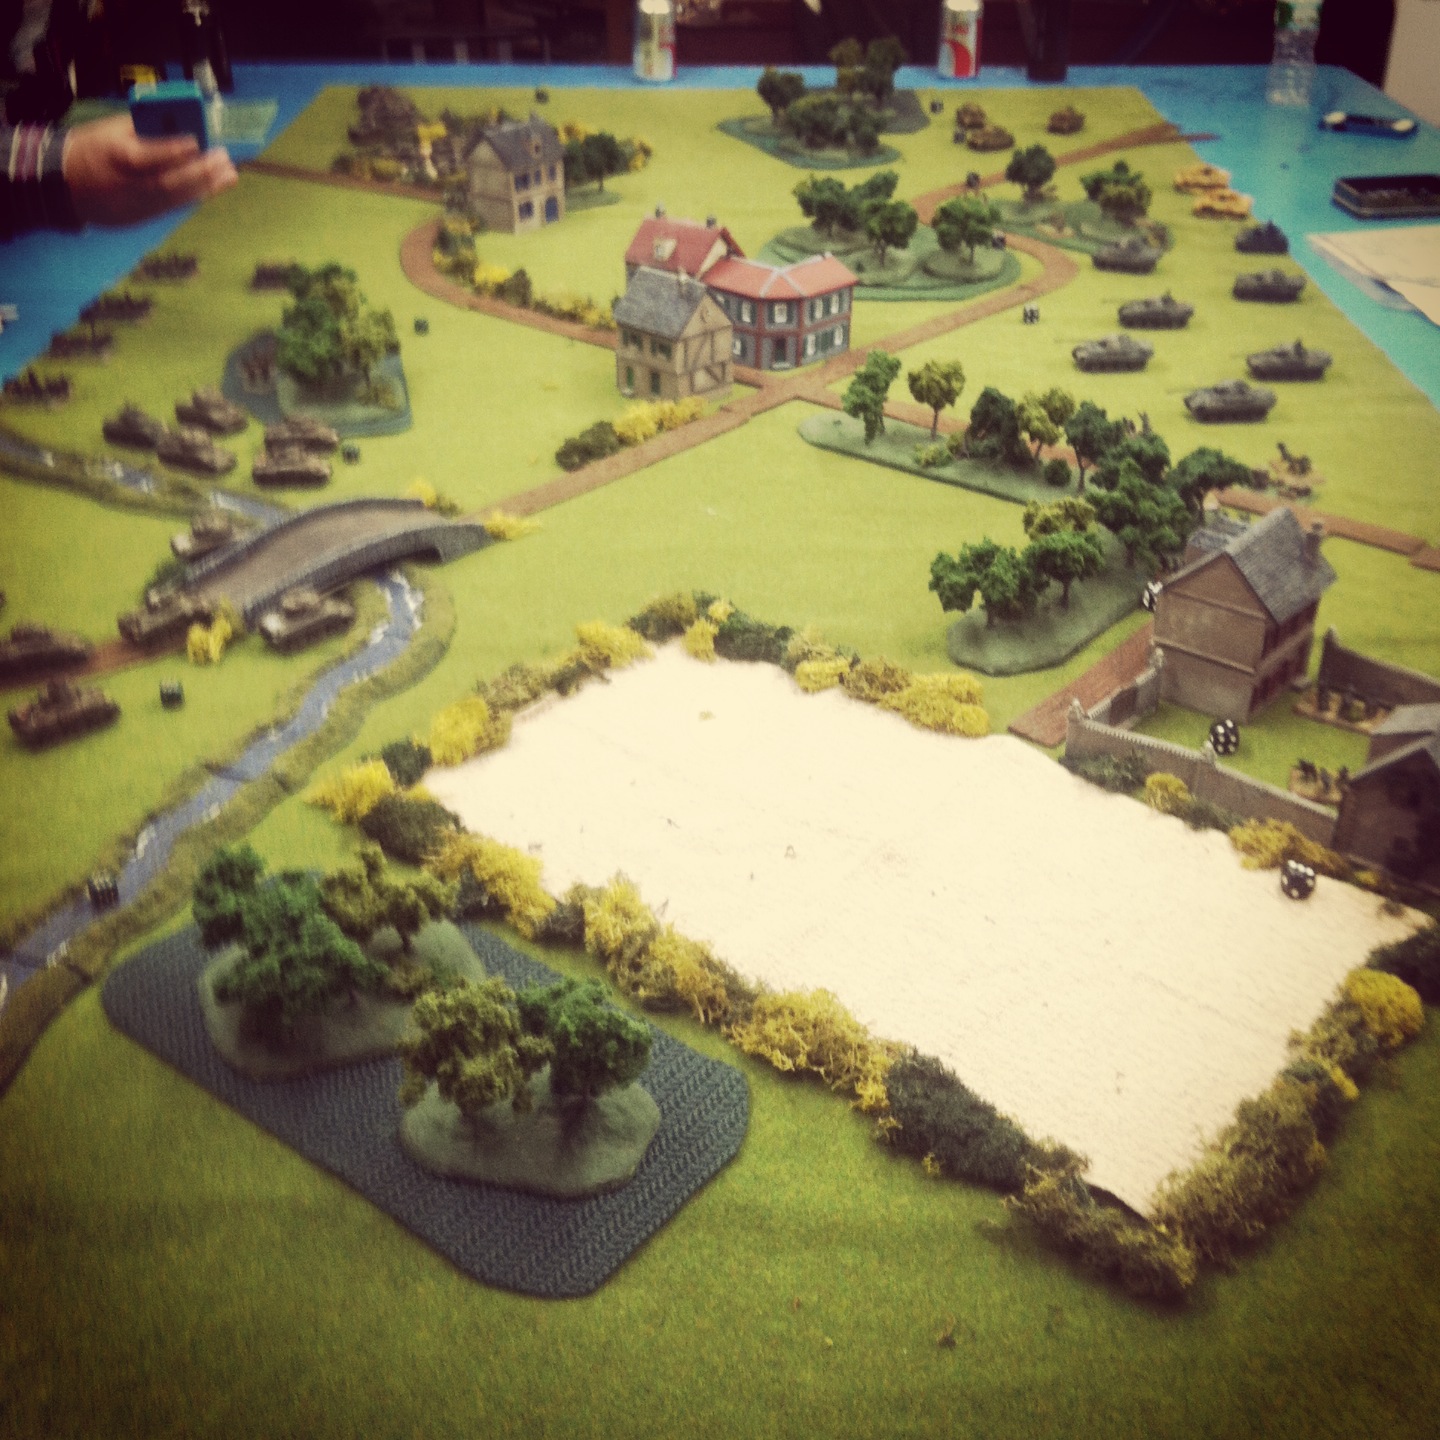
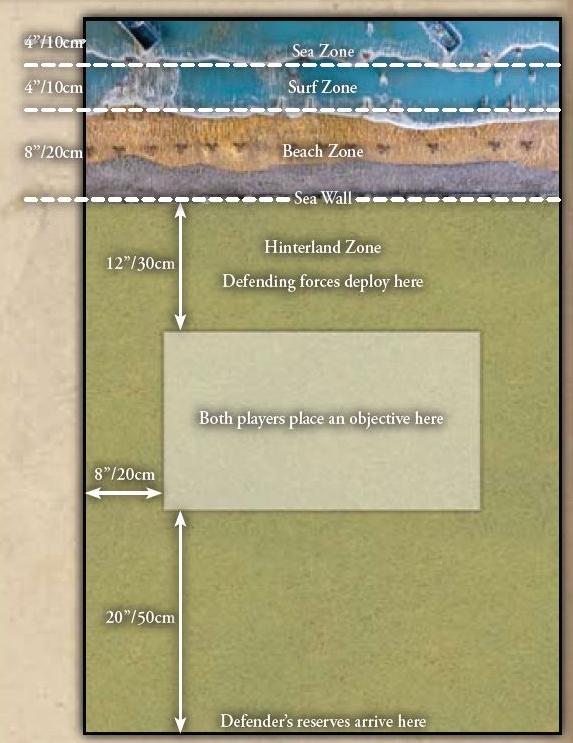
Flames of War “Hit the Beach” scenario set-up

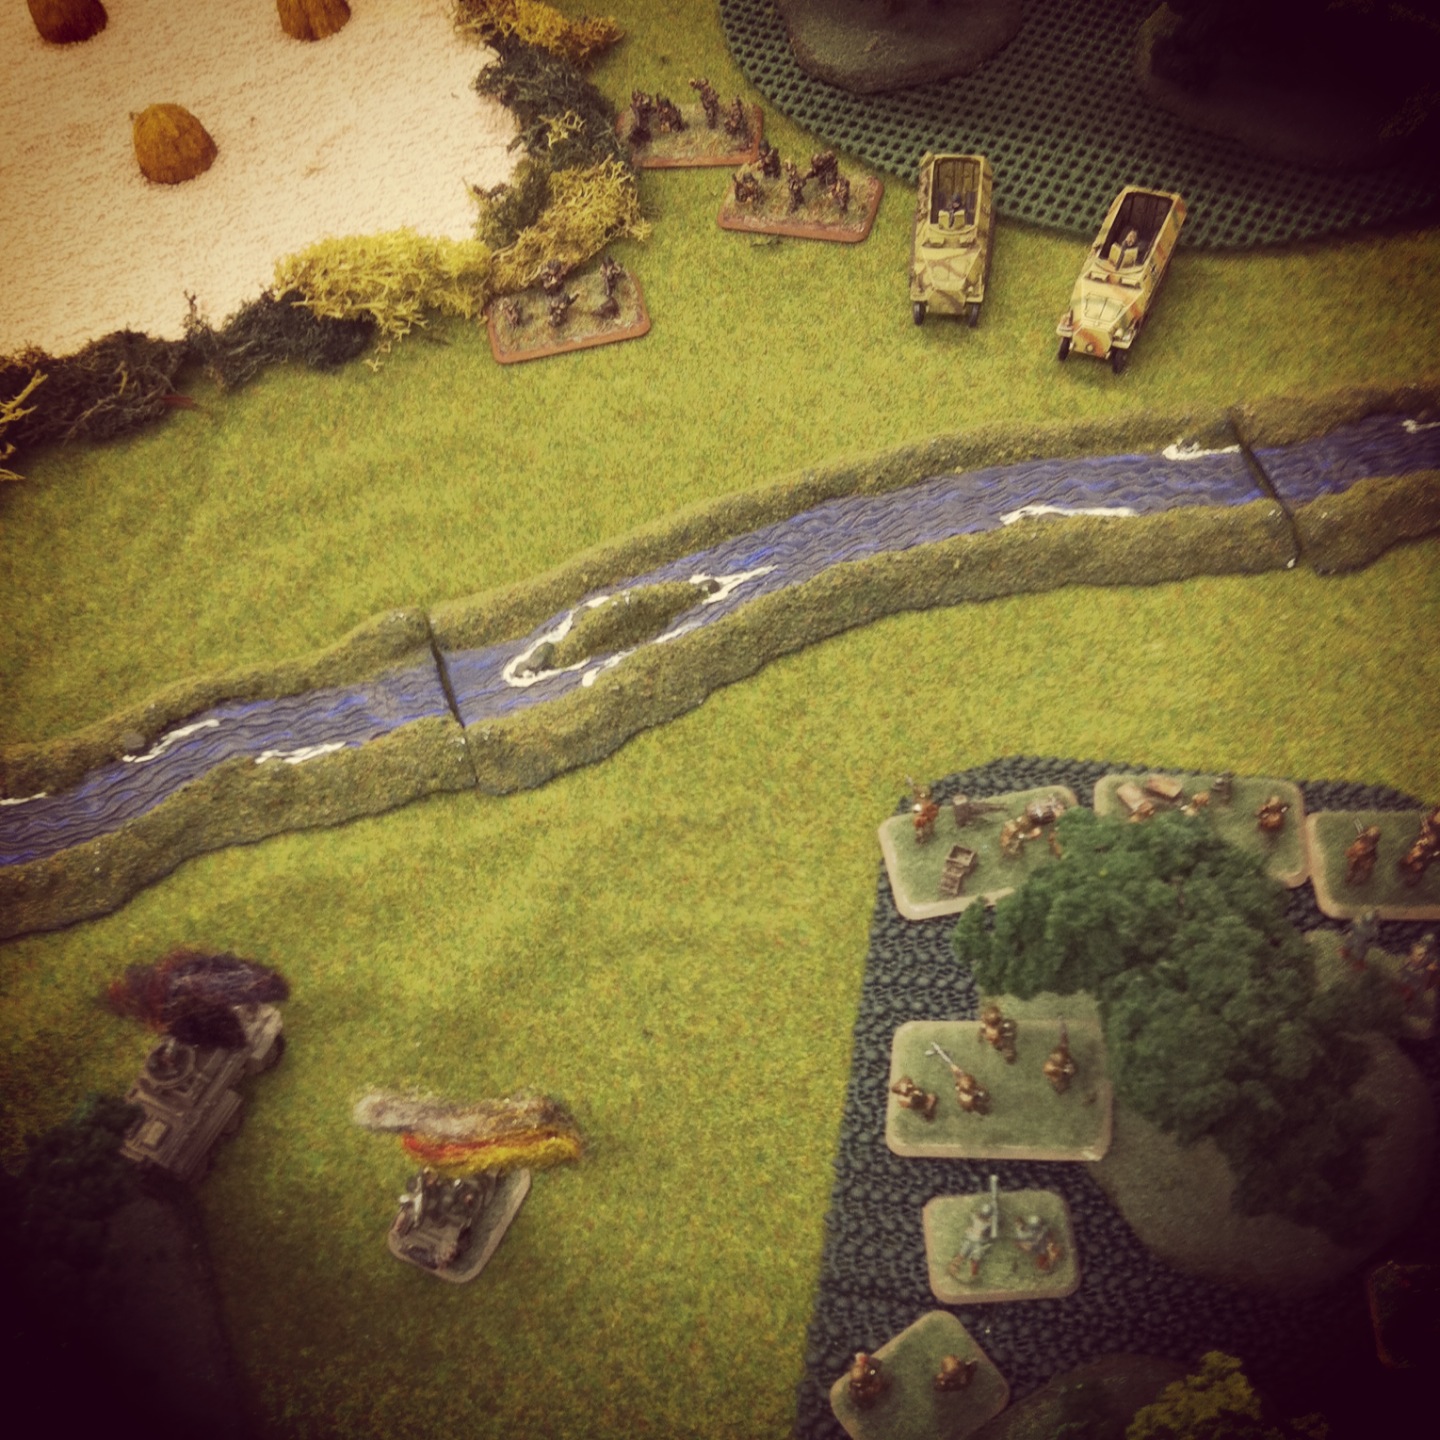
This past weekend a few of us ran an Uncle Red beach assault scenario on one of the club’s sand tables using the Flames of War Amphibious Assault rules and ‘Hit the Beach’ scenario.The 4′ x 5′ table I set up featured a sculpted surf landing zone, sea wall and two beach exits leading to an inland area. Each player placed an objective. The German player then deployed their coastal defenses at the beach including barbed wire, two bunkers, tobruk machine gun nests and a Grenadier platoon. At the rear of the table, the Germans deployed an artillery battery and another machine gun platoon in a nearby house defending their objective. Half their 1500-point force remained off the table in reserve.

IMG_2813
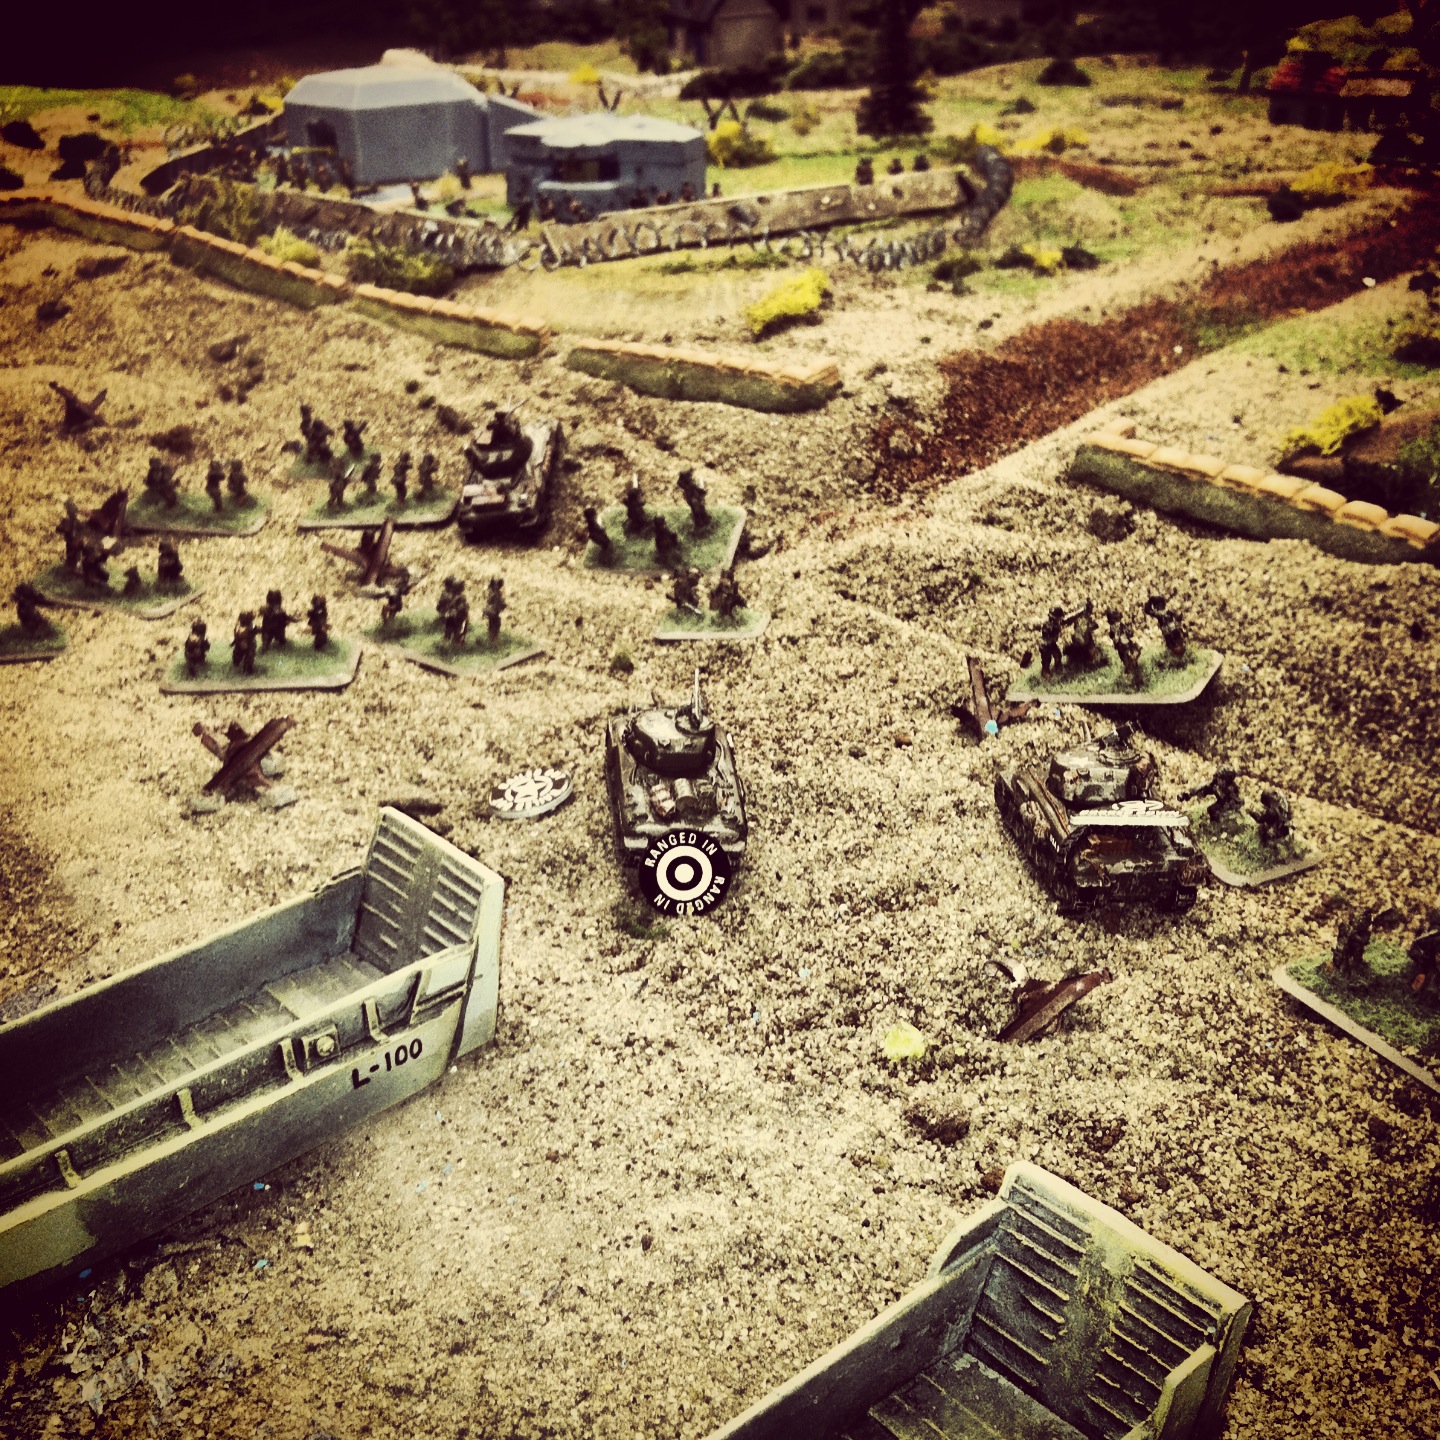
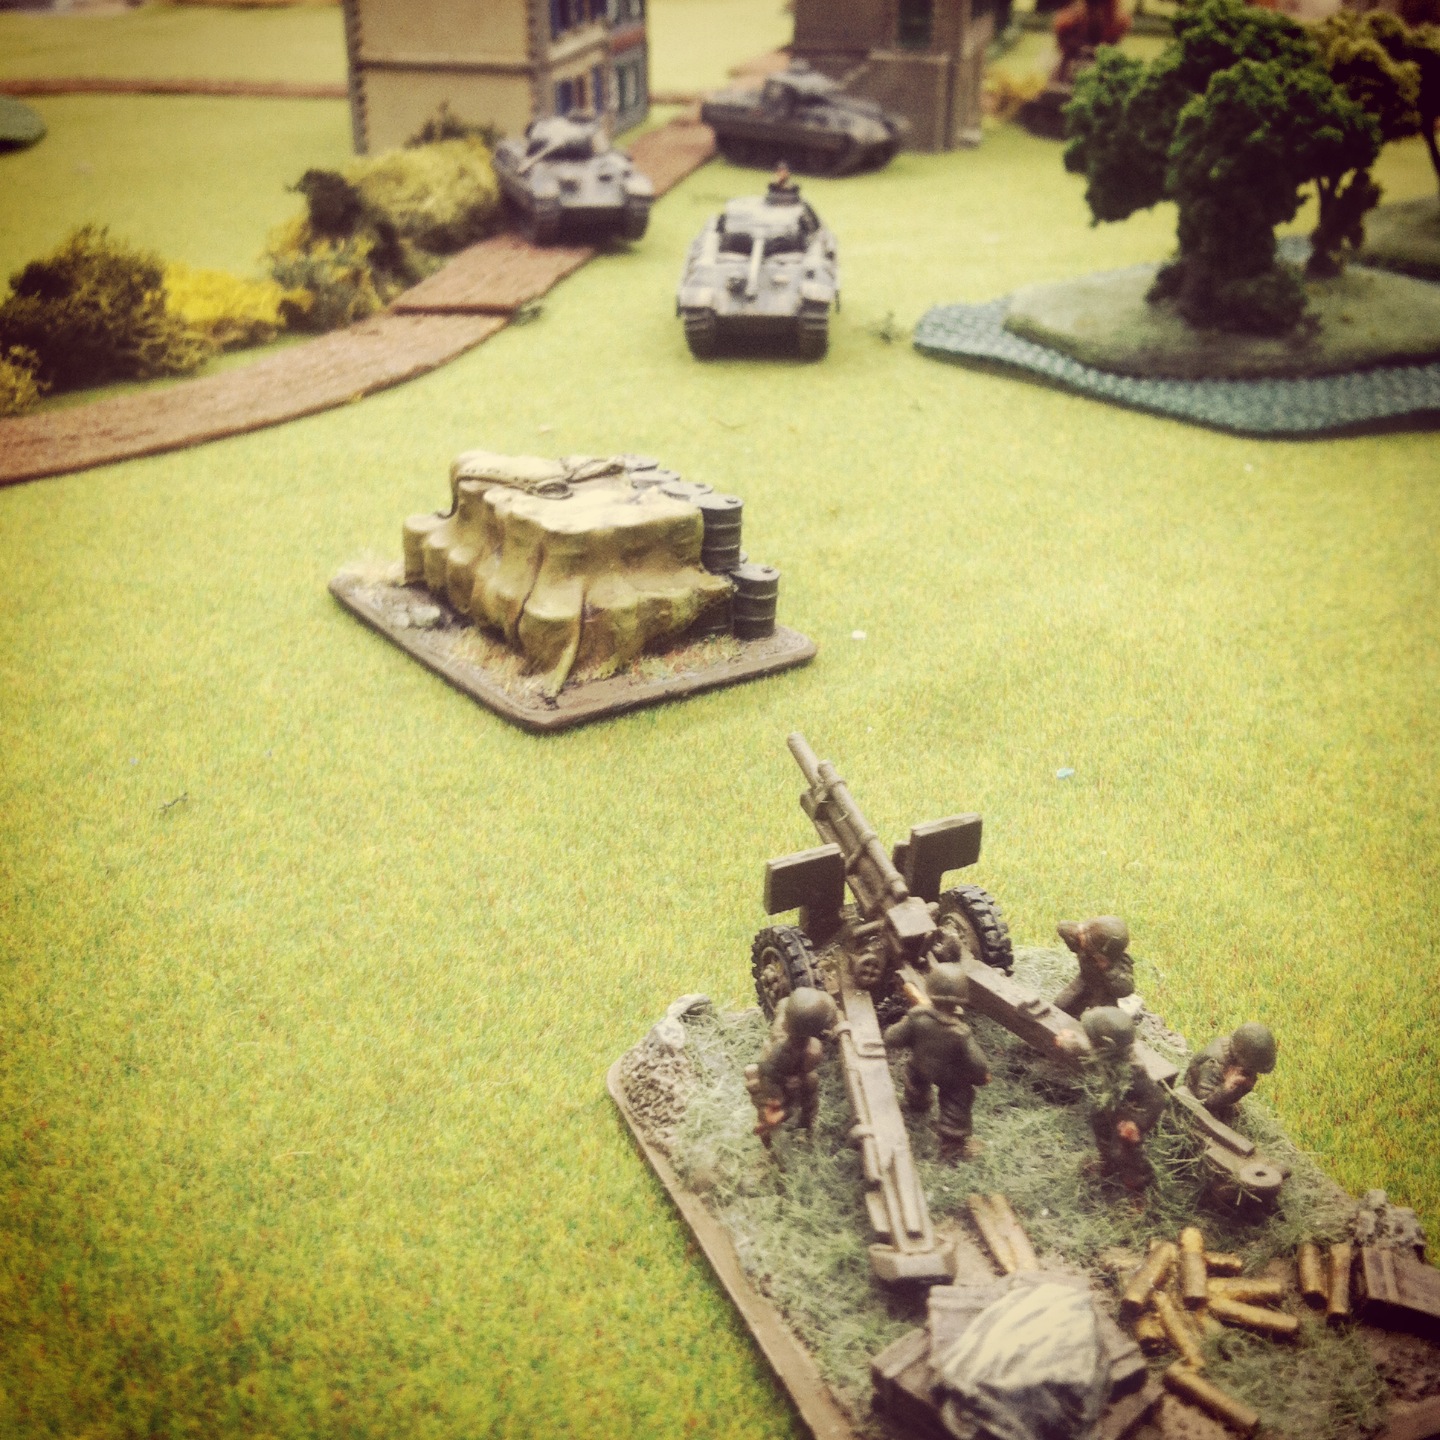
The US landing begins against the fortified coast and German artillery at the rear

The Americans began with a naval gun barrage pinning every German platoon but only detsroying one stand at the beach. With the first turn, two boat assualt platoons and a pioneer platoon landed at their left and center area of the beach. Choosing to shoot rather than move at the double, the first three American platoons were quickly pinned and subsequently destroyed in the first two turns of the game.

IMG_2814
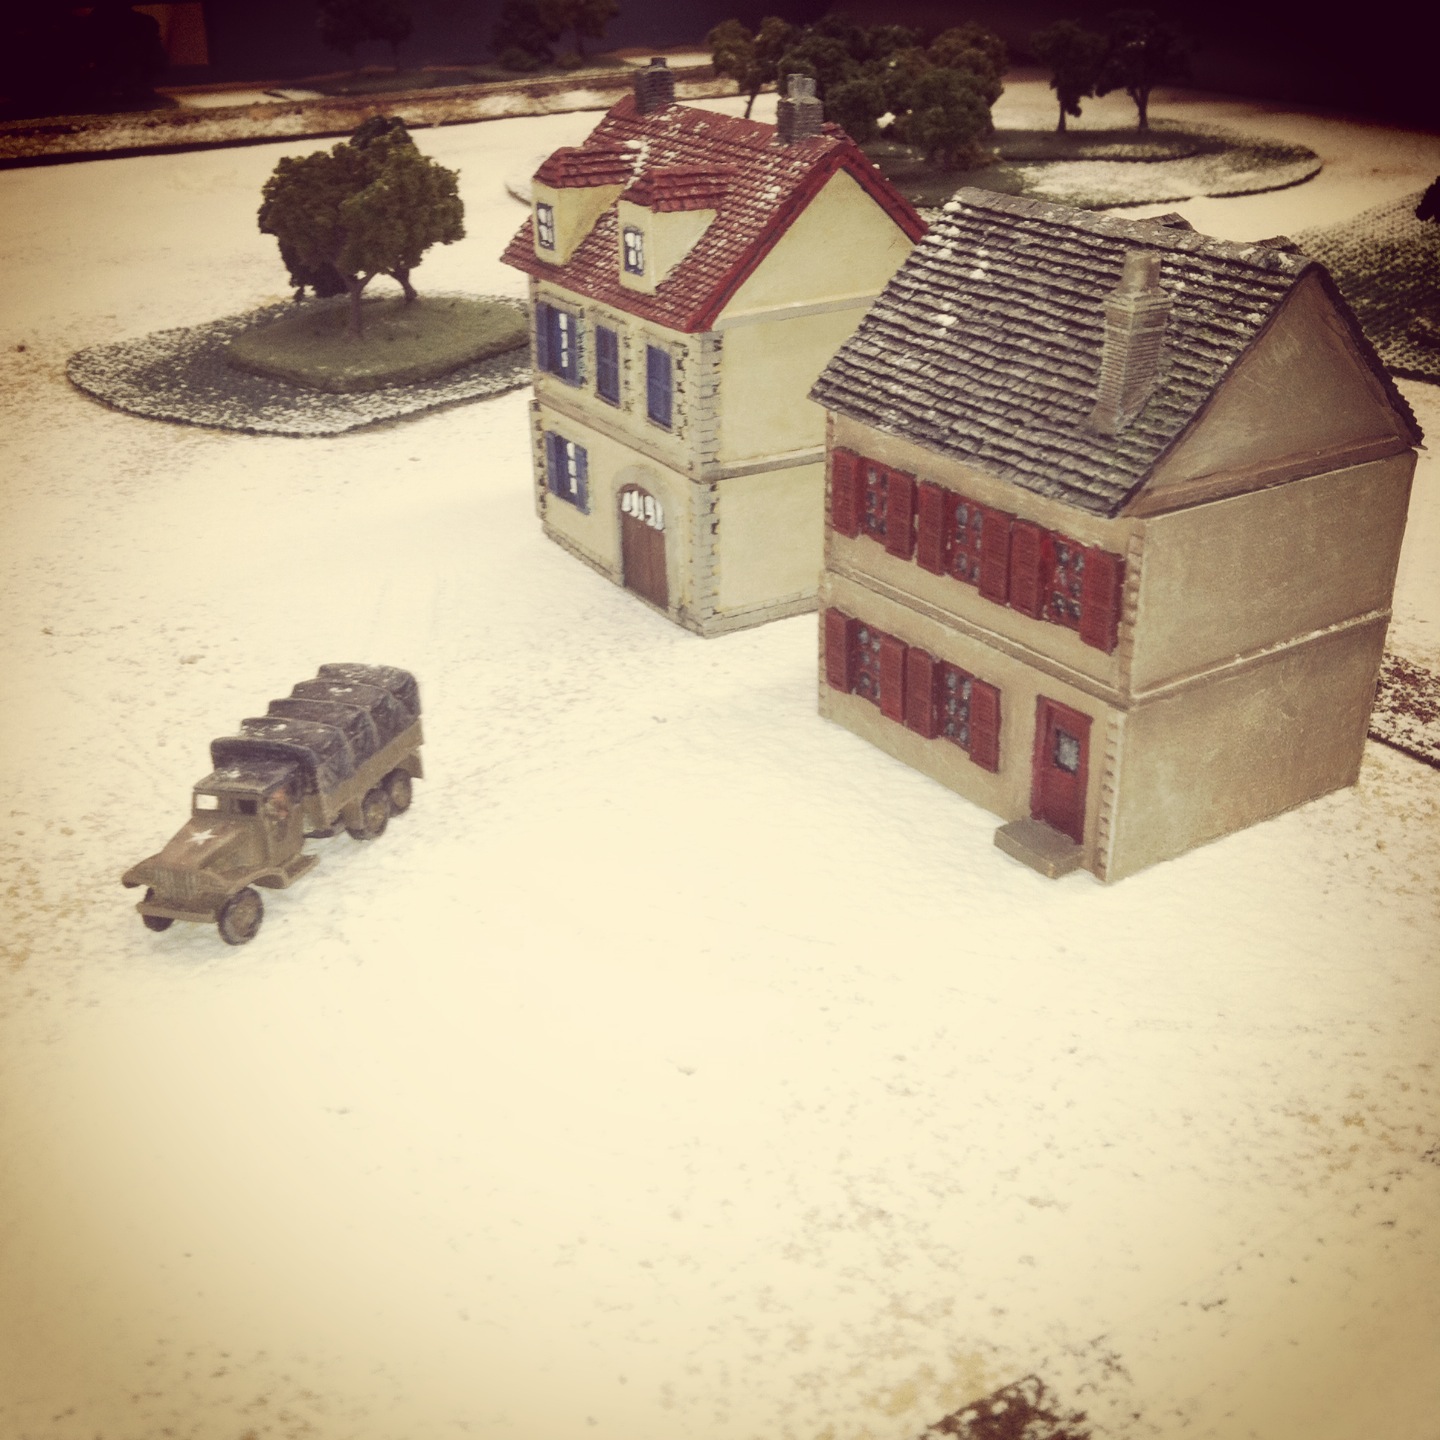
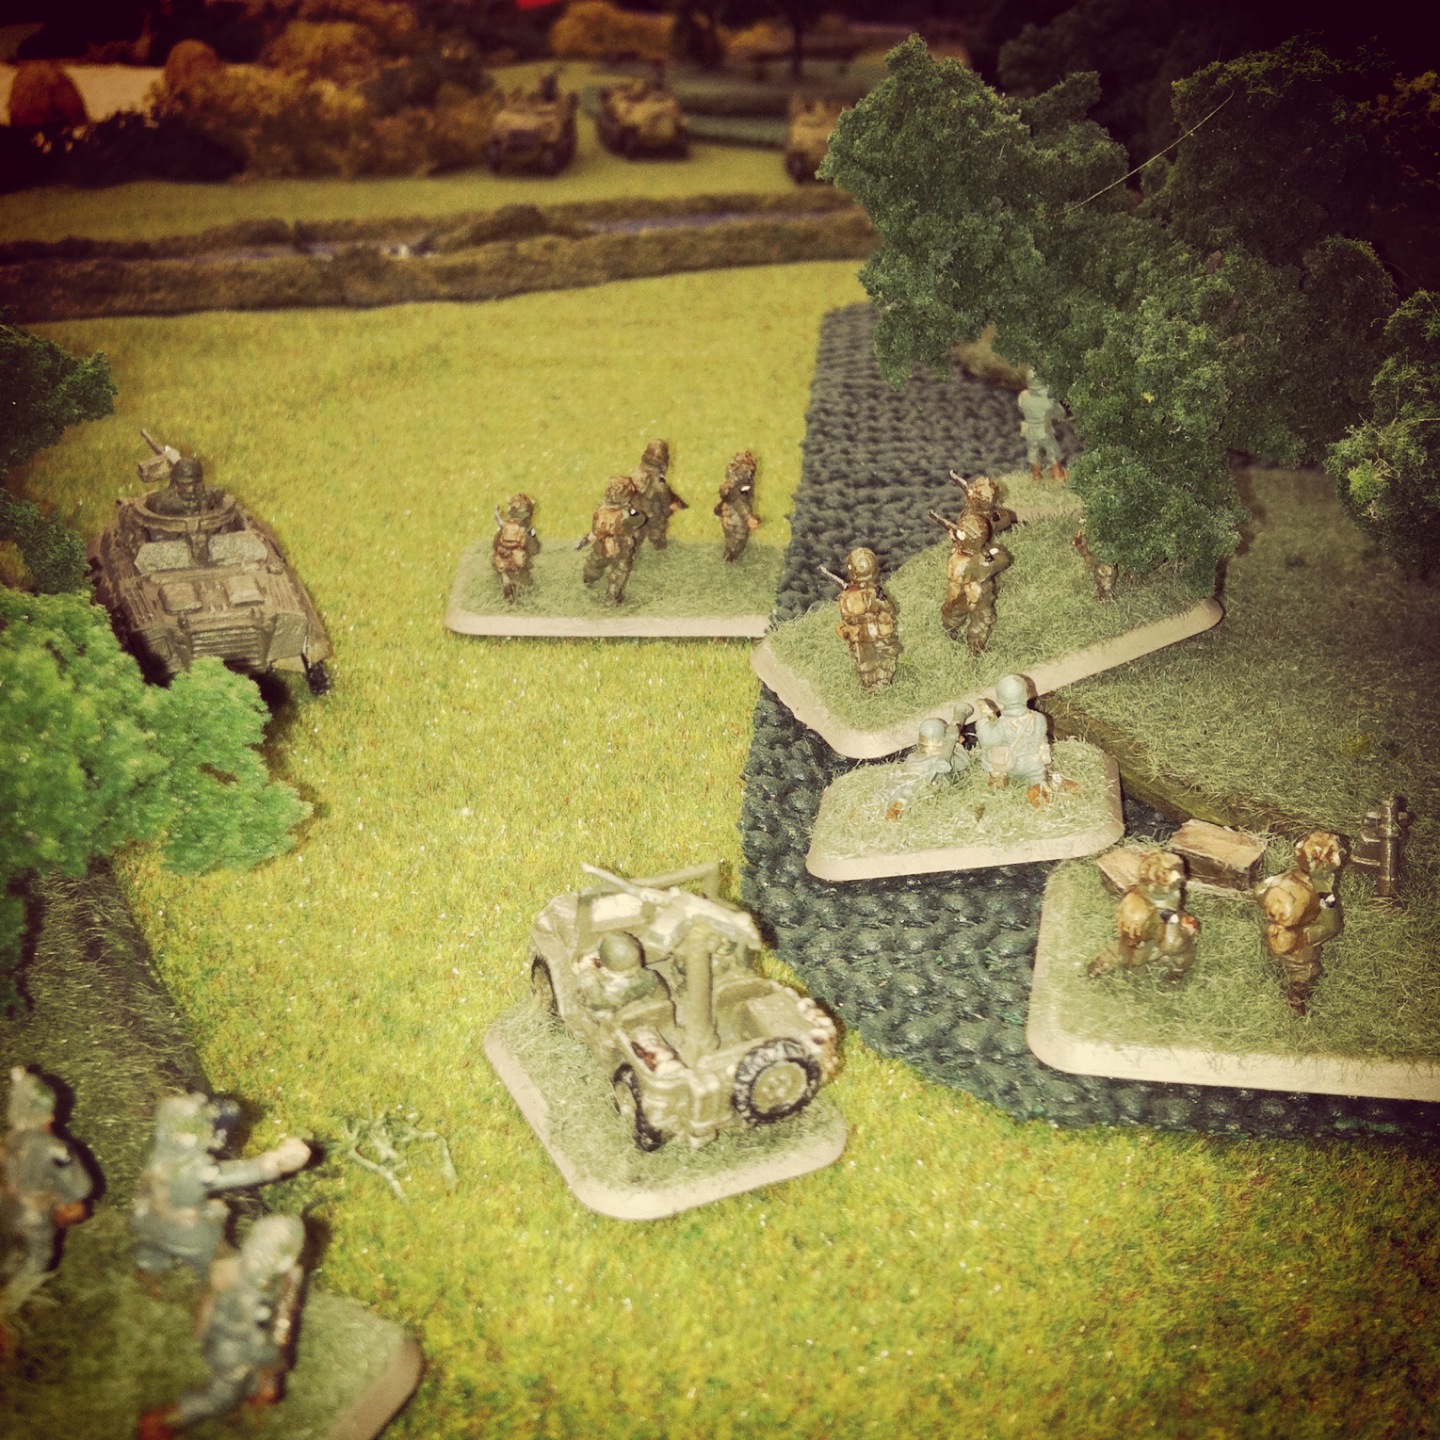
View from the German rear with Americans landing

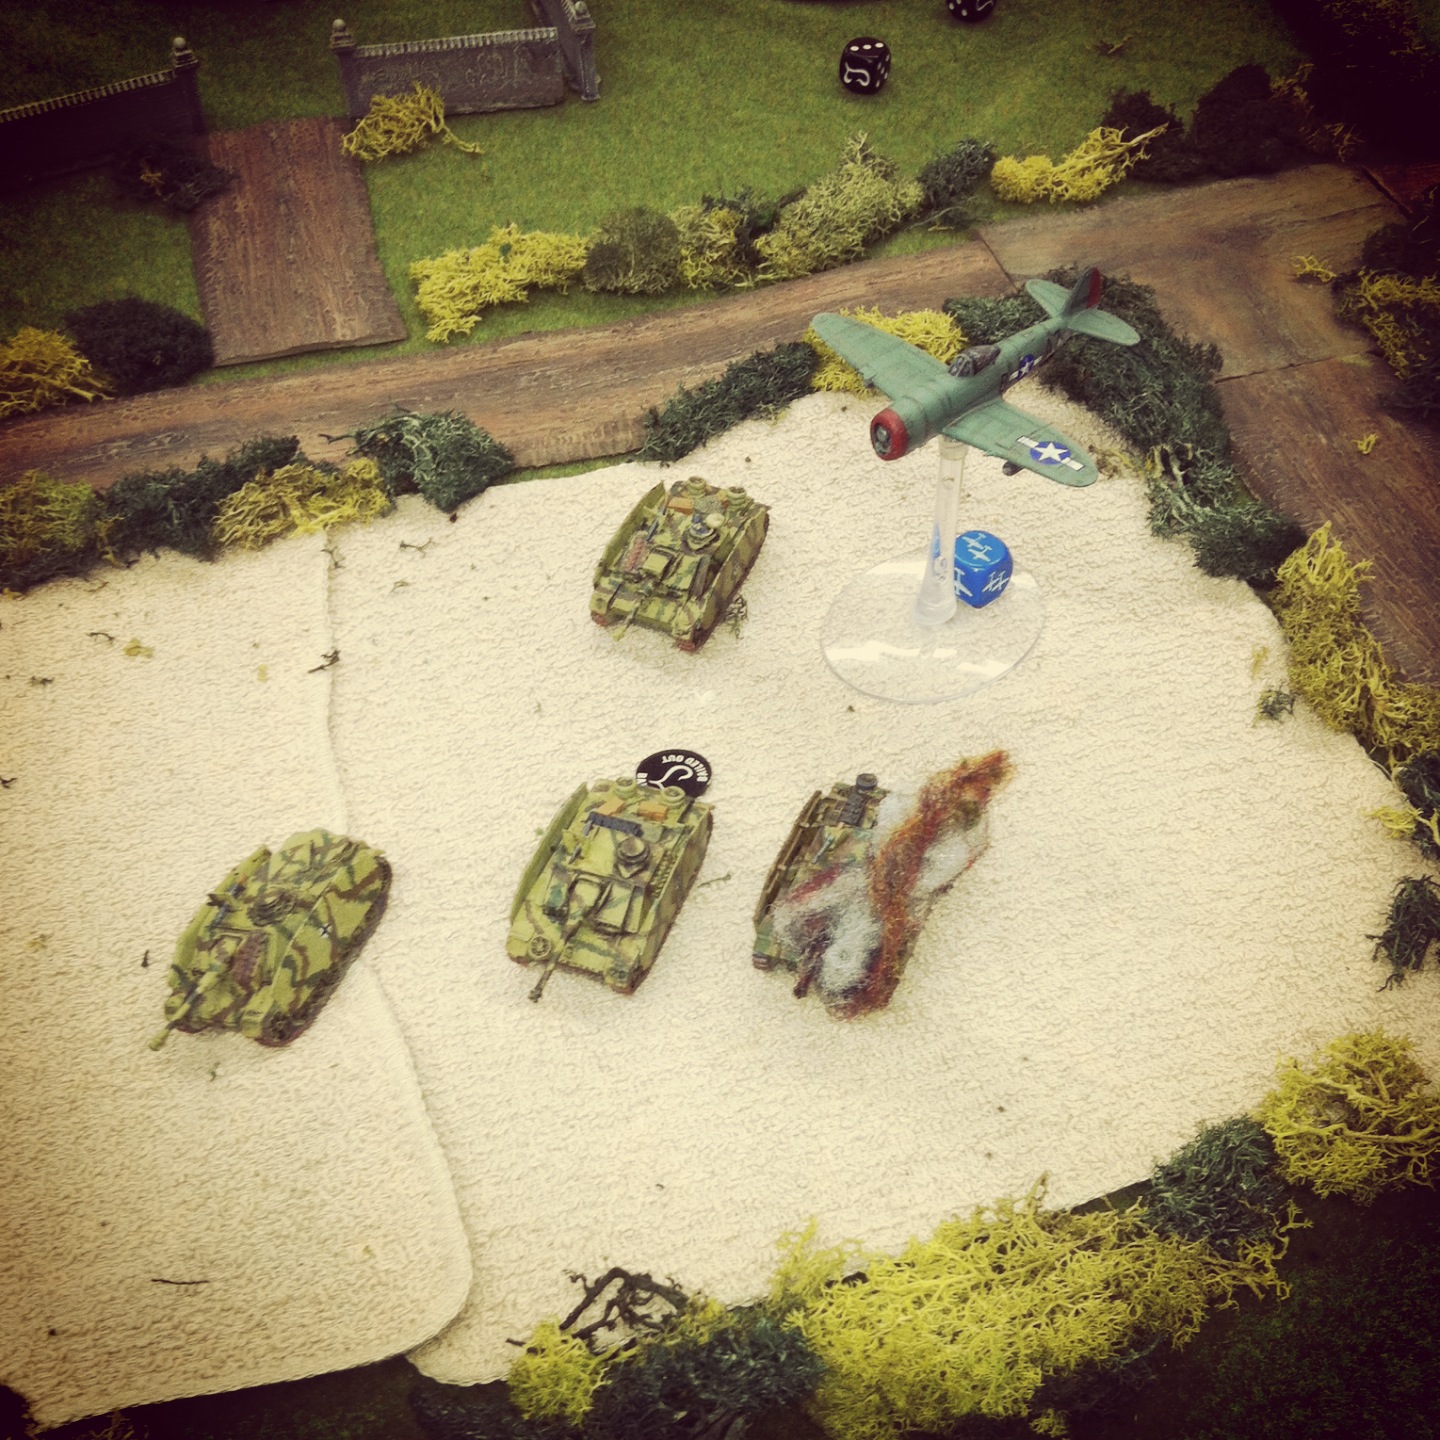
Choosing to still keep their D-Day tanks off the beach, the Americans attempted another landing in turns three with only two boats able to land. Naval guns and P-47 air support attempting to hit the rear German artillery proved completly ineffective as troops at the beach continued to be pinned and detsroyed.

IMG_2816

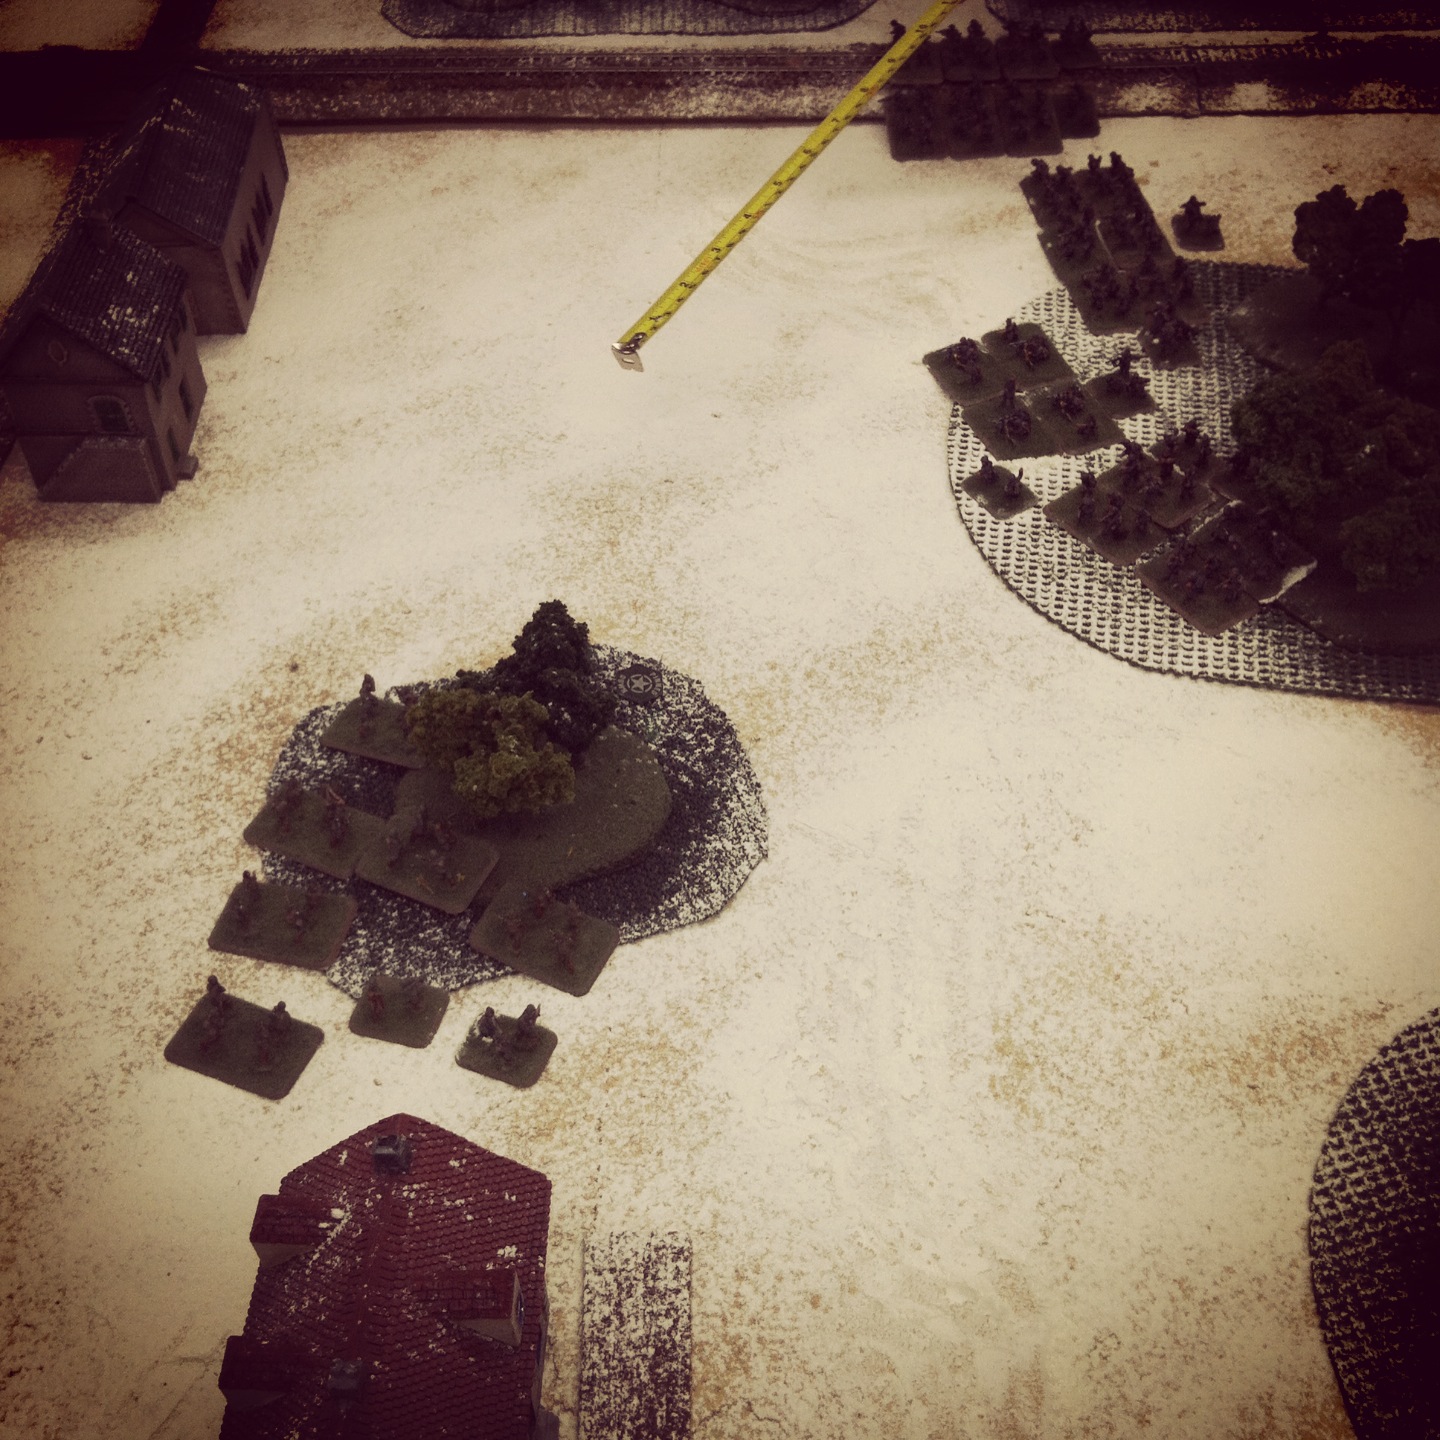
US waves struggle to get off the beach

IMG_2819

Remanants of US platoons get over the sea wall in turn four

With still more delayed landing reinforcements and no tanks heading for the beach, two US platoons breached the sea wall in turn four. Moving at the double and under heavy machine gun fire, the short-lived progress was stalled and the platoons lay pinned with heavy casualties.

IMG_2821

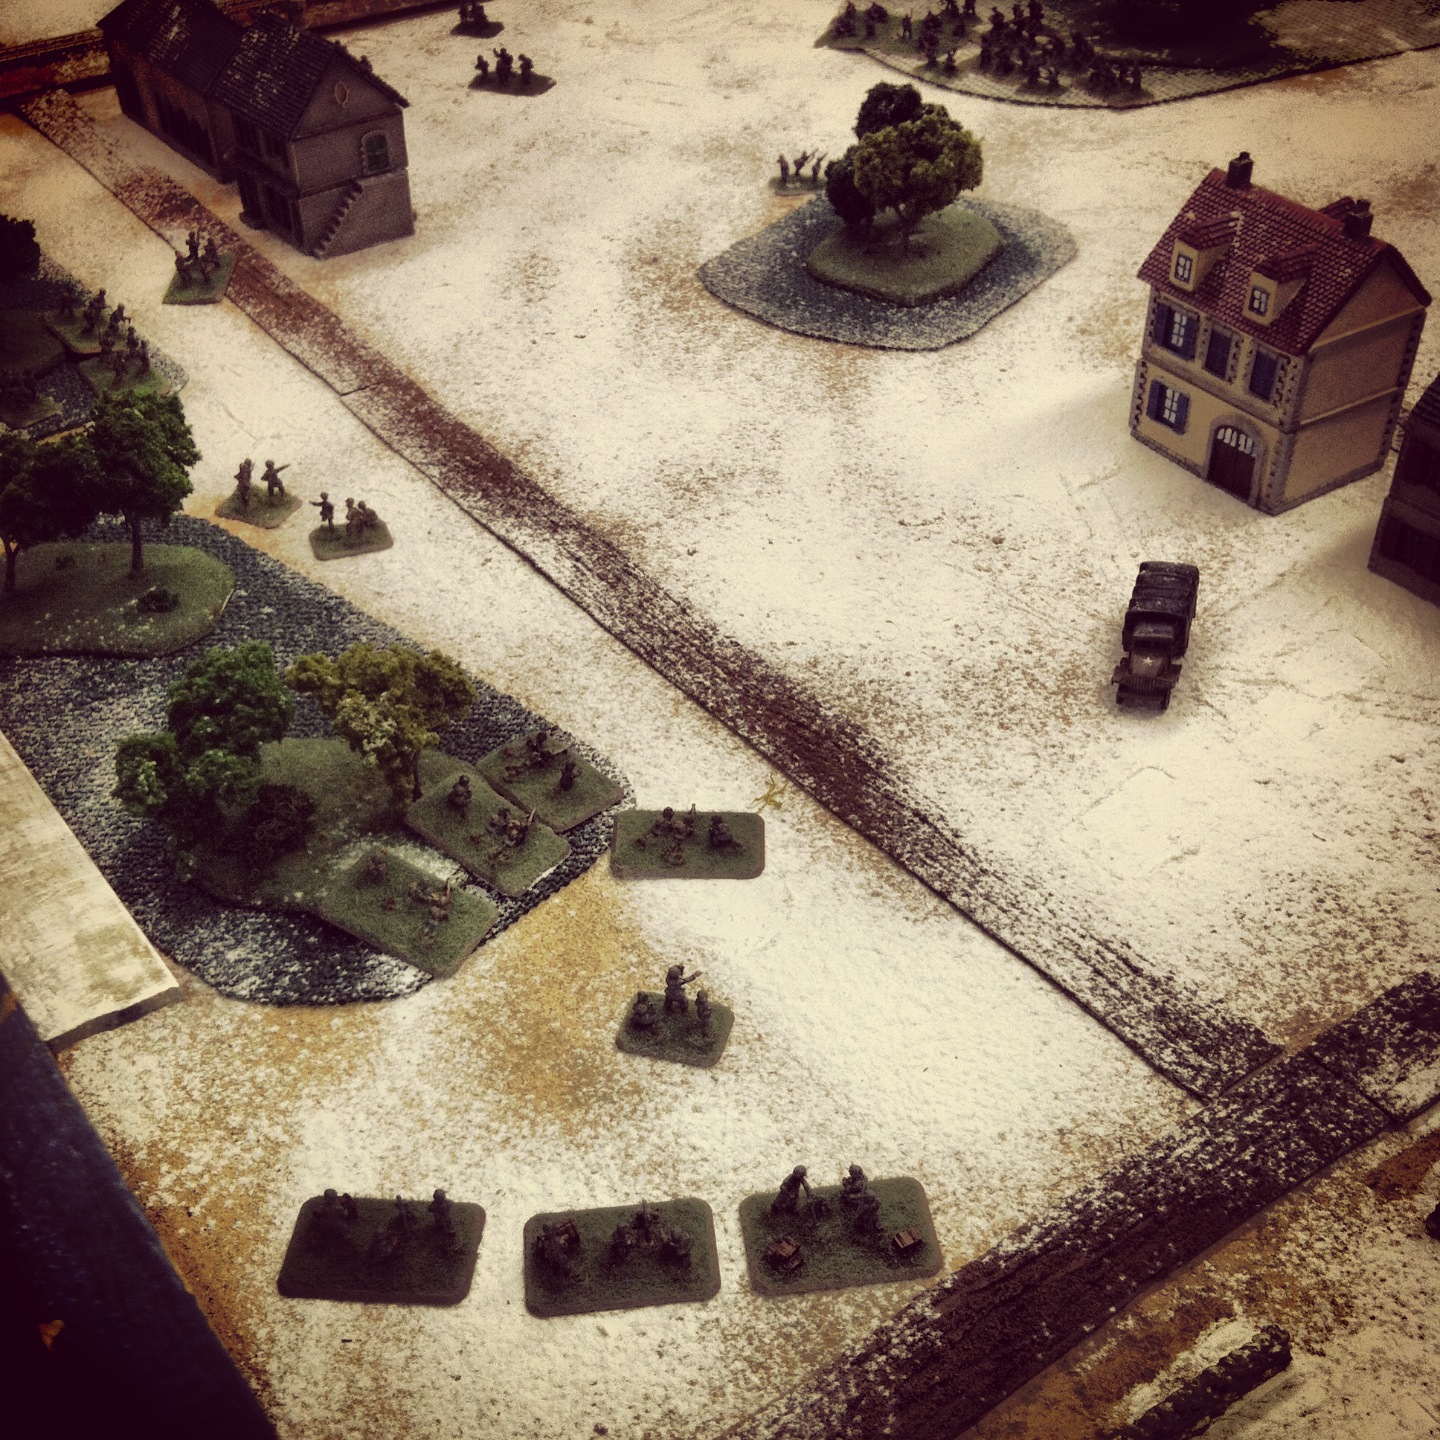
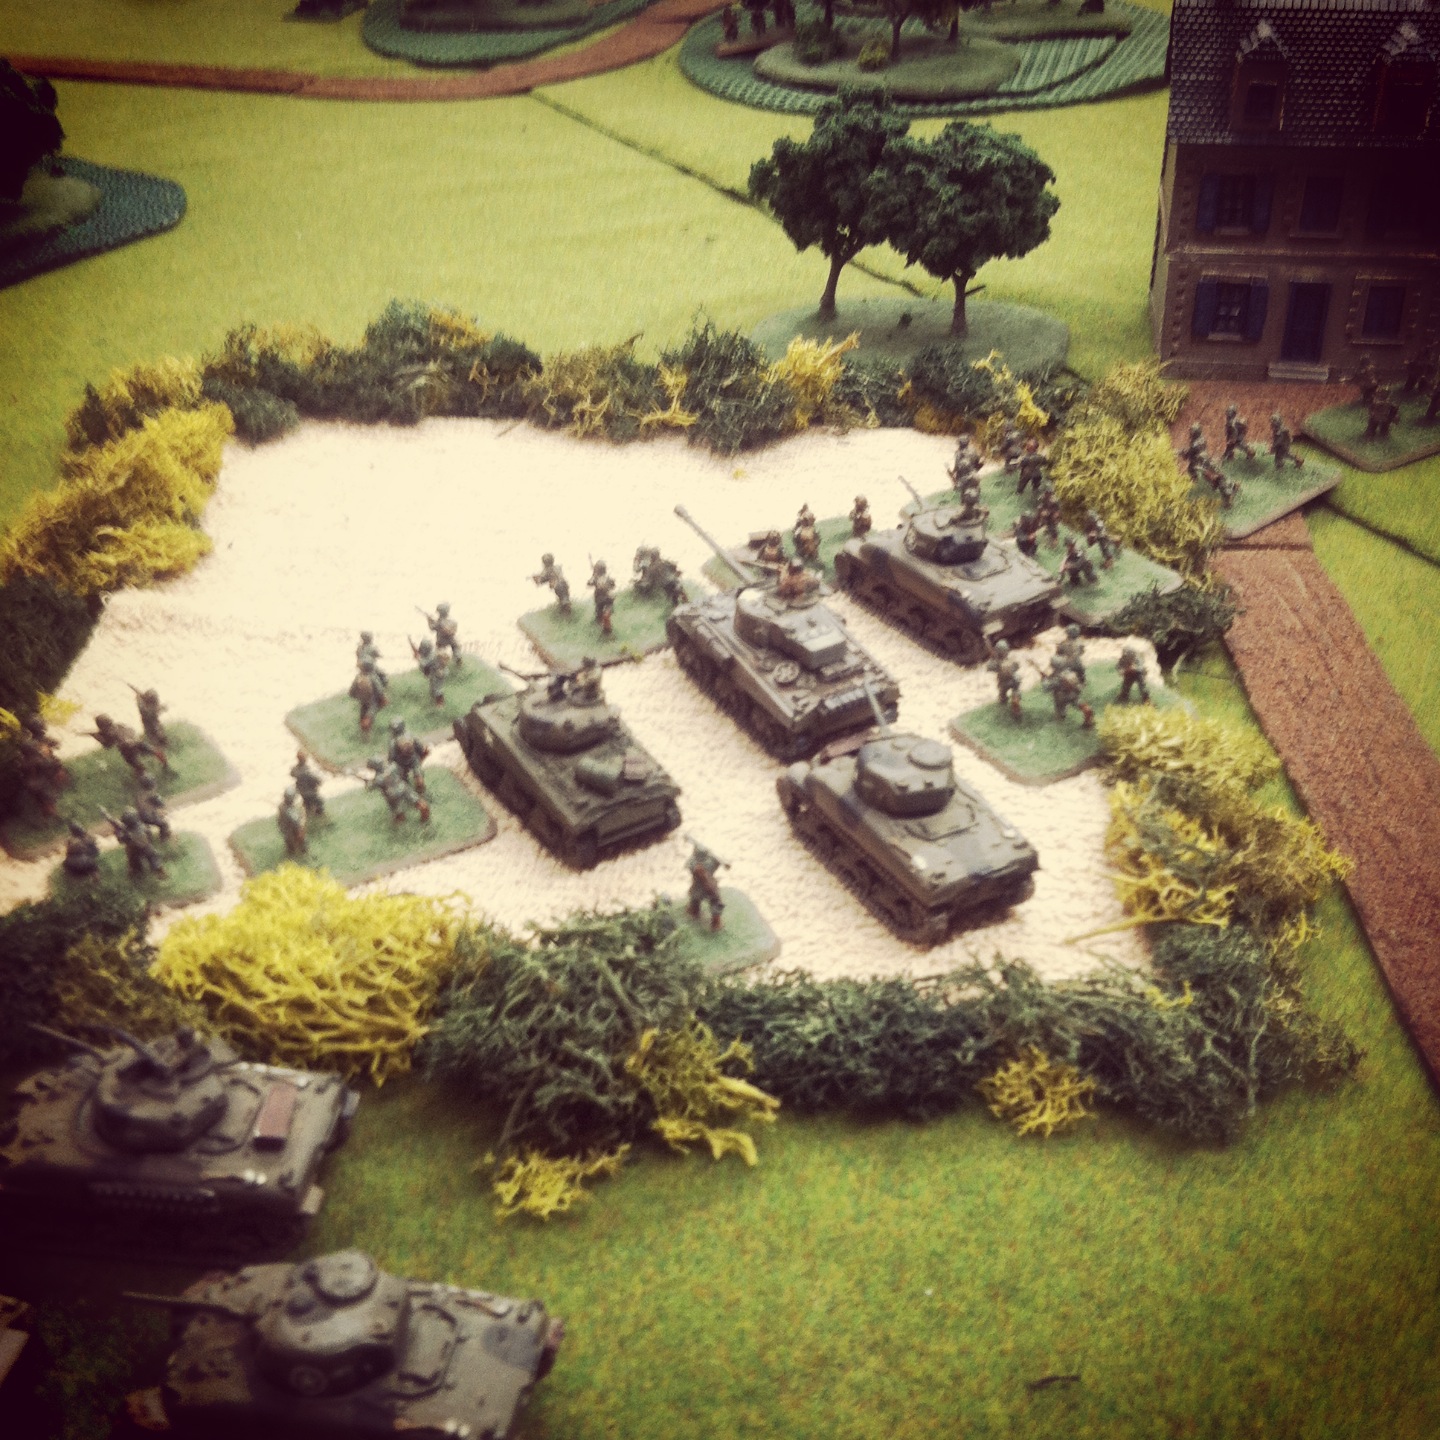
Swimming Shermans finally come ashore with more infantry

Switching tactics in turn five, the Americans went for the right side of the beach. Two boat crews hit the beach moving at the double with three Shermans coming ashore in support. Two tanks immediately bogged, creating two targets stuck on the beach for the next round of incoming German artillery.

IMG_2822

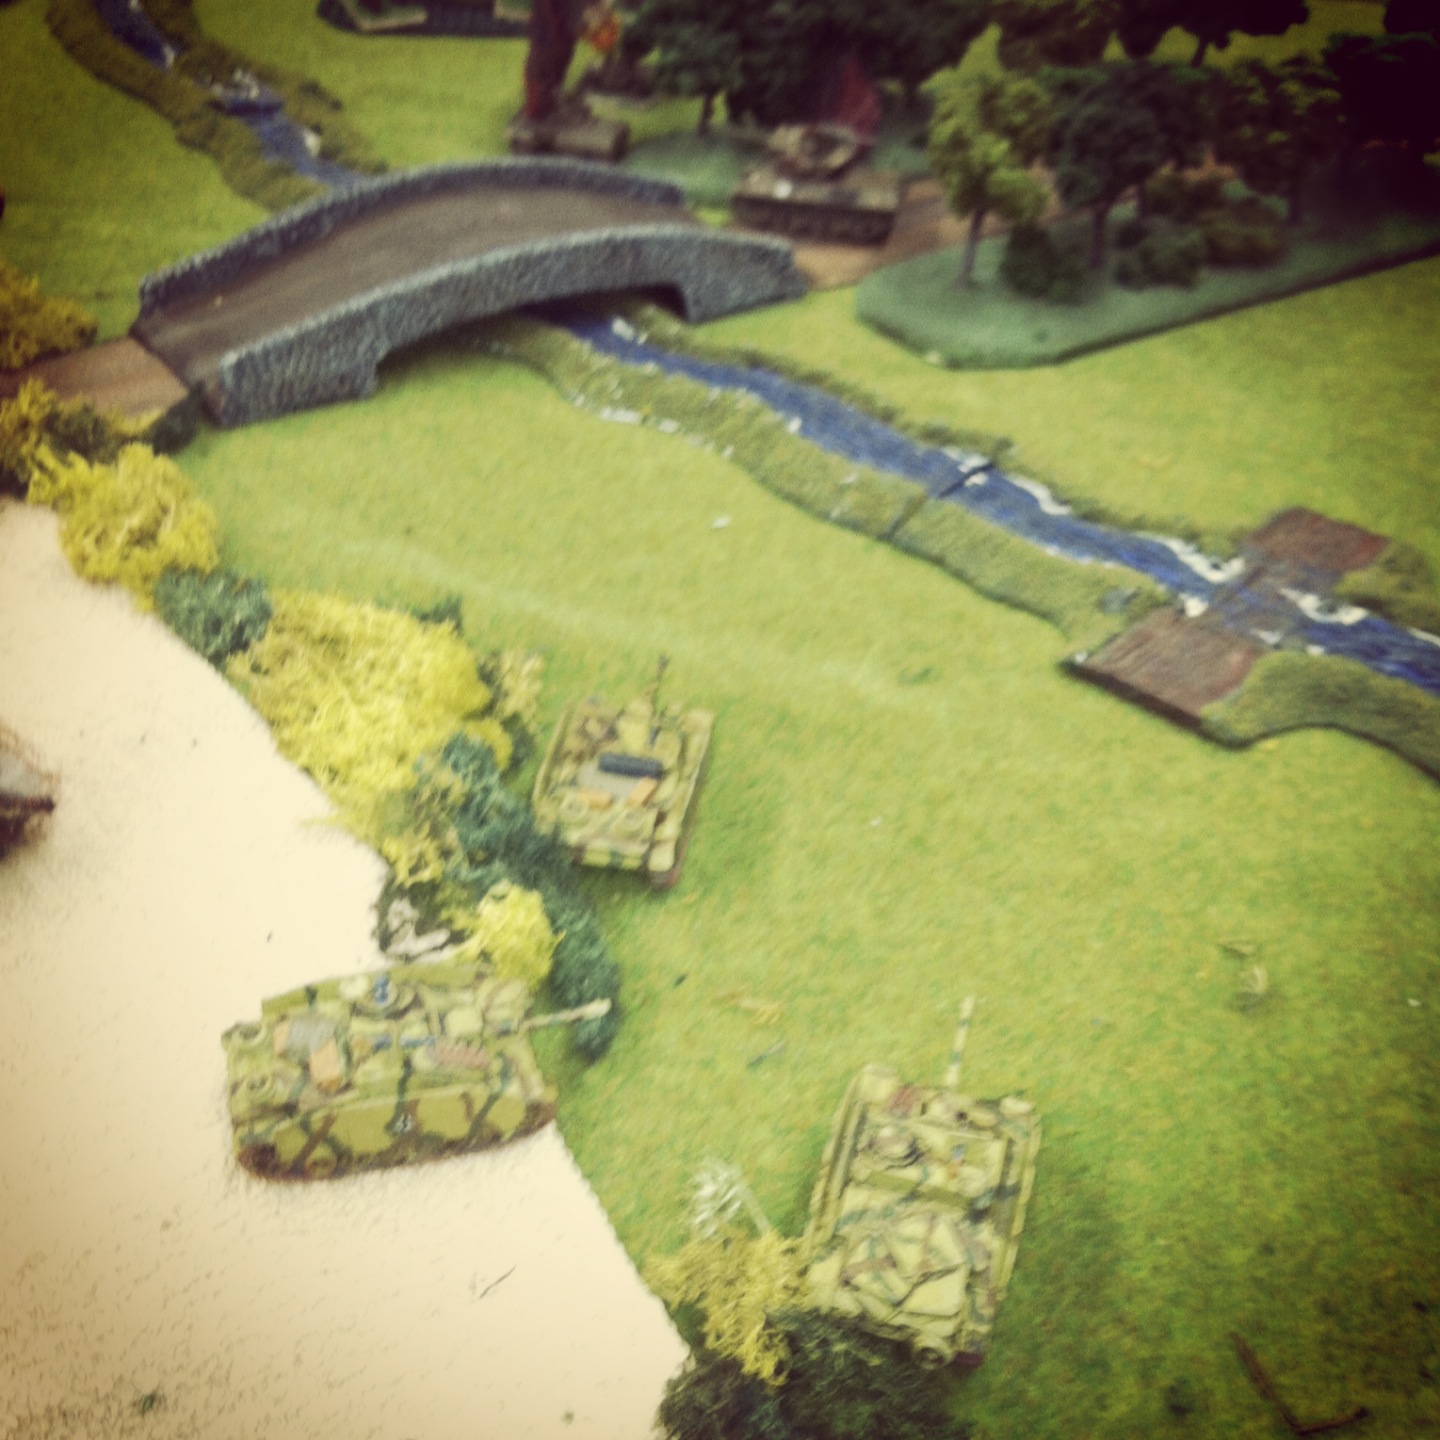
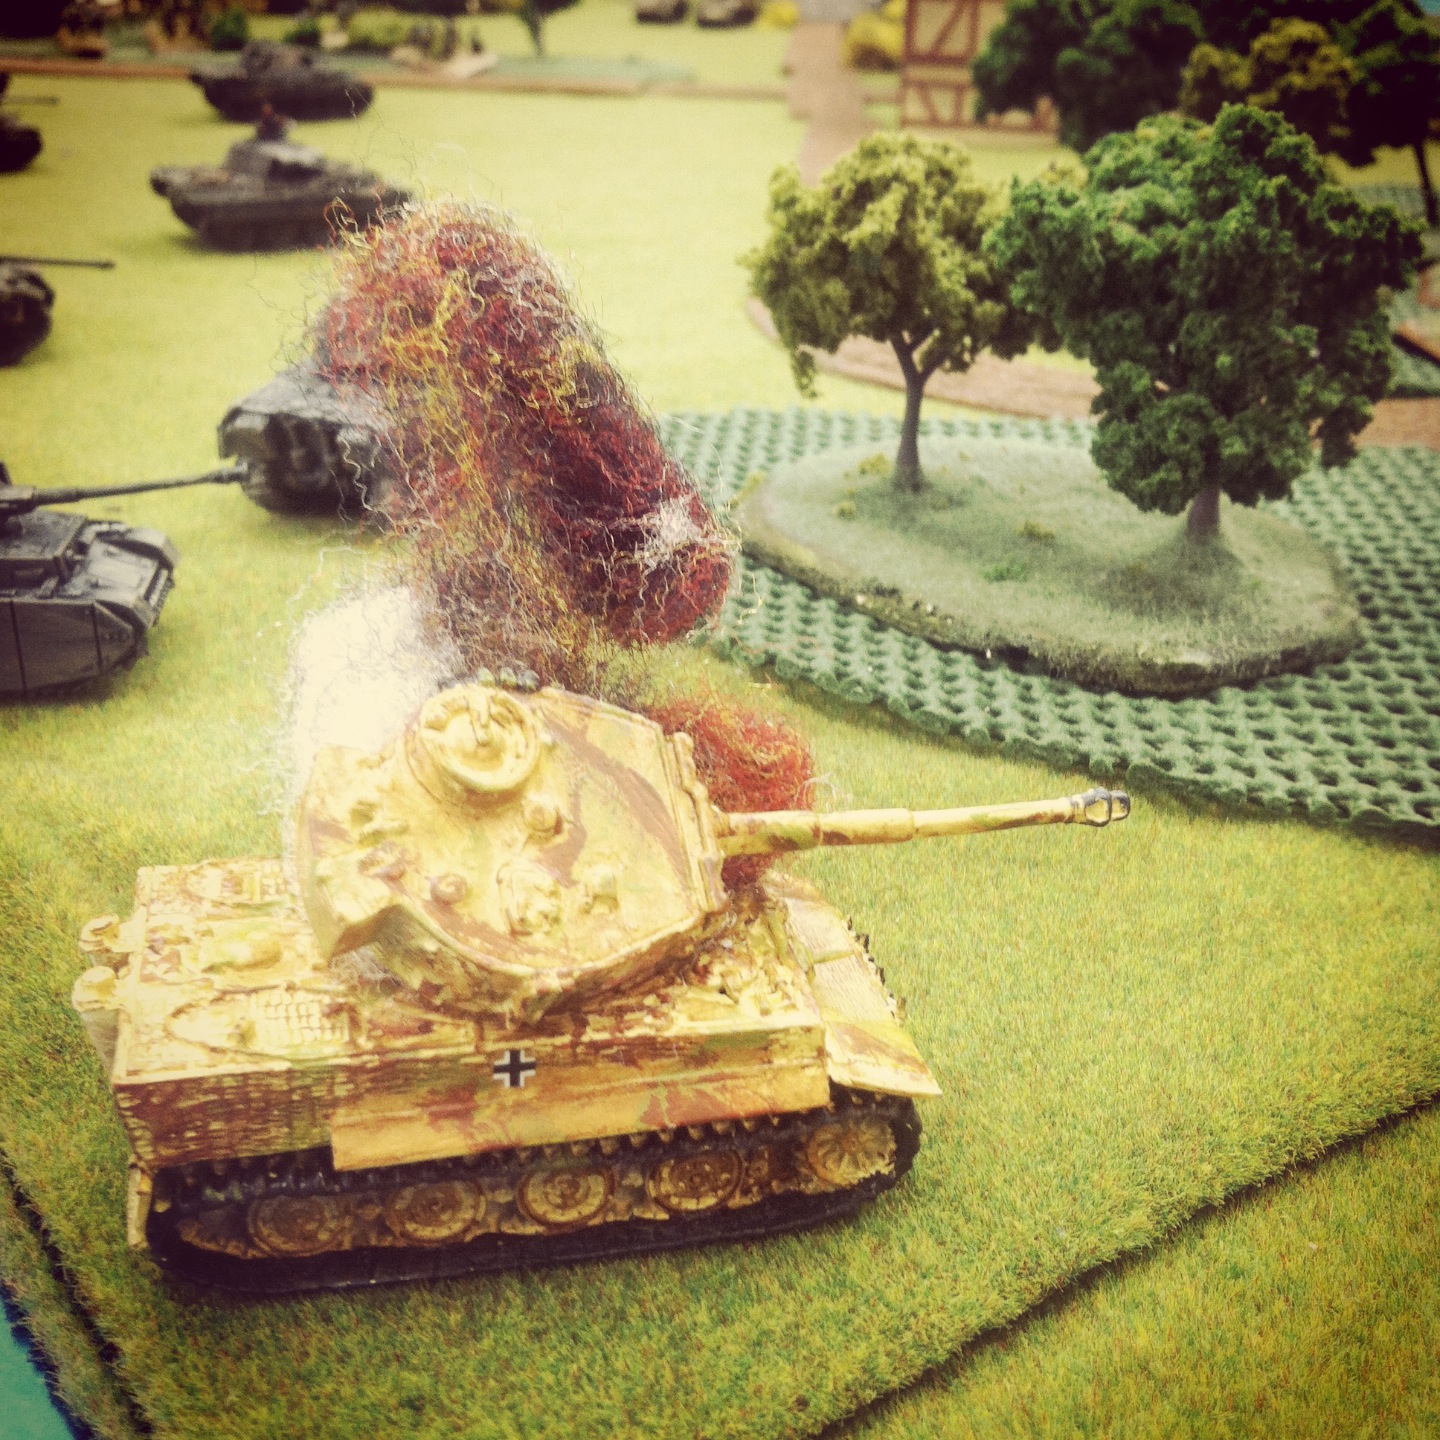
Shermans pour fire into the German defenses

With turn six, one more Sherman made it to the beach while another was swamped and lay destroyed in the surf offshore. Just one more boat of infantry landed to support a pinned and heavily-damaged platoon already on the beach. Progress was made over the sea wall with US troops moving out of range of much of the German machine gunners on the far right edge of the table. Finally, the US did some damage with fire from the Shermans destroying several Grenadier units and a tobruk nest. At the bottom of the turn, the Germans brought on their first reserves with a Nebelwerfer battery at the back of the table. One Sherman was hit and destroyed by German artillery and another’s crew bailed out.

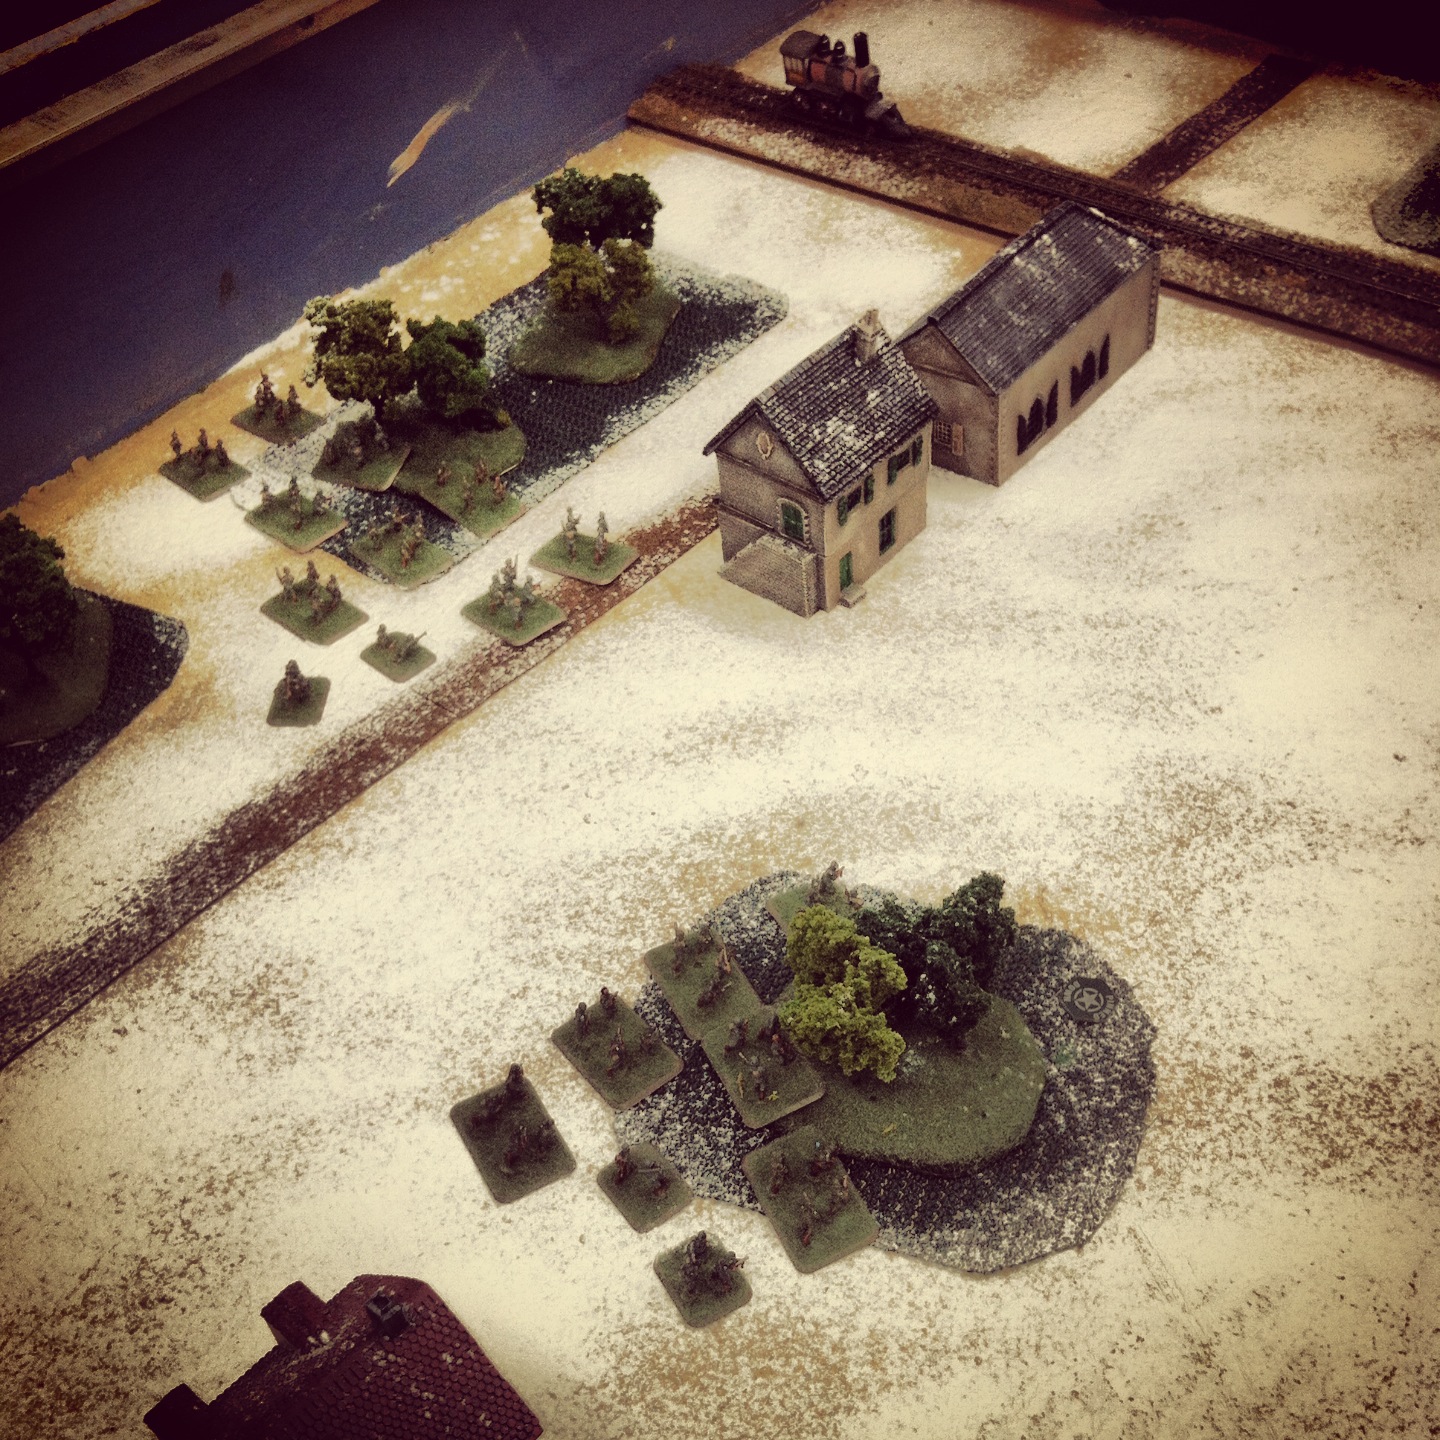
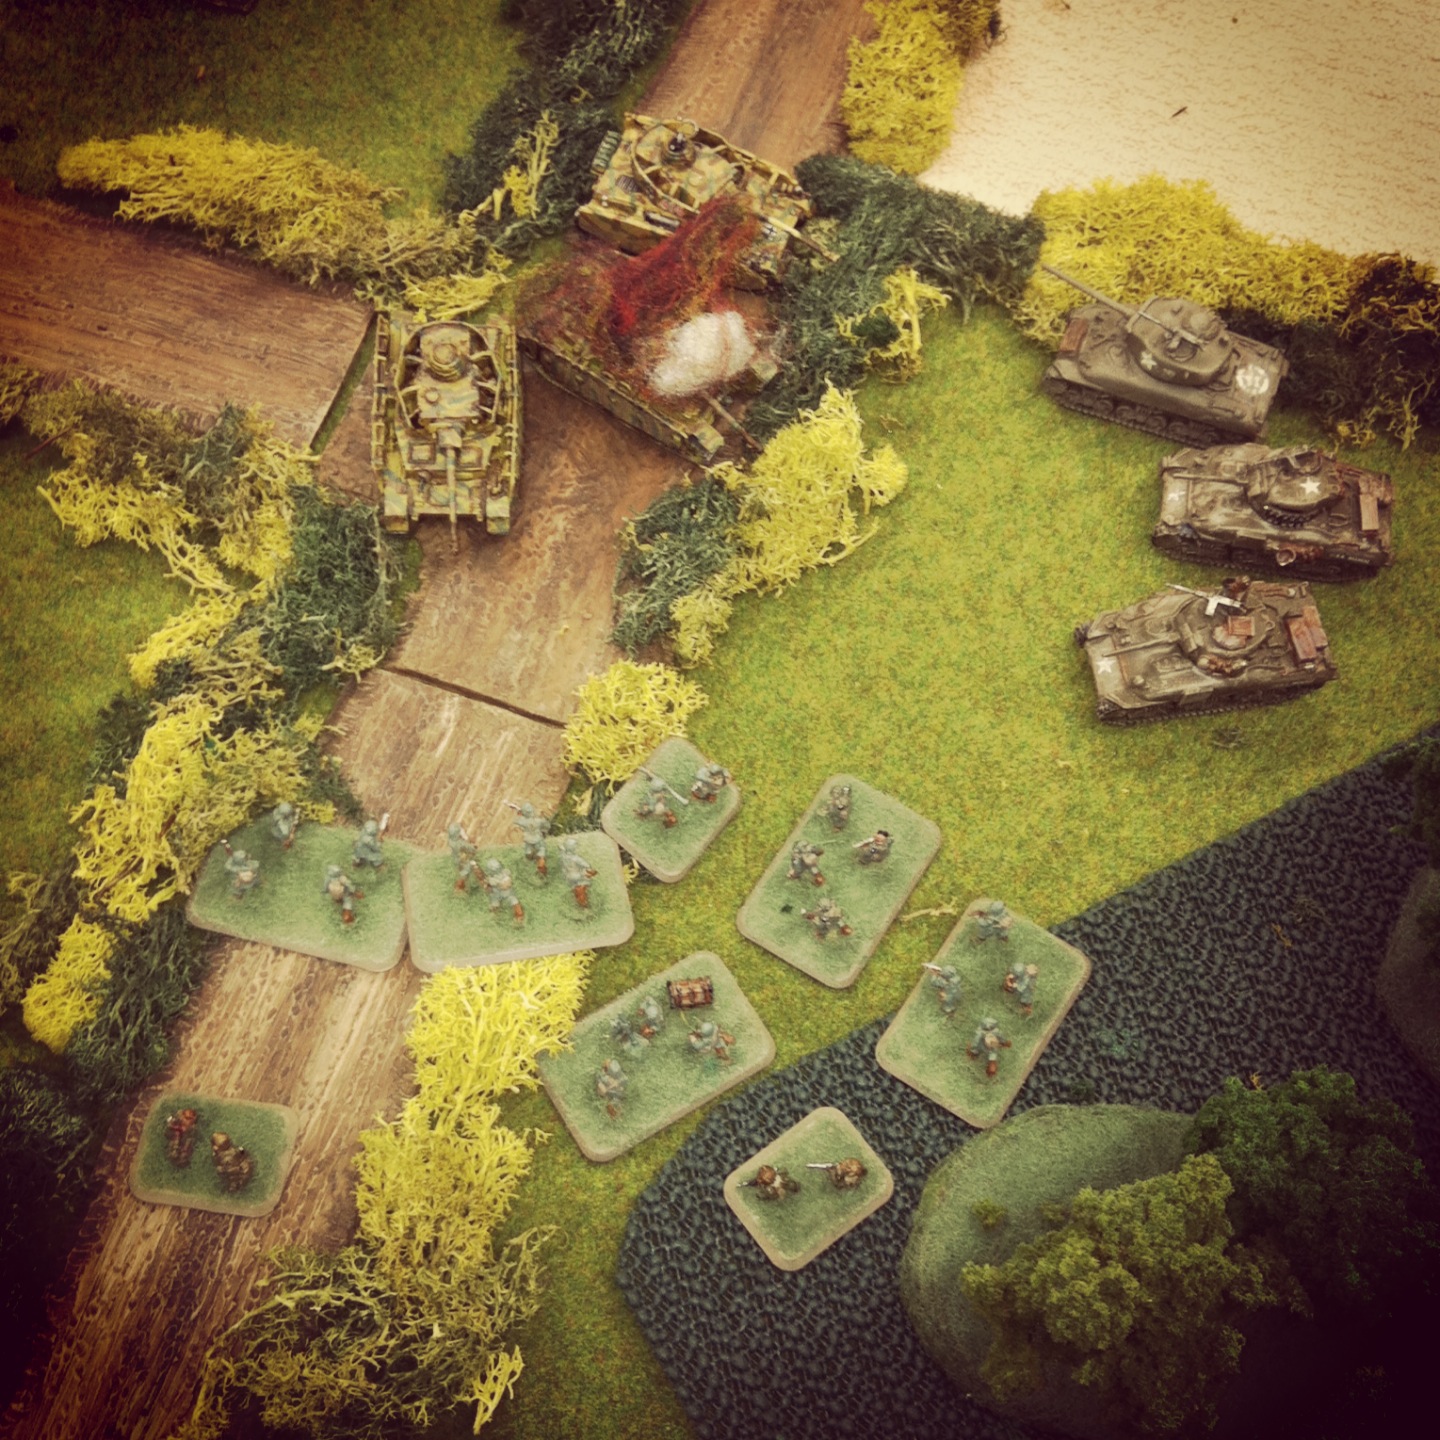
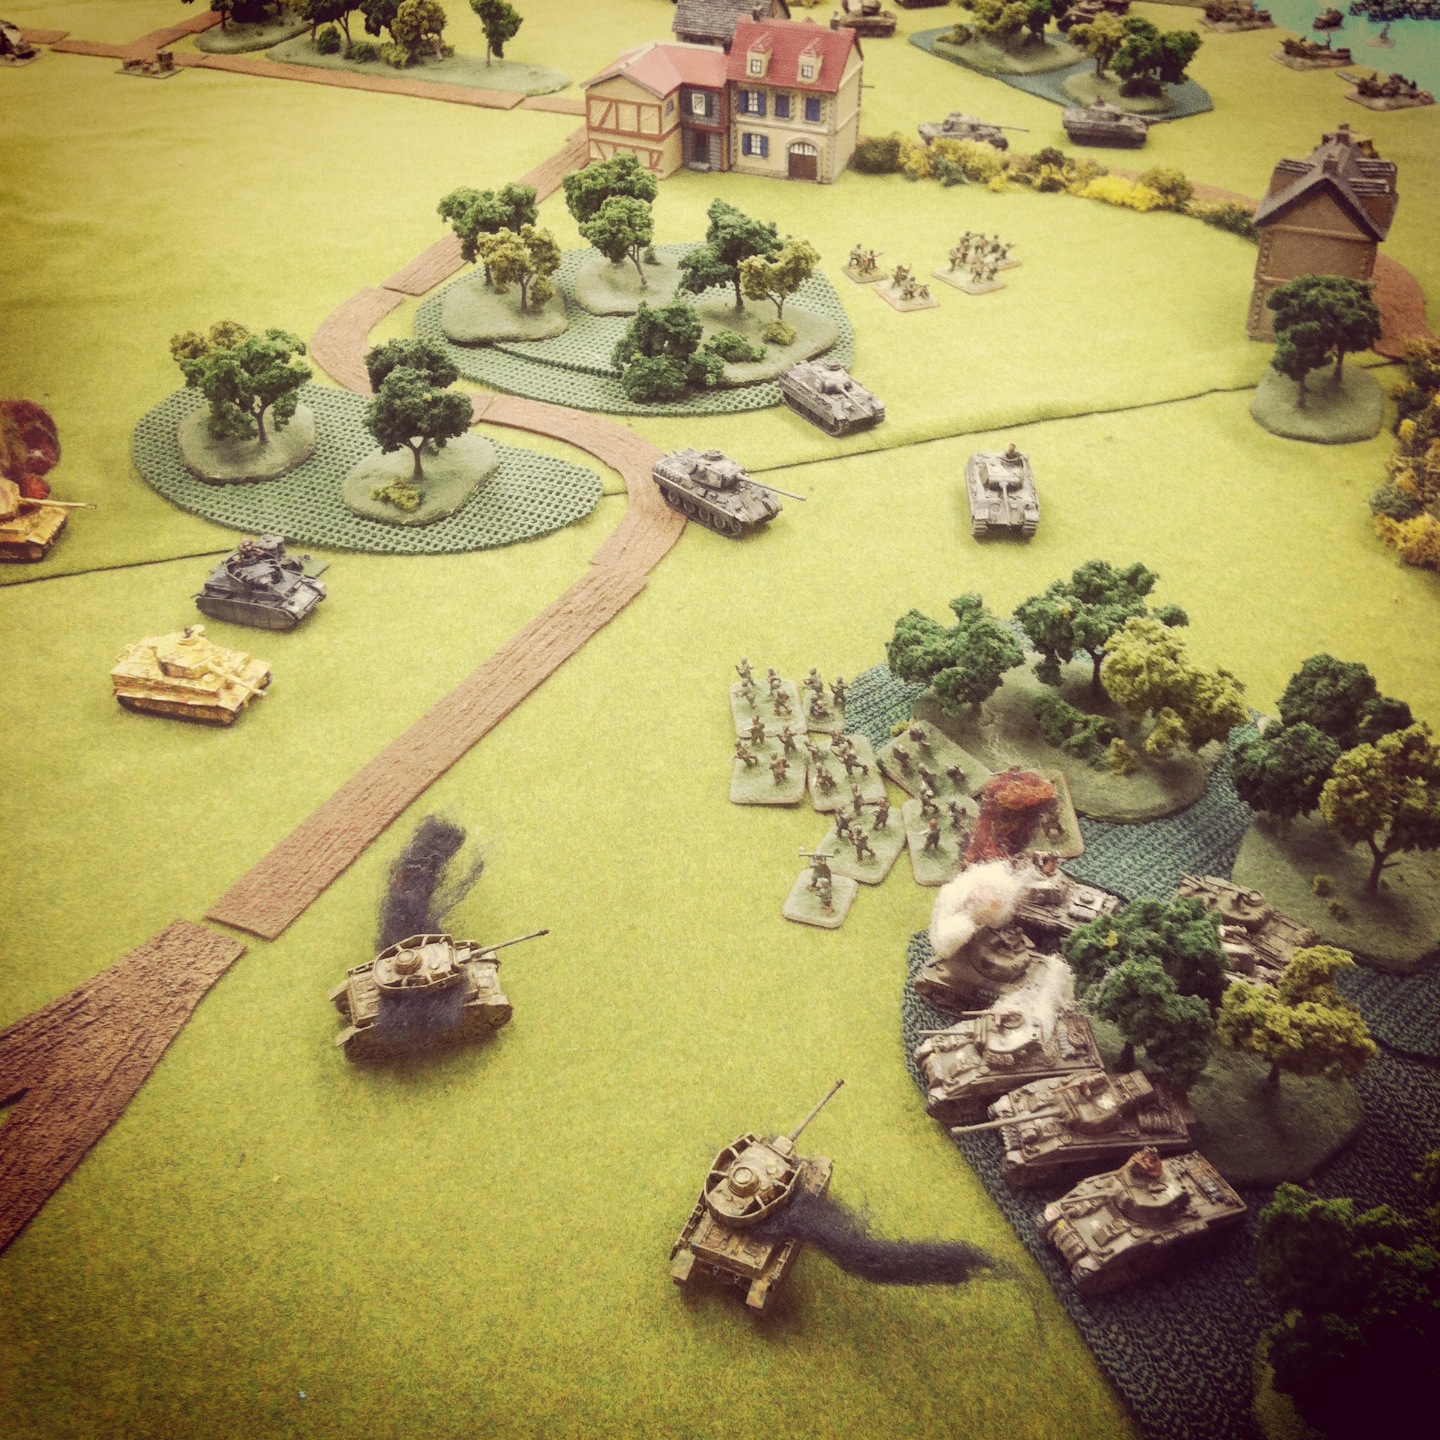
The US looked to be making a bit of progress as turn seven began with their M7 Priest arillery platoon landing with half of the platoon bogging right off the boat. The remaining three guns, along with three Shermans, took  shots at the German defenses and destroyed two more Grenadier stands. German infantry reserves began rushing on the table in front of the artillery to cover the American objective. On the beach, another monstrous German barrage left the Priests in flames and just one surviving Sherman. At turn eight, the Americans ceded the table after only one additional landing craft of troops made it to the beach to join their final Sherman.

This was our first FOW beach landing at the club, and a big learning experience for us. The US players chose to play way too conservatively from the outset with troops moving too slowly off the boat in the first two turns. Leaving the Shermans off the beach until the fifth turn was also a huge mistake, as getting them on sooner would’ve provided greater pinning support and potential for smoke cover for the boat infantry. US air support was frustrating, as often seems the case, and use of the naval guns was likewise botched. The US also suffered from poor luck with too many landing craft either not getting back off the beach to grab more reserves or failing to land existing floating reserves. In many turns, just one of three boats were able to arrive, making it impossible to hit a critical mass of troops on the beach.

Several of us at the club are planning a weekend-long D-Day series to celebrate the 70th anniversary of the Normandy campaign this June, so look for more practice scenarios and a lot more on the anniversary event in the coming months. As Gen. Roosevelt said at Utah Beach, “We’ll start the war from right here!”

Flames of War: Buchholz Station 1944 Scenario

bulge

On December 16, 1944 what became known as the Battle of the Bulge began. The German surprise winter campaign offensive – Unternehmen Wacht am Rhen (“Operation Watch On The Rhine”) – would run until the end of the following month. In the cold, snowy forests of the Ardennes region of France, Luxembourg and Belgium, the series of ferocious engagements would see the highest casualties for the US during WWII severely set back the German war machine’s fighting ability for the remainder of the conflict.

BBmap

Map of the southern flank of the Battle of the Bulge, featuring Buchholz Station

Early in the morning of the 16th, a US company at Buchholz Station was taking a quick break from the morning’s action. Lining up for a hot breakfast, the weary American riflemen spotted distant shadowy shapes  moving through the fog along the nearby railway tracks. Initially figuring these troops to be fellow Americans, machine gun fire quickly erupted as the realization that these were in fact Germans moving to take the nearby train station. The Americans rushed to meet the Germans, eventually filling the area with exchanged mortar and gun fire. Late-arriving US anti-tank guns and some gutsy attacks eventually repelled the small German force.

IMG_2758Table set up for Buchholz Station at Metropolitan Wargamers

Recently on The Miniatures Page message boards I stumbled on a Buchholz Station scenario for Flames of War. A fellow blogger had sunk a fair amount of research into the scenario and presented a great overview on his blog known simply as Kevin’s Blog. Having never done a Battle of the Bulge scenario before, I was anxious to give Kevin’s game a try.

IMG_2761The US chow truck waiting for hungry GIs to show up at Buchholz Station

This past weekend I finally got around to running the scenario at Metropolitan Wargamers. Using the online scenario as a jumping off point, I modified it down to a 4′ x 4′ table decked out in snowy terrain (using regular baking flour). I also tweaked the US and German forces since my own collection didn’t have exactly what Kevin’s scenario called for as written.

IMG_2760The Buchholz Station depot — the main German objective

The Confident-Veteran Germans consisted of three rifle-machine gun Grenadier platoons, plus a heavy machine gun platoon. The Confident-Trained US company featured three rifle platoons, a light machine gun and mortar weapons platoon and a small anti-tank gun platoon towed by Jeeps. Both the US and Germans had large off-table mortars with German spotters deployed in the game and all US command spotting for their own mortar crews. Each company featured just under 750 points per side.

IMG_2776US deployment at the beginning of the game

As in the scenario outline, the Americans began with two rifle companies on the board. One was deployed within 4″ of the chow truck, and the second within 4″ of the small group of buildings at the table corner. All other US platoons were held in delayed reserve, meaning they would not come on until at least turn three. The towed anti-tank gun platoon would be the last reserves for the Americans.

IMG_2777German deployment after their first turn

The German platoons deployed all at once with their first turn, entering the table within 6″ of either side of the railroad tracks. They chose to move at the double and divided their force, heading toward the woods to hold off an American advance and straight toward their objective of the train station.

IMG_2778Turn one ends with a race to the train station

The Americans finished the first turn with their own movement at the double. The platoon at the chow truck headed for a small clump of trees, hoping the forest would provide just enough cover from the coming German fire. The second platoon stayed to one side of the road, out of range of German bullets and racing to the train station.

IMG_2779One US rifle platoon takes heavy fire while the second slides to cover the objective

In turn two, the Germans and US platoons each exchanged fire from their occupied woods. The US took their first casualties and were pinned from the withering German heavy machine gun fire. With most of the fire concentrated on the one US platoon in range, the second American platoon was able to slide toward the train station to control the objective ahead of the Germans.

IMG_2780US and German platoons fire between the woods

Turn three was somewhat of a repeat of turn two as the one US platoon swallowed a ton of German gunfire and remained pinned down in the woods. The US failed to roll any reserves on the table in their first attempt, but the platoon at the train station began occupying the buildings to hold off the coming German onslaught.

IMG_2781The Germans sprint in the open

With turn four, the Germans came out into the wide open looking to assault the remnants of the platoon in the woods and the train station objective. The Americans in the woods took more casualties but stuck it out with a motivation test roll as the Germans moved nearer to assault. The Americans in and around the train station benefited from cover and stayed in control of the objective with the Germans advancing. As the turn ended, two adjacent German platoons took American rifle and mortar fire, pinning the Germans in their advance to the train station.

IMG_2782Germans surround the train station

The last of the remaining Americans in the woods at the center of the table fled in turn five, just as the Germans prepared to assault them. Another German platoon reached the doors and windows of the train station but had their assault repulsed. At long last, the first American reserves arrived, and a light machine gun and mortar platoon platoon hit the ground running at the double. Additional US off-table mortar fire rained onto the assaulting Germans in the snowy open field.

IMG_2783US light machine gun and mortar reserves arrive

The Germans still in the woods broke from the trees iat the top of  turn six and made way toward the train station. Germans already at the station destroyed the remaining Americans there, effectively taking the objective. A few Americans ran at the double to contest the objective. The US responded with fire from the newly-arrived light machine guns and more from the mortars.

IMG_2785The final US reserves arrive…but too late

Things ended on turn seven with the last of the American reserves arriving too late and too far out of range movement and fire to contest the train station objective now in control by the Germans. Timing on the battlefield is everything, and the lack of US reserves arriving earlier in the game made it a tough slog for the Americans. The scenario is pretty fairly matched, and playing a FOW game without the usual mass of tanks was a refreshing break.

The Battle of the Bulge also seemed fitting, given the snowy winter we’ve had here in Brooklyn this past month. With the 70th anniversary of the Battle of the Bulge coming up at the end of the year, playing this first scenario already has me thinking of more wintery tabletop warfare about 11 months from now.

New Game Weekend: 1775 Rebellion

1775box

Late this past week, the Washington Post ran a lengthy article on game designer and CIA analyst Volke Ruhnke. Ruhnke’s games are popular at Metropolitan Wargamers, including his COIN (Counterinsurgnecy) series from GMT Games, including the two 2013 releases of  Cubra Libre (Cuba) and A Distant Plain (Afghanistan). The basic mechanics of these games and other historicals like them involve simple map game boards, wooden blocks placed in area control of spaces and detailed cards driving player actions.

While Ruhke’s games from GMT focus on 20th-century insurgencies in Southeast Asia, the Middle East and Central and South America, Academy Games has been producing games for a couple years framed in similar mechanics but focused on US history with their Birth of America series. Thus far, the series consists of  1812: The Invasion of Canada, published two years ago  to conicide with the 200th-anniversary of the War of 1812, and 1775: Rebellion, an American Revolution game. Next up for Academy Games is an Underground Railroad-themed game called Freedom which was successfully funded on Kickstarter last year.

1775backbox

Back of the box for 1775: Rebellion showing game contents

This past weekend I had an opportunity to play 1775 for the first time, and if you’ve got a passion for board games and American history like me, you need to give this one a try yourself.

IMG_2754

Game set up for 1775: Rebellion

The board presents a map of ther thirteen original American colonies, plus Quebec and Nova Scotia to the north, at the dawn of the War of Independence. Two to four players begin the game as American Regulars, Colonial Militia, British Redcoat Regulars and English Loyalists deployed throughout the colonies. On the western frontier are unaligned Native Americans, and throughout the game opportunities arise for Hessian and French forces to join the conflict. All forces in the game are indicated through simple color-coded cubes with American Colonists in blue and white, British in red and yellow, Native Americans in green, French in purple and Hessians in orange.

1775movementcards

Sample movement cards from 1775: Rebellion

The action of the game is propelled by movement and event cards. Each player draws three cards to their hand and may play one movement and up to two event cards during their turn. Movement cards indicate one or more allied army’s movement from one to three spaces in a turn. Native American, Hessian and French forces cannot move until another force moves to their space and joins in alliance with them. Moving forces cannot move through enemy-occupied areas, and movement to a space containing enemy forces results in a battle.

1775cards

Sample event cards from 1775: Rebellion

Event cards depict historic personalities such as generals or statesmen and other occurences from the Revolutionary period like Paul Revere’s Ride, signing of the Declaration of Independence or the creation of the American flag by Betsy Ross. Each event card allows for things like additional forces to arrive or extra movement.


IMG_2755

Turn 1 with the Americans moving on British-occupied Boston

Combat is resolved with dice color-coded to each force. Dice faces show hits, blank sides and flee indicators. Defending forces roll first in a combat. Hits destroy an enemy unit, returning it to the reinforcement pool. A blank result allows the option for a unit to retreat to a neighboring allied-controlled space. A flee roll removes a unit to the flee space to be replaced at the beginning of that player’s next turm. Dice for each force are weighted differently, so British Redcoats don’t hit as often but never flee while Hessians hit more frequently but flee more readily.

1775trucecards

Truce cards from 1775: Rebelllion

The game proceeds in random turn order each round with players deploying reinfocements into occupied cities and retrieving fled units. The object of the game is to control the most colonies before the game ends after turn three with the play of two truce cards on each side. Colonies are only controlled when every space in the colony is controlled by allied forces.

IMG_2757

Turn 3 with the American truce card played and British advancing from the north

In our four-player game this past weekend, my team’s Colonists initially attempted to oust the British from Boston but were repelled. The British advanced from Canada into northern New York, New Hampshire, Massachusetts and Connecticut. The Colonists picked up Native American allies in Western Pennsylvania and took control of the colony while a stalemate resulted in New England. With a mass of British-allied reinforcements to the north, the Colonists recieved French reinforcements in turn three and quickly took control of two colonies to the south. Colonists quickly played their second truce card and ended the game with more colonies in our control.

Although our intro game was a quick one, I’m very much looking forward to trying 1775: Rebellion again using different paths to victory. The game’s rules are short and the components simple, but there’s a lot of strategic heft to the game. For adults, or even smart kids, with a thing for early American history, I can’t recommend 1775: Rebellion enough.

Flames Of War: Encounter Mission

IMG_2697

The official FOW website makes all the missions from the third edition rules available online, and they’re a quick way to throw together a game and practice tactics without putting all the work needed into a historic scenario. Having been away from a Flames of War table for a week or two, a couple of us at Metropolitan Wargamers in Brooklyn, NY threw together a quick, non-historic Encounter Mission last weekend.

IMG_2698Encounter Mission table (German deployment to right and US to the left)

My opponent, playing as Germans, rolled as attacker and chose the long side of the table with the church on his right and a farm and wooded area to his left. This left my US 101st Airborne with the bridged river at my right and a farm at my left as defender. As per scenario rules, we each began by placing an objective on either long edge of the table, placing half our platoons in reserve and deploying the remainder of our starting units along our edges.

IMG_2699

Germans Stugs move to control the center

The Germans won the roll to go first and immediately pressed toward the center around the church yard with their Stug platoon and on their left toward the river with Panzergrenadiers. It was clear the Germans hoped to make  speedy run to the objective just on the other side of the stone bridge and ford on the river.

IMG_2700US anti-tank platoon rolls to seal the German advance at the bridge

In my first turn, I moved my M-18 Hellcat tank destroyers to the bridge and hoped to get some quick kills in on the advancing German Stugs from the bridge.

IMG_2701

Members of the 101st Airborne take position in the woods

On the other side of the road to the bridge, my US Airborne hustled into the two sets of woods. Hiding among the trees, the paratroopers looked to seal the flank against the advancing German mounted troops on the other side of the river.

IMG_2702

One Hellcat burns at the foot of the bridge while another fires from the bridge

With my Hellcats missing their shots on the advancing Stugs, the German guns rolled to the intersection just beyond the bridge and destroyed one of my anti-tanks. While the loss of the Hellcat halved my anti-tank capabilities, the burning hulk effectively shut down the German path to the bridge.

IMG_2703

US Airborne and German Panzergrenadiers exchange fire over the river

Across the river, the 101st troops safely fired from the treeline toward the mechanized Germans across the river. With combined fire from a a nearby remaining Hellcat, Jeep and armored car from the tank destroyer platoon, a German halftrack was destroyed and forced its troops to dismount. Returning fire, the Germans destroyed the armored car and Jeep.

IMG_2706

Stugs cross the field as an Airborne platoon lies behind the bocage beyond

With the road to the bridge shut down, the Stugs turned to speed their way across the fields at the center of the board. An Airborne platoon took up position on the other edge of the field, lying in wait for the advancing Stugs.

IMG_2707

The US P-47 hits the Stugs in the open field

The Stugs sitting in the open field made for a quick target for the P-47 Thunderbolt which flew on in turn four, leaving one Stug in flames and a second with its crew bailed out.

IMG_2708

The Stugs reach the gap at the field edge and destroy the remaining Hellcat

I their next turn, the Stugs remounted and made their way to the gap at the far edge of the field. A couple quick shots to the side armor of the remaining Hellcat destroyed the remaining US tank destroyer which had been busying itself pouring fore into the still-mounted Panzergrenadiers. It looked bad for the Americans with nothing standing between the German Stugs and the objective just beyond the river ford.

IMG_2709

US Shermans make quick work of the remaining Stugs

Luck switched back for the Americans as they successfully rolled for their Sherman tank reinforcements in turn five. The Shermans moved to the river’s edge and destroyed the remaining three Stugs. Not only had the German armored advance to the objective been thwarted, but yet another easy path had been closed-up with a burning Stug clogging the exit from the field.

IMG_2710Panzer IV reinforcements move to take the US left

By turn six, the German Panzer IV reinforcements were rolling down the road looking to run around the far edge of the field and attack the US left flank. The left side was only held by a US light machine gun and rifle platoons, so armored support was badly needed if the Germans were to be stopped.

IMG_2716The first turn at the battle of the crossroads on the US left

At the intersection on the US left, ferocious fighting erupted as an assault from the usually stalwart 101st Airborne was repelled. The Shermans moved in and destroyed a Panzer IV.

IMG_2717

The second turn of the battle of the crossroads on the US left

With space and options getting tight, the Panzer IV’s returned fire and Sherman was left burning. With a two-on-two fight. the Shermans destroyed another Panzer IV in the sixth turn and the final German tank fled the field after failing a morale test for the pummeled platoon. With German armor destroyed across the field, the US rifle and light machine gun platoons scurried to the German right toward their objective behind the church.

IMG_2714

German half tracks struggle to cross the river on the weakening American right

The final turns of the game played out back at the river with the reinforced Germans struggling across the river. Fire continued to be exchanged with the US rifle platoon in the forest which eventually fell back into the treeline at the road.

IMG_2715

The Thunderbolt engages German transports at the river crossing

Another run from the Thunderbolt threw more Germans from destroyed transports. Remaining Germans trucked over the river and around the woods with only only a few US rifles between them an victory with capture of the objective.

IMG_2720

The final showdown at the contested objective

On the eight turn, it all came down to the contested objective. With a full US parachute rifle platoon in the woods and another heavily-damaged one nearby, the final battle looked like it was going to be decided with some bloody assaults. It looked like anyone’s game, but the Germans were now at half-strength on the table, and a failed motivation test caused the Germans to cede the battle.

German artillery never played a factor in the game, and the heavy terrain shut down use of US air support except for in two deadly runs of the game. Tanks on both sides wound up serving more as roadblocks at some key points on the road, and the river also played an important role in the US defense against the German advance.

We’ve got a couple historic scenarios at the club I’ll be reporting on soon, including a landing at Utah Beach and a scenario from the first day of the Battle of the Bulge. What makes FOW flexible and so enjoyable as a system is the ability to play historic and non-historic engagements, something I experienced last week and am certain to see more of in my after-action reports soon to come.

Gaming The Rails

HSCPA

I’ve been a railfan for as long as I’ve been a gamer. I grew up taking daily school bus rides past the rail yards of the short line Genesee & Wyoming Railroad. As a kid, my brothers, father and I built an enormous HO scale model railroad in our basement, complete with mountains, tunnels, trestles, lamp-lit streets and a working waterfall. After graduate school, I found myself living in Western Pennsylvania surrounded by and visiting railroad landmarks like the Gallitzin Tunnels, Horseshoe Curve National Landmark and East Broad Top Railroad. To this day, I rarely walk by a magazine rack without leafing through the latest issue of Model Railroader Magazine. There’s just something about trains.

For dual fans of railroading and gaming like me, there are a lot of options. Railroads lend themselves to gaming with their familiar cultural history coupled with thematic economic and mission/route-completion mechanics. Real-world competition among railroad companies, investors and promoters also contributes easily to any game presented within a railroading context.

AARailBaronAvalon Hill’s Rail Baron from 1977 is widely considered the grandfather of railroad games. Based on a 1974 board game called Box Cars, Rail Baron presents players with a map of the US with 28 historic railway routes. Players compete, as did the railroad moguls of the past, to complete routes, upgrade to faster trains and collect more cash to pour back into their empire. Rail Baron became one of AH’s all-time best-selling games, and most modern railroad board games owe more than a little to this classic.

Ticket

A longtime favorite at my house is Ticket To Ride, the award-winning 2004 game from Days Of Wonder. TTR is a pretty straightforward game where players complete routes between US cities, scoring points based on the length of the rail line and connections made along the way. Players balance holding cards in their hands attempting to build more longer valuable routes with the risk of their opponents building the highly-prized lines before them. The game is great for kids since play is fairly straightforward with little-to-no reading required, and various expansions have added to the replay of the game over the years.

steam box

A couple weeks ago I had occasion for a first play through Steam at Metropolitan Wargamers in Brooklyn, NY. Steam, released by Mayfair Games in 2008, is similar to many train games in that it has a a route-completion component. The basic game comes with a two-side board featuring the US Northeast and the European Rhine/Ruhr region on the flipside. Aside from building routes, players transport goods between cities and upgrade towns to become new hubs. The game is competitive, but players can also balance sharing the wealth over some lines as tracks are strategically completed. Various map expansions add geographic possibilities in Europe, Africa, Asia and the West Coast of the US. Steam Barons expands the game further with a heavier economic mechanic of investing in the stock of multiple railways.

IMG_2658

In my first play through Steam I really enjoyed the Eurogame feel with choices made each round in various focuses of upgrading trains, building track, establishing new stations and moving goods. Bidding for turn placement also becomes increasingly important throughout the game as the board becomes crowded with competing routes and available goods begin to dwindle. Access to capital also shifts during the game, as access to lots of money becomes less important late in the game after a focused growth mode early on. Having played through the game, I’m anxious to give it another ride soon with the Steam Barons expansion’s added stock market elements.

RussianRR

The latest favorite rail game hitting the table at the club in Brooklyn is last year’s Russian Railroads from Z-Man Games. In classic Eurogame style, Russian Railroads is driven by worker placement mechanics as players push to develop increasingly technological superior trains ahead of the competition. While I haven’t had a chance to play the game yet, it did make a lot of people’s top games of the year, so I’m certain to jump into a game in the very near future.

Like myself, I’ve found a lot of gamers who are passionate about trains. Maybe it’s the competition inherent in railroad history that make them appealing. It could also just be the boyish thrill big trains never cease to bring. Regardless, like a passenger waiting at some rural depot with ticket in-hand, we’re all waiting for the next train to arrive with the possibility of adventure and fortune somewhere down the tracks.

Flames of War: Fielding the Guards Armoured Division Part II

UKguards

Since starting with 15mm World War II Flames of War gaming a number of years ago now, my Allied modelling has focused exclusively on United States forces. Beginning with basic US infantry rifle, artillery and armored companies, I eventually added in some US Airborne forces plus some air support. Recently I’ve felt maxed-out on the US, so I’ve taken to looking to build out my Allies with another country’s army.

eagUARDSTEMP

After a bit of research and reading, I’ve settled on the British Guards Armored Division. I began this new journey with the plastic Guards Armored Sherman and Firefly models included in the excellent Open Fire! starter game box set. While these can be played as Allied support to my existing US Airborne, I really wanted to give the British their own space on the board.

IMG_2737

Along with my existing plastic Shermans and Fireflies I already have painted-up, I bought another set from a fellow member at Metropolitan Wargamers in Brooklyn, NY. This gives me a full four-platoon armoured squadron with four Shermans in the command section.

IMG_2738

 To fill out my Guards Armored Division, I’ve also added the special Lieutenent Colonel Joe Vandeleur warrior character. As a leader of the Irish Guards during such famed actions as Operation Market Garden, Vandeleur proved to be a solid field commander known for his by-the-book leadership.

Caine

 Michael Caine as Lt. Col. Joe Vandeleur in ‘Bridge Too Far’

I’m a big fan of 1977’s A Bridge Too Far in which Michael Caine co-stars as Vandeleur during Market Garden, so I couldn’t help but add this model to my new force with the colonel riding upright in his armoured car.

IMG_2735

IMG_2734

IMG_2733

In the coming month or so I’ll be filling out my British force. I have one completed Royal Artillery section and another on the workbench, enabling me to field a full eight-battery platoon. I’ve also got Battlefront’s British Rifle Company box allowing me to march three full platoons on the table of what was known affectionately during WWII as the PBI – Poor Bloody Infantry.

IMG_2732

I’m really looking forward to playing with my new British units this coming year, along with all their special national rules. The Brits are really going to open possibilities with new scenarios and new fronts. As Caine says as Vandeleur in A Bridge Too Far, “I’ve got nothing else planned.” At least for now.

Related articles

2014: Opening New Fronts

wraondsnyIn the middle of 2013 I somewhat unexpectedly re-launched Brooklyn Wargaming with a new design and a renewed posting vigor. Since then, I’ve had more than 10,000 visits from readers all over the world. Together with these folks I’m sure to never know, we share a continued passion for gaming I am committed to infusing in every one of my postsings here.

My World War II Flames of War posts are clearly the favorites for visitors to the site. My FOW After Action Reports continue to garner a lot of daily views, and people in particular seem to love the Barkmann’s Corner scenario I played in July at Metropolitan Wargamers in Brooklyn, NY. More AARs and building-out my various national forces in my FOW Modelling posts will be a big part of 2014.

As for other stuff on the site, my few posts on Warfare In The Age of Reason are quickly shooting to the top of popularity. I really enjoy writing up my plays a variety of board and card games through my New Game Weekend posts, and taking a look backward at Retro Gaming The 70s & 80s often result in emails from people like me who have fond memories of hours spent at play in the past.

Looking to 2014, here’s where my focus will continue and grow on Brooklyn Wargaming and the tabletop each week.

World War II

For years, I’ve played a lot of FOW with a big focus on Western Europe. To start the year, I’ll be playing a beach landing or two as a way to prep for the 70th anniversary of D-Day this summer, and I’ve also got a handful of other historic scenarios I’ve been working-up over the past few months.

a3ee242c52

Over Thanksgiving, my brother (another lifelong gamer like myself) handed me a copy of Antony Breevor’s Stalingrad and told me it was the best military history book he’d ever read. The highly-readable account of the vicious siege of Stalingrad has gotten my hooked on the idea of expanding my WWII gaming into the Eastern Front in the new year.

Desperate-Measures

As a first step toward this front of the war, I picked up the new FOW Desperate Measures book. While this intelligence briefing is centered on the closing months of the war battled among German and Soviet forces, there’s also a newly-released updated edition of the FOW Red Bear book which gives a broader look at the Allied forces on the Eastern Front. These resources coupled with my historical reading on Stalingrad have whet my appetite for fielding some large masses of Russian forces on the table. A couple other guys at the club in Brooklyn have already started putting together some of Stalin’s finest and I’m very much looking forward to the Eastern Front opening up my WWII gaming with some scenarios this year.

716532

I spent a chunk of the past year reading Rick Atkinson’s Guns At Last Light, the third book in his World War II Liberation Trilogy. The book’s focus on the D-Day landings through the campaigns in Western Europe to the fall of the Third Reich squares with the majority of my FOW gaming from the past year. Working my way back through Atkinson’s books, I’m just starting in on The Day Of Battle for Christmas. As with my new swing in interest toward the Soviets and Eastern Front, I’m looking to Atkinson’s second WWII book to fill in my knowledge on the southern European campaigns in Sicily and Italy. Whether I get some Italian troops on the table by year’s end remains to be seen, but I’m really looking to 2014 as another big year of WWII gaming and learning.

Seven Years War

I grew up in Western New York State and then lived for a period of time in Western Pennsylvania, so the French and Indian War has always lingered as an interest but has never found its way into my gaming.

lastmohicanpen

James Fenimore Cooper’s The Last of the Mohicans and other books in his Leatherstocking Tales series have also been favorites since boyhood. These colorful stories are set within the wilderness backdrop of the colonial wars of the Americas fuel much of my love for the French and Indian War period, and my visits to historic sites like Fort Niagara and Fort Necessity have added physical understanding to the frontier conflicts of the period.

ageofreasonrules

Toward the end of 2013, a fellow club member introduced me to the Warfare In the Age Of Reason rules and the Seven Years War. While my experience gaming battles from the period have thus far had a European focus, my long-time interest in what most consider the world’s first global-scale war holds tremendous interest for me. To this end, I hope to make wargaming the Americas front with the FIW a project for the coming year. Modelling 15mm miniatures of colonists, French, British and Native Americans, along with requisite early American frontier terrain, is sure to be making an appearance here in the coming months.

World War I

While I’m on the subject of world wars, I can’t help but acknowledge the calendar and the 100th anniversary of the beginnings of World War I this coming July.keegan_first_l

My only real exposure to the war so far has been with John Keegan’s excellent The First World War. I’ve read a half-dozen of Keegan’s books, and his 1999 overview of the Great War gave me a solid introduction to a war that’s often overlooked by most Americans like myself. Clearly this is a major period in modern warfare I could stand to learn more about.

9780385351225_p0_v1_s260x420

To get myself back into the period, I’m planning on reading Max Hasting’s Catastrophe 1914: Europe Goes To War which made many top nonfiction lists at the end of 2013. I’ve only gamed WWI once with a 28mm French-German trench warfare scenario at a convention back in 2011, but there are a number of club members with miniatures from the period I may prod into using in some games this year. There are also rumors afoot that the makers of FOW are expanding into WWI just in time for this year’s anniversary, but for now I think some time with a few good books should be enough tribute from me in 2014.

And…

I can’t really tell with complete certainty where this coming year in gaming will take me. Like with most battle plans, a grand strategy can be laid out but actual events often unfold very differently in the fog of war. I can say there will be more miniatures, more scenarios and more completely fresh games to come here on Brooklyn Wargaming by New Year’s Day 2015. For now, here’s to old fronts not forgotten from 2013 and new fronts to come in 2014.

Warfare In The Age Of Reason: Battle of Kolin 1757

drillmanual18th-century European military drill manual

Now that I’ve had my interest sparked in the Seven Years War (SYW) period, I’ve been doing some homework. For background, a lot of people point to the outstanding Wiki-style Kronoskaf SYW Project website for more than 2200 articles and 5500 pictures relating to the period. I’ve found the maps collection to be particularly compelling since I have a huge interest in how landscapes shape warfare in all periods.

I’ve also laid out a small initial investment on the very popular Warfare In The Age Of Reason rulebook written by Tod Kershner and Dale Wood, published by Emperor’s Press and available at On Military Matters. I also found a Facebook page dedicated to the rules which I plan on using for visual inspiration and gaming information in the coming months. At some point, tracking down a copy of the out-of-print Uniforms of the Seven Years War 1756-63 by John Mollo and Malcolm McGregor sounds like thing to do if I want a collection of handy plates on my bookshelf.

Fortunately there are a few players at Metropolitan Wargamers in Brooklyn, NY who already have pretty sizable collections of SYW 15mm miniatures from a represenative cross-section of period armies. Some guys at the club also have figures from the period in 28mm, and one of the newer members is talking about running a campaign-style SYW game next year. Even with models at the ready for gaming at our club, I’m already eyeballing the 18th-century 15mm figures available from Old Glory Miniatures and Essex Miniatures as one of my projects for 2014.

Kolin1757

Battle of Kolin, June 18, 1757

This past weekend, my son and I got together with some club members in Brooklyn for another SYW game, this time the Battle of Kolin June 18th, 1757. The battle came a couple months prior to our previously-played scenario of Moys from September 1757, and proved to be the first defeat experienced by King Frederick II of Prussia.

Admired by contemporaries and scholars today as one of the greatest military leaders in history, Frederick The Great and his Prussian forces were viewed at the dawn of the SYW period as the greatest standing army in Europe. Aligned with Great Britain and surrounded by Austrian-aligned adversaries on the continent, Frederick’s tactical innovations led his often outnumbered forces to numerous victories.

At Kolin in the present day Czech Republic, Frederick led some 34,000 Prussians in a march hoping to destroy the Austrian army seeking to reinforce the besieged city of Prague. Unfortunately for Frederick, he chose to confront the superior force of 44,000 Austrians on their home turf defending from the rolling hills near Kolin. On the hot summery day in June, Frederick’s aggressive gamble would result in his undoing.

 IMG_2605Starting hilltop positions of the Austrians with the oak wood to their right and the Prussian lines before them

IMG_2591The central Austrian defenses with heavy guns at the front, cavalry in reserve and skirmishers in the town beyond

Our battle started historically with the Austrian infantry aligned across the defending hills, three heavy gun batteries at the center and cavalry to either end of the line. The Prussian advance began with a cavalry push on their left around a small town held by Austrian allied skirmishers. Frederick, near the center of the line, began a slow and cautious march to the hill objectives toward the center.

IMG_2597Prussian cavalry charge into the Austrian right

IMG_2596Austrians advanced on the skirmishers in the village

On the Prussian left, a cavalry charge was met with a counter charge from the Austrian-aligned Hussars. Nearby, Austrian line infantry advanced in the hopes of driving skirmishers out of the nearby town. If the initial Austrian press worked, the entire Prussian right flank would fold.

IMG_2602As disordered Hussars retreat, Austrian heavy cavalry ride to answer the Prussian charge

IMG_2593Austrian heavy cavalry gallop to defend their right

As the Hussars folded under the attack and retreated in disorder, Austrian heavy cavalry charged back toward the advancing Prussians. With the Prussian charge repulsed with losses on both sides, the Austrian cavalry now looked to turn the Prussian left flank with more heavy cavalry rushing from the rear.

IMG_2592Gun batteries at the Austrian center

IMG_2604Prussians advance on the Austrian center and receive cannon fire

IMG_2600Prussian lines continue the advance as cavalry reserves in the distance rush to buoy their softening left flank

At the center of the table, the Austrian lines held their ground and pulled into the nearby woods to defend against the coming Prussian advance. As Prussian infantry advanced several lines deep, they were met with several turns of cannon fire yet continued their press forward with Fredrick attached at the rear. If you listened carefully, I think you could hear Fredrick’s famed shout of “do you want to live forever?” echoing from the tabletop as he urged his Prussians onward.

IMG_2603The Austrian battery takes casualties from the advancing Prussians

IMG_2601The Austrian battery is overrun in a Prussian charge

Eventually, the  overwhelming force of the Prussian lines closed on the Austrian batteries at the front of the line. One battery was destroyed and a second fled the field following a charged assault. With Austrian infantry now staring down from on the hill, the Prussians marched uphill to their objective and closed within charge distance.

IMG_2598Prussians press the attack into the woods and up the hill

IMG_2599The wood becomes a locked melee as firing erupts all along both lines and into the distance on the Austrian left

A charge and counter charge locked lines in melee in the woods at the Austrian right as Prussians pressed their advance now all along the line. On the center hill, an Austrian line wheeled down the hill to envelope the Prussian lines in fire both to the front and at their flank. The one remaining Austrian battery continued to pummel the Prussian lines scrambling for the center hill. On the far hill on the Austrian left, lines finally made a move on the Prussians.

With the cavalry charges at a stalemate on the Austrian right and the Prussian lines split into two losing combats at the hills, the Prussians failed a morale test under heavy losses and ceded the field to the Austrian army. Once again, Frederick’s gambit at Kolin had resulted in defeat.

fredIIkolin‘ Frederick the Great After the Battle of Kolin’ by Julius Schrader (1859)

After two games in the Seven Years War period in as many weeks, I’m hooked on the era. The games begin cautiously with slowly-deployed movements but quickly erupt into vicious volleys of fire, swift charges and hand-to-hand combats. Even with thoughtful strategic planning at the outset, the battles quickly evolve into chaotic back-and-forth tactical blood baths. The constant morale checks as the battlefield shifts and fire is taken becomes as much a path to outcome as men falling on the field. And, as with the original battle at Kolin, the Austrians defenders proved to be too much a match again for the Prussian invaders this past weekend.

Warfare In The Age Of Reason: Battle of Moys 1757

moysfullA c. 1790 map of the Battle of Moys, September 7, 1757

This past weekend at Metropolitan Wargamers in Brooklyn, NY, there was some focused excitement around around two big boardgames. One group of players was huddled around an ongoing campaign using the very popular Zombicide and its new expansions. Another crowd anxioulsy anticipated the arrival of the newly-released Designer’s Edition of the old Steve Jackson Games sci-fi battle classic Ogre which comes in a monstrous 30-pound box overflowing with huge game maps, 3D models and more than 500 cardboard playing pieces.

At the back of the club, four of us had a go at a game of more traditional historical miniatures wargaming our club was founded on nearly 30 years ago. After a long hiatus, our club President had decided to blow the dust off his “Warfare In The Age Of Reason” rules from Emperor’s Press and host a few of us for a learning game of the Battle of Moys from the Seven Years War. After so many hours spent with World War II miniatures gaming with Flames of War, it was great to dig into a period ruled by wigs, muskets and traditional European battlefield tactics.

moysdetailMap detail of the area of the game scenario

The Seven Years War was a different kind of world war from a very different era. Fought throughout Europe, along the West African coast and in the colonial outposts of India, the Philippines and the Americas, the war raged from 1756-1763 between various kingdoms and alliances competing for land and trade worldwide. By the fall of 1757, several major battles had already been fought including the Prussian defeat of Austrian defenders at the Battle of Prague in May 1757 and the Austrian defeat of Prussians in answer at the Battle of Kolin a month later.

Near Moys in modern Poland on September 7th, 1757, a 26,000-man Austrian force led by General Franz Leopold von Nádasdy moved toward routing an isolated and retreating Prussian force half its size commanded by Lieutenant- General Hans Karl von Winterfeldt.  A small group of advance Prussian troops were posted on the Jäkelsberg outside of Moys but the majority of the army lay encamped at a distance. Rather than attack at first light of dawn, the Austrians waited for the Prussians to complete their breakfasts and morning drills before moving columns of Grenadiers on the defending Prussians. As subsequent Austrian waves pushed onto the heights, Hussars met the retreating Prussians. Surprised by the Austrian attack, Prussian leadership rushed reinforcements from nearby Gorlitz to the fight, briefly retaking the Jäkelsberg. The battle for the raged back and forth, but by mid afternoon the Austrians had deployed lines of regulars in the neighboring plains and forced an eventual Prussian retreat.

IMG_2537Austrian Grenadier columns enter the field toward Moys

Our game began with advancing Austrian Grenadiers and artillery moving in column on the central Jäkelsberg objective hill. With short firing range for small arms, there were a couple turns of movement and positioning from column into line as the Prussians remained stationary in their positions on the hill.

IMG_2539Prussians on the Jäkelsberg spot the advancing columns of Austrians

The Austrian medium cannons also began the game out of range, necessitating them to spend a turn moving and getting into position to fire on the Prussian lines.

IMG_2556Austrian guns deploy on a hill near the Jäkelsberg

By the third turn, the lines of advancing Austrians began softening-up the Prussian left and center with musket volleys as cannon likewise opened fire. On the far side of the hill, Hussar cavalry raced to the flank and skirmishers moved toward the right lines.

IMG_2555Austrian lines advance on the Jäkelsberg as guns fire

With things on the Jäkelsberg heights looking bad for the Prussians, fresh columns of Austrian regulars advanced on the field in turn four and immediately broke toward the open fields on the far side of the battle.

IMG_2557Fresh Austrian columns arrive

On the Jäkelsberg, the Prussian cannon position was overwhelmed by advancing Austrians and the remaining Prussian infantry lines were closed in on three sides.

IMG_2558Austrians take the Jäkelsberg to the left, form lines to the right and fresh columns arrive at the rear; Prussian reinforcements arrive in the distance

With the Austrian objective of taking the Jäkelsberg nearky achieved by turn six, over a hlaf-dozen late-arriving columns of Prussians began arriving on the table in the distance. To the right rear of the Austrians, a Prussian cavlary contingent also arrived and moved to flank the deploying Austrian lines in the field.

IMG_2559As the Austrians overrun Prussian positions to the left, my son’s reinforcements arrive at the edge of the field

The Prussian cavalry made a move to charge the fresh Austrian arrivals in the rear, and one column quickly moved to defend in square formation. Cannon blasts from the Austrian guns routed the Prussian cavlary, driving them toward retreat off the board. By the seventh turn, the new Prussian lines were marching toward the Austrians who were already massig several ranks deep. With the Jäkelsberg held by the Austrians and their lines likewise controlling the open field, we called the game with a repeat historical victory for Austria.

ageofreasonrulesThe Battle of Moys was my first time playng with the popular “Warfare In The Age Of Reason” rules. Having not played a pre-20th-century miniatures game in quite some, I loved the tactics of movement, fire and charges. In the period and game, fighting occurs at very close range, making movement and protecting flanks and rear key to victory. Forcing your opponent into disorder or routing becomes as important as the number of casualties inflicted.

I found the rules to be simple, with the move order determined by drawn cards. Dice throws for morale checks, arms fire and charges all occur with a simple mechanic of adding or subtracting the number of dice according to the position and condition of your forces. Fighting in close quarters causes the battlefield to quickly shift throughout the game as lines and columns ebb and flow for position on the board.

With the fairly large scale Battle of Moys under my belt, I’m looking forward to studying up on the “Warfare In The Age Of Reason” rules and Seven Years War period a bit more. The 18th-century tactics,  colorful troops and special rules according to nationalities and fighting quality provides for a ton of unique fun in a vast world war period I look to get back to again very soon.

Flames of War: Metropolitan Wargamers Tanksgiving 2013

Tanksgiving PicAbout ten of us at Metropolitan Wargamers in beautiful Park Slope, Brooklyn kicked off the holiday season this past weekend with a day of WWII armored action in conjunction with our first Flames of War Tanksgiving event. The official rules for the event called for 1500-point companies facing off in multiple games throughout the day. Given we had so many new players interested in playing their first games of Flames of War, a few of the more experienced players decided to play host with our own forces brought along for the day over two tables.

FFAMissionThe bigger of the two tables featured Allied forces facing off against Germans in a Late War Western Europe scenario. The Flames of War website offers a group of basic missions of increasingly-complex scenarios, each easily playable in about three hours. Given we were dealing with an entry-level game, we went with a beginner-friendly Free-For-All mission with two 1500-point companies on each side.

IMG_2442Allied defenders (left) and German attackers (right) deployed

Since this was a tank-focused game, we went easy on terrain with just a smattering of wooded areas, buildings and fields spread over the table. The Allied forces defended, beginning on the side of the table defined primarily by a small river crossing bridge on the Allied right and a field and nearby farmhouse on the Allied left.  On the attacking German side of the table, a walled farm complex surrounded by a tree-lined road sat to the German left and a group of wooded areas to their right. A small town was situated squarely at a crossroad at the center of the field.

IMG_2446Guards Armoured and 101st Airborne started in the farm field

The British Guards Armoured Company began near the farm at their left, deploying its Sherman and Firefly tanks along with one platoon from the US 101st Airborne. Near the bridge, the US 4th Armored Company set its 75mm and 76mm tanks and finally deployed its 105mm artillery platoon at the center of the table edge hidden behind a copse of trees. The Germans deployed Panzer IVs, two Tiger tanks and a Grenadier platoon near a forest at their right. A large group of Panthers started near the center behind the small town with a supporting dismounted Panzergrenadier platoon on their left and a two-tank Panther command platoon at their extreme left.

IMG_2444US 75mm and 76mm Shermans tanks at the bridge near the German objective

With the German player starting things off, their main thrust of Panthers moved toward the center of the table while their Panzer IVs and Tigers made a move looking to shutdown to the advance of the Guards Armoured and US airborne troops. The Panzergrenadiers made their way for the walled farm and the treeline at the neighboring road, and the commanding Panthers looped around the farm toward the river and the American right flank.

IMG_2448A Tiger sits burning after being hit by a Firefly

On the Allied first turn, the 101st Airborne made a beeline for the neighboring forest across from the field while tanks rolled into the gap between the forest and the field. A lucky opening shot from a British Firefly took out a German Tiger, providing one of the only bright spots for the Allies during the entire afternoon. The spotter for the US howitzers ran for the cover of the town’s buildings while the mass of American tanks on the right split to hold off the center German advance as well as the German command section’s coming end-run at the river.

IMG_2453The Armoured Guards take ferocious fire from the German tanks

In the second and third turns, the German players began running the table to their victory. A concentration of fire into the town destroyed the US artillery spotter, effectively shutting down any good chance of Allied artillery support. The Tigers began laying waste to the line of advancing Shermans in the field and rolling in the open. A failed assault on the German tanks by the 101st Airborne out of the woods stalled under a hail of machine gun before it began, but the Guards Armoured managed to route the Panzer IVs off the board and whittle-down the Grenadiers making their way between the town and farm house nearby.

IMG_2460Panzer IVs and Shermans aflame as the 101st Airborne sprints across the field

By the fourth turn, German infantry making their way through the open both for the bridge and objective near the American artillery were mowed down under heavy machine gun fire from the US Shermans. Finding a gap amid the tank fight around them, the 101st made a dash to the next forested area while German tanks poured more fire into the British armor at the rear. At the bridge, American 76mm guns managed to destroy one command tank and bail the crew from the other. Unfortunately, the remnants of the American armor were outgunned and entangled in the burning shells of their comrade’s tanks. With nothing left to stop the advance, German tanks rolled to the center and seized their objective.

IMG_2458Nothing left to stop the German advance to victory

While things raged away on the European table, an Early War showdown between 1500-point British and Italian forces in Africa dustily clamored away one table over. You couldn’t get a more different game with less advanced equipment and differently skilled troops battling in a desert environment laced with prepared defensive positions. Since most of my gaming has focused on Late War Europe, the earlier war stuff fascinates me and I’m definitely going to make some time to try my hand at this other period soon.

IMG_2440Early War Italian and British desert action at Tanksgiving in Brooklyn

As it turned out, the Italians took the game on the Africa table, making our first Tanksgiving event a 2-0 victory for the Axis powers. I learned a mass of German armor is really hard nut to crack unless you’ve got some effective artillery and enough infantry to assault and push to an objective. Every game under my belt gives me ideas for the next. Win or lose, I think a few hours of playing may have hooked a couple new players on Flames of War. For that, we’ll all be thankful as we deploy our platoons for another game very soon.