Flames of War: JR Miniatures 15mm Arnhem Row Houses

arnhemstreet

I picked up two different 15mm JR Miniatures Arnhem row house models on my recent trip to the HMGS Fall In! 2014 convention at a real steal of 40% off the list price. At nearly 12″ long and up to 8″ tall, these cast resin models create a quick urban feel to a tabletop battlefield. Each model has lift off roofs and interior floor and wall sections which pull out to allow for stands of troops to occupy varying rooms and levels. The roofs on the models also contain open parapet areas where artillery spotters, machine gunners or other troops can placed to command the battlefield from high upon the rooftops.

IMG_4674Cleaned and primed Arnhem row houses from JR Miniatures

As with most of my experiences with JR Miniatures models, there’s a fair amount of clean up to flash before getting started. The castings also contain a few air holes here and there, but nothing that detracts too much from the overall models. If anything, missing pieces of a cornice or a small hole in a wall might be chalked up to gunfire.

Here’s a simple outline of my technique for painting resin buildings:

Painting Western European Buildings

  1. Use a sharp hobby knife to carefully remove extra resin flash from casting. Particular care should be taken to make sure interior floor sections lift out of the model easily.
  2. Wash models in warm soapy water to remove molding residues. Allow models to dry overnight.
  3. Spray prime roof and removable interior floor sections in flat black and main building sections in flat grey. Allow primer to dry overnight.
  4. Paint roofs:
    1. Tile roofs begin with a dry brush of 50/50 black and red paint, followed by a dry brush coat of red paint and finished with a dry brush of orange paint to highlight.
    2. Shingled roofs begin with a dry brush of dark grey, followed by dry brushed coats of lighter browns, light greys and dark green.
    3. Stuccoed areas in roof gables and dormer windows receive a dry stipple brushed coat of light brown followed by off-white paint dry brushed with the same stipple brush.
  5. Paint floor sections:
    1. Dry brush floorboards with layers of dark and lighter brown paints.
    2. Paint wall sections in off-white paint.
  6. Paint building facades:
    1. Stucco walls receive a dry stipple brushed coat of light brown followed by off-white paint dry brushed with the same stipple brush. Dab some random areas with more off-white to create areas of more fresh stucco to create variations along the street.
    2. Dry brush a slightly heavier amount of off-white paint over cornices and door a window molding to create more depth of highlights.
    3. Stone areas receive a dry brush of light grey followed by off-white dry brush highlights and a dark brown wash in recesses.
    4. Brick areas are dry brushed with 50/50 black and red paint followed by random dry brushing in off white paint to highlight.
    5. Paint doors and shutters with a variety of blues, whites, greens, reds and browns. Follow basecoat with highlight in same color slightly lightened with off-white. Dab doorknobs with brass paint with a fine brush.
    6. Window panes are all carefully given a light coat of black and then dry brushed with dabs of lightly dry brushed white paint to give the illusion of glass.
    7. Sidewalks are dry brushed with light greys over a medium grey basecoat.
  7. Ground areas at the rear of the buildings receive brown and green dry brush coats followed by grass flocking and small clumps of foliage.
  8. Coat models in several layers of spray clear matte finish, allowing each coat to dry before applying an additional coat.

I was able to achieve a pretty decent tabletop quality finish to my buildings with maybe three hours of work on each model using the painting scheme above. Since colors on buildings are rarely monotone (unless newly constructed), I use a plastic surface on which I dab a variety paint shades and mix colors from this palette as I go with my dry brushing. I then build up areas with heavier amounts of one color or another to pull out highlights, create varying textures and differentiate from one building to the next along the street.

IMG_4695A completed JR Miniatures Arnhem row house

IMG_4694 The other completed row house with corner shop

IMG_4692Close up of the corner shop

IMG_4698A view along both row house blocks

IMG_4697Rear detail of one of the blocks

IMG_4693Close up view of the facades

IMG_4696A German Stug parked in front of the row houses

IMG_4691Overhead view of the interior floors

IMG_4690A floor section being removed for placing troops inside

I’m really excited about these models which nearly double the footprint of my existing Western European buildings in 15mm. Models from JR Miniatures fit in nicely with my buildings from Mark IV Miniatures and terrain from a variety of other manufacturers. Although modeled on actual streetscapes of Arnhem, the buildings are easily usable in creating the look of many densely populated areas of France, the Netherlands or elsewhere in Western Europe during late war operations.

Flames of War: Metropolitan Wargamers Tanksgiving 2014

Tanks2014

For the second year in a row, we’ll be hosting a day of armored Flames of War tank battles on Sunday November 30th at noon at Metropolitan Wargamers in Park Slope, Brooklyn. At last year’s Tanksgiving 2013 we hosted about ten players stretched over two tables participating in Early War Africa and a Late War Europe scenarios. This year we’ll be running multiple Late War Europe games using 1500 points of armored forces on a side. We’ll have plenty of US, British, Germand and Russian models on some gorgeous tables, so experienced players can bring their own forces or newcomers are welcome to just come along, move some armor, roll some dice learn the game.

The event will be held at Metropolitan Wargamers at 522 5th Street in Park Slope, Brooklyn (enter through basement level). Visitors pay just $15 and regular club members are free. The event will be a great opportunity for new people to meet some of us at the club and experience the best and oldest wargaming community in New York City. If you’d like to come, RSVP via our club’s Yahoo group.

Bringing Modelling Into Focus

IMG_4465

As a wargamer and scale miniatures modeller working my way through the latter half of my 40s, eyesight has become more of an issue for me. It’s a reality of just getting older (I like to think, more experienced) as I’ve aged through about 30 years in the hobby.

Recently, I picked up the magnifying visor from Sharper Image and it’s become a welcome addition to my modelling tool kit. Retailing for about $60 (and less expensive with an additional 10% off for new customers), the visor brings a number of great features which separates it from other magnifiers I’ve seen. The adjustable visor comes with four lenses at  1.5x, 2x, 2.5x and 3x strengths stored in a separate small plastic case. Each lens snaps into the visor and flips up and down easily with a flick of the wrist while painting. Most visors or magnifying eyeglasses used by hobbyists come with just one fixed lens strength, so being able to adjust the level of magnification depending on the project adds a lot of use to the Sharper Image’s visor.

Living in an a Brooklyn apartment, I do most of my modelling projects in natural light at the dining table flanked by a tall set of large windows. For a lot of other hobbyists relegated to painting in basements or small, darker rooms, lighting is often supplemented with workbench lights or a separate camping-style headlamp. For hobbyists like me without a permanent workspace, tabletop lights just aren’t practical and adding a headlamp is just one more thing to store. With these factors in mind, the added feature of a powerful LED light on the Sharper Image visor is also a welcome addition. The light adjusts easily to angles which can direct a beam of cool, white light directly to the area needed. Again, this kind of thing just isn’t found on lesser magnifiers.

I got the Sharper Image visor just as I started going to a smaller scale with 6mm World War II microscale models from GHQ. Whether painting or applying decals, the visor makes details pop on these tiniest of models. At this scale, I found the 2.5x lens to be the best option. The smallest bits of equipment and other features on models practically jump out at me when wearing the visor, and I feel I could practically apply paint with a house painting brush if I had to. I’ve got some other 15mm projects coming up in the coming months, and I’ll be using the visor at that scale for the first time, too.

Regardless of the scale and veteran status in the miniatures hobby, the outlay for the magnifying visor from Sharper Image is a solid investment. As I soon head into another decade in the hobby, I’m grateful to have this new tool to keep my future projects in focus.

I Ain’t Been Shot Mum: Panzer Lehr Counterattack Campaign – ‘Morning of the 902nd’ July 11, 1944 Scenario

OLYMPUS DIGITAL CAMERA

The battle near Hauts-Vents was a two-day affair between the US infantry and armored forces and German Panzer Lehr Division. After a day of intense combat on July 10, 1944, US forces were warned of local movements of the 902 Panzer Grenadier Regiment toward Hauts-Vents. With a German counterattack expected in the early morning hours of the next day, American infantry and armor prepared for a defensive fight under the cover of darkness and foggy, damp weather among the dense bocage hedgerows and under cover of the strong French buildings.

HVJuly44MapMap of the battle at Hauts-Vents, July 11, 1944

(via US Army Center of Military History)

After a first game loss at Hauts-Vents by the Germans, we continued our campaign at Metropolitan Wargamers in Brooklyn, NY this past week. The second game from the “Panzer Lehr Counterattack” mini campaign from the Heroes of Omaha and Panzer Lehr scenario book from Skirmish Campaigns is called ‘Morning of the 902nd.’ The game uses the same terrain set-up as the first scenario, but this time focuses on the German attempt to recapture Hauts-Vents on July 11 after losing key objectives to the Americans the day before. The game begins under pre-dawn darkness over wet ground with US platoons in hidden positions at the north end of the table and the Germans advancing under blinds from the hill position to the south. The Germans must retake the field by capturing two of the three objective buildings at the center town.

IMG_4251Germans deploy on blinds looking to take back the town

IMG_4253Germans blinds rush forward and immediately hit a minefield

IMG_4254A German platoon encounters a minefield and takes heavy casualties

The German advanced on blinds from Hill 91, making a hasty frontal push straight for the town. On the German left, mechanized Grenadiers mounted in Sd. Kfz 251s roared their engines and drove straight into a minefield at the bocage at the bottom of the valley outside town. Making matters worse, American machine guns hiding in the dense hedge sprayed the German line with fire. German infantry and half tracks fired back, destroying one US machine gun team and forcing a retreat of the other to the center of town. At the end of the firefight, the German commanding officer escaped but three fire teams in one platoon took heavy damage, forcing them to fall back.

IMG_4256The German Panzer IV column exposes two Shermans behind a farmhouse

IMG_4255The lead German Panzer IV is destroyed, blocking the road

IMG_4312Panzer IVs switch routes, making for the American flank

On the German right, things didn’t go much better. A column of Panzer IVs drove on the main road for town, accompanied by a a Grenadier platoon closing in on a farmhouse they had lost the previous day. Waiting hidden at the stone cottage were two M4 Shermans which opened fire at the lead Panzer at close range , leaving it a burning hulk blocking the road forward. Closing in from behind, Grenadiers ran to engage the tanks with a Panzerfaust shot on their rear armor. Several turns of fire were exchanged between the Shermans and Panzer IV second in line as the two rear Panzers reversed direction back to the fork in the road. A few rounds later both Shermans were destroyed, and the surviving three Panzer IVs and the unharmed Grenadiers were heading for the east side of the town.

IMG_4313Panzer IVs and Grenadiers move on the US left and expose a Sherman platoon at an objective

The Germans continued their advance up the road on the US left, looking to flank the town. The three Panzer IVs were slowed over the barbed wire blocking the road, and one bogged for the remainder of the action in soggy ground. German infantry spotted a Sherman platoon camped out around one of the objectives and then ran over and around the bocage looking to avoid fire in the field beyond.

IMG_4314US Wolverines take aim at a German Panzer III flame tank in the open

IMG_4316US and German armor exchange fire, leaving a Wespe, Panzer III and M10 Wolverine in flames

Two remaining German blinds rolled to the field as US tank destroyer M10 Wolverines appeared behind the bocage at the town. The blinds revealed themselves as a Panzer III flame tank and Sd. Kfz. 124 Wespe and both turned to engage the Wolverines. Two quick shots from the flame tank failed to harm the open-topped Wolverines which returned fire and blew up the Panzer III. The German’s mobile gun fired back, destroying one of the Wolverines before subsequently being wrecked by US anti-tank fire. With German armor burning in the field, the Grenadiers continued to sprint over the open area and looked to swing into the town from the rear.

IMG_4317Flares illuminate the town objectives and German mechanized Grenadiers push forward

Back on the German left, several Grenadier platoons on foot and mounted in their half tracks moved to the US left in the town as the early morning darkness was lit up with a flare. Two fresh American rifle platoons revealed their positions in two of the objective buildings and gunfire was exchanged with the German platoons moving toward the town. Despite their cover in the stone building, the combined arms fire from the Germans ousted one US platoon from their building and the other took steady damage.IMG_4318Panzer IVs destroy the final M10 Wolverine as German infantry rush to flank the town from the rear

On the other side of town the two functioning Panzer IVs rolled across the field, shooting at and destroying the last American tank killer. Under continued cover from their Panzers, the Grenadier platoon continued slipping across the field, climbing over the bocage and looping around to the American rear.

IMG_4319A direct hit from Germany artillery arrives in the middle of the American position

With German infantry looking to encircle the town and two Panzers wheeling to engage the Shermans at the center of town, a German artillery barage hit dead center amid the objective buildings. As the smoke cleared, only two Shermans remained fully operational and the surviving US rifle platoons were on the run. As early morning light began to break, the Americans heard encroaching German voices from the hedgerows from every side of the town. The Panzer Lehr counterattack had been a success, and the Americans chose to cut their losses, regroup and fight again.

Flames of War: Fielding the CD and FOW M13/M16 MGMC AA

M1650cal AA

One of my favorite blogs, War Is Boring, recently ran an article about the famed Browning M2 machine gun. Introduced in the 1930s, the .50 cal machine gun went on to become one of the most common heavy weapons used in the field by US infantry, mounted on ground vehicles and installed in aircraft. Whether used on the ground or against air targets, the gun is beloved by troops for its ferocious stopping power. Installed in combinations in half tracks as anti-aircraft guns, the weapon earned affectionate nicknames like the “Ma Deuce,” the “Quad 50” or simply “The Fifty.” To this day, the .50 cal is still in wide use wherever US forces deploy.

IMG_4295M13/M16 MGMC AA model comparisons with Flames of War (left) and Command Decision (right)

My recent projects for  my 15mm World War II gaming have focused on filling in extra support units, and adding some AA was key to filling a gap in my forces. Needing four models for a full platoon, I was faced with a choice of manufacturers. Flames of War sells their M13 MGMC models separately for about $13 each. Old Glory Miniatures offers a 3-pack of M16 Quad AA SP Halftracks for $25. So, I was looking at choices of purchasing four of the FOW models for $52, buying two of the CD sets for $50 (and having two leftover, unused models) or ordering from each manufacturer and getting exactly the four models I needed for $38.

I opted for the economical route and wound up with some pretty different models. Side-by-side, the FOW resin and plastic truck is taller, longer and wider than the CD all-metal castings. Everything glued-up nicely, but the guns for both companies proved to be very delicate and prone to bending. The FOW model has crisper lines, but the rougher CD half tracks have a fair amount more detail.

IMG_4296My completed M13/M16 MGMC AA platoon

With four half tracks in the platoon, the larger FOW model literally stands out among the other three smaller CD models. With its bigger profile, I’ve decided to take advantage of its differences and use the FOW half track as the command model in the unit. Since I won’t be fielding the platoon all the time, the delicate gun barrels are less of concern as they are bound to sit comfortably in one corner of the table and blaze away at any Axis aircraft or unfortunate ground forces who dare get too close.

Flames of War: Fielding the FOW L-4 Grasshopper AOP

L4Grasshopper1944

Piper Aircraft was founded in the late 1920s with an eye toward building planes for general civilian use. From 1938 to 1947, Piper sold nearly 30,000 of their relatively inexpensive J-3 Cub models, making the plane one of the most ubiquitous non-commercial planes soaring over the United States by the mid-20th-century.

1943 industrial film of the building of a Piper Aircraft J-3 Cub

During World War II, Piper supplied the US Army Air Forces with nearly 6000 of their J-3 Cub planes in a modified military version known as the L-4 Grasshopper. The main modification of the light plane was the installation of wide banks of plexiglass windows, making it usable as a radio observer and reconnaissance plane during key missions like the Allied invasion of Normandy in June 1944. The Grasshopper also found varied service transporting supplies to the front, carrying wounded to the rear and ferrying military and political dignitaries. In rare cases later in the war, the plane was also equipped with light weapons for use as an air-to-ground attack platform.

IMG_4250My completed Flames of War US AOP Grasshopper

My modelling for Flames of War has been focusing as of late on filling in some odd little gaps in my forces. Since I run some US artillery from time to time, adding an air observation plane not only allowed me to add to my gaming but also take a break to model another plane. This time around I also decided to pay a bit more attention to basing my plane to add a bit of visual interest to an otherwise simple model. I like the quick work on the base so much that I’m going to go back and add the same to my US P-47 Thunderbolt and British Hawker Typhoon models. While relatively inexpensive and easy to assemble and paint like my other aircraft, my one criticism of the FOW Grasshopper model is the lack of decals.

Even with the one shortcoming in markings, my new Grasshopper will be a welcome addition to my FOW games. In most American army lists, adding an AOP is a cheap point spend while also greatly expanding the effectiveness of the already devastating US 105mm howitzer battery. Getting this little plane zipping over the heads of my Axis opponents on the tabletop battlefield may not prove to be a total game changer. It is, however, going to give the enemy one more thing to worry about and may just provide an edge like this classic of American engineering did some 70 years ago in the skies of Europe.

I Ain’t Been Shot Mum: Panzer Lehr Counterattack Campaign – ‘Hauts-Vents’ July 10, 1944 Scenario

NearStLo

Although the Panzer Lehr Division was held out of action during the Allied D-Day landing at Normandy in June 1944 , they would go on to provide a number of important defensive, delaying and counterattack actions in the months following. They first distinguished themselves in the days immediately after, throwing up a hasty defense at Caen against encroaching British and Canadian forces. After battles at Tilly-sur-Seulles and Villers Bocage in mid-to-late June, the vastly depleted Panzer Lehr Division was called out of the fight. With only a short time to regroup, the war-worn division was ordered west to countetattack he Allied inland progress toward Saint-Lo. While the June battles had run the Germans up against British Commonwealth forces, the July engagements in the hilly fields and bocage-lined roads would be against the armored and infantry forces of the United States.

PLCounterattackJul44Map

Map of the Panzer Lehr Division counterattack in July 1944

(via US Army Center of Military History)

For a few months now at Metropolitan Wargamers in Brooklyn, NY, we’ve been playing a fair amount of I Ain’t Been Shot Mum rules system for World War II. After a number of one-offs and our recent North of Caen game, we finally decided to jump into a mini campaign focusing on the Allied push inland toward St Lo and the German defense following the D-Day landings in  Normandy in June 1944.

SCHeroesofOmahaSkirmish Campaigns  “Heroes of Omaha and Panzer Lehr” scenario book

For our campaign, we’re using the classic Heroes of Omaha and Panzer Lehr scenario book from Skirmish Campaigns. The Skirmish Campaigns series of books offers well-researched and detailed campaign scenarios full of detailed orders of battle, terrain layout maps and deeply descriptive narrative of how actual engagements unfolded during World War II. With just a little bit of work, the Skirmish Campaigns scenarios are easily adaptable to a variety of wargaming rules and scales including Battleground, Bolt Action, Flames of War and I Ain’t Been Shot Mum.

IMG_4207

Scenario set-up with two small houses as objectives at the middle of the table set amid rolling hills, small farms and thick bocage

The scenario at Hauts-Vents is set up on a long table with hills rolling into a valley from either end. Roads cross the table among fields lined with heavy bocage hedgerows. At the center of the table are two farmhouse objectives that are the focus of the US mission. All German platoons are deployed on blinds nearly everywhere on the table, accepting the northeast corner from which the US advance begins.

My Germans deployed on blinds with a Pak 40, a Sdkfz 10/1 and an artillery spotter for the off-board 105mm artillery deployed around a farmhouse atop Hill 91 on the southern end of the table. German rifle platoons armed with Panzerfausts deployed in blinds in and around the objective farmhouses. One platoon also had a MG42 and another contained a Panzerschrek anti-tank team. To block the predicted US advance, one road was blocked with barbed wire and another was laid with mines.

The American blinds moved in straight in column along the road sloping down toward the valley. Heading the advance was a US recon platoon led by an M8 Greyhound armored car. Three platoons of mechanized infantry loaded up in half tracks and a platoon of Sherman tanks fell into line behind.

IMG_4210

A US recon Greyhound at the head of the column exposes barbed wire laid to block passage on the road to the objectives

IMG_4212

The recon unit moves to overlook the German position near the objective house as US half tracks roll into position

IMG_4211

 German infantry move out of the house to engage the US infantry

IMG_4213Fire from German Panzerfausts destroy two half tracks and their passengers

IMG_4215

Germans use their last Panzerfausts to destroy the remaining half track and its crew

The first few turns progressed quickly with the US column moving down the road under blinds while the Germans quietly defended from concealed positions. The lead Greyhound revealed the barbed wire blocking the road, forcing the first platoon of half tracks off the road toward the first objective. Closing in on the house, the German position was revealed and the Germans quickly destroyed two half tracks and their mounted infantry with shots from Panzerfausts. In subsequent turns, the US commander jumped from his vehicle and was followed in by the final half track which was also destroyed. With the lone US commander in the position, the Germans assaulted taking casualties before eliminating all Americans from the disastrous head-on assault on the objective.

IMG_4214

 The column of US Shermans and infantry mounted in half tracks rush down the road

IMG_4216

German 105mm artillery rains in from off the table wreaking havoc on the US column

IMG_4217

A German Pak 40 and Sdkfz 10/1 break their cover on Hill 91 to engage the paralyzed American column

As the first platoon of US infantry fell, the remainder of the column ran into problems of their own. The Shermans attempted a push into the field off the road but two of the three quickly bogged in the rain-soaked ground. With the Shermans stalled and the rest of the column bunched-up on the road, an off-board German 105mm artillery barrage made a direct hit to the US line. As a result, the tanks took severe damage to their sights, main guns and mobility. Infantry jumped from their half tracks and one platoon took immediate fire from German MG42s hidden in the bocage across the nearby field. As the Americans desperately attempted to spread out and move to cover, additional rounds of fire from the Pak 40 and Sdkfz 10/1 on the far hill continued to pour shots into the remnants of the burning US column.

IMG_4218

 US reinforcements arrive at the house and advance on the defending German left

IMG_4220

Germans attempt to hold the flank at the objective

IMG_4219

Smoke is laid down in front of the German position on Hill 91 to cover the US advance

IMG_4245A late game push up Hill 91 by the US Greyhound leaves it in flames

The survivors from the US column swiftly moved to position themselves for another round of assaults on the German position. Two surviving Shermans unbogged and rolled to position along the bocage, destroying the MG42 positions along the way. US infantry rushed in along both flanks of the German survivors at the farmhouse who were quickly reduced to a single operable fire team. US mortars followed up with a directly aimed smoke bombardment in front of the German guns on the hill, providing invaluable cover for the American ground advance. Pressure from the advancing Greyhound forced the Sdkfz 10/1 to fall back late in the game. As the armored car breached the crest of the hill, a quick shot from the Pak 40 eliminated it. Unfortunately for the Germans, this was one of their last bits of glory for the game.

IMG_4242German defenders get routed at the first objective during close assault and fall back

IMG_4243The last platoon of German defenders get spotted at the second objective

IMG_4244The final objective falls to the Americans as the German defenders are caught in combined infantry and artillery fire

Back at the two objectives, the US moved hard toward victory. A close assault at the first house sent the survivors of two German fire teams running for the rear with heavy casualties and all but eliminated from the game. With that, one lone German platoon was exposed at the second house objective, and all US focus turned toward them. Two turns of heavy US artillery strikes and small arms fire from the bocage across the road laid waste to all but a few of the last Germans holding out. With the US Shermans still working their way on the German left and US infantry closing on the front, my Germans threw up their hands in defeat.

The first day of battle at Hauts-Vents went to the Americans, but as dark was drawing near, another battle was already looming before dawn as more Germans rushed to the defense.

I Ain’t Been Shot Mum: North of Caen 1944 Scenario

BritsCaen1944The city of Caen presented a big target during the Allied invasion of Normandy in June 1944. One of the larger cities in the region of the invasion, it also occupied an important series of crossroads straddling the Orne River. Less than ten miles from the British Commonwealth forces landing zone of Sword Beach, Caen was a target for British and Canadians wading ashore on June 6th. Despite a relatively easy landing at the beach, Allies with their eye on Caen were met with a hastily-organized armored counterattack from the German 21st Panzer Division. By the end of the day, the British sat just halfway to their objective and Caen remained in Axis control.

CaenMap1944Map of the Battle for Caen, July 8-9 1944

Over the next two months, the area around Caen became a bogged-down front as Anglo-Canadian forces positioned themselves around the city. The eventual capture of the city on August 6th was costly for all involved. The ancient city was nearly leveled with Allied bombing campaigns and much of the French civilian population fled. The British forces suffered around 50,000 casualties, a devastating loss of men and equipment for British commander Bernard Montgomery. With the costly British victory, it had achieved not only the occupation of Caen but had also provided an enormous distraction for German forces which suffered even greater losses than the Allies.

iabsmlogo

This past weekend at Metropolitan Wargamers in Brooklyn, NY, a couple of us ran through a non-historical scenario typical of the British-Germany engagements just north of Caen in early July 1944. The “North of Caen” scenario is provided in the basic rule book for I Ain’t Been Shot Mum, the fantastic company-level World War II game that has fast become a favorite for some of us at the club.

Caen1British infantry advance through an orchard under blinds north of Caen

The small infantry engagement is set in the fictional hamlet of Le Moulin on a table of flat, open terrain with fields, orchards, low hedge rows and five stone buildings set at a crossroads. The game begins with three British infantry platoons entering from the north under blinds after an initial off-board artillery bombardment of the Germans dug under in around the farm and crossroads. The objective of the game is for the Germans to eliminate the British advance while the British are tasked with seizing four of the five buildings or otherwise eliminating the German troops.

Caen2A British rifle platoon takes heavy German MG42 fire and is pinned behind a barn

Following my initial bombardment, my British advanced under blinds for a few turns through the orchard northeast of the crossroads. The German blinds positioned themselves in a wood at the crossroads and in a small orchard southwest of the hamlet. Three of my blinds moved toward cover to my left behind a barn while my third false blind moved toward the road. My first blind was spotted behind the barn by a German platoon armed with three rifle sections and a deadly MG42. With the Germans deploying in a nearby barn and within the orchard, they opened up on the British rifles. With not enough cover behind the small barn, one British rifle section was all but eliminated in the first round of fire.

Caen4A British platoon runs bravely under a blind across an open field between two barns

The British survivors behind the barn returned fire, firing their rifles and 2″ mortar into the Germans in the orchards and nearby barn. In the meantime, my false blind was revealed as a second British platoon slipped to the hedge to the other side of the barn. Firing at the Germans from each side of the barn, the MG42 was forced to retreat back south of the crossroads. But the damage had been done to my first platoon at the barn, and two fire teams fell back to the orchard leaving one safely inside the barn. Sensing a brief opening, my final blind sprinted across the wide open field between the barn.

Caen3The British blind is exposed, take fire and break for hedge in the distance

Midway through the field, the German rifles in the second barn spotted and revealed my blind, slowing their run and forcing them to deploy in the open. The final German blind revealed itself among the buildings west of the crossroads. My fresh British platoon hopped the hedges and likewise crossed to the west of the road, opening fire at the Germans in the building just the other side of a small orchard. Subsequent turns of fire were exchanged and my British losses started to pile up on my right.

Back at the field on the British left, combined rifle and mortar fire poured into the Germans in the barn. Despite shock stocking up on the Germans, their position in the barn allowed great enough cover allowing them to slowly begin wearing down the exposed British platoon which became pinned from movement. With British taking losses to the right and less against well-protected Germans in the heavy stone buildings, it was not working out as a good day for the British who ceded the tiny hamlet to the Germans. More costly days were to come after this day just north of Caen, but a month off there would be victory for the British.

I Ain’t Been Shot Mum: Saint Lambert-Sur-Dives 1944 Scenario

stlambertsurdives1944Just over two months after the Allied D-Day landings, the Normandy campaign marched toward a conclusion at the Battle of the Falaise Pocket in mid-August 1944. With orders not to withdraw, a last ditch German defense was cobbled together from surviving Panzer divisions in an area about 20 miles south of Caen. Over a nine day period desperate fighting, the German defenders were eventually encircled by overwhelming British, Canadian and US forces. Aside from tens-of-thousands of surrendering troops, Germany had suffered enormous losses in its dwindling tank forces. Elements of the German 7th Army managed to elude capture and slipped back to the German border, although they too took heavy losses in men and and equipment.

VCCurrieMajor David Currie, winner of the Victoria Cross for his actions at Saint Lambert-Sur-Dives in August 1944

On August 18, 1944, Canadians from the Argyll & Sutherland Highlanders and armored South Alberta Regiment made way for Saint Lambert-Sur-Dives. The objective was to take and hold the town, thus preventing more Germans from slipping out of the Allied encirclement. Over three days of infantry fighting and tank duels in and around the town, heavy losses piled up on both sides. With dozens of vehicles and tanks destroyed, the surviving Germans surrendered to Major David Currie. Currie’s actions at Saint Lambert-Sur-Dives earned him the Victoria Cross, the only one earned by a Canadian during the Normandy campaign.

IMG_4093
View from the north entry point for Canadian troops in the IABSM Saint Lambert-Sur-Dives scenario

The rulebook for I Ain’t Been Shot Mum from Too Fat Lardies includes a scenario for the battle at Saint Lambert-Sur-Dives which we recently ran at Metropolitan Wargamers in Brooklyn, NY. Using 15mm terrain, we set up the table with a series of roads intersecting at the town sitting at the edge of a hill surrounded by fields, orchards and hedgerows.

IMG_4092View from the south of the IABSM scenario — the Canadian objective is the crossroads at the lower right

My first Canadian platoons arrived under blinds along the road to the north heading straight for the town where the Germans waited. With several turns of movement under blinds, the plan for each side was quickly exposed in two main areas of the field. My two platoons of M4 Sherman and Firefly tanks made straight down the main road toward the crossroads objective. To stave off the Canadian armor, the Germans quickly set up their Panther A and Tiger tanks behind a hedge southeast of town. The other German armor, two Panzer IVs operating without a commander present, set up in the orchard south of town and covering the other main road to the objective.

IMG_4095German Panther and Tiger tanks overlook the main road into Saint Lambert-Sur-Dives

IMG_4096Panzer IVs occupy the orchard at the southwest corner of Saint Lambert-Sur-Dives

Two platoons of Canadian rifle infantry crossed the river. One made way to the orchard just north of town at the middle. Meeting them was a single, smaller German rifle platoon. The veteran Canadians quickly destroyed half of one fire team from the tired, German regulars. The surviving Germans pulled back to take up position in the buildings in town as the Canadians pursued.

IMG_4094Canadian and German troops open fire across the stream just north of Saint Lambert-Sur-Dives

IMG_4098Canadian infantry press forward through vicious fire at the center of town

The second Canadian rifle platoon made way through the buildings nearby their fellow Canadian tank platoons. Once close enough, the Canadian rifles exposed a German platoon armed with a frightful MG42 camped out in a farmhouse on the eastern edge of town. Thus all the infantry settled into a series of firing positions at the center of town with the Canadians taking fire from German rifles and machine guns on two sides.

IMG_4097Canadian and German tanks exchange fire to the southeast of Saint Lambert-Sur-Dives

At the farm to the east, a game-long tank duel erupted with the Canadian Shermans and Firefly tanks firing from positions behind the French farm’s buildings. The German Panther and Tiger fired from light cover of a hedgerow over the fields beyond. In two turns of fire, the Panther sat in flames and the Sherman platoons were able to focus on the Tiger which unsuccessfully returned fire over repeated tries. One Panzer IV shot harrassingly at the Sherman platoon closer to town which was forced to turn its guns away from the Tiger to return fire.

IMG_4100With German armor aflame, Canadian tanks roll to seize the objective

Back at the town’s center, the Canadian infantry took heavy casualties from German rifles shooting from building windows and the Panzer IVs firing from the orchard. The breakthrough for the Canadians came as the Tiger was destroyed and the Shermans were able to fire up their engines and make way across the fields. Turning the Sherman and Firefly guns to the orchard, the Panzer IVs were quickly destroyed. One more fresh German rifle platoon finally moved to occupy buildings in the town, but by then the path was wide open for the Canadian armor to roll unmolested to the crossroads objective and victory.

This was our first IABSM game using a lot of armor, and the unbalanced number of Canadian tanks firing and moving without a single loss clinched the game for the Allies. The veteran Canadian rifles had also served their purpose of locking down the town in a pitched battle with their numbers and quality allowing them to hold out against their German foes.

Seventy years ago at Saint Lambert-Sur-Dives the German surrender was captured by a a film crew, and bits of the film survive today (see below). The exploits of the Canadians in the Falaise Pocket led by Major David Currie helped seal victory for the Allies after months of fighting in Normandy, and his miniature tank crews won the battle again on our tabletop historical repeat of this important victory at one more crossroads in the French countryside.

Newsreel footage of Canadian troops in action and the German surrender at Saint Lambert-Sur-Dives in August 1944

Flames of War: Fielding the PSC US Mortar Support Platoons

USmortaritaly

As with so many armies past and present, the infantry man was the backbone of the US Army during World War II. Armed with the M1 rifle, his training and an enormous line of supply to the rear, the American soldier was arguably one of the most formidable combatants in the history of warfare.

That said, even the most effective foot soldier often needs support. Along with machine gun crews, US infantry companies commonly contained the M2 60mm mortar. Crewed by just two men, the M2 added explosive punch in a highly portable weapon which could move swiftly with ground advances through varied terrain.

wwIIchemmortar M2 4.2 inch chemical mortar in use during World War II

At the battalion level, larger mortars with more diverse ammunition, longer ranges and greater effectiveness were also available. The M1 81mm mortar (pictured at the top of this post) was used throughout the war with its 3000 yard range and mix of explosive shells. The larger mortar, weighing in at about 150 pounds, required a larger team and was commonly transported by cart or mounted in the back of a halftrack.

By the time of the Allied invasion of Italy in 1943, the even heftier M2 4.2 inch chemical mortar was added to the American arsenal. Designed but never used for lobbing various weaponized chemical payloads like poison gas, the M2 was set on a large rectangular base plate with a pinion-like stand to stabilize firing large explosive or smoke payloads over 4000 yards. The weight and over-sized shells of the M2 did limit its portability significantly, but even so, it helped to very effectively fill out the small artillery arsenal at the infantry level.

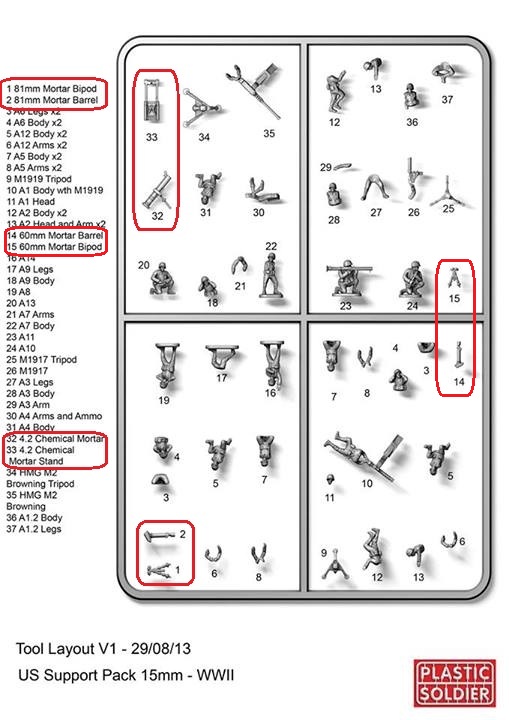
pscusheavyinstr

Sprue detail for the PSC US Heavy Weapons set with 60mm, 81mm and 4.2 inch chemical mortars

I’ve been diversifying my mortar support when building my US force for our Flames of War Infantry Aces Campaign at Metropolitan Wargamers in Brooklyn, NY. The Plastic Soldier Company’s Late War US Heavy Weapons 1944-45 box offers a whole host of extra weapons for my infantry, including three types of mortars. My 92nd Infantry Division started out with a weapons platoon containing a few standard 60mm mortars along with some M1919 machine guns.

To my initial force, I’ve recently added both 81mm and 4.2 chemical mortar platoons (photos below). I continue to be impressed by the PSC sets both for their sculpting as well as their value. I love the mortar crews holding their ears as the mortars fire and the guys crouching with binoculars. The tiny arms can often be a bit wonky when gluing the figures up, but this also allows some flexibility in poses. I set up one pair of figures in a little vignette of one guy reaching over to console his comrade who has been rattled by all the noise.

IMG_4003Completed 81mm mortar platoon

IMG_4002Detail of 81mm mortar and command

IMG_3998Completed 4.2 chemical mortar platoon

IMG_4004Chemical mortar platoon observer and command stands

IMG_3999Detail of a 4.2 chemical mortar squad

MWGInfantry Aces

I’m putting my new mortar support platoons to use already in the Infantry Aces Campaign we’ve been running at the club for more than a month now. Although their first outing this past weekend wasn’t very successful, I’ve been studying up on FOW mortar smoke tactics. With strength only in numbers with my relatively inexperienced Confident/Trained riflemen, I’m going to be giving my force another try soon with mortars raining smoke and pinning fire on my German opponents. My hope is the mortars will provide just the support my American infantry need to fight to another tabletop victory.