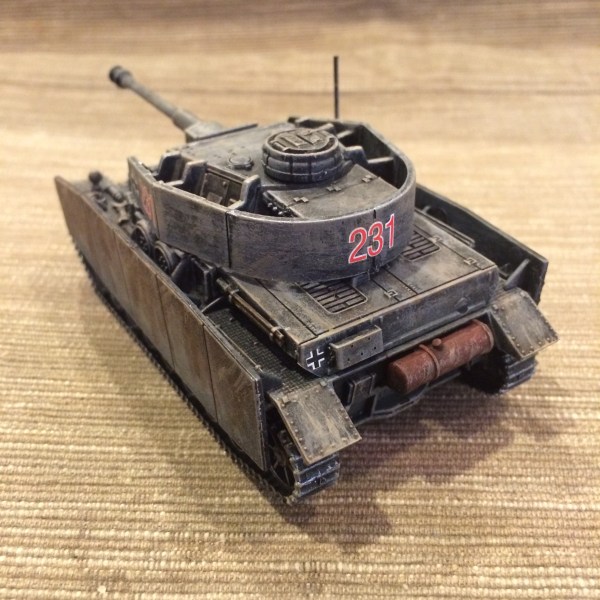
28mm: Panzer IV By Rubicon Models

PzIVWWII

With 8000-9000 Panzer IV models rolling around over the course of World War II, this German tank was ubiquitous in engagements throughout. The tank itself went through a number of evolutions in terms of guns and armor, and the chassis wound up serving in many capacities as the carriage for other ant-tank and anti-aircraft guns. If you’re a wargamer like me fielding a WWII German force, chances are you’re eventually going to need a few Panzer IVs.

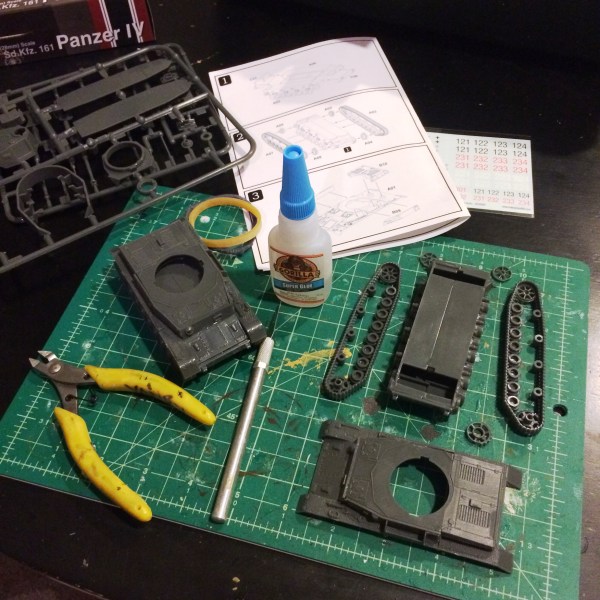
IMG_8768Unboxing the Rubicon Models Panzer IV kit

I’ve had a bit of experience in the past modelling the Panzer IV in 15mm with a kit from Plastic Soldier Company. For my 28mm models, I turned back to Rubicon Models which I had used in modelling a US M4A3 Sherman a while back. I chose Rubicon again for a consistency of scale, the clean casting of their kits and the deal I found on a pair of their Panzer IVs for under $50 USD. Unboxing their models is a real pleasure with separate sprues individually wrapped in protective plastic, clear instructions and decals included with the kits.

IMG_8776

Cutting and sorting pieces as construction begins

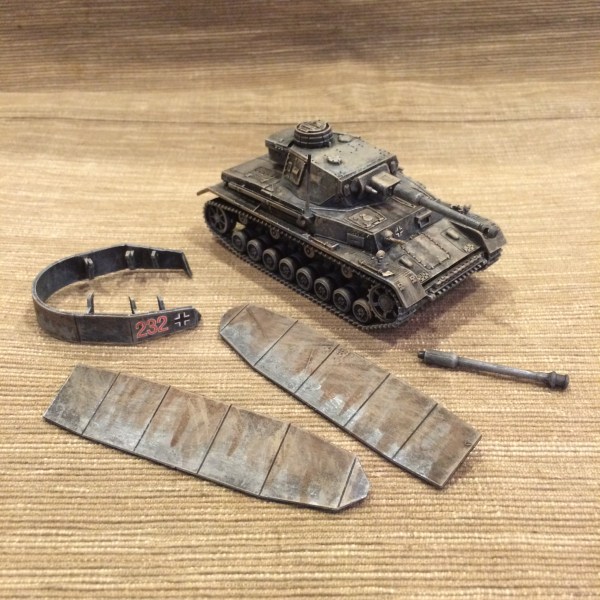
The clear step-by-step instructions make assembly a breeze as long as pieces are organized and the model is done in stages. The kit includes options for building the Panzer IV in its evolution from F2, G and H models. Uniquely, the kit allows the finished model to swap out the 75mm KwK L/43 and L/48 gun barrels with a friction fitting pin. The Schürzen on both the sides and turret are likewise removal, allowing you to effectively field two versions of the tank. For now I’m leaving the guns and Schürzen removable but I may decide to permanently glue them in the future.

Here’s my quick guide to getting the models assembled and painted:

Painting 28mm German Armor

  1. Carefully cut kit pieces from plastic sprues with small pliers.Keep pieces organized as you go and assemble the model in stages per manufacturer instructions
  2. Basecoat the model with flat black spray primer.
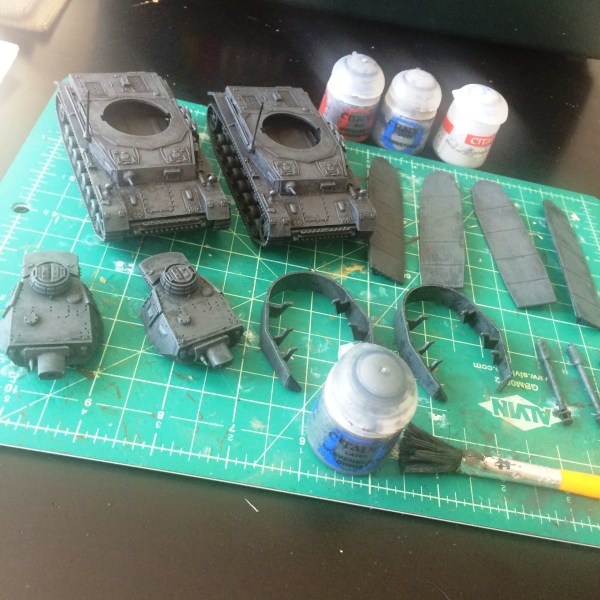
  3. Using three progressive coats of dry brushed greys, paint the entire model. I use Skavenlight Dinge, Mechanicus Standard Grey and Dawnstone (all from Citadel).
  4. Paint tracks Black.
  5. Paint wooden tool handles Dark Brown and metals parts with metallic Silver.
  6. Using a flat brush with only the very slightest amount of the same metallic Silver, dry brush the tracks. Use the same method on raised plates, hatches and edges of the entire model to create raised highlights.
  7. Paint the rear muffler a rust color by mixing Dark Brown and Red.
  8. Apply decals to the model and set the decals with Solvaset or some other decal sealer.
  9. Use a watered down Agrax Earthshade (Citadel) and add a muddy wash at edges, plate and hatch seams, muffler and on the Schurzen.
  10. Very, very lightly dry brush the entire model with Baneblade Brown (Citadel) to create a general muddied and weathered effect.
  11. Spray coat completed models with matte finish. Make sure you remove the turret so it does not stick to the main chassis during the spray coat.
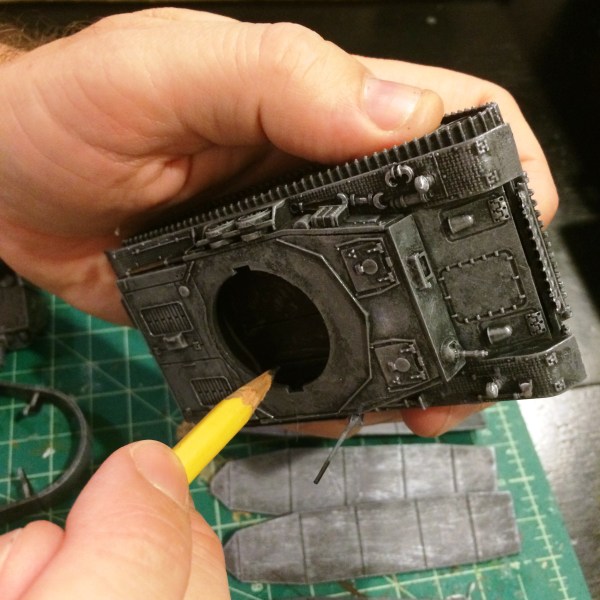
  12. Rub pencil graphite on the edges where the turret meets the chassis to ensure free rotation.

IMG_8803

Dry brush coats of greys gradually lighter greys provide most of the color

IMG_8815

Included decals provide a lot of modelling options

IMG_8817

Watery mud is applied to the Schürzen

IMG_8814

Rubbing pencil graphite where the chassis meets the turret to ensure easy rotation

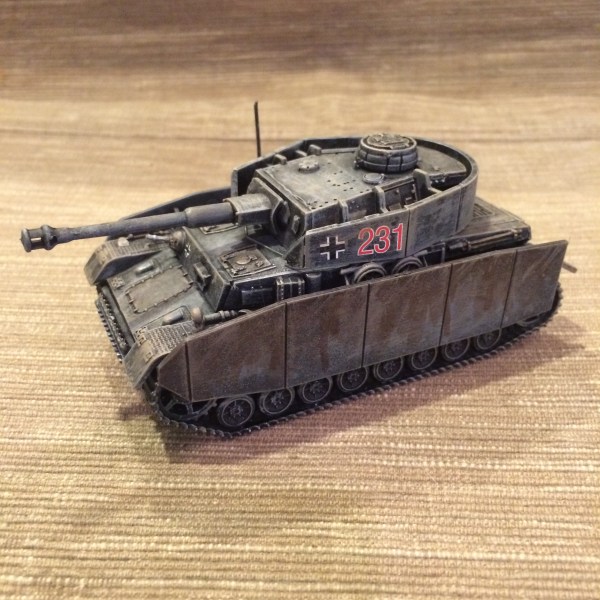
Aside from the drying time between steps, my tanks were finished in just a couple hours work over the course of a few week nights. I really love how slick the Rubicon Models kits assemble, paint up and look when completed. More views of the finished models are below, but I can’t wait to get these on the table at Metropolitan Wargamers in Brooklyn, NY and see how they perform in pushing back the Allies.

IMG_8821

IMG_8822

IMG_8823

IMG_8827

IMG_8825

28mm: Comparing WWII models

SoldierHeights

It is indisputable that war has been under continuous change over the centuries with evolutions in arms, tactics and scale. Soldiers themselves have also changed from era to era, owing to changes in diet, fitness standards and healthcare. The size of soldiers have also been used to promote propaganda of superiority for one nation over another, often falling back on nationalistic or stereotyped perceptions of one country’s peoples over another. Thus, photos like the one above from the Boxer Rebellion are instructive but potentially do not tell the whole story of how an entire nation’s soldiers may have measured up against their allies and enemies.

A 1986 paper on the physical characteristics of US soldiers in 1864, 1919, 1946 and 1986 depicts the average World War II era US male soldier to have been 5 feet 8 inches tall and about 155 pounds. There can also be no doubt that within these averages there was a great deal of variation from man to man and at what point in their service they were measured. So, while we may be able to get at some sense of the size of the average fighting man in World War II’s US military, each man was an individual.

ADlogo

BTD

Warlordlogo

Historical miniatures gamers spend a lot of time talking about scale, and I have fielded WWII miniatures from numerous manufacturers in 6mm, 15mm and 28mm while also occasionally playing in 20mm with other collectors at Metropolitan Wargamers in Brooklyn, NY. For my recent projects, I’ve focused on 28mm US Airborne and German forces with models from Artizan Designs, Black Tree Design and Warlord Games.

I’ve sourced my 28mm WWII miniatures from three separate makers for a few reasons. Firstly, I prefer metal figures for their durability, heft on the table and quickness in getting them painted up and ready to play without a lot of assembly. Some modellers will blanch at the higher cost of metal, but my opinions of pluses justify the investment. I also prefer not to duplicate poses, so purchasing across manufacturers allows me to have every model be a unique representation of a soldier or officer in the field. Third, although some outstanding plastic options are available, I like the detail that comes through with a good metal sculpt and casting. Finally, Black Tree Design in particular runs weekly sales which makes frequent orders of their miniatures a great deal when looking to field a sizable force from any number of available WWII Axis and Allied nations.
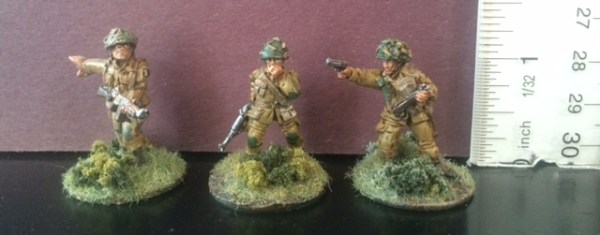
IMG_8362

28mm US Airborne NCOs from Artizan Designs, Black Tree Design and Warlord Games (left to right)

By way of comparison, I’ve first taken a few images of US Airborne figures from the three manufacturers I use and also seem to be the most commonly cited within the WWII gamer community. In the first photo above, three NCOs stand side-by-side. The figures from Artizan and Warlord on either end show similar details in equipment and bulky helmets. The Black Tree model in the middle shows slightly less detail in the netting on the smaller helmet and carried equipment, but his pose calmly smoking a cigarette makes him one of my favorites.

IMG_8363

28mm US Airborne riflemen from Artizan Designs, Black Tree Design and Warlord Games (left to right)

In the second photo above, I’ve got three riflemen in slightly similar battle-ready poses. Again, the Artizan and Warlord figures on each end are a bit more bulky and the bandage pack strapped to the helmet of the Artizan figure creates some nice variety. At the middle, the Black Tree soldier’s standard helmet without the camouflage netting likewise breaks up the sameness of how the soldiers are kitted out without sacrificing a single bit of detail.
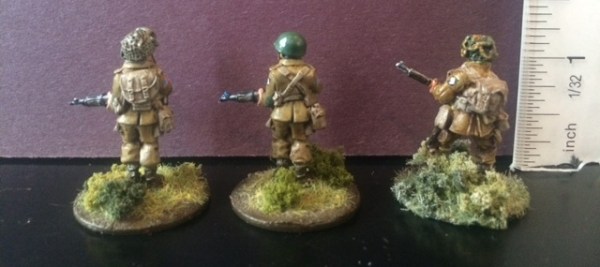
IMG_8367

Equipment detail on 28mm US Airborne riflemen from Artizan Designs, Black Tree Design and Warlord Games (left to right)

Having a look at the equipment detail at the rear of each manufacturer’s models is also useful in the picture above. Again, the models from both Artizan and Warlord are most burdened with packs, multiple ammo pouches and canteens. The Warlord figure is also toting a shovel at his left hip and even more extra pouches. On the other hand, the Black Tree soldier is traveling a bit lighter with only a canteen to one side and an ammo pouch on the other. I take the differences in equipment as representative of different soldiers who lost, dumped or acquired more equipment depending on their specific roles and points in their mission.

IMG_8364

28mm US Airborne riflemen from Artizan Designs, Black Tree Design and Warlord Games (left to right) in front of a M4A3 Sherman from Rubicon Models

Next up, the photo above takes on the often-argued topic of soldiers and armor scale when playing at 28mm. The three riflemen stand in front of a M4A3 Sherman from Rubicon Models. To my eye, the tank does seem a bit undersized for its listed 1/56 28mm model scale when set next to soldiers from three different companies.

IMG_8365

The M4A3 Sherman from Rubicon Models and a US Willys Jeep from Warlord Games

Comparing sizes of vehicles across two manufacturers also depicts a fair amount of difference in perceived scale. One of my recently completed US Willys Jeep models from Warlord sits next to the Rubicon Sherman in the photo above. While the tank looked small against standing infantry, the Jeep looks to be a bit better at scale.

JeepTank

A photo from near the end of WWII in featuring captured German officers and US GIs in a US Jeep next to a US tank

By way of comparison, historical miniatures gamers like me often rely on WWII period photos to show variations between troops and vehicles. The photo above depicts a US Jeep alongside a tank toward the end of the war in Europe. Despite the documentary nature of photographs, they can be deceptive in representing reality in terms of the angle, perspective and depth of field from when the photo was taken. Compared to my Jeep and tank models, the photo does inform a bit about real-world scale. My model Jeep’s hood measures up at a height about equal to the treads on the tank model. That said, the historical photo perhaps doesn’t present the full story given the placement of the Jeep in the foreground with the tank behind.
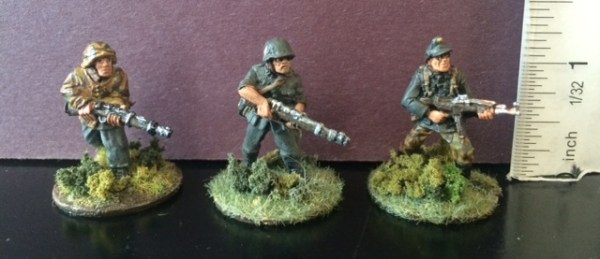
image1

28mm German infantry from Artizan Designs, Black Tree Design and Warlord Games (left to right)

Aside from my US Airborne models, I also have a good sized collection of German troops. Most of these are from Artizan and Black Tree, and I’ve only just recently added some Warlord Grenadiers armed with assault rifles to the mix. In the first photo above, I have three soldiers walking forward, guns at the ready. The partially camouflaged Grenadiers from Artizan and Warlord on either end flank a Wehrmacht soldier from Black Tree at center. With these figures I find little difference in scale and sculpt across manufacturers, and only their differing equipment, uniforms and weapons set them apart.
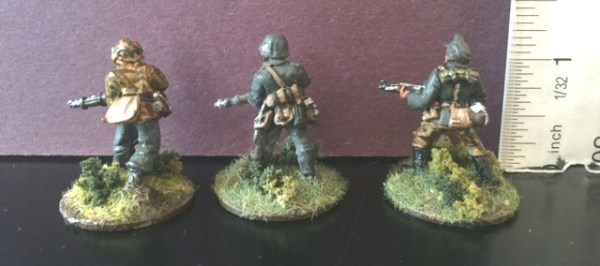
image2

Equipment detail on 28mm German infantry from Artizan Designs, Black Tree Design and Warlord Games (left to right)

Above I have some rear detail of equipment carried by soldiers from each maker. In the case of these soldier models, both the Black Tree and Warlord kit are my favorite both in detail and how it hangs from their backs and sides back with a shovel, mess kits, water bottle,s ammo pouches and rolled ponchos or bedding all included. The Artizan model is only carrying a couple items and his pack is a bit larger than that on the Warlord model, but all three form a diverse compliment of presentation.
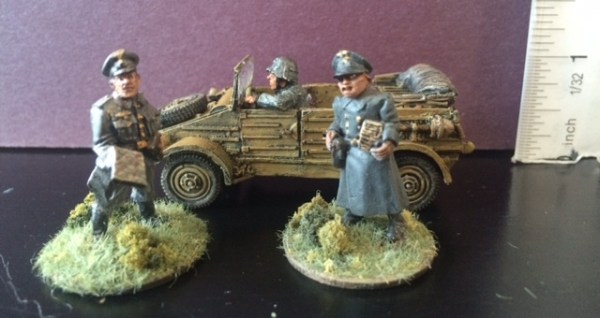
image3

28mm German officers from Artizan Designs and Black Tree Design (left to right) in front of a Warlord Kubelwagen

For comparing Germans to a vehicle, I’ve got officers from Artizan and Black Tree alongside a Warlord Kubelwagen. The officer from Black Tree is perhaps a bit broad with his sculpting but no less animated as the Artizan model who stands confidently with a battle plan and hand firmly on his left hip. The driver from Warlord sits well with scale of the standing soldiers, and the two officers look as though they would fit nicely in the rear of the car to be chauffeured to the front.

Kublewagen

A WWII photo of German officers conferring in and around a Kubelwagen

As with the US vehicles, I’ve found a historic photo for comparison with a variety of officers and soldiers standing and sitting in and around a Kubelwagen.These real life men and their small car reveal the accuracy in the models I’ve got ready for the table.

No pictures, whether taken from WWII or snapped on the workbench, are going to tell the full story of how men and machines stack up. Modellers and gamers will gravitate to a mix of models that fit their tastes in cost, material, sculpt, diversity and historical accuracy as they see fit for their use. That said, when I have a look at my 28mm metal armies recruited from three leading manufacturers, I find them all well-equipped and scaled to take the field together.

Battleground: Advance to La Fiere 1944 Scenario

LaFiereAerialAllied airborne troops were the first units on the ground in the pre-dawn hours of June 6th, 1944 invasion of Normandy. As the vanguard ahead of the massive beach landings to come on D-Day, the inland goals of the paratroopers was to secure key inland areas and deny German reinforcements a path to the coast. Members of the 505th Parachute Infantry Regiment of the 82nd Airborne Division were tasked with seizing a bridge over the Merderet River at La Fiere and just west of Sainte-Mère-Église.

LaFiereMapMap of the action around La Fiere, June 6-9 1944

There to meet the arriving Americans were elements of the German 1057th Infantry Regiment of the 91st Infantry Division. For three days, German resistance amid the open fields, bocage hedgerows and scattered stone Normandy buildings held out against the elite US airborne troops. By July 9th, however, the Germans withdrew and the way was cleared as Allied troops began to arrive inland from the beaches.

IMG_6037Skirmish Campaigns  “Normandy ’44 – First Hours” scenario book

I’ve previously run a 15mm Flames of War scenario at La Fiere, so I was excited to scale up the battle to 28mm at Metropolitan Wargamers in Brooklyn, NY this past weekend. Our game at La Fiere once again came from the classic Normandy ’44 – First Hours scenario book from Skirmish Campaigns, and we used Battleground rules. The Skirmish Campaigns series offers narratives, orders of battle and terrain layout maps that are brief and to the point, focusing on getting into the game as quickly as possible. For our game at La Fiere, we modified the order of battle and added in my newly-painted Rubicon Models Sherman tank for the US and a German anti-tank unit I’ve also recently completed. The rest of our forces came from my collection of 28mm German and US troops painted over the past year.

IMG_6699Table set up and initial German deployment at La Fiere

At the 28mm scale, we increased the tabletop set-up to a 4′ x 4′ board accommodating two main bocage-lined east-west roads, fields and a large stone house. With an American objective to seize the house, the Germans set-up with an infantry team and light machine gun in a line of trenches stretching through the main field. The German command set-up in the top floor of the house with a tripod-mounted MG 42 and anti-tank unit armed with a Panzershreck and Panzerfausts ready to deploy from the rear of the building. Two small anti-personnel mine fields were also set — one to the east of the house and one protecting the northern end of the German prepared positions.

IMG_6701Entrenched German troops and machine guns shift to meet the arriving Americans

With a game time limit of ten turns, the game began with the US being given the initiative as the Germans lay quietly in wait. The Americans took the first two turns to move on from the far edge of the table to the east and their deployment quickly revealed their plan. To their right, a M1 mortar crew set up behind a tree with their spotter creeping to the edge of the bocage to sight German targets across the field. Next, a .30-calibre machine gun team  set up at the hedgerow, followed by the HQ and a parachute rifle squad all stretched along the thick hedge. Across the road at the American left, one additional rifle squad moved in along the road with their Sherman rolling in support.

IMG_6700US paratroopers advance at the bocage hedgerows supported by a Sherman

Clearly the US plan was to lock down the German forces in their prepared positions with combined mortar, machine gun and infantry fire as the infantry would push through the open field toward the house objective. All the while, the balance of the Americans would creep toward the house using their tank for cover and intimidation. The mortar team confirmed the plan by launching two smoke rounds into the wide field at the end of the second turn, providing drifting cover for the next two turns.

IMG_6706German machine gunners take heavy fire from the American rifles

With the tank’s position revealed at the road, my Germans quickly moved their anti-tank squad around the house through turn three and lay in wait behind the bocage. The Germans also redeployed their tripod-mounted MG 42 to the far right of the trench to stave off the American advance in the field. The German advantage lay solely in their defensive positions, and all they had to do was survive. The Americans were going to have to abandon cover early in the game, but they superior numbers, elite troops and better weapons. Plus, the airborne had a tank.

IMG_6703The Sherman rolls down the road

There were few targets for the Germans soldiers to shoot at through turn four, and they had difficulty spotting through the smoke and distance across the field. The American machine gunners managed to lay down steady fire each turn, forcing some Germans into prone positions, wounding others but not scoring any kills. The American plan shows signs of unraveling early on as the mortar began failing to repeatedly to sight and range in effectively on any German targets in the trenches.

IMG_6705Confident US soldiers make for the open as their tank protects their left

The only other alternative for the Americans was to simply start pushing across the field in the open. With the heavy German machine guns at their center and right jamming and the crew taking fire, the US airborne began a slow advance by turns five and six. Infantry fire from the US included three dice from each Thompson submachine gun and two dice for every M1 rifle. As the paratroopers closed in, grenades were also thrown and knocked the German tripod MG 42 out of commission. All the Germans could answer with were single dice from their rifles and three dice for submachine gun shots from the officers, all in fewer numbers than the larger US squads.

IMG_6702German anti-tank weapons move to meet the advancing American airborne and supporting tank

Across the road, the second American rifle squad crept along on either side of the bocage with the tank rattling along beside them. As the first troops closed near the house, the first minefield was exposed but no Americans were injured as they continued on at a slower pace. Their delay allowed the German anti-tank crew to move into position, firing a few rifle and submachine gun shots along the way at the airborne tip-toeing around the mines. With the tank finally in sight, the Sherman opened up with opportunity fire from its hull, turret and top-mounted .50-calibre machine guns. Under a hail of bullets, the anti-tank crew went prone and took light wounds, disallowing their planned shot at the tank for the turn. By the sixth turn, the assistant gunner was able to crawl to the injured Panzershreck and deliver a crippling shot to the tank’s front track. Rolling for morale after the hit, the American crew rolled a ’20’ — the worst possible outcome — and fled their tank and the field.

IMG_6704German troops hold fast against continued fire from the Americans

With the tank out of the battle, the airborne infantry were left alone to do the job. At the seventh turn, the first US troops to close on the building were mowed down under heavy fire from the German HQ inside the building. The German survivors in the field trenches held out against three waves of US advances. In the open and with no heavy support, the Americans were eaten up in the field despite their superior training and weapons. Against the odds, the German forces had thrown back the US airborne’s advance on La Fiere.

Playing a 28mm battle with the Battleground skirmish rules gives an incredible amount of detailed feel to the game. Wounds, suppression, weapon jams, moving, loading, spotting, morale checks, cover and troop quality all intertwine to effect each figure individually as they contribute to the overall mission of their force. Under battle conditions, unlikely things — like mortars being completely useless or a tank crew fleeing the field– can and did happen. In our game, a well-laid plan by a superior American force was thwarted by Germans who just kept hanging on as the dice went their way.

28mm: M4A3 Sherman By Rubicon Models

M4A3ShermanPicThree

I’ve been quickly fitting out my 28m World War II infantry over the past few months with models from Artizan Designs, Warlord Miniatures and Black Tree Design. With scores of figures on the table, I thought it was high time to add some hefty support to the mix. So, at my recent journey to the excellent NJ Con I picked up a copy of the Rubicon Models M4A3 Sherman tank

55mm-M4A3_no_outline_cs4

Retailing for under $40 USD, the 1/56 scale Rubicon Sherman comes on three sprues of well cast plastic. The very detailed instructions allow for the construction of three versions of the tank with 75mm, 76mm or 105mm guns and multiple turret variations. As this was my first at this scale, I opted for the most common 75mm gun, and the assembly allowed for loose gun for elevation at multiple angles. The interlocking turret also enabled easy rotation as did the top machine gun when left unglued but snuggly fitted into the turret. No stowage parts were included, but since this was my first model, I didn’t mind keeping it a relatively clean, right off the assembly line version of the workhorse Sherman of WWII.

IMG_6250My go-to basecoat for my US wargaming miniatures

After a quick assembly, my Sherman was hit in a basecoat in the US olive drab color from the Plastic Soldier Company. I’ve gotten a ton of mileage out of this product as a foundation for 15mm Flames of War models in the past, and it worked equally as well at this larger scale. Following the base spray, the treads got a black and then metallic drybrush. Seams in the hull were washed with a black-brown, and the hull received layers of dry-brushed rusty metallics and layers of varying brown mud. The included decals were easily applied and then washed and muddied up before the whole model was dull-coated in a final protective spray.

The resulting M4A3 Sherman armed with a 75mm gun is shown below in detail from a few angles and is ready to operate in support of my Allied models in the months to come.

IMG_6247

IMG_6246

IMG_6249

IMG_6248